I may be misunderstanding, but I think putting bolts through the stove would mean the force from a pot sitting on top would be transferred straight to the ground. This is bad for the CFV bc, as I understand it so far, we want vertical pressure to help our absorbent material transfer fuel to the periphery. The vertical pressure adds force to the existing capillarity, thus, a capillary force vaporizer.
Topic
Anyone tried this pocket stove?
Become a member to post in the forums.
- This topic is empty.
This stove needs air!

I was testing it today and tried 3 different setups.
First I tested it as I have before- on top of an inverted tin can with my Heiny pot on top.
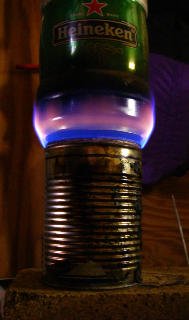
I was getting consistant 6 min boils with this set up. (2 cups 60 F water to 212 F measured)
Second setup was with the stove directly on a flat surface and the pot on top.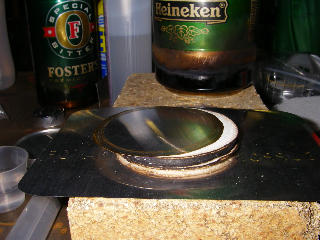
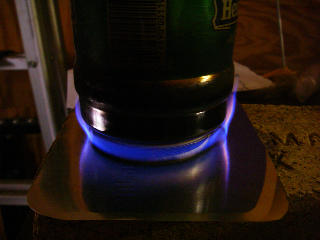
When I put it directly on the flat surface it took 50% longer to heat 60 F water to a boil than when it was on the tin can. I was getting 6 min boils on the tin can and it took an average of 8:50 min when the stove was directly on a flat surface.
I then elevated the stove about 8mm above the surface using the top of the Heiny can.
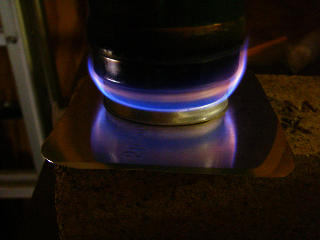
That small change in elevation allowed boil in an average of 6:30 min., almost as good as on top of the tin can.
I am assuming that the difference in the air intake patterns. The flame is about half the height on the flat as it is elevated.
I also did several tests to see what the minimum amount of iso91 needed to boil 2 cups of 60 F water. 14 ml of iso91 constantly boiled the water with about a minute of boiling after it reached 212 F. The room temp was 66 F no wind and humidity of 48%. Several tests of 10 ml got the 60 F water to 185 F which could "cook" a freezer bag meal. So in ideal conditions one could fix 6 cups of hot water on 30 ml (about 1 fluid oz) of iso91.
Next step is to field test this stove.
-Mark
Fun and easy stove to build!
It seems that since the heat is transferred along the sides of the pot (instead of concentrated on the bottom) this stove design is definitely geared towards tall, skinny pots.
Trying the design with my Evernew 0.9L pot and using 14 oz of denatured alcohol (Sunnyside brand), I'm getting 60 degree F water only up to about 200 degrees (in an indoor setting). Comparing this with Mark's results I'm guessing the short sides of the Evernew pot don't provide as much surface area for the flame pattern to work with.
I am very blessed: I get to try out the ROF in a couple of weeks, as soon as the state parks open here in Wisconsin.
Also, my wife brought home some gourmet ice cream home called "Sheer Bliss." The steel can is about 6 inches tall and has a lid that fits VERY tightly. I tried to take a pic of it just now but my camera batteries are de-juiced. Later, if anyone is interested.
Yes, please show us pics!! Thanks
Nixie,
You might try your Evernew 0.9L with isopropyl alcohol 91% (aka rubbing alcohol). At my local supermarket it comes in 50%, 70%, and 91%. The iso91 has slightly more heat capacity than the Sunnyside ethanol, so that might get you the extra 12 F.
-Mark
OK: about 4.5 inches high: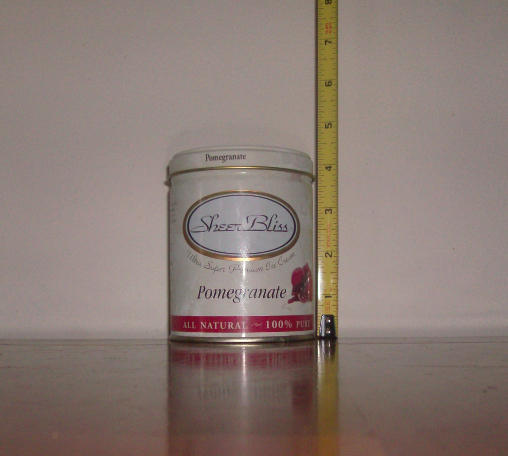
Wow Mark, 6 min boils with 1/2oz isoalc. That is fantastic. What are the metal plates you are using on top and bottom? Are they mason jar lids? I am using circles I cut out of pie tins that measure about 3 15/16" (for my heinie pot) with 15 layers of paper towel. I use 1oz of fuel to get 6 min burn times. I do have the stove elevated as you did. Is there something I can change to get your boil times on 1/2 oz of fuel? By the way, in my experiment I boiled 16oz of 57deg water in 70 deg climate. No idea the humidity.
I've had a play with some of these ideas…

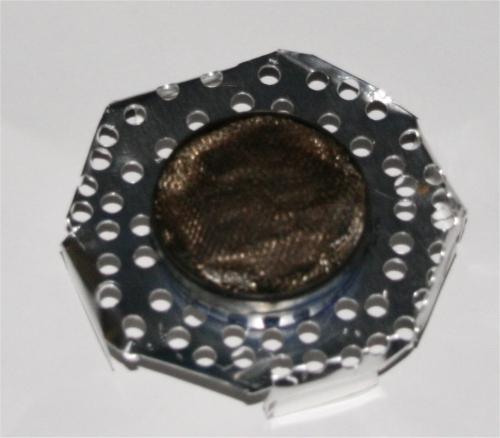
This is a 20g pocket tub of vaseline that has been cleaned out and stuffed with glass-fibre tissue (it's like tissue paper) and then topped off with aluminium mesh.
It holds up to 19g of fuel.
I ran a simple test of weighing the stove empty, full, and after and measured the time taken to boil a large (300ml+) cup of water.
It boiled the cup in about 6 minutes (I made sure it was boiling for at least 30sec before I called it) and then weighed the stove. It had lost about 16g in weight – i.e approx. 1/2oz fuel (28g/oz).
I thought it worth revisiting the science bit of this stuff because we are all getting carried away looking for the miracle stove.
1. Alcohol that is burnt 100% efficiently will produce a certain amount of energy. You may make it burn faster or slower by stove design but the amount of energy produced will be the same.
2. This heat must be transferred into the water being boiled. Any heat that 'escapes' is lost energy.
As things stand ISTR that the most efficient stove around is probably the Caldera Cone stoves. They have tried to optimise both the burn efficiency – to ensure 100% combustion and the heat transfer efficiency by use of the cone.
Little stoves like this one are cleary getting 100% combustion because alcohol vapour can only leave the stove in one direction, cannot miss the flame and the flame is burning blue.
It might be an idea to investigate pot stands / heat shields more than stoves. It's likely to have a significant impact on fuel consumption…
Ok here is the math for what it is worth
1 calorie = amt of energy to raise 1 ml of water 1 degree C.
So it will take 500 calories to raise 500 ml (2 cups or darn near) 1 degree C.
Water at 15.56 C (60 F) raised to boiling (100 C) is a change of 84.44 C.
So to heat 500 ml of water from 15.56 C to 100 C will take 500 x 84.44 = 42,220 cal = 42.22 kcal.
Isopropyl alcohol has 7.4 kcal/gm.
42.22 kcal/7.4 kcal/gm = 5.7 gm
So it should take 5.7 gm of isopropyl alcohol to boil 500 ml of 15.56 C water at 100% efficiency.
Now, isopropyl alcohol's density is roughly 0.786 gm/ ml so 5.7 gm/0.786 gm/ml = 7.25 ml
7.25 ml of isopropyl alcohol to heat 500 ml (2 cups) of 15.56 C (60 F) water to boiling under ideal conditions.
-Mark
Mike,
Nice stove! The whole idea of a wick stove is enjoying a renaissance. Minibulldesign.com sells several and I think Zelph actually sells a variation of your stove on his sight.
This CFV pad stove is a side burner and since it can be made out of paper towels and a couple of can lids I just find it fascinating. And this stove is pretty efficient for all of it's simplicity ( somewhere between 55-65 % by my calculations). And that is with a beer can pot which are notoriously inefficient to heat compared to a pot with a broader base.
I agree with your assessment of the Caldera Cone and I rely on mine.
Anyway the CFV pad stove just makes me smile, especiallly when I think of all the complex contraptions I've made to burn alcohol over the years.
-Mark
Mark,
Thanks!
It was a quick and dirty experiment to try the concept out. I'd bought the tin as a "it might be useful for a stove if I can work out how" about a month or two ago.
Some playing around in the kitchen suggests that this type of stove works well with a relatively low stove-pot distance. 1-1.5" seems to be about right and did improve the efficiency.
Using a pot-stand that also acts as a bit of a windscreen also seems to help a little.
I haven't done anything yet but I'm thinking that an idealised windscreen/stand should work on a difusion principle so that air-speed is reduced as you go inwards – an outer ring with a large number of small holes and then an inner ring with a smaller number of large holes.
Transfer of heat from the stove to the pot seems to be the area most worth investigating since any stove that clean-burns alcohol is going to get the same bang for yer buck.
Time-2-boil might be a contributing factor in efficiency in the real world since minimising the exposure of the pot to cooling may improve the perceived efficiency. So, a fast-burning stove might appear more efficent than a slow burning one due to lower overall convective losses.
OBTW thanks for the math…
Just back from an overnight camping trip and wanted to report on the CFV pad stove in the field.
Well as you might guess there are a few kinks to work out. Worst problem was the wind. Very blustery here and the stove does not do well in the wind. Lots of flare and yellow flame with the slightest breeze. I improvised several windscreen configurations with a large sheet of aluminum foil I had. None of which were entirely satisfactory. The best of the lot was basically a bowl shape with the stove sitting in the bottom.
Mike, I like your idea for a a diffusion windscreen. May need to work on this.
Overall the stove did heat water in the field and I was able to "cook" (i.e. boil water) for dinner and breakfast on about 45ml of iso91. It lights easily and you can blow it out if you need to. Will need improved windscreen for any practical use.
-Mark
Hi Mark,
This capillary pocket stove is interesting stuff.
I have been doing some thinking about the design, at the moment I am too busy with several other stove projects to play with my Ideas .
I noticed that you are using a piece of flat plate for the top layer, my thinking is to use some material that conducts fairly well like copper, aluminum, brass and then use a flat bottom pot, the stove top should take some of the heat from the edge and transfer to the bottom of the pot like a solid electric hot plate, it would still leave most of the flame to heat the outer edge.
I feel this idea at least needs some testing it could improve the efficiency of the stove.
Tony
I wait with baited breath to see where JSB or Tinny might take this idea!
Hi Tony,
<…at the moment I am too busy with several other stove projects to play with my Ideas .>
Too bad we can't find someone to pay us for all of our brilliant stove work, right? :-).
Yeah, this stove has kind of caught my fancy. I like your idea of transferring heat via the plate to a flat bottom pot. I am using thin aluminum from a disposable roasting pan for the plate, but the Heiny pot has a concave bottom. I have some Ti pots with flat bottoms so I may give it a whorl. Still, I like the Heiny pot due to it's 700 ml capacity and wt of 28 gm which is hard to beat. I also think this stove may work better with tall thin containers, but I have not tested that.
Anyway, thanks for the input. Hope things are going well for you.
Happy Trails,
-Mark
I've had a play with some windscreens and the alcohol stove.
The stove sits on a platform that is about 1/2" off the ground. This sits inside a windscreeen that has holes at the base below the level of the stove platform.
A 'pot' sits on the top. I've tried using 1g titanium skewers – they worked well but became red hot and bent. I tried mesh but this just encouraged flame blowback.
The windshield did become very hot and has scorched a kitchen top (I'm not married fortunately).
Using the skewers I managed to serially boil two 250ml cups of water before I used all the fuel.
With the mesh it was 6 minutes for 13g of fuel.
I'd like to play with the idea of having one windshield inside another to stop the outer one becoming so hot – that heat is heat lost.
I've used a wide cup as a pot to maximise heat transfer into the pot from the flame.
Total windscreen and burner stand weight was 38g. Hopefully it might encourage some ideas. The concept is of course a scaled-down trangia.

Everything nests! The burner and platform sit inside the cup and the windshield just slips around the outside of the cup. The mesh is just part of the experiment, I don't think it's viable.


The platform allows me to use it as a simple ESBIT stove but most importantly it encourages 'good' airflow. Air coming in the holes at the base of windshield have to come through/around the platform.
The windshield is slightly taller than the cup so I might just rivet a few pot stands onto it.
Using a tall cup might be a better idea but this would then reduce the surface area that can soak up the core of flame's heat.
Mark Hurd >> Just back from an overnight camping trip and wanted to report on the CFV pad stove in the field.
Well as you might guess there are a few kinks to work out. Worst problem was the wind. Very blustery here and the stove does not do well in the wind. Lots of flare and yellow flame with the slightest breeze. I improvised several windscreen configurations with a large sheet of aluminum foil I had. None of which were entirely satisfactory.
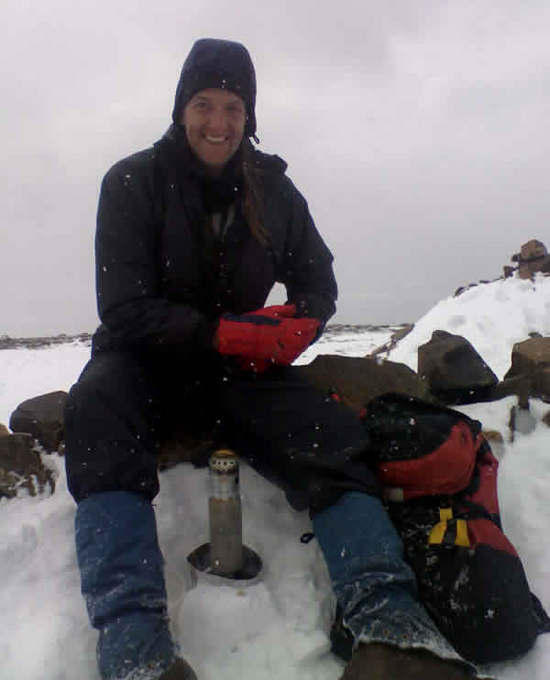
Just the problem I've designed my kettle to overcome. This was taken in a blustery force 4-6 wind on the summit of Red Pike at easter weekend. Performance was a little different to indoor tests. 14.5oz water boiled in 8 mins with 13g of fuel. Indoors I get the boil in 6 mins with 10g fuel. Still, a better wind resistant performance than any pot/stove/windshield combo I've tried.
Prior to describing the stove, I think it’s important to present two issues:
1. Organics burn when heated above approx. 196 degrees F. Understandably, when food is placed in boiling water, it will transfer heat within its’ mass and reduce the water temperature below 212 deg. F. My point is that we need to get away from the thinking that boiling water is essential for all our cooking. We need to heat water sufficiently based on the amount of food or beverage to be heated, food mass to temperature required ratio. Food nutrients are destroyed when burned with taste improved or lost based on the type of food or beverage. Stove fuel can be conserved and no need to wait for the food or beverage to cool down.
2. This type of stove design basically limits our cooking to “Freezer Bag Cooking”. I don’t recall a reference to this in any of the POST REPLYs’. If not referenced earlier, you might log into the following web-site devoted to the subject: http://www.freezerbagcooking.com/
My approach to the design was to improve fuel burn time and reduce stove components to just the fuel absorbing material if practical. “Stove”is just a cold brew coffee filter 3/8” thick cut to the size of my 12 ounce thin-wall aluminum bottle “pot”. It cooked 11 minutes using denatured alcohol w/4% methanol. 12 ounces of water at a start temp. of 63 degrees F. I saturated the “stove” with the alcohol, placed the 12 ounce “pot” on top and removed leached alcohol prior to lighting it. It boiled for 6-1/4 minutes and continued to do so for just under 11 minutes.
Pros: Less than ¼ ounce in weight and no other parts. Excellent duration when needed.
Cons: Unusable after 3 to 4 uses due to burning of the inorganic filter material. The aluminum can is beveled at the base, limiting the amount of absorptive material and related fuel capacity.
Conclusions:
1. Note from the picture that the stove is lying on the bottom of a pot, absorbing heat. We need an insulating base to reduce conducted heat loss.
2. With this design approach (one material only) burn time and life expectancy is based on a highly absorbent non-flammable material. Thickness provides more surface area for air to mix with the fuel.
3. Per zelph’s experiments, height above base and pot would improve fuel/air burn.
4. Many of us know the limitations of alcohol stoves in cold, wind and altitude. Such is the life.
5. Further experiments to follow.
What a pleasure to find a design that is simplicity beyond belief versus my numerous alcohol-stove design experiments six years ago – they had too many parts = space & weight. We can’t ignore however the other gear required to support the stove, such as a fuel bottle that prevents leakage due to temp/pressure variations, insulating base, method of raising the stove higher or not, wind screen and the 91% isopropyl alcohol recommended by Mark Hurd.
Stuart
Always have had this stove in the back of my mind. I started doing some searching for the right materials and came upon some space age stuff that is working out pretty good for the fuel absorbtion. I used 2 aluminum plates for the top and bottom held together with aluminum screws. I used a shoe polish container for storage and support of the stove. The lid of the container can be used as the pot lid. The storage container will fit in my pants pocket easily.
Just a thought…….not much capillary action going on, more gravity fed on a horizontal plane.
Tell me your thoughts on it’s design.
<center>
</center>
<center>
Become a member to post in the forums.
advertisementYour privacy is protected: We do not transmit your user data to third-party ad platforms or advertisers, and we do not host third-party tracking pixels. Backpacking Light serves ads on its own custom, native, and internal platform.
 New Ultralight GearSee the latest releases in ultralight cottage-brand gear from small makers.