Ever found yourself with only one tree to hang from? Do you carry a standard adjustable trekking pole? Here is a 9 oz modification to keep from 'going to ground'. I'm not the first to do this and got my inspiration from a thread on hammock forums https://www.hammockforums.net/forum/showthread.php/112008-Hammock-Stand-using-hiking-pole-it-can-be-done?p=1511470#post1511470 The OP of that thread has continued to have success with the idea, and I have sleep overnight with mine. The weight can probably get shaved down a few ounces if you go with Zing-it/Lash-it and forgo the extension pole. Enjoy. Using Sirenobie's idea I have put together my own "no ground" kit. I have done a few experiments and the following is what I am testing right now. I passes the afternoon 'hang in the yard' test. Tonight is the 'sleep in it test'. Most of my materials were things I had on hand, so my cost has been minimal. First I would like to thank: Sirenobie for starting this thread Alamosa (for the anchor idea) https://www.hammockforums.net/forum/…-Hammock-Stand 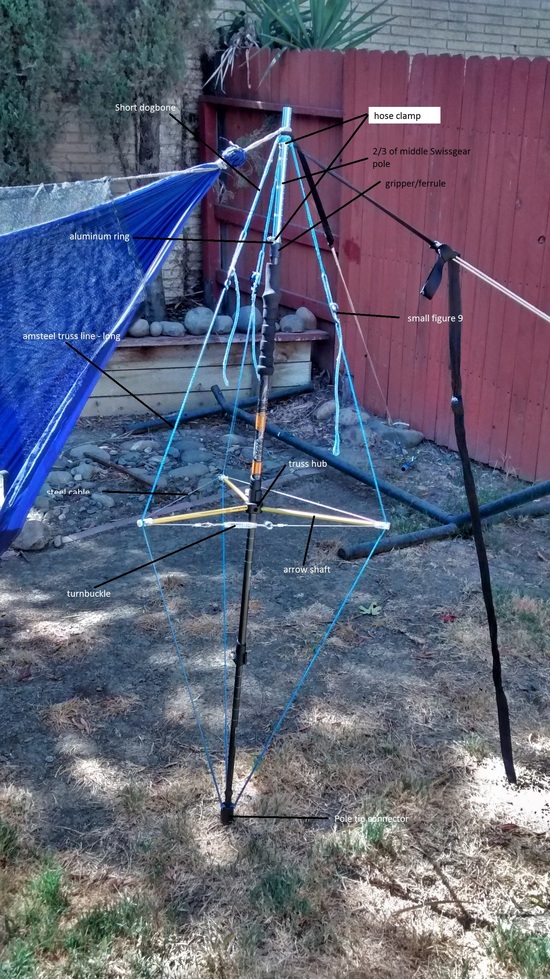


 Materials: Hiking pole (210 gm) 1. (1) Cascade Mountain Tech carbon fiber hiking pole http://www.cascademountaintech.com/Q…les-p/1010.htm I normally carry 2 of these when hiking. Truss assembly and pole extension. (181 gm) 2. (1) 2/3 of the middle segment of a Swissgear aluminum hiking pole with all hardware removed 3. (1) 4" of the middle segment of the above Swissgear pole 4. (1) Plastic gripper/ferrule for the top seglment of the Swiss gear pole 5. (2) small hose clamps 6. (1) DIY aluminum ring (slice of tubing, sized and dressed) 7. (1) Delrin truss hub (piece of delrin rod drilled for the arrows at 120 degrees apart and center drilled to accommodate the Cascade Mountain Tech center pole.) IMPORTANT: do not drill the arrow shaft holes all the way through. 8. (3) 10" segments of aluminum arrow shaft – all cut from one slightly bent arrow. 9. (3) Plastic arrow shaft truss line guides. I drilled 2 perpendicular holes for the truss line at one end and then drilled a center hole for the arrow shaft. 10. (1) small turnbuckle* 11. (1) length of 1/16" steel cable* 12. (2) 2 aluminum ferrules and 6 stops.* 13. (3) Aluminum small Nite ize figure 9s 14. (1) Delrin fitting to support the lower truss lines. Center hole drilled to accept the bottom of the Cascade Mountain Tech pole with 3 equally spaced holes for the truss lines. This needs to be deep enough to support the pole inside the hiking pole tip, not just the tip itself. 15. (3) Short amsteel dogbones. I used a 24" piece to make 1-1/2" loops at either end with the buries almost touching. 16. (3) Long amsteel lengths with a 2" loop on each end (I made these earlier as dogbones but the top loop is not needed.) * if I get motivated these items will change to amsteel and another figure 9. Ground anchors (224 gm per pair) 17. (2) 12" lengths of 5/16" aluminum rod. Sharpened on one end and a hole (for a removal loop) drilled into the other 18. (2) 9" lengths of 1" aluminum pipe with and angled hole (5/16") in one end for the above aluminum stake. Alternate anchors (57 grams per pair) 19. (2) 9" snow stakes http://www.rei.com/product/845328/re…take#tab-specs When I did my first test I was using a wood screw into the top of the Cascade Mountain Tech pole to anchor the 2 guylines and 1 hammock suspension. Worked fine until I stupidly moved the guylines down onto the handle and left the hammock on the screw. Can you say snap? I can, fortunately only the very top of the handle came off, the carbon fiber poles was undamaged. Actually that was serendipitous, since it gave me an easy way to make the hiking pole taller. The unmodified pole maxes out at 53", whereas the currently modified one is set for 56" and can go much higher. That 3" makes a big difference. For using the pole as my hiking pole I just took a 4" length of the segment I cut down and attached it to the original handle. It just slips back on the top of the hiking pole. Amsteel is probably overkill, Zing-it would probably do the job and save a couple of grams – but I had amsteel and not Zing-it. VERY IMPORTANT: Tension on the truss lines is crucial. Also make sure the truss supports (aka arrow shafts) are square all the way around and up and down. Pictures of the whole set up and one with me in it. The solid aluminum pole was my first pole attempt and it works well, just heavier and not my favorite pole to hike with. I trust the 12" stakes and extenders more than I do the REI 9" stakes at this point. Clearly I would prefer to use the much lighter REI stakes once I feel comfortable with them. I wish I had a backyard tree for one of my anchors on the sleep test tonight, but the only good tree is in the front yard – not really where I want to spend the night. The rig passed the overnight test well. I had a little pole slippage (into itself) when I got up in the night. Since the pole clamps are set very tight I'm considering adding to small hose clamps to prevent this. It will add a little to the set up and takedown but virtually nothing to the weight.
Topic
Hanging a hammock with adjustable trekking poles.
Become a member to post in the forums.
- This topic is empty.
Viewing 3 posts - 1 through 3 (of 3 total)
I love those rube Goldberg solutions. Here is another one : 
Much like how a bicycle wheel actually works, or tensegrity structures, I find it really hard to wrap my head around the physics of the truss design you’ve got there. Pretty cool that it works, though!
Viewing 3 posts - 1 through 3 (of 3 total)
Become a member to post in the forums.
advertisementYour privacy is protected: We do not transmit your user data to third-party ad platforms or advertisers, and we do not host third-party tracking pixels. Backpacking Light serves ads on its own custom, native, and internal platform.
 Ultralight folding polesCarbon fiber, adjustable, 15" collapsed length.