Topic
The Homemade look–Aargh!
Forum Posting
A Membership is required to post in the forums. Login or become a member to post in the member forums!
Home › Forums › Gear Forums › Make Your Own Gear › The Homemade look–Aargh!
- This topic is empty.
-
AuthorPosts
-
Nov 29, 2007 at 8:52 pm #1226045
Why is it that every time I make some sort of wearable it always comes out looking homemade?!
This may have an obvious answer, but I'm not that new to sewing (sewing clothes maybe, but not sewing in general). I've been making backpacks and such for a while as a sub-contractor, but for some reason clothes just escape me.
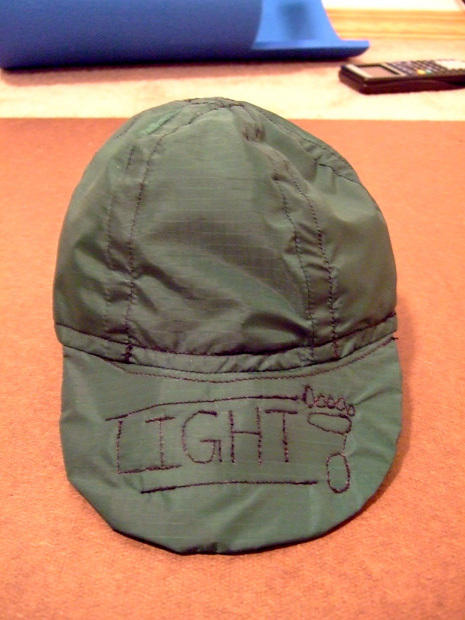
Here's an example. I made this cap today, trying to be real careful about pulling my seams tight and what not but it still has that homemade look (note: the exposed seam on the bill was a choice of laziness–my other problem).

I wonder if it's just my ignorance of this genre of construction and pattern making. I'm just beginning to understand how clothes go together, but shouldn't the basic skills transfer? Phhhht!
Any advice? I'd really like to start making my own clothing, and eventually get to the point where I can bang out my own designs w/o feeling like a craft-shop noob on the trail ;)
Cheers!
CaseyNov 30, 2007 at 5:23 am #1410773Unless you make multiple refined copies of something, pretty much every thing you make is a 'prototype'. Sometimes roughing something up in a cheap fabric is a worthwhile practice exercise.
For many items such as tarps, stuff sacks, pouches, gaitors, even packs, the final look of seams is no big deal. Unless you have a double needle machine and the feed attachment it is hard to duplicate the look of factory seams. I find it isn't worth it to make many high-seamage, tight tolerance items such as complex hats, gloves, etc. Mittens aren't too bad.
Many times to make things lighter, fashion features are left out. A pair of pocketless wind pants with no zippers and a bungie cord waist will always look cheap even if the main seams are neat and tight on a good pattern. Lighter fabrics often lack the substance or 'hand' to look form fitting.
Stretch fabrics or panels of stretch fabrics can help with fit, as can using bias-cut pieces to give woven fabrics a little stretch and better drape. Adapting a patern to bias cut is trial and error, particularly for weaves that aren't symetric.
But I suspect the double, parallel seam or top stitch will always be a tough thing to duplicate on a hobbyist sewing machine.
If you want your home made gear to be undetectable, you'll need to make many copies of an item to refine the design and learn how to get around the trouble spots. Then sew on logos, reflective accents, functionless straps, undersized pockets, and use the heaviest, widest, water-holding elastic on every hem. ;-)
Often no one will see the flaws as clearly as you do. I am amazed at how little comment my 'craft made' creations draw.
Nov 30, 2007 at 6:18 am #1410776I agree with Neil. Making one item 100's of times beats it out (yet, not to worry, my weak point on what I do is the Velcro closure. My stitching looks awful on 1/4 of the sewing of the Velcro!)
I also agree that we as the sewer see EVERY imperfection that nearly no one else will see.
My only tip? Make your thread a lighter choice. Try to have it fade into the fabric. Top stitching is always tricky to have look perfect.
But then again, before you beat yourself up take a hard look at items sold in stores, You will see some lousy sewing! Loose stitches, seams not matching up, irregular stitching……
Nov 30, 2007 at 7:05 am #1410781Thanks for you optimism Neil. I will remember 'prototype'. It is all how you look at the issue isn't it?
It looks like a 'prototype' to me, it does not look homemade.
Nov 30, 2007 at 7:28 am #1410782I agree with Sarah, try using a lighter thread, both in thickness and color. The heavier color and thickness of what you have now makes the seams stand out.
I'd also suggest one more seam… maybe about 1/4 inch in… along the curve of the bill. That one seam I think will surprise you in how much more finished the design will look. RIght now the bill just looks unfinished. Try sketching the design first to see how it might look to get a feel for the difference. Or you might want to try sewing on some trim (you can buy them pre-folded so all you have to do is fit them on and sew. The trim will make the hat look "professional".
And if it's worth anything, I don't think I'd be able to sew that footprint design, at least not on my sewing machine! That's pretty intricate!
Nov 30, 2007 at 7:43 am #1410784Instead of trying to make your stuff look professional, go for a more … "frontier look" if you will. How did people make hand made items for thousands of years without machines, etc?
Fringe, hidden seams, beads, buttons, and the like were used to dress up/hide seams that wouldn't look nice due to the stitching. Some of those techniques can be useful today.
I would certainly agree that there are some things that just aren't worth making at home …. but a lot of other things are … packs, gaiters, bivys, quilts, and even tarps.
I can buy an Acrylic watch cap at the local "mega-mart" for about a buck … why take the time to knit one?
Also … I find that there are a lot of people that are envious of homemade, custom gear. My Quilt draws a lot of attention on the trail, not because it's so beautiful, but because I've sized it exactly to my needs. A comparable bag, in the same weight/temp range, made as water resistant as the quilt, would run me $400. I made my quilt for $120.
Sew on dude …. sew on!
Nov 30, 2007 at 7:59 am #1410785Just a couple of thoughts.
— Forget trying to do embroidery on a home machine. I've never seen it come out good. I've got a $2500 high end machine that does lettering and it sucks compared to computerized embroidery machines. You can get it professionally done for less than a buck a hat once you're into production.
— I'd keep the second reinforcing stitch close to the main seam. No more than 1/8th of an inch. With wide gaps it's easy for the fabric to pucker between the two seams. The second seam should look more like a shadow from a distance.
— I can't say much about the bill. They are hard to do right and I've never tried. I do believe that you can purchase premade bills that can be added to your cap for a more professional look.
— Contrast stitching is fine as long as the tension is properly set. It looks like yours is a bit off, but that may simply be the photo. I'd look for a lot more contrast in the thread used in the logo.
Ron
Nov 30, 2007 at 9:51 am #1410795I'd agree that as the maker you always notice every imperfection. I just finished up a poncho-tarp last weekend and my first seam was abysmal. It doesn't effect the functionality one bit but it looks funky. I was fretting over it quite a bit when my girlfriend pointed out that no one else will ever care. Most people are so impressed by the fact that I've made a lot of my gear that they don't take note that it doesn't look as great as something they would go to the store and buy.
When I made my Liberty Ridge windshirt I used the gray 1.1 oz DWR ripstop. My floormates dubbed it my "trashbag jacket" since it really did sort of look like I made it out of an old trashbag. After I realized how useful the shirt actually was it never bothered me when people joked me about it.Adam
Nov 30, 2007 at 10:12 am #1410799Casey,
I think the cap looks fantastic! Love the unique logo!
Be proud of it.
From a sewing machine tinkerer,
MikeNov 30, 2007 at 12:27 pm #1410826I think Neil, Sarah and Ron have covered most of it pretty well.
Yes, it takes *many* repeats to really sort out the bugs. That's why you can buy 'factory seconds'.
I agree with Ron about the second seam – closer to the first is better. But sewing both seams under slight tension is also needed with light fabrics, and I think you have the top tension set too high as well and need to reduce it. Both will help to reduce that puckering which is so common on DIY gear.
The comment about adding fashion frills is right: we are accustomed to seeing them on commercial gear, even though they are mostly useless frills.
If you want to do embroidery, which is hard on a domestic machine, use a thicker and more colourful embroidery thread on the top (and a bigger needle to take the thread). It will actually look better that way.
Then stop worrying and use the gear!
Nov 30, 2007 at 12:41 pm #1410829Thanks everyone for all the advice and encouragement. In my mind I totally agree with everything you're saying, but there is just something inside me that 'needs' to be able to make clothes and such that look professional. Not sure why…maybe it's from my ardent desire to be less reliant on the man! (Or maybe it's because I'm cheap and meek)
Ron: Thanks for the tips!
The reason why I used black thread on a green cap was because I didn't have any green thread at the time (again, I'm lazy). And the reason it's so thick is b/c I'm using an industrial machine. This is probably the reason why the tension seems off too.
How do you go about learning how to make your own clothing and design your own patterns? Getting clothing to fit and drape well is freakin' hard compared to getting a pack to close!
Thanks all!
CaseyNov 30, 2007 at 3:33 pm #1410847Casey, with pattern making it takes time. It isn't easy to think in 3D and get that on paper.
The best thing you could do though is read books on it. Yes, the majority of the books are on ladies garments, but you can still learn the basics ;-)
Another way is to take clothes you like the fit/style of and carefully take them apart. It can help you learn how the cut is done and how they are draped/put together. But warning: don't do this with stuff that you'd hate if you wrecked!
I learned how to make patterns over many years, mostly because I used to make Medieval/Renny outfits for clients and they didn't have patterns back then to buy. And often I had to make the garments for larger ladies with huge bosoms. Making a boned corset for a 38 E is way harder than anything else I have sewed ;-)
But for every good pattern I got, tons of paper went in the recycle bin. I'd hedge I have wasted a couple hundred yards of fabric in my sewing time. Sometimes it is better to find a commercial made pattern and develop off of it (for home use of course!) using that pattern to get the shape you need, the hang, fit, etc and then add in what you want. It is not hard to change a pattern's style.
Nov 30, 2007 at 4:26 pm #1410862Craftshop noob???
It's a badge of honor on the trail.
In fact, you might consider using contrasting thread – at least on your prototypes. Now THAT looks homemade! But contrasting thread makes it easier to rip out a misplaced seam when you make inevitable mistakes. -
AuthorPosts
- You must be logged in to reply to this topic.
Forum Posting
A Membership is required to post in the forums. Login or become a member to post in the member forums!
Our Community Posts are Moderated
Backpacking Light community posts are moderated and here to foster helpful and positive discussions about lightweight backpacking. Please be mindful of our values and boundaries and review our Community Guidelines prior to posting.
Get the Newsletter
Gear Research & Discovery Tools
- Browse our curated Gear Shop
- See the latest Gear Deals and Sales
- Our Recommendations
- Search for Gear on Sale with the Gear Finder
- Used Gear Swap
- Member Gear Reviews and BPL Gear Review Articles
- Browse by Gear Type or Brand.
