Topic

Ultralight Cook Kit for BRS 3000T Canister Stove

  • This topic is empty.
Viewing 10 posts - 1 through 10 (of 10 total)
David Gardner BPL Member
PostedAug 27, 2015 at 6:04 pm

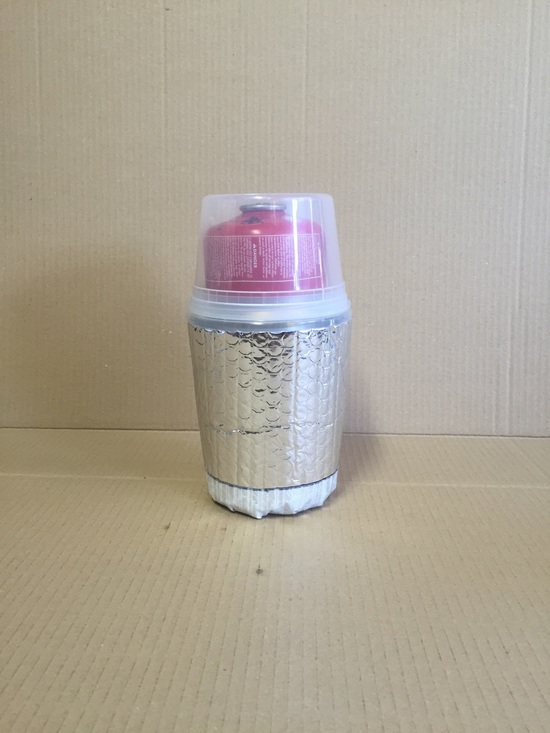
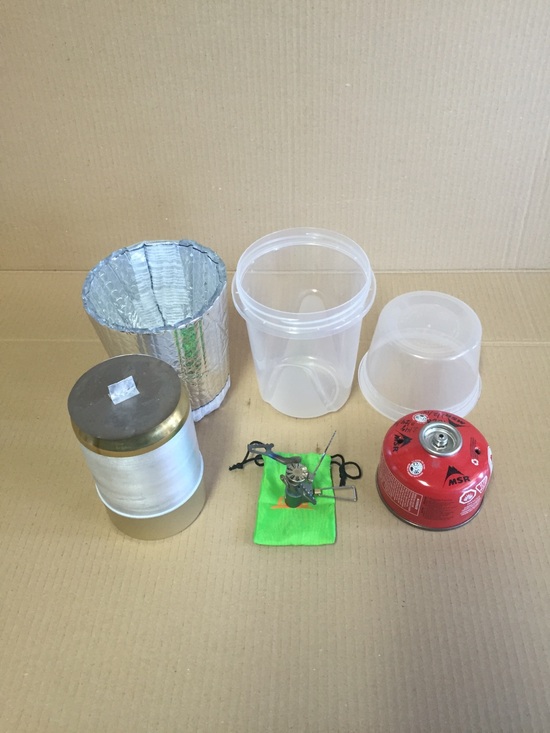
Because of the severe drought here in California alcohol stoves, esbits and wood fires are banned in virtually all wilderness areas. So I picked up a feathery 25 gram BRS 3000T stove (can't beat the price or weight) and decided to make an ultralight cook kit for it as my new "go to" camping kitchen. The kit, including the stove, weighs 4.7 oz for an all-aluminum, flat-bottomed cook pot made from a modified Foster's can, a 1 qt Ziploc food storage container for a bowl and bottom section of a caddy, a Reflectix cozy, a 16 oz. Delitainer for a cup and top section of the caddy, and a titanium foil pot lid. The caddy has room inside for the can, stove, and one 110 gram fuel canister. First, I cut the lid off a Foster's beer can using a side-cut can opener. Then I cut 1" off the bottom of the Foster's can using the "utility blade screwed to a board" method. Cutting the can down is necessary to make room inside the caddy for the 110 gram canister. (Before cutting off the bottom I also brushed the outside of the can with a 6" wire brush wheel on a bench grinder because it absorbs heat more efficiently than the original slick surface, and I also like the way it looks, but this step is optional.) Next I trimmed the top of a 5.5 oz cat food can with the side-cut can opener, which leaves a thin open tapered section at the top. Then I press fit the Foster's can into the cat food can with a thin bead of food-grade sealant and set it aside for 24 hours to let the sealant set. The finished can has a maximum capacity of a bit more then 700 ml, and with 500 ml of water in it has 1.75" of freeboard so it doesn't boil over. Then I went to the Zen Stoves web site page for designing conical windscreens (http://zenstoves.net/PotStands-Conical.htm#ConeTemplates) and, using the dimensions of the 1 qt Ziploc, designed a pattern for the cozy. The cozy is a frustum (truncated cone) just like a conical windscreen, just upside down. I used 4.25" for the base, 3.5" for the top, and 5.25" for the height. I drew the cozy pattern on a piece of 8.5" x 17" paper using a long tramell compass, but it can also be drawn using a thumbtack, some string, and a pen. Then I used a Sharpie to trace the pattern onto the Reflectix and cut it out with scissors. I assembled the cozy using 3M "transparent" duct tape because it has good adhesion and weatherability, and I like the hi-tech look. I took the 1 qt Ziploc to a deli and found a 16 oz. "Delitainer" which is precisely the right size for a nice, tight friction fit on top of the Ziploc. Finally, I cut a pot lid from .004" titanium foil from Titanium Goat and made a little folding handle from aluminum tape. It weighs 2.6 grams. You can skip this step and use the lid from the Foster's can, but it weighs about 4 grams more. Or you can go even lighter and use aluminum foil for the lid. That's it. I tested the stove and pot, and it boils 500 ml of 70* F water in less than 6 minutes and uses about 6 grams of fuel. I then poured the water into the Ziploc with cozy and pressed on the Delitainer top. I checked after 30 minutes, and it was still 185* F, plenty of time for a meal to rehydrate and "simmer." The inside diameter of the Foster can opening is 3", so many different kinds of small canister stoves will fit in it, not just the BRS 3000T. c The components packed Everything packed up and ready for the trail.
todd BPL Member
PostedAug 27, 2015 at 8:13 pm

That is really sweet, David! How do you get the press-fit without messing up the open end of the can?

PostedAug 27, 2015 at 8:42 pm

I love the complete, modular nature of that design. very welk done! I cant stand beercan pots, though..sorry. So, for those of us more inclined to use titanium, etc and deal with the HORRENDOUS weight penalty:)-what are the dimensions of your Fosters pot (diameter and height) so that we might use a more durable substitute? Thanks for posting your design!

David Gardner BPL Member
PostedAug 27, 2015 at 9:54 pm

Thanks guys. Todd: By some amazing coincidence, the dimensions of the beer can and cat food can are precisely compatible so that the cut-open bottom of the beer can fits perfectly inside the cat food can without any deformation. It's such a good fit, I'm going to make one without any sealant and see if it's water tight. Jimmer: The pot is 5.5" tall and 3.25" in diameter. Is there a titanium pot available from anyone in those dimensions? It would be great if there was.

PostedAug 28, 2015 at 10:43 am

David, Most if the usual suspects in mugs and pots with a 2 cup + capacity will be 3.5" plus which is too wide ,I believe. Montbell makes a tall ,wide 600ml titanium mug with handles. Its 2.8 oz and is 3.1" wide by 4.7" tall. It should fit that system well and only costs $27. Also, Sam at batch stoves makes his lathe spun annodized aluminium beer can substitute pot and it should fit as well. I think the Montbell mug would work great:)

Roger Caffin BPL Member
PostedAug 28, 2015 at 4:00 pm

> The pot is 5.5" tall and 3.25" in diameter. Any pot that narrow is going to be very INefficient on a canister stove. Most of the heat from the stove will go up the sides of the pot, rather than heating the base of the pot. You will end up having to use a lot more fuel. Your call of course. Yes, I know beer can are very popular on small alky stoves. Alky stoves put out a lot less heat than canister stoves. Even so, the popularity of beer cans is almost entirely due to their light weight, despite their known inefficiency. But it's a free world. Cheers

PostedAug 28, 2015 at 5:21 pm

Roger, in general I agree about wide pots, but the BRS-3000T burner pattern is so small in diamteer, I think it's not much of a handicap . A decent windscreen and proper flame adjustment by the user would matter more in terms of efficiency than pot width ,IMHO.

David Gardner BPL Member
PostedAug 28, 2015 at 6:59 pm

"Any pot that narrow is going to be very INefficient on a canister stove. Most of the heat from the stove will go up the sides of the pot, rather than heating the base of the pot. You will end up having to use a lot more fuel." I know the theory that a wider pot is supposed to be more efficient, but my actual experience doesn't bear that out. I just did three test boils, one with the beer can pot (5.5" tall and 3.25" wide), the second with an aluminum pot from some generic camping set I used in the past (3" tall and 5" wide), and the third with a classic "mess kit" pan (1" tall and 7" wide). I ran the stove at the same fairly low setting to maximize efficiency. The can pot with Ti lid weighs 28.6 grams. The generic pot weighs 105 grams (an additional 76.4 grams). The mess kit pot weighs 97 grams (an additional 68.4 grams). The can pot took 5.5 grams of fuel to boil 500 ml of water. The generic pot took 6.0 grams. The mess kit took 9 grams. I believe there are at least 3 factors which explain these results. Edit to add Caveat: These tests were done under ideal lab conditions, which maximizes heat flow up the side of the beer can pot. Real world results will vary. First, the BRS 3000T has a small diameter burner, which focuses the heat in a small area, minimizing heat loss up the sides. (Edit: I wrote this before I saw Jimmer's last comment, with which I agree.) Second, any wide, short pot has much more top surface area to radiate heat away. The beer can pot has a top surface area of 8.3 sq. in. The generic pot has 19.6 sq. in. of top surface area. The mess kit pot has 38.5 sq. in. of top surface area. Third, you have to heat a lot more metal with any normal wide, short pot (if someone made a wide, short pot with the same thickness walls as a beer can pot it would minimize this factor, but no one does). It takes a lot of fuel to heat up all that extra metal. Even if the wide pots used only 1/2 as much fuel as the beer can, it would take a lot of burns to make up the difference in the weight of the pots. In this case, assuming 2.75 grams to boil, it would take 28 burns to make up the difference in the weight of the generic pot, or 25 burns with the mess kit. If there are errors in my test method, I'm happy to be educated and run the tests again.

James Marco BPL Member
PostedAug 29, 2015 at 6:43 am

Well, I disagree on the testing methodology since every pot will have a certain "sweet spot" as far as efficiency goes. Similar SHAPED pots can be compared like that, but not different shapes. A beer can pot will often have a dished in bottom. The old camp pot will likely have a flat bottom with rounded edges. The "mess kit" pot will likely be rounded for a good portion of the way around the pot. Yes, heating metal to transfer the heat to the water also takes some heat. It is about 2-5% of the total heat depending on the thickness for a normal backpack pot. (This was from Roger Caffin about 9-10 years ago on another list.) Thinner is always better, but this misses the basic surface area of the pots. And, holding the heat low on the pot. And the basic overall shape of the pot. Surface area – heat goes in both directions. The more surface area the faster the heating, but also the faster the cooling. It happens simultaneously. If there is a net heat gain, then we heat the contents. If there is a net heat loss, then we cool the contents. It can happen that neither will occur. The water will warm but never boil, hence you have nearly infinite fuel used to boil water even applying heat. (Of course, the water will still evaporate or reduce in volume. And the fuel canister is limited in fuel supply.) Depends on your heat input. Surface area will radiate heat as quick as you add it, roughly speaking. I am assuming a lid to keep evaporation down. Insulating the area above the heat, and the lid of course, will help. The wide pot you mention will actually heat more efficiently by turning up the heat to overcome the radiative heat loss despite this being against popular wisdom of heating water on low heat on a beer can. The shape of the bottom can contribute to holding the heat against the pot. The dished in bottom of the smaller beer can will trap heat slightly longer against the bottom than a flat bottom. As long as the heat is on, this will exchange the "cooled" heat with fresh heat. So, the shape of the bottom can influence the heating. The wide "mess-kit" will shed heat quickly, the beer can will hold it slightly longer. This looks like heat "friction" or resistance to heat flow around the pot similar to a heat exchanger. Or, a shiney metal will "slide off" more heat than a dull black. If the heat flow is slowed before it starts to rise around the edges, it will stay closer to the sides of the pot allowing it to contribute more towards net heat gain. I use a grease pan with a series of ridges to increase surface area, and to increase friction. I get about a 15-20% increase over a standard grease pot with no other changes. Anyway, it is not a simple matter of heating water and comparing results as you did. There are other things going on that can strongly weight the results. Metal thickness, shape, surface area are a few off the top of my head.

Viewing 10 posts - 1 through 10 (of 10 total)
Loading...