Topic

14 oz. 2-person cuben bivy tent for under $200?


Forum Posting

A Membership is required to post in the forums. Login or become a member to post in the member forums!

Home Forums Gear Forums Make Your Own Gear 14 oz. 2-person cuben bivy tent for under $200?

  • This topic is empty.
Viewing 8 posts - 1 through 8 (of 8 total)
  • Author
    Posts
  • #1328702
    matt kirk
    BPL Member

    @matthew-d-kirk

    Locale: southern appalachians

    Happy Friday, I'm seeking feedback on a shelter design. It will be used by me and my wife for super light outings. In the past, we've used tarps, but she's expressed an interest for full-enclosure.

    My goals for the design: 1.) simple construction, 2) use every inch of a minimal amount of cuben, so… 3.) it's relatively inexpensive for cuben standards (under $200 in materials), and last but not least 4.) provide full-enclosure for two cozy people without a significant weight penalty so that it would be reasonable weight for solo trips as well.

    Here's what I came up with:

    https://docs.google.com/spreadsheets/d/1J3SCy6CjqeMXreIjS0vXJVrnUB5b1urhnnmleMhpeHA/edit#gid=2010868194

    The floor measures 104" by 42" and the peak height is 36". I know this is tiny, but my wife and I have done alright together in 1 and 1+ person tents in the past. My main concern is about the efficacy of the argon splash doors to shield the occupants from what the awnings might not block. Please refer to the diagrams on the above link. Feedback appreciated! Thank you.

    #2198002
    Ryan Smith
    BPL Member

    @violentgreen

    Locale: East TN

    1) If you are looking for the Argon to repel spray, M50 would be a better choice at virtually no weight penalty. Argon doesn't have a great DWR IMO.

    2)Instead of Nano-see-um, you could use tulle at .30oz/yd or NS50 at .50oz/yd. Tulle has proven to be pretty durable so either should work fine.

    I honestly couldn't understand the diagrams that well to give any design advice. However, you could also make a cuben hex pyramid for 9oz and about $200 which would have plenty of space for two.

    edit: If by full enclosure you don't mean a shaped tarp and instead are looking for tent-style enclosure my pyramid advice is of no help unless you fashioned a floor of course.

    Ryan

    #2198006
    Franco Darioli
    Spectator

    @franco

    Locale: Gauche, CU.

    Maybe if you make a 3d paper model it will be easier to understand.
    (I did not get it either…)

    #2198074
    matt kirk
    BPL Member

    @matthew-d-kirk

    Locale: southern appalachians

    Ryan, thanks for the feedback. Yes, the goal is to have an integrated bathtub floor here to eliminate all creepy crawlies.

    I haven't played around with M50. Considering I only need a yard, it's not much of weight or price penalty. One drawback is going through a 3rd vendor (and paying 3x vs. 2x shipping). I have used argon, but not for this purpose, so I trust your assessment of this material. RE tulle: I'm skeptical about its durability. When I've checked it out at a craft store, the stuff tears easily. The price and weight are very attractive though…

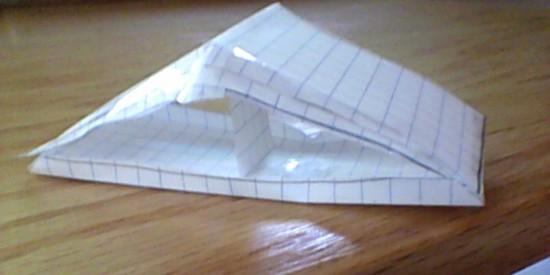
    OK, here's a rough picture of a rough 3D model of the cuben tent body. (w/o doors, which I'll try to describe below the pic):3d model

    What this image is showing is the one continuous 6.5 yd length of cuben wrapped all the way around and taped to itself and then trimmed and folded. The result is a 104" x 42" dual side-entry body with 6" bathtub floor and trimmings attached to create a tapered 12" awning over each door.

    Now, as for the main door design: I plan to attach zippers as mapped out in black on the diagram in spreadsheet from the top of the bathtub walls along the edges of the tent body all the way to the apex on both sides. Zipped closed, the pulls will be located at the apex. This will be the main door, which will be made out of netting.

    Right now, the plan is to attach a second set of zippers (directly to the zippers of the main door and on the inside of tent). These are mapped out in red on the diagram in spreadsheet. They will attach to the splash door material (either M50 or Argon) and will go approximately 2/3 of the way to the apex when zipped fully closed. When opened any amount, the splash door material can tuck down into the pocket created between the two doors.

    Wow, clear as mud yet? If you can actually smell what I'm stepping in, then I'll take it one step farther and mention that I'm now thinking about eliminating the "double-layer door" design in favor of just one-layer splash/netting hybrid door on either side to KISS. This would eliminate cost and weight of materials, but also reduce versatility of design IMO. I do like the idea of opening the splash door all the way down on a clear night for full-breeze and views…

    #2198164
    R
    Spectator

    @autox

    Cool concept. I think your splash doors will work as intended.

    Here's something you might considered that would reduce cost/weight/complexity. Rather than making the splash doors zip up the roof line, use a few plastic snaps/watch buckles or velcro. Basically just tack it up at the corners. This probably won't work so well if you do it full height, because there's not much awning protection at the edges of the door down low. But this might work for the upper half of the door. Mechanically, it just has to withstand wind loading.

    Have you evaluated the roof height at your head and toe? For reference, if you're 6' tall, the roof will be ~15" high at your head and toe. 2" of air pad + 2" of loft leaves 11". That's cutting it pretty close (for some one 6' tall w/ big feet).

    — Edit: this assumes you have 6" vertical walls at the head and toe as part of your bath tub floor. I just noticed your paper model is sloped right down to the ground. —

    Another ramification of the flat roof is that you'll have to be careful in going from lying to sitting that you don't brush the ceiling. You probably won't be able to sit up as you normally would. Placing the roof apex closer to your head will give you a steeper slope making it easier to sit up at the cost of less height above your feet and a slightly lower peak height for a fixed amount of material. Another design change would be to increase the height of the vertical walls at the head and toe. Every 2" you take off the length will raise the whole roof 1". At 8'8", I think you've got some room to spare.

    Actually, if you take your length down towards 7' it becomes much like the shape of the Tarptent Notch: http://www.tarptent.com/notch.html

    Nice high walls at the head and toe, apex shifted towards the head, peak height >40". Might be worth looking up a few reviews of that one to see how the general form works out.

    #2198193
    matt kirk
    BPL Member

    @matthew-d-kirk

    Locale: southern appalachians

    Rene, thanks for your input. I started with vertical walls at the head and foot of the tent, but grew concerned about the added complexity/cost/weight of poles and sleeves to hold up those walls. I do very much like the idea of shifting the apex towards the head though. Eliminating the symmetry on the doors may require more yardage for the fabric(s). I will investigate and see. Good thoughts indeed.

    #2198466
    Franco Darioli
    Spectator

    @franco

    Locale: Gauche, CU.

    Matt,
    I suggest you make a full scale model just using some string, two poles ans some stakes.
    or just some masking tape on a wall.
    Insert your mat and sleeping bag and see how it will fit.
    104" sounds like a lot but it isn't in that kind of design.

    #2198618
    R
    Spectator

    @autox

    +1 to simple mock-ups for sizing. Given the cost of Cuben, you might want to assemble your pattern in plastic film (painters drop cloth) and packing tape before you cut your material.

    Re. vertical end walls – you don't necessarily have to add poles if you don't mind guying the corners out a little further. See the second to last photo in this thread: http://www.backpackinglight.com/cgi-bin/backpackinglight/forums/thread_display.html?forum_thread_id=102703

Viewing 8 posts - 1 through 8 (of 8 total)
  • You must be logged in to reply to this topic.
Forum Posting

A Membership is required to post in the forums. Login or become a member to post in the member forums!

Get the Newsletter

Get our free Handbook and Receive our weekly newsletter to see what's new at Backpacking Light!

Gear Research & Discovery Tools


Loading...