


I'm looking for ideas for how to sew a cylindrical ventilation tube to a flat tent wall. This is for some bothy bags I'm making.
All ideas are welcome, pictures would be even better…I've done quite a bit of sewing but I don't recall ever doing this…
Topic
Become a member to post in the forums.
I'm looking for ideas for how to sew a cylindrical ventilation tube to a flat tent wall. This is for some bothy bags I'm making.
All ideas are welcome, pictures would be even better…I've done quite a bit of sewing but I don't recall ever doing this…
If possible, attach the tube material to the tent wall before turning the tube material in to a tube. Sew the seam along the length of the tube after attaching it to the tent wall. The reason is that, at small diameters, it's tricky to get a close match between the tube's circumference and the length of your circular seam. If you wait to sew the length of the tube until after the circular seam, you can accommodate the small error you're likely to end up with – leave a little extra hem length on the straight seam.
Also, consider sewing a hexagon instead of a circle. Straight lines are easier to deal with than a small radius curve. They also reduce the degree of the above type of error. This I learned making small gear sacks.
Elliott,
I took a closer look at my commercial bothy. The geometry is more complex than I thought. The tubes are not cylindrical. They are, in fact, conic sections with the larger opening attached to the wall. The change in diameter is about 3/4 inch on the pole receptacle "tube" and it is about twice that on the built-in stuff/ventilation sack.
My brain does not wrap itself around 3D objects very well, so bear with me. The hole in the wall is circular, there are no fancy wall fabric joints in the neighborhood to confuse the issue. There is a third piece of material involved which is about 1 inch wide X tube circumference. This third piece serves as a clamp; it is folded in half lengthwise over the raw edges of the tube and the wall then the 3 piece/5 layer sandwich* is sewn. Actually, the tube is folded back on itself toward the exterior about 1 inch before being sewn; after sewing it can be flipped down to cover the ugly seam.
Maybe make some paper or fabric mock ups of this before tackling the final product? An oversized piece of material that will eventually become the tube can be adjusted to fit the wall hole properly and I suspect that it will become apparent why a conic section is a better fit. The seam that makes the fabric into a tube is not sewn until after the tube is attached to the wall???
My very amateur thoughts only.
*sandwich consists of 1 layer of wall, 2 layers of the clamp (sorry, I don't know the proper term), 2 layers of tube because it is doubled back on itself.
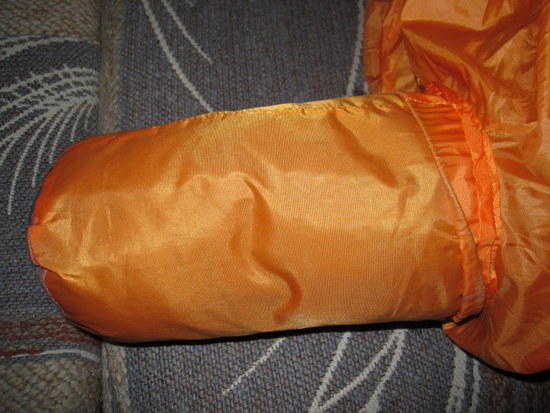
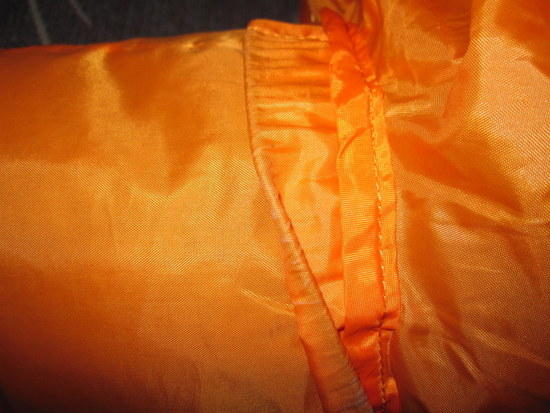
A couple more photos. The first one is what I would think you would see while you are sewing. The tube is pushed into the inside of the bothy.
The second one is similar but shows the stuff sack cord and lock which is built into the folded-back part of the stuff sack.
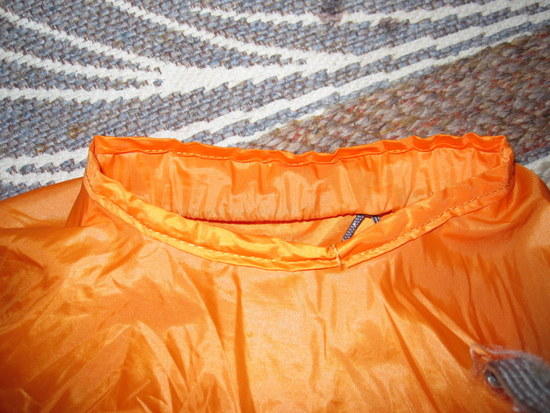 lock which is built into the folded-back part of the stuff sack.
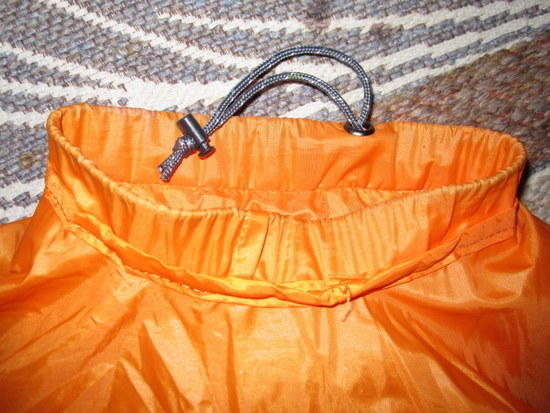
Become a member to post in the forums.
 Brynje Mesh BaselayersBrynje baselayers use open mesh construction to move moisture away from the skin, create insulating air pockets, and help regulate body temperature across changing conditions and activity levels.
 © Beartooth Media Group Inc.
 Loading...