Topic
Thinking through a small mid test project
Forum Posting
A Membership is required to post in the forums. Login or become a member to post in the member forums!
Home › Forums › Gear Forums › Make Your Own Gear › Thinking through a small mid test project
- This topic is empty.
-
AuthorPosts
-
Mar 10, 2015 at 1:10 pm #1326662
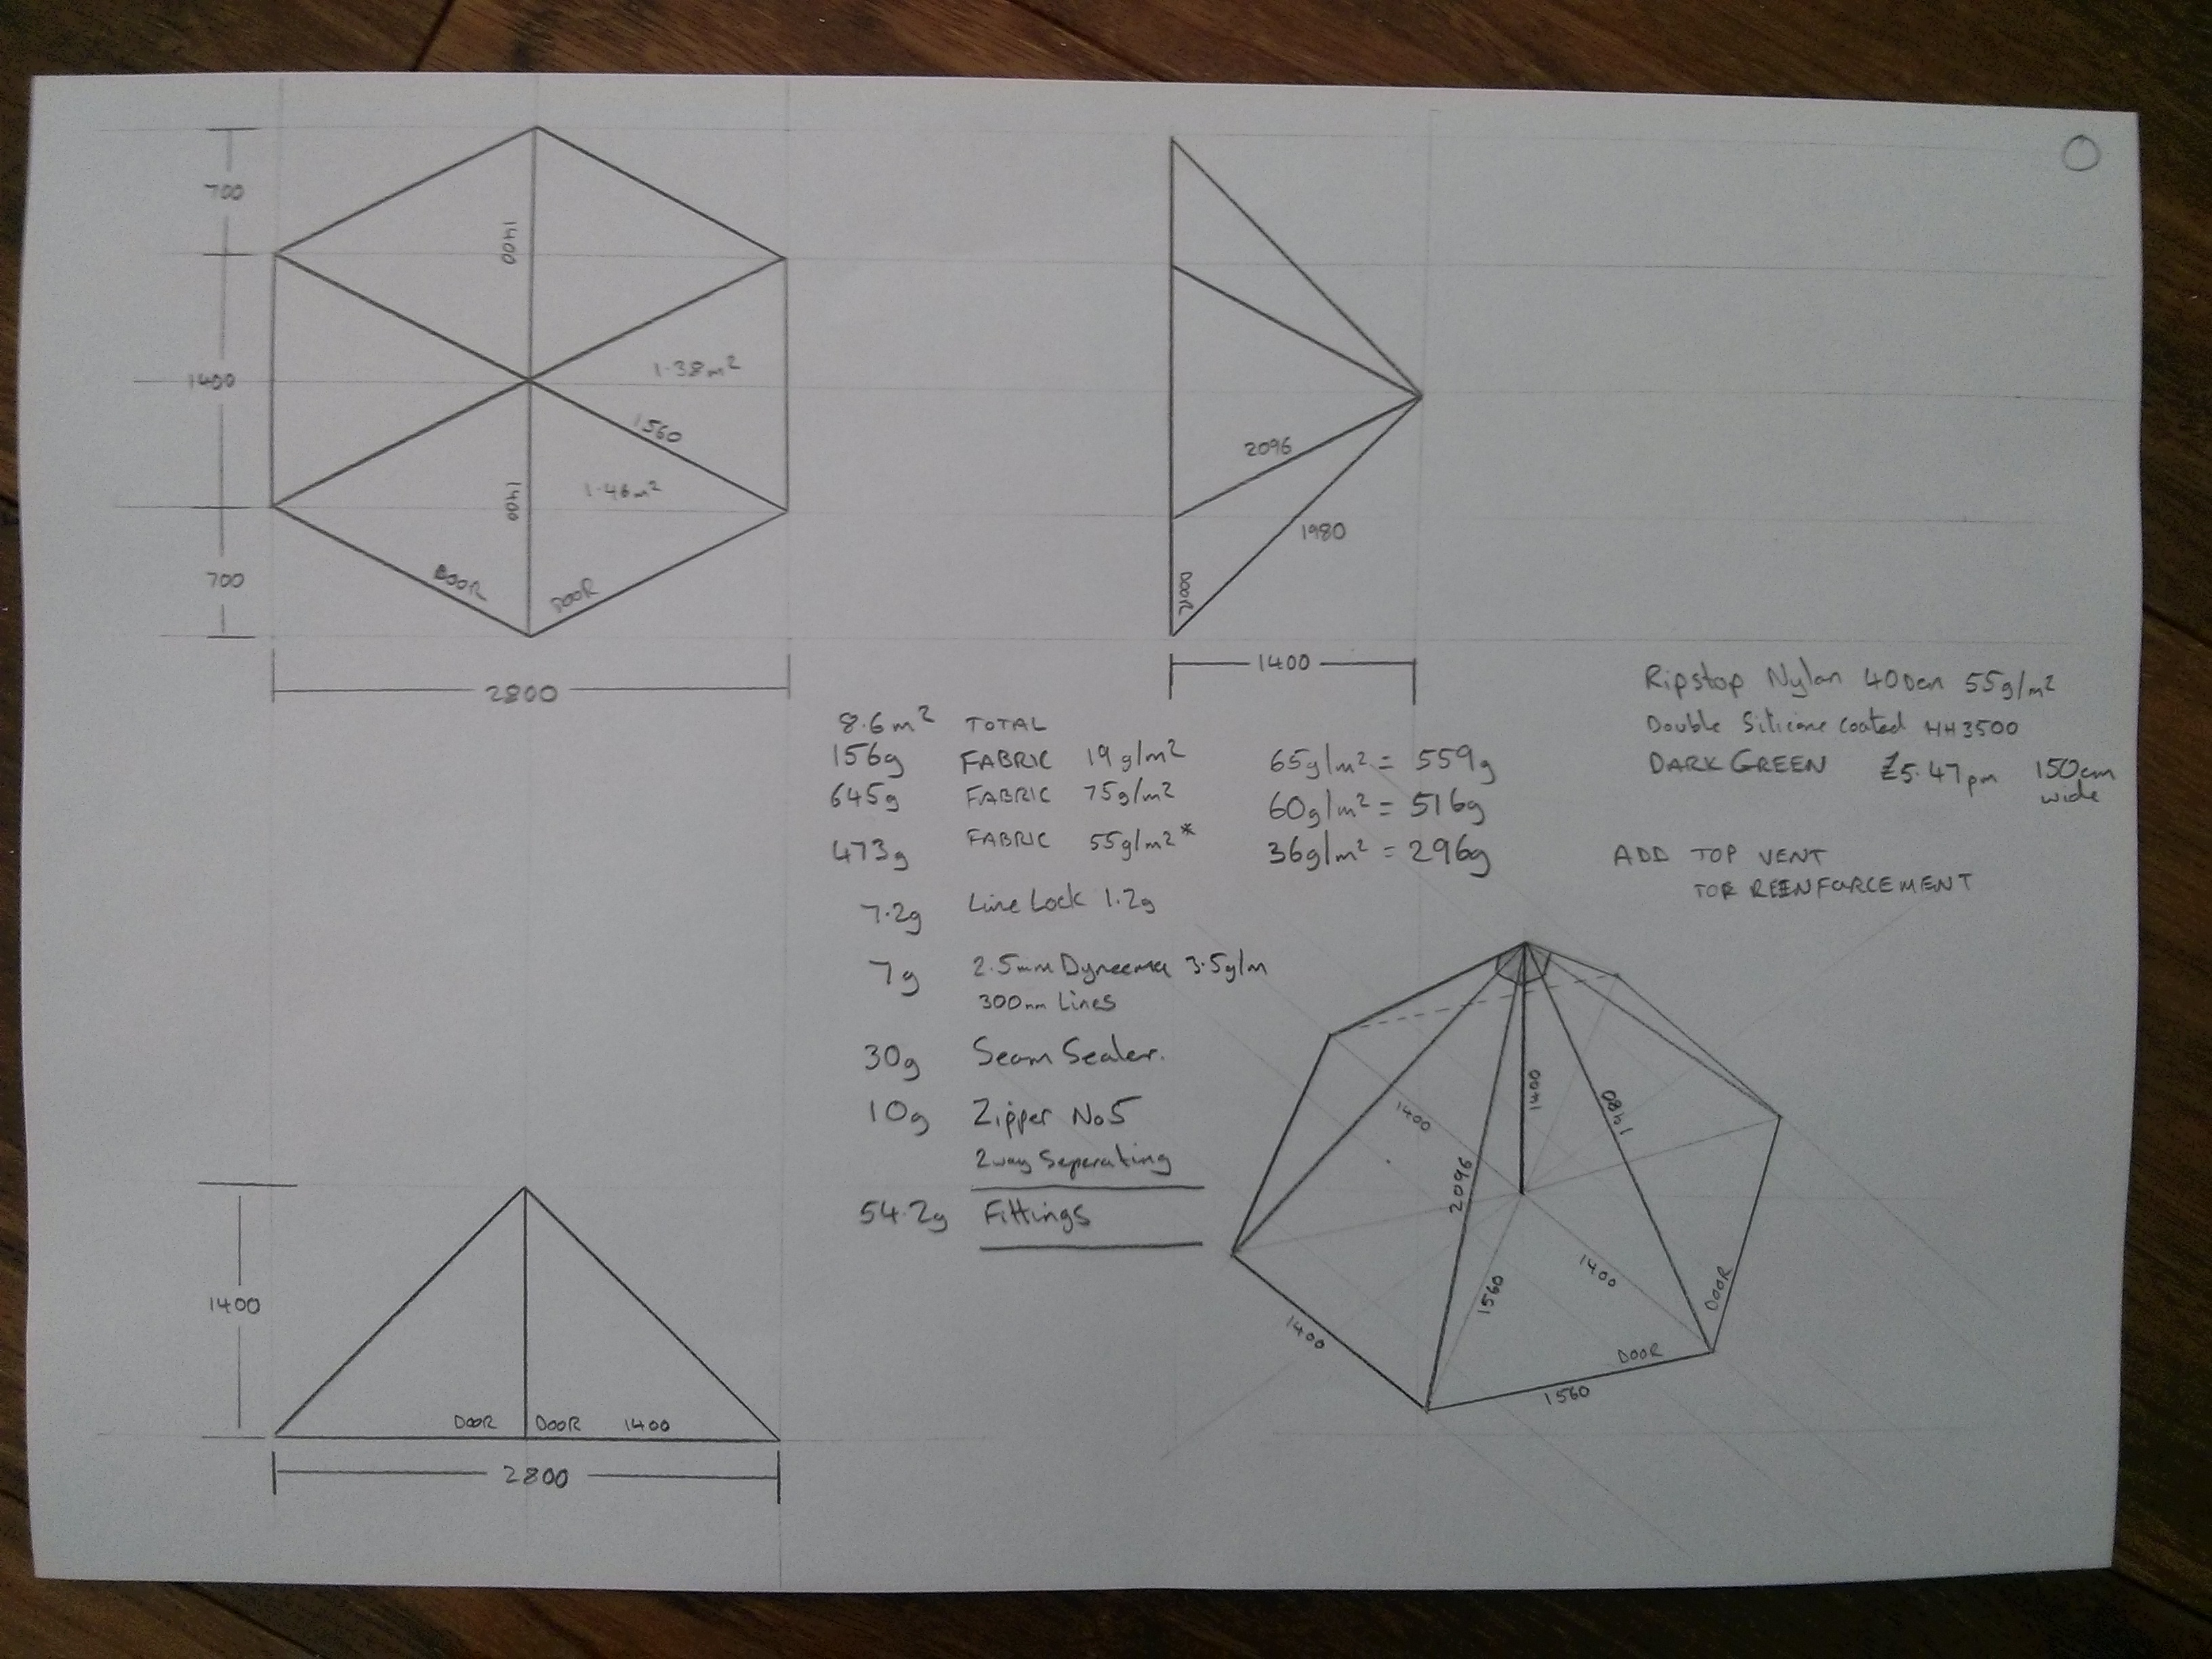
I'm planning a fun experimental project to further my sewing skills. I'd like to make a solo mid-type single-walled tent with a net floor or maybe net/sil floor. Here's a preliminary sketchup drawing I put together. The extra lines on the panels are dummy cat curves, inch or inch-and-half deflection. Also if I don't have as much scrap fabric in the closet as I think I do, it may get more of a beak than a full door.
I've also been going back and reading the threads on ridgeline seams. I've been doing the faux-felled on flat tarps and other simpler experiments, but figured I'd try something new. I got to wondering whether I could do a nearly full-felled seam (where where both of the stitch lines that are visible on top go through 3 layers of fabric) without ironing and with minimal pinning. I think the 3-pass method in the second figure, would work. The first sewn line would end up hidden, and I'd use the 1/4" overhang as a guide when folding over (since the sil I have can be seen through enough to see the underlying edge).
Lastly, any ideas for avoiding having a zipper for both the door and the net? I was thinking maybe a cinch closure on the net, with a hang loop at the top of the door for when you want to keep it open.
 Mar 10, 2015 at 3:21 pm #2181465
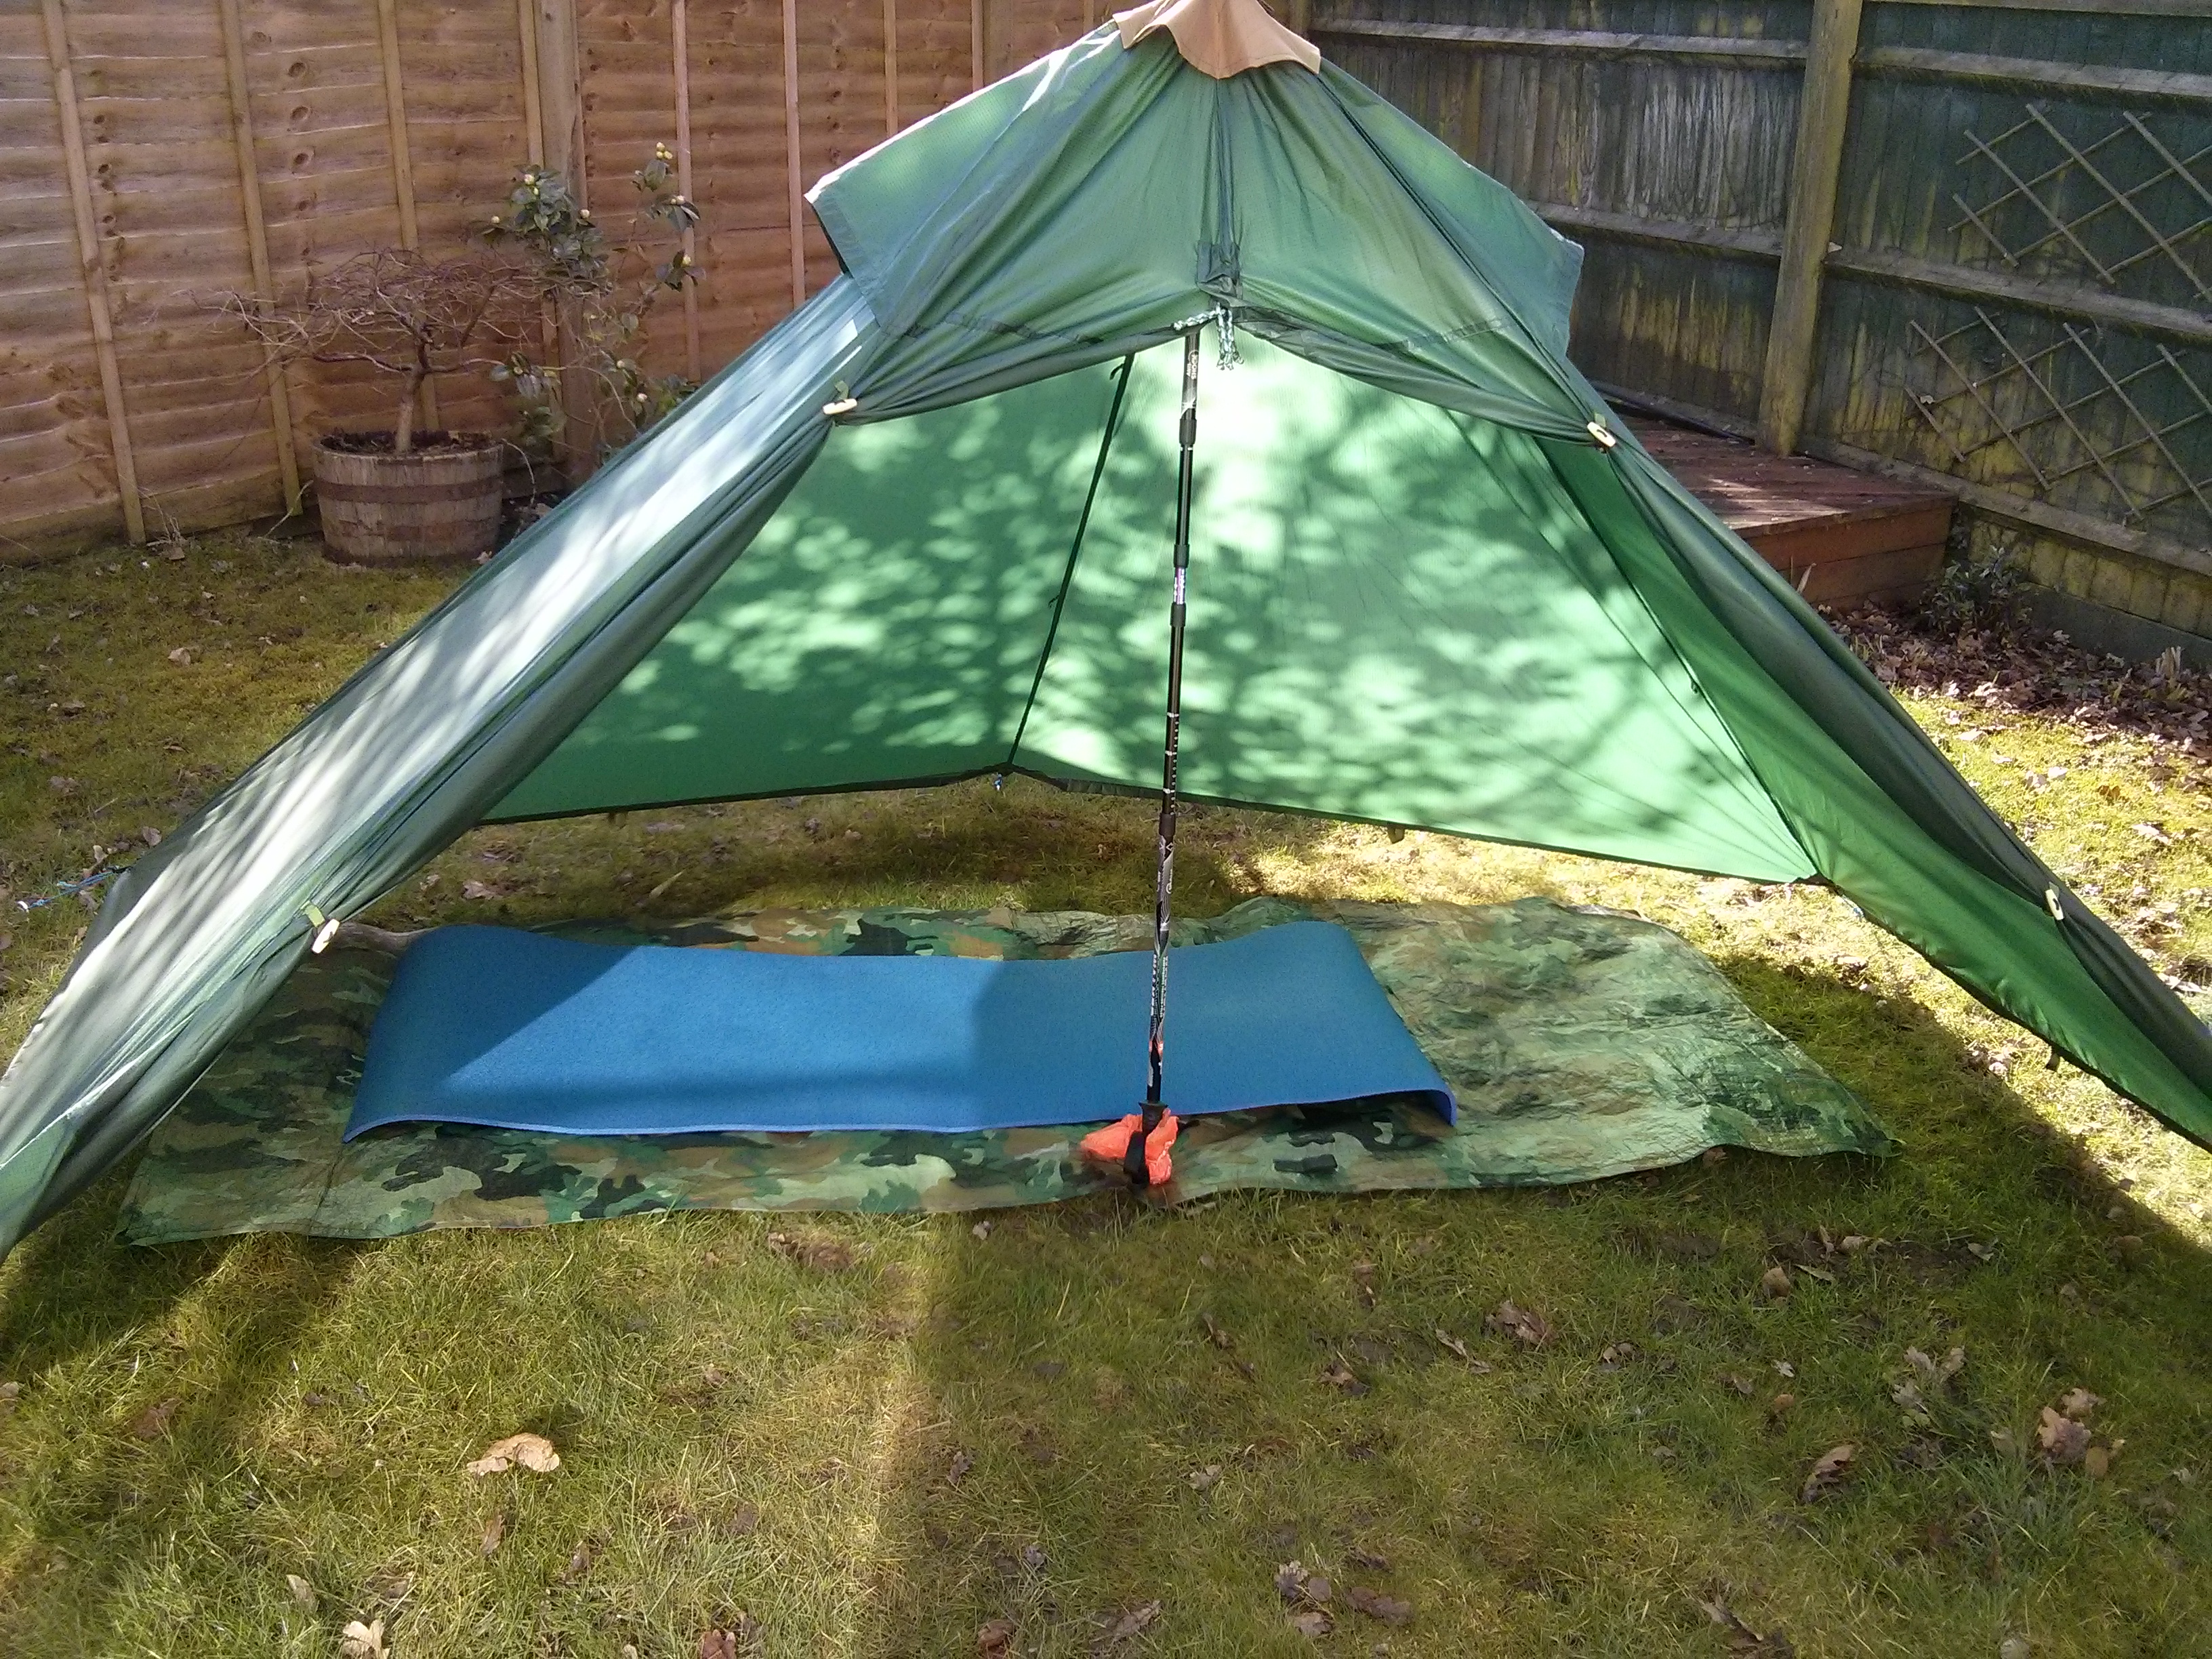
Hey, that's my tent (except I have no floor). I've been using that on many trips and think it works really good.
I only have cat curves on 3 ridges. The 2 ridges next to the door/beak area don't need to be cat curve. But not that big a deal so I guess it doesn't matter. You definitely want cat on zipper.
I don't see what's wrong with "faux felled". Easier. Do a third row of stictches to get extra stitches and strength.
Is there netting across the door? In fair weather you want door open for good ventilation. One of the door panels is left in place, the other hangs loose. I have velcro strip to hold it open, rolled up. Sometimes I want the right side to open, sometimes the left, depending on which end my head is at, which depends on which way the slope is.
Sorry, all I have is unsolicited advice/comments, can't answer your questions : )
Mar 10, 2015 at 3:27 pm #2181467What's the peak height? I like 60 inches, because then I can sit up on my sleeping bag and maybe my head will just barely touch the inside that can have condensation. With a mid, the sides slope in so the very top isn't really usable. Maybe a 45 inch height would be okay on a tunnel tent.
Mar 10, 2015 at 7:53 pm #2181536Jerry, I recall your "unsolicited advice" was very helpful when I first got my sewing machine too. Thanks for your thoughts.
Your ideas are spot on. I'll have to follow up with a more fleshed out plan soon. I think I put a peak height of 50" in the drawing. I might make myself a mockup with sheets in the living room and try it out. 50" was just based on recollection from browsing Zpacks and MLD.
Also, nothing at all wrong with the faux-felled seam. It hasn't been an issue on my two flat tarps so far. Just figured I'd try something new. I enjoy the process of learning new sewing techniques.
And since there's so little snow this year, I'm hoping it'll be a good tarping summer, so I'm not in too much of a hurry with this project yet. :)
Mar 10, 2015 at 9:38 pm #2181563I second the notion that a "faux felled" seam is plenty strong. Plenty. If you like to try something else just for the joy of it, go to it.
I would suggest you consider a simple rectangular mid for one main reason and a couple subsidiary ones. The main reason – simpler setup. Staking out a simple rectangle is super easy, making it faster to set up, easier to get tight, and better in situations where things are not going well – like it's raining hard and you want shelter about 20 minutes ago.
Secondary reasons are it's easier to pattern and sew, and for just a very small weight increase (do the fabric area calcs and you'll see what I mean) you get the option of fitting two if needed. If you do a net inner, keep it to one half of the rectangle and you have a lovely big vestibule.My vote goes to the inch and a half "catenary" cut on the ridgelines.
Mar 10, 2015 at 10:06 pm #2181573Good point Paul.
5 sided polygon is weird when the 5 points aren't on a level plane, with the base of the center pole on the same plane. But it is possible to figure out.
You're right, small weight savings, a few ounces. More complicated to lay out. I made one version of square pyramid, about three versions of 5 sided pyramid before I was happy.
Now, if you like the challenge, 5 sided is better : )
How long should the center pole be?
Mar 11, 2015 at 11:16 am #2181706This is one I made recently,

Its a squashed hexagon, in the future I will try to keep all the sides the same as it makes it a lot easier.
Apr 7, 2015 at 3:09 pm #2189965I finally got around to making progress on this thing. Ended up going with 6 panels, including a large beak. Cutting took forever (really makes you appreciate the simplicity of a rectangle), so I went with the top-stitched french seams instead of getting fancy. The pics below show it pitched loose for fitting the cone reinforcement. All seemed to be going well. Well just a few minutes later I managed to put two gashes in one of the side panels, by stupidly knocking a 2-lb weight onto it, ugh. Anyways, wanted to share my two steps forward, and whine about the one step back. We'll see how long I lick my wounds before getting to the repair.
 Apr 7, 2015 at 3:15 pm #2189967
looks good
you can glue on patches with silicone:mineral spirits. Maybe sew around perimeter.
test the patch first on scrap to make sure you get the ratio right.
Apr 7, 2015 at 3:50 pm #2189974Jim,
If you still have the shelter up , try lifting the pole height up an inch or two, without moving the stakes.
(just curious to see what it will look like that way)Apr 7, 2015 at 4:47 pm #2189988Concur with Franco on the slight pole lift. May have been that it was taught when you pitched it, then it sagged a little bit with stretch before you took the picture?
Great work though, thanks for sharing!
:-)
Apr 7, 2015 at 6:31 pm #2190027Thanks for the comments. I added some temporary tenacious tape patches to take a photo with a better pitch for you guys (see below).
When I drew up the plans I assumed a 54" pole height (max of my current poles) and 6" vertical gap at the edges (figuring stretch might reduce that a couple inches). Previous photos were a lazy pitch on an uneven part of my lawn. The new ones are better.
In my limited messing around with it so far, a couple thoughts. I should have put small cat curves on the bottom edges to make it pitch more taughtly, but it appears to be mostly cosmetic. Also it's kinda neat the way I can tilt the peak toward the back or the front to choose a balance of weather protection, interior space, and vestibule area.
 Apr 7, 2015 at 7:14 pm #2190038
Cat curves; maybe just the long edges? Might not be too late to fix that if you can be bothered, just unpick the seam, curve, seam again. But yeah, just cosmetic apart from flapping annoyance in wind.
:-)
-
AuthorPosts


- You must be logged in to reply to this topic.
Forum Posting
A Membership is required to post in the forums. Login or become a member to post in the member forums!
Our Community Posts are Moderated
Backpacking Light community posts are moderated and here to foster helpful and positive discussions about lightweight backpacking. Please be mindful of our values and boundaries and review our Community Guidelines prior to posting.
Get the Newsletter
Gear Research & Discovery Tools
- Browse our curated Gear Shop
- See the latest Gear Deals and Sales
- Our Recommendations
- Search for Gear on Sale with the Gear Finder
- Used Gear Swap
- Member Gear Reviews and BPL Gear Review Articles
- Browse by Gear Type or Brand.
