Topic

MYOG Silpoly Solo Tent

  • This topic is empty.
Viewing 16 posts - 1 through 16 (of 16 total)
Sean H BPL Member
PostedFeb 22, 2015 at 3:11 pm

After a few years I decided to have another go at designing and building a solo shelter. My last attempt was a basic A-frame style similar to the original Tarptent, with attached net/floor. It's been weather worthy, reliable and light, but unfortunately I just designed it too small for my height – sitting up was never comfortable. Since that time I'd made a side entry tent to share with my wife, and had long considered making a solo version.

With a kid running around and little free time, I was hoping to try an easier to work with material than silnylon, and chose silpoly from ripstopbytheroll.com. I figured if nothing else the new design would be a good prototype, even if silpoly didn't perform as well as hoped. So far I have yet to rain-test the finished tent, but can attest that the material was a little nicer to work with than silnylon, and doesn't stretch as much as silnylon when wet. I still used silnylon for the floor.

Specs:
Side entry, single-entry tent
Sewn-in bug net and floor
Uses hiking poles, one pole goes inside tent
18 oz (w/ out seam seal or stakes)
Silpoly tarp
Silnylon floor
.7oz noseeum mesh
#5 zipper on tarp
#3 zipper on mesh
5-sided floor – 83" x 25", plus around 8" extension at center of non-entry side
Main tarp overhead area is 105" x 28"
23" vestible, and ~18" extended coverage on side opposite the entry
46" height

Other things:
-The non-entry side of the tarp sits a few inches higher off the ground at the tie out. I wanted to see out that side and have more ventilation
-Floor optionally clips up 4 inches, except on center of the non-entry side which gets 8" high to block wind-blown rain (and makes up for having less coverage from the tarp)
-The side panels are oriented w/ bias strech meeting the overhead panels. It was a real pain stiching the bias against the straight grain of the overhead panels. I took some quality vacations just to get it over with!! If I was more patient, I'd use more pins there. Fortunately, the result is very tight side panels when pitched properly.

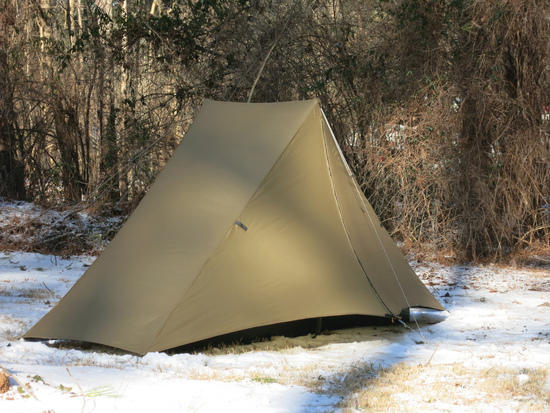
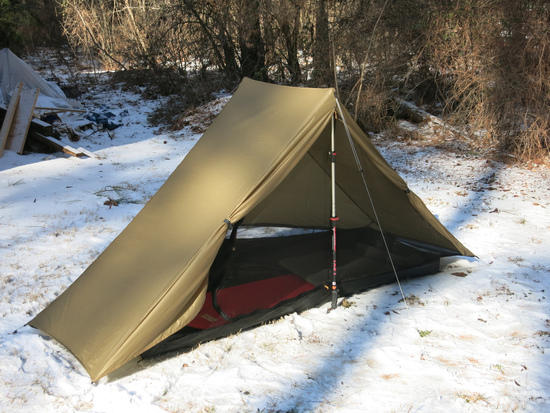
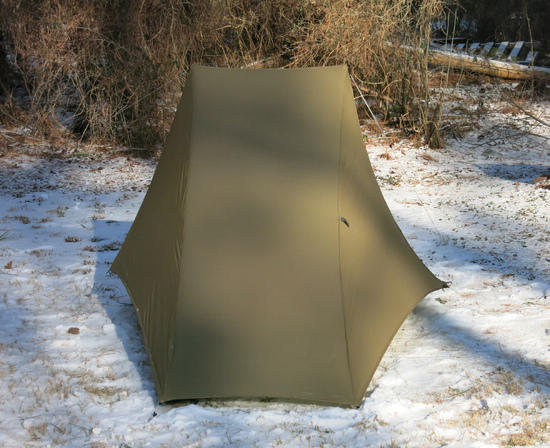
Here's the result:
front

entry closed

open entrance

J-L BPL Member
PostedFeb 22, 2015 at 8:16 pm

Beautiful work. The tent looks like it turned out great and pitches taut. Nice design too

PostedFeb 22, 2015 at 8:32 pm

Very nice.

This is my favorite tent design. Simple, sturdy, warm.

Thanks for the info, photos and specs.

Ben Wortman BPL Member
PostedFeb 23, 2015 at 1:31 pm

I just about finished a tent almost exactly like yours. Mine differs in that it has 2 doors and vestibules and the poles are on the inside. One question I have for you is do you feel it is necessary to sew in a pull out on all 4 corners of the floor to the stake out points on the roof? Right now I am leaning towards not doing it since my trekking poles are on the inside, they keep the middle in place at least. I suppose sewing in pull outs to the floor corners would also prevent any additional stress on the netting that joins the floor to the ceiling if I am camped on a slight incline.

Thoughts?

Thanks
Ben

Sean H BPL Member
PostedFeb 24, 2015 at 8:26 am

I've observed that the mesh stretches without excess stress at each end. You might try going without and decide once you've been able to set it up a couple times. On the other hand, I put floor tie outs on from the beginning, at all 5 corners at ground-level. I use those cord loops as a guide when staking out the tent before putting the poles in place – takes the guesswork out of setup. I also added a bit of shock cord at the floor tie out locations so they have some give. Seems to work well, although I usually still have to fine tune a couple stake locations once the tent is all setup.

Hope to see the finished product, let us know how it goes!

Rob Daly BPL Member
PostedMar 15, 2015 at 8:18 pm

Looks tight. I also think this is one of the best trekking pole designs around. Great job.

John S. BPL Member
PostedMar 15, 2015 at 8:26 pm

Sean, I am betting no spreader since he is guying the peaks out also.

Sean H BPL Member
PostedMar 16, 2015 at 5:26 am

You're right, I guy out at each peak to get tension on the short overhead ridgeline, and it works OK. A spreader pole would have been nice, especially since it would be fairly short and add minimal weight.

Rob Daly BPL Member
PostedMar 17, 2015 at 7:29 am

Daryl, I might have to borrow that idea sometime. I love your ingenuity and save most of your threads, especially on your pack frames.

PostedMar 17, 2015 at 9:23 am

Looks good but did you ever get it seam-sealed?

I made a winter Hammock tarp with doors our of the silpoly 1.0 and never could get it sealed. I just got the replacement silpoly 2.0 yesterday that Kyle(RSBTR)was sending out to us people who used the 1.0. I haven't started on my new tarp yet though.

Sean H BPL Member
PostedMar 18, 2015 at 5:01 pm

Great idea Daryl, will certainly be keeping that in mind for any future version of the tent I make. Thanks for sharing.

Regarding silpoly, I used the Sea-to-Summit "ultra seam-SIL" product and it works well, but only on one side of the fabric.

PostedMar 18, 2015 at 6:10 pm

Thanks Sean. I'm tempted to cut that first tarp up and copy youridea here. I like it.

Guy Bouchard BPL Member
PostedApr 13, 2015 at 6:14 pm

I have not sewn anything since a few years but would really like a tent like this. Any plan to start?

I would like to sew one but don't want to make mistake.

What is the go to material right now?

Viewing 16 posts - 1 through 16 (of 16 total)
Loading...