Topic
Why use heavier fabric on back of pack?
Forum Posting
A Membership is required to post in the forums. Login or become a member to post in the member forums!
Home › Forums › Gear Forums › Make Your Own Gear › Why use heavier fabric on back of pack?
- This topic has 18 replies, 9 voices, and was last updated 5 years, 3 months ago by
 David Chenault.
-
AuthorPosts
-
Oct 27, 2019 at 7:30 pm #3616073
I’m working on a Tyvek prototype of my first myog pack and getting ready to buy fabric for the next iteration.
Why do lots of people use heavier fabric on the back? It doesn’t seem like the highest wear area. That would be the bottom.
Is it to have one less seam? Or is it just to have something sturdier to attach the straps to?
Oct 27, 2019 at 11:20 pm #3616097I use thicker fabric on the bottom due to abrasion when picking up and putting down the pack I use thicker fabric for the back panel as it is the panel which all the load bearing and complicated seam junctions are located on. Makes it more durable. My last pack used cordura for back and bottom and silnylon for the lower stressed panels.
Paul
Oct 28, 2019 at 3:16 pm #3616151@floodcontrol That makes sense, Paul. I’m thinking of maybe taping little reinforcing fabric patches on the backside of the areas where I sew on the shoulder straps, haul loop, etc. That way I can use the same Xpac on the back as everywhere else.
Or just use a heavier Xpac on the back. That would be easier if it’s beefy enough.
Oct 28, 2019 at 5:27 pm #3616172It’s all about experimentation really. Just have a go and see how it works out. You will be making another one in no time anyway lol
Oct 28, 2019 at 6:51 pm #3616176Right, the proof is in the hiking. I do expect to make another one, though at my rate it might not be “In no time”. :)
Oct 28, 2019 at 7:36 pm #3616180Doug,
I use heavier material on the back for better stitch retention. I would also urge you to think really clearly about the direction of forces and what will make the pack stronger-especially around the shoulder strap attachments. I have made the mistake on two packs that I didn’t pay close enough attention to how the seams where folded down for top stitching. Both times I lifted the fully loaded pack to start a week-long trip only to see stitches start to pop. It’s not fun to have to baby a pack. If the shoulder straps are sewn into a seam, they need to be top stitched with the felled part of the seam folded down toward the bottom of the pack. If the seam is folded up, the straps pull the seam apart, if it is folded down, the reinforcement is in line with the force and stronger. It was an unconscious choice when I was top stitching the felled seam- and ruined the pack.
Similarly, think clearly about how load lifter straps are attached and what will happen when they are loaded. In a lot of my packs with just two aluminum stays, there is really nothing opposing the buckle’s force from the pack side. The lifter buckles were pulled forward and started stressing where the alum stays where attached. This sideways force was not thought about by me and the channel for the stay started ripping out. Frames that have a horizontal stay keep these buckles in line with the stays and rest of the pack. Again, I didn’t discover this flaw until the pack was stressed from a “full” load and another week was spent baby a pack and attempted hand stitches in the field.
Anyway making your own stuff lets you look at how the commercial sewers make things with new appreciation.
Scott
Oct 28, 2019 at 9:47 pm #3616220Scott,
Thanks for the heads up. I just looked at some of your forum history—you’ve made a lot of packs, and a lot of different kinds!
I’m going to go the direct and perhaps crude route. Instead of sewing the shoulder straps and such into seams (which does have a neater appearance), I plan to put a piece of reinforcing fabric on the inside and then sewing the straps onto the surface of the main pack parts.
I’ve heard from others here who’ve done this successfully (specifically Paul McLaughlin) and I like the (hopefully) simplicity of construction this allows.
Oct 29, 2019 at 12:21 am #3616258“I plan to put a piece of reinforcing fabric on the inside and then sewing the straps onto the surface of the main pack parts.”
That’s my typical strategy.
Oct 30, 2019 at 12:02 am #3616414First, please note: I don’t use non-woven fabrics for packs because have not been satisfied with their fitness for this purpose.
For the pack bottoms use 6 oz coated nylon that resists abrasion, and add a layer of 30D silnylon inside the pack bottom to increase WP, as the coatings on heavier nylons, including the 6 oz, often do not adhere well. Note that the only gear that rests on the inside of the pack bottom is the sleeping bag, which does not threaten the thin silnylon.
My packs all have suspended mesh back panels, so an inner panel must be added to keep water out. Use silnylon for that, and because there can be more abrasion from the contents further up the inside of the pack, use 70D silnylon further up the inner back panel .
The rest of the pack outer fabric is a problem. Have been using a 3 oz coated double ripstop nylon bought from Rockywoods, but am just about out of it. The double ripstop adds greatly to abrasion resistance. Unfortunately, they no longer have it, unless you want black, which I don’t. Only make one pack at a time, and replace it when it wears out, so maybe in a few years there will be comparable fabric on the market when it’s time for yet another pack. RBTR often adds new fabrics, so check their site regularly.
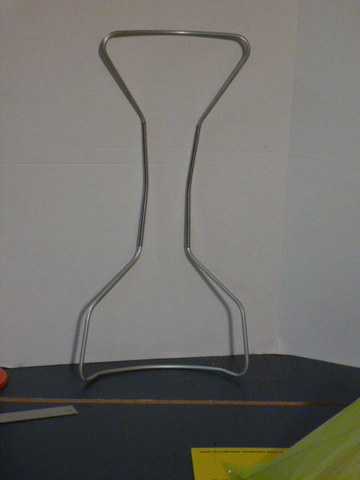
My packs have inner frames, but they are very light. The current project has a frame made of Easton tent pole tube, .340″ in diameter, prebent with the help of Roger Caffin to make a frame with a butterfly, or hourglass shape. Here is a photo of a such a frame used on a Bean’s pack:

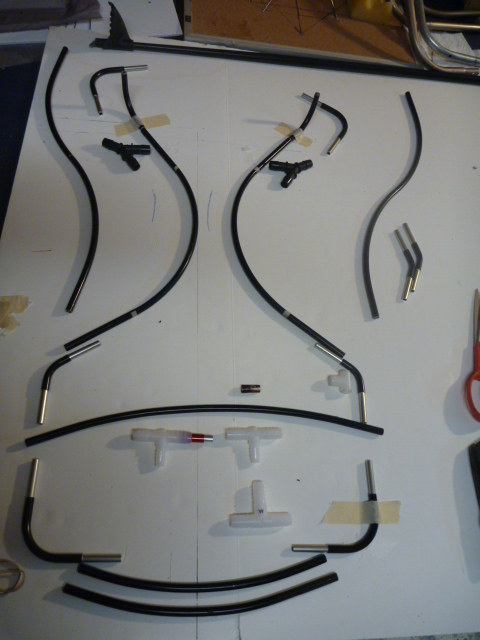
Here is another photo of parts of a butterfly frame laid out:
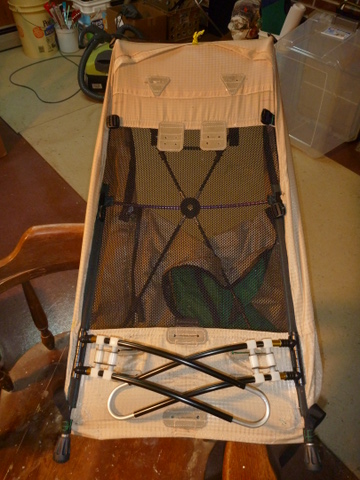
And here is a photo of a the backside of a previous prototype with the straps removed. Plan to rebuild this pack to take the butterfly frame:
Also integrated on both the old and new frame are carbon fiber cross bars that hold the shoulder and lift straps in place. The webbing from the straps runs through the pack to connect to the cross bars. Reinforcement patches are sewn on the pack with slits to accept the webbing. The patches are small, so thin leather can be used for them without adding much weight. So most of the pulling force from the straps is directed to the cross bars. Not shown are double pull ladderlock buckles that are connected to the cross bars on one side of the buckles, and snug right up to the back of the pack. The other side of the buckles accepts the webbing from the pack and lift straps, and is adjusted as needed.
In line with Scott’s cautions, the outside of the top of the pack is reinforced at points most subject to abrasion, like the top sides of the pack, as is the inside at points where the inner frame rubs against the fabric. Without this inner reinforcement, the inner fabric coating would rub off, and the WP would be lost.
Expect this approach will yield a total weight under 2 lbs, but not sure by how much until the whole thing is put together. Hope that this approach will be of some interest.
Oct 30, 2019 at 6:05 am #3616472Daryl—Thanks.
Sam—Woah, that’s some complex design going on there! When you have it done, please show us what it’s like.
As far as fabrics for my final design, I’m planning on using Xpac V15 for most of it and maybe VX42 on the bottom.
Oct 30, 2019 at 9:56 am #3616486Xpac V15 for most of it and maybe VX42 on the bottom.
Been there, done that, very happy, got many years of service, and still going strong.
With the side benefit that the pack can be made seriously waterproof.Cheers
Oct 30, 2019 at 7:54 pm #3616552Roger—That’s good to hear, thanks!
Nov 1, 2019 at 4:26 am #3616843“Sam—Woah, that’s some complex design going on there! When you have it done, please show us what it’s like.”
The basic pack is not complex, much less so than the LL Bean AT-55 (frame pictured above). It is just a drop panel front loading pack with a butterfly frame. What may seem complicated are the sidearms; however, they remove virtually all of the weight from the back and place it on the hips, and do not require a front hip belt buckle that presses against the tummy: so are worth a bit of complexity for those who want to save their backs and would like more comfort than a conventional hip belt can ever provide. The suspended mesh back panel protects the back, not to mention providing ventilation. Osprey packs have had that last feature for years.
Yes, certainly will post a thread when the modifications are done, which will take a while.
Nov 1, 2019 at 5:36 pm #3616889Apologies for the thread drift…
@scfhome – Sam, I’m interested in that frame with sidearms you’re working on. Could you provide some additional info on that? Specifically, any details on how it stays in position when in use, and what packs have used this system in the past. Thank you!Nov 2, 2019 at 5:41 am #3616949Erik,
I do not want to burgle this thread, but will post at length when the project is done.
All my packs using this system in the past have been MYOG, from scratch or modified. Surprisingly, most of the earlier models were very stable, but on a later one the top swayed too freely when rotating with the hips while walking; and while held in place by the shoulder and lift straps, felt top heavy. Besides just not having the pack extend too far up behind the head, a likely explanation is that the vertical center of gravity on the later pack was too low, so the point where the sidearms connect to the pack must be moved further up from the bottom, maybe about 1/3 of the way up the back panel. Installing side pockets for water bottles low on the side panels should also help with this. Think of a well-balanced airplane propeller.Aside from that, there has been no slipping either sideways or downwards with any of the models. The earlier packs were much more stable than a conventional hip belt pack I made in 2007 and I regret not following up sooner with the sidearm types. The only marketed packs like this AFAIK were from Stephenson’s Warmlite, but they advised were discontinued due to parts procurement issues with Easton. Those packs did not have the ability to adjust the sidearms so they would cinch and hold firmly around and just above the hips; hence, they also had front buckles to keep the hip belt adequately tight if needed. I walked behind a guy with one going up into the CO San Juan’s near ‘the window’ or El Rincon, and he could not lean the slightest bit forward without the pack slipping down. Looked very uncomfortable.
There have been a number of packs with sidearms, beginning with Jansport’s and a lot of spin-offs; but they all put the pack weight too far back, pulled backward on the shoulder straps, and made the wearer lean too far forward for balance.
Nov 9, 2019 at 5:58 am #3617870With enough judiciuos reinforcement i suppose i could use just about any fabric on the part of the pack that us agsinst my back, but i prefer a textured fabric, as i find that helps the pack stay put. So i like light cordura.
Nov 10, 2019 at 5:16 pm #3618033@paul-1 Paul, Good point about the texture against your back. My plans to use Xpac are slippery, so I’ll have to think more about that aspect.
Nov 11, 2019 at 11:16 pm #3618228I Really like 3d mesh for lumbar, shoulder straps etc very nice for contact points. Only reason I dont use it on back panel is because I use a foam mat as my padding. Does double duty as insulation to go under my dog. :) I did test a Chevron 3d mesh design for back pad and it aided ventilation nicely. The 3d mesh was stitched over strips of 5mm dense foam as a former. Worked well but used a LOT of thread.
Nov 12, 2019 at 4:47 pm #3618339Lots of good advice in this thread.
-
AuthorPosts
- You must be logged in to reply to this topic.
Forum Posting
A Membership is required to post in the forums. Login or become a member to post in the member forums!
LAST CALL (Sale Ends Feb 24) - Hyperlite Mountain Gear's Biggest Sale of the Year.
All DCF shelters, packs, premium quilts, and accessories are on sale.
Our Community Posts are Moderated
Backpacking Light community posts are moderated and here to foster helpful and positive discussions about lightweight backpacking. Please be mindful of our values and boundaries and review our Community Guidelines prior to posting.
Get the Newsletter
Gear Research & Discovery Tools
- Browse our curated Gear Shop
- See the latest Gear Deals and Sales
- Our Recommendations
- Search for Gear on Sale with the Gear Finder
- Used Gear Swap
- Member Gear Reviews and BPL Gear Review Articles
- Browse by Gear Type or Brand.
