Topic
Testing Cuben Fiber (D.C.F.) Tarp Tieouts
Forum Posting
A Membership is required to post in the forums. Login or become a member to post in the member forums!
Home › Forums › Gear Forums › Make Your Own Gear › Testing Cuben Fiber (D.C.F.) Tarp Tieouts
- This topic has 15 replies, 7 voices, and was last updated 4 years, 9 months ago by
 Brook / MtGL.
-
AuthorPosts
-
Apr 28, 2020 at 1:00 pm #3643678
I wrote an article many years ago about testing cuben fiber tieouts, and just made a video version of it that I thought would be of interest to the MYOG community.
Hoping that either someone can continue or expand on this testing or use it in a helpful way. Enjoy.
Apr 28, 2020 at 1:16 pm #3643685Be interesting to see results with larger reinforcement pieces or different shaped pieces (square, triangle, semi circle). I have seen sail makers use each of these and sometimes combinations with layers.
Apr 28, 2020 at 5:00 pm #3643758Anyone know where to find the magic decoder ring to make sense of their ever cryptic model numbers?
A web search didn’t turn anything up, nor did going to Dyneema’s site. Dutch and RSBTR both sell it, but neither explain it.
Thanks for the vid, Steve!
Apr 28, 2020 at 8:55 pm #3643841I am a complete and total ultralight backpacking nerd
Apr 29, 2020 at 6:56 am #3643883At one point, Cubic Tech had sent me a sample pack, with a small square of each version they made and a chart explaining all the numbers of fabrics. I have no clue where it is now, but someone might have it handy as I am sure I wasn’t the only one who had it.
They may have also changed the names after they sold the business…IMSMC the stuff in the video is the standard 0.8 oz/sqyd.
Apr 29, 2020 at 7:34 am #3643889Thanks for posting, Steve.
Things to consider (and please discuss!) regarding these tie-out tests:
– Adhesive promoters. There was a thread on hammock f. discussing the increased benefits of using 3m 94primer with a couple different versions of VHB transfer tape.
– Other various tapes to possibly use. I have seen mention of 3m 9485, 9482, 9462, 9472?, etc.
– What is this mystery quest tape? lol I think i have a couple yards of their mylar tape but never used it as I do not truly know how well it works.
– Failure of the tie-out versus failure of the material. (I think this was already mentioned in the video). For example, Hysol forms the best most permanent bond, but is much more difficult to apply. The least permanent bond may also work well enough and be easier to apply.
One of these days I’ll try to put together a bunch tests for seam strengths as another member did not too long ago. I currently have the standard .5, .8, 1.0, and 1.43 to work with and will do various tests with sewing versus bonding and combinations.
Cheers
Apr 29, 2020 at 10:23 am #3643942– Adhesive promoters. There was a thread on hammock f. discussing the increased benefits of using 3m 94primer with a couple different versions of VHB transfer tape.
I was aware of some of these, but never use them. I did however prep the surface with alcohol. And always applied pressure (heavy weights) for around 24 hours. Nothing documented specifically, but the thinner you can get the bond, typically, the better.
– Other various tapes to possibly use. I have seen mention of 3m 9485, 9482, 9462, 9472?, etc.
There must be others, and new versions of the tapes and adhesives. There was a 20% difference in strength between the 5 I tested.
– What is this mystery quest tape? lol I think i have a couple yards of their mylar tape but never used it as I do not truly know how well it works.
Good question…they had it available at the time. lol…
– Failure of the tie-out versus failure of the material. (I think this was already mentioned in the video). For example, Hysol forms the best most permanent bond, but is much more difficult to apply. The least permanent bond may also work well enough and be easier to apply.
A key observation. The parent material is the limiting factor in these tests. A larger reinforcement path would certainly work better, as would a stronger parent material. What would be helpful, would be identifying the required strength of the joint and then designing to meet it. So the next question is, what type of loads are seen on a typical tarp tie-out during XX mph winds. Who wants to put a force gauge on their tarp guylines to correlate wind velocity to guyline stress…sounds like a great article for BPL…Roger Caffin perhaps? :)
Apr 29, 2020 at 2:36 pm #3644041Last month, Ryan measured loads close to 40 lbs on a tent side panel.
ExtremeTextil lists tear strengths. They have CT2E.08 (0.8osy) and CT2K.18 (1.0 osy) both good for ~100 lb/in. CT1E.08 (0.51osy) is rated to 63 lb/in.
In retrospect, do you think your samples would have sustained higher loads if the box stitch was farther from the edge of the patch?
Apr 29, 2020 at 5:13 pm #3644093In retrospect, do you think your samples would have sustained higher loads if the box stitch was farther from the edge of the patch?
In my opinion, no. My experience tells me that it is important that the box stitch goes through the edge of the tarp where it is folded a few times to give it some “meat” to hold onto. As a matter of fact, the box stitch should be as far away from the mating edge of the reinforcement patch to the parent material as much as possible, in order to reduce the peel force – and that position, will always be on the edge of the tarp, where it is folded.
May 3, 2020 at 1:32 pm #3644888Steve, your video mention a possible reason for the stitching failure on the sample using the quest tape and you said it could be due to the tape thickness. So how many times should the hem be folded for stitching through?
May 4, 2020 at 7:28 pm #3645157I had mentioned the thickness of the tape, because generally you want bondlines to be thin to stop it from imposing any loads on the joint other than shear. You will notice that bond strength is high in shear and much lower in peel. In the case of the tape, we are talking about maybe 1/16″ but this is many times thicker than the hysol adhesive, for example.
If you are referring to the hem edge of the tarp, I think that will have much less of an impact than the actual reinforcement path. I think I usually do a few times, can’t recall counting. If you sew the grosgrain, like mine, right through the hem, than I imagine the more times you fold it the better.
May 5, 2020 at 5:53 am #3645187Thanks. I will bar-tack through the folded hem. I think I’ll make the tieouts from folded dcf and just bond them to the main body of the tarp though.
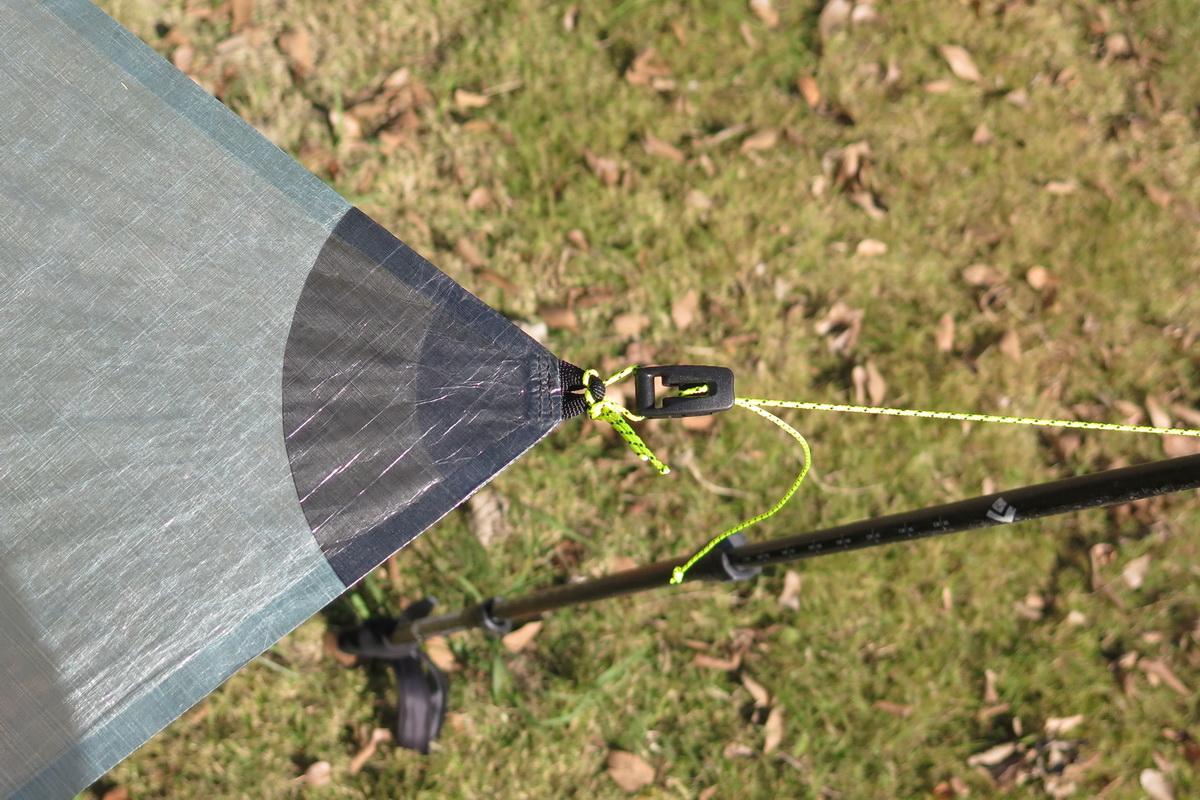
May 6, 2020 at 8:56 pm #3645554Hi, Steven, I carefully read your article many years ago the time when you had it on your website. After so many years I now had the opportunity to say thank you for sharing. :-) As I am now more into this field, lots are to be said about the tieout design specifically with DCF. I share a picture with the community what I did now:

A few words on this tie-out system:
- Double progressively-sized radial DCF bonded reinforcements
- Safe and elegant load transfer from the “folded over” webbing to a detachable line
- Highly efficient “minimally invasive sewing” technique
Enjoy!
May 7, 2020 at 5:26 am #3645594Brook,
I’ve also used progressively sized radial reinforcements for cuben however I had the smaller reinforcement closer to 3/4 rather than 1/2 sized as your shows. I do not know which is better or for what reasons. Have you tried different variations of the this?
You have the smaller radial patch between the base fabric and under the larger radial patch, correct?
I decided for my latest project to simply use a heavier single radial patch of 2.92 like it seems other cottage manufacturers use. Not saying it works better but it certainly is less laborious. (time costs money in production setting…)
May 7, 2020 at 1:06 pm #3645642The two factors to look at are edge length (where one material terminates on top of the other), and relative strength of the two materials. You have to start at the guy attachment.
Say your tarp is 0.5osy DCF (63 lb/in), your patch is 0.8osy DCF (100lb/in), and your cord is good for 200lbs. You would need to attach the guy loop across a seam (200/(100 + 63)=) 1.23″ long (5/8″ grosgrain w/ the ends side by side will let you do this). Then the edge of the patch against the base material would need to be (200/63=) 3.17″ long. For a circular patch in a 90 degree corner, it would have a radius of (2*3.17/pi=) 2.02″.
This works in a perfect world, but in the messy, real world with uneven loading, you have to apply a multiplier – 2 is good, giving you a patch radius of 4″.
Two take ways:
– heavier patch material wants a larger radius to reach full strength
– double layers of the same material wants double the edge length (as Brook did)
May 8, 2020 at 12:14 am #3645727Hi Eric,
- The larger radial patch is on one side of the base fabric
- My smaller radial path is on the other side of the base fabric
- The webbing is sandwiched in between.
The first line of thread is along the edges of the corner and hidden (inside out sewing). Two additional lines of stitches that you can see in the pic give more strength.
Yes. this is quite laborious and means more time and $. But I feel I cannot resist the beauty when everything is done. :-)
To my understanding, the stitches that connects the webbing to the fabric should expand as less as possible into the reinforcement area. The more they goes into the reinforcement area, the less of it that really functions. That’s what I mean by “minimally invasive sewing”.
For most cottages, they use 50D DCF for the reinforce patch. I think it’s just comparatively simplified. Compared with the 50D polyester, Dyneema threads are more weight efficient to contribute more tear strength to the tie out. That means, I can perhaps use larger/more patches in 1.0OZ DCF that weight less than a 50D DCF patch, but with equal more even more strong tieout.
-
AuthorPosts
- You must be logged in to reply to this topic.
Forum Posting
A Membership is required to post in the forums. Login or become a member to post in the member forums!
HAPPENING RIGHT NOW (February 11-21, 2025) - Shop Hyperlite Mountain Gear's Biggest Sale of the Year:

Our Community Posts are Moderated
Backpacking Light community posts are moderated and here to foster helpful and positive discussions about lightweight backpacking. Please be mindful of our values and boundaries and review our Community Guidelines prior to posting.
Get the Newsletter
Gear Research & Discovery Tools
- Browse our curated Gear Shop
- See the latest Gear Deals and Sales
- Our Recommendations
- Search for Gear on Sale with the Gear Finder
- Used Gear Swap
- Member Gear Reviews and BPL Gear Review Articles
- Browse by Gear Type or Brand.
