Topic
Tent for snow camping?
Forum Posting
A Membership is required to post in the forums. Login or become a member to post in the member forums!
Home › Forums › Gear Forums › Gear (General) › Tent for snow camping?
- This topic has 84 replies, 21 voices, and was last updated 5 years, 2 months ago by
 Roger Caffin.
-
AuthorPosts
-
Nov 8, 2019 at 5:11 pm #3617793
I’ll include a few pics of my Hillies in tough conditions—
 The Hilleberg Staika is very stable in high winds mainly because it has 6 guylines with 12 tent attachment points and uses beefy guyout tabs sewn onto the tent fly. The bottom perimeter has loops for 6 stakes. In a big blow atop 5,500 foot Haw Knob in TN it got walloped with 60+mph gusts and deformed a bit but the guyouts kept it from bending flat.
 The Keron 3 on the other hand has a bit more “Swaying” but still has 12 stake out points (and 6 side guylines with 12 attachment points)—and also has 6 bottom perimeter peg loops. I’ve set up this beast in terrible winds and striked it in terrible winds and sure—with careful planning and procedures you can stay very low to the ground while inserting or removing poles etc.
Storms can be rough in any tent—talking about high wind mainly along with extreme cold and spindrift etc—but one of the challenges where I live is packing up an “ice-varnished” tent into its now too-small stuff sack when striking camp in the morning. Ice varnish meaning the sheen of ice on the fly cannot be removed. The solution is to roll up the whole wad minus poles in a ground cloth and strap it on the pack—and get the heck out of Dodge . . . or is it Sphincterville??

When the tent’s a wad of ice—wrap it big and keep moving.
Nov 8, 2019 at 7:56 pm #3617814When the tent’s a wad of ice — wrap it big
I found that the silnylon fabric I use does not hold too much ice. The regular treatments with silicone spray help it there. It was getting the 20 mm thick ice off the guy ropes one time which proved difficult :)The double guy ropes on the Keron are good.
Cheers
Nov 8, 2019 at 9:16 pm #3617827I’m getting ready to re-coat the Keron’s kerlon tunnel fly with Nikwax waterproofing spray—on the advice of Hilleberg—and so maybe I can prolong the life of the aging fly—as I don’t have an extra $1,000 sitting around for a new tent. It’s faded and UV damaged which means the fly fibers are actually holding water so when it freezes it creates the Varnish effect.
Is Nikwax any good? We’ll see by Christmas.
Nov 8, 2019 at 11:31 pm #3617836A caution here. What material is your tent made from?
If it is DWR-treated nylon, then Nikwax for tents should be OK. I am not sure whether any tents have been made with such fabric for a long time.But if it is a silicone-coated fabric, I doubt the the Nikwax will do anything for it. The wax ‘stuff’ in it will not (to the best of my knowledge) bond to the silicone coating. In fact, the only stuff which has any chance of bonding to a silicone-coated fabric is … more silicone. But the surface needs to be clean (as with most treatments).
If it is a PU-coated fabric, then ‘that depends’. If the PU coating is on the inside with plain fabric on the outside, then Nikwax may bond. If the PU coating is on the outside … dunno. Probably it won’t bond. Not sure what to recommend there.
EDIT: Double Caution! We know that fluorocarbon DWR and silicone are totally INcompatible. Do not ever try putting one over the other: it trashes the surface so that it can not be successfully treated by either in the future. Is Nikwax compatible with your tent fabric?
Cheers
Nov 9, 2019 at 12:03 am #3617840My initial thought was to grab a tube of McNett’s Silnet sealer and run a “roof” coat over the highest/flattest part of the tunnel fly—where water tends to settle on occasion.
And Silnet sticks to H’s silicone Kerlon fabric like magic. Just need to run a wide long thin swath from end to end.
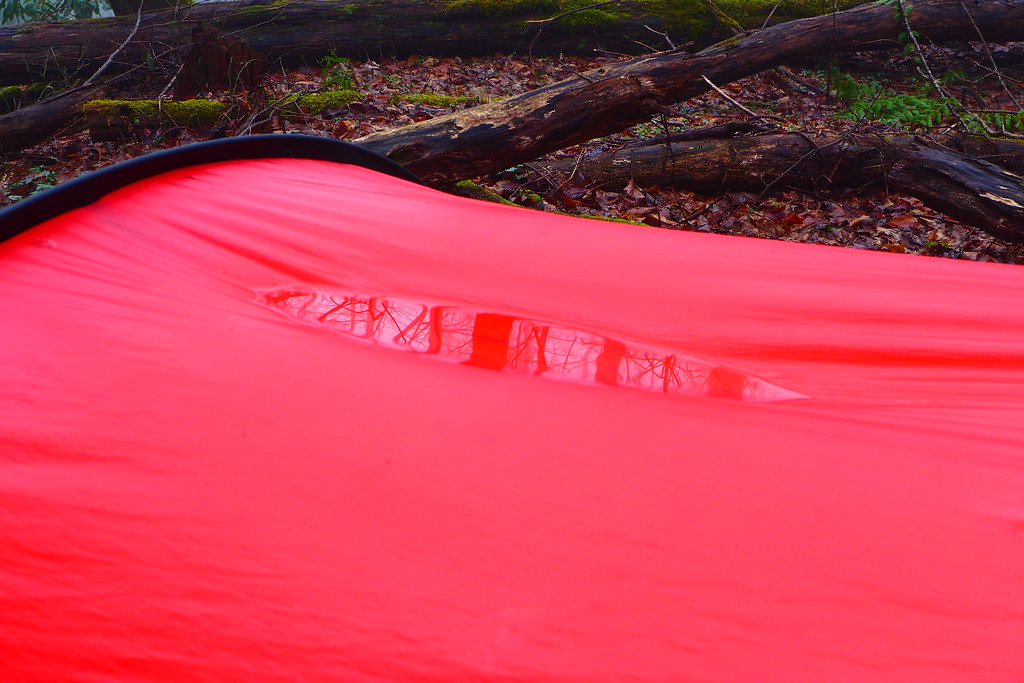
Example of occasional tunnel puddle—and not fixed by any tensioning adjustments—
 Nov 9, 2019 at 12:28 am #3617844
Hi Tipi
You might be able to fix that puddle by attaching end guy ropes near the top of the pole sleeve. They can put direct tension on the top fabric.

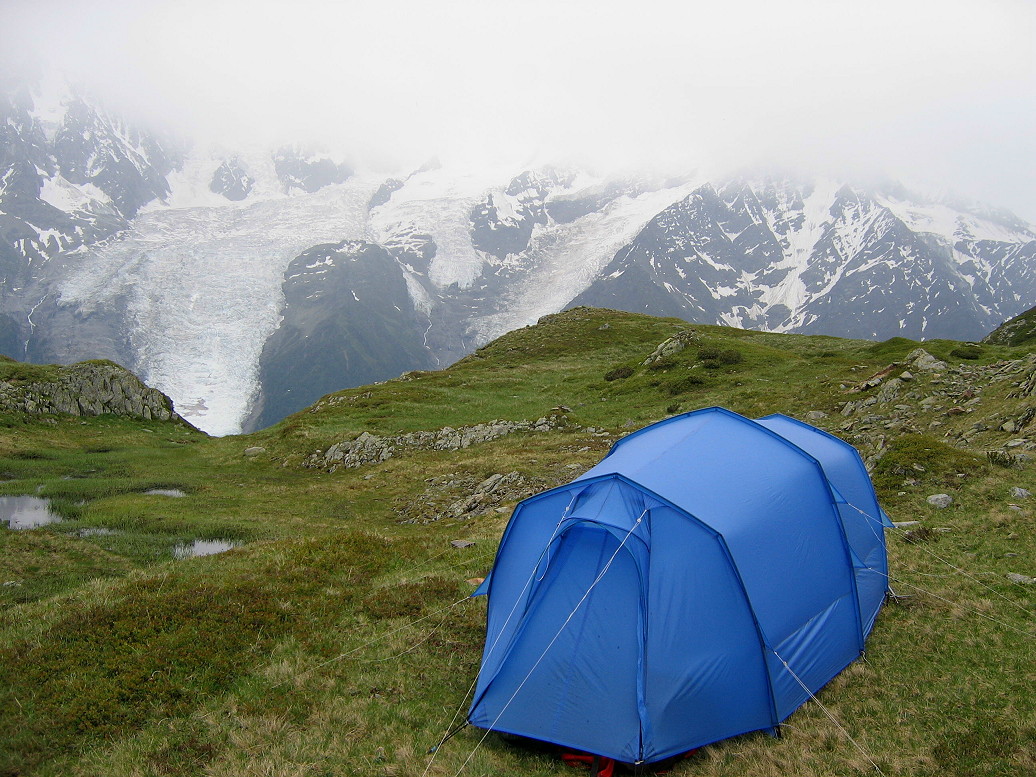
(On the side of Le Brevent, opposite Mt Blanc, in wind)I would be inclined to suggest a silicone spray (eg Atsko) first, rather than going to SilNet. Pitch, spray, leave for several hours for the silicone spray to bond to the silicone coating. That is what I do.
Cheers
Nov 9, 2019 at 12:54 am #3617846Tipi
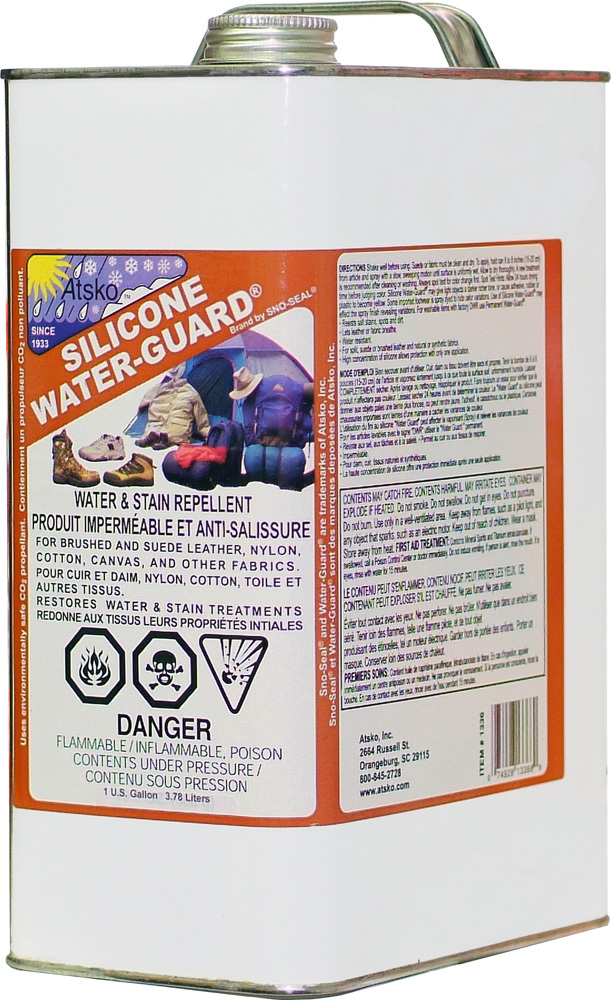
Given that the fabric on your tents is silnylon , I suggest you look at the Atsko waterproofing range.
For a light job the spray but since you are prepared to use SilNet , get the liquid version :
http://www.atsko.com/silicone-water-guard-1-gallon/
It is already highly diluted, ready to be applied. You will have plenty left to do the other tents too.
Nov 9, 2019 at 5:49 am #3617869On a side issue, should mention that Hilleberg coatings are silicone: https://hilleberg.com/eng/about-our-tents/materials-uncompromising-quality/
But yes, there are different silicone treatments. As noted recently, the 20D “silnylon” from Extrem Textil looks nothing like the silnylon we are used to from Quest & other suppliers. But it is still very slippery. Perhaps not so much for Hilleberg’s ‘Kerlon.’
Matt’s profession and comments about crossed poles gave me some deja vu about past discussions with Roger on BPL about this issue. Looking at the photos of the Hilleberg Tarra near the end of page 2 of this thread, it appears there are sleeves at several points that hold the poles in place until they reach a crossing point. This is on the lower sides of the tent, so that when the tent canopy is staked taut, it’s hard to see how there can be much movement of the poles at the crossing points. The same logic Roger uses to show how the tent canopy stabilizes tunnel poles applies here also, just in a different context.
The design I’m working on has similar sleeves to hold the poles in place until they reach crossings, but not from the ground up like the Tarra; rather from the two peaks down to the pole crossings on each side of the tent. Since the tent wall will be held taut by double extensions, much like the front of Roger’s tunnels, it’s again hard to see much opportunity for movement, albeit there should be a little bit of that in a tension structure. Will post a photo here just to show where the poles cross:

This was just a prototype model, but imagine pole sleeves coming from elbows at the peaks and holding the poles in place until the crossing point is reached. When end covers that also function as vestibule walls are added to the left and right, and staked down like those on Roger’s and Warmlite’s tunnels (4 stakes total), it’s hard to see much opportunity for excessive movement at the pole crossings, as both the tent structure and the sleeves should hold them in place where they cross. Especially if the inner sides of the sleeves are sewn together and reinforced at the crossing points. And note also that there will be a fly stretched over the poles, further securing the structure. Of course the sleeves could cover the whole length of the poles, but in a blow, the tent should be pitchable as quickly as possible. Also thought about adding pole clips just below the crossing points, Not sure it’s necessary, but could do that as well.
The poles in the full scale model above, even with the elbows arching the poles in a gothic shape, even with the mutual bracing occasioned by two pole crossings, and even with the tension of the taut fabric canopy, are still 13 feet long each, otherwise unsupported, and as Roger points out, more subject to distortions from high winds than shorter poles in a tunnel design. That is where a couple guylines out from each of the two pole crossing points become essential.
There is a point, however, in designing to limit the number of guylines required. In conditions described and pictured by Tipi and Roger, numerous guylines require numerous stakes, and sturdy ones if they are to hold in high winds. At some point, the pole weight becomes less important to the BPL ethos than total stake weight, defeating the purpose of designing light. Suggest that the more inherent the stability in the structure, the less number of heavy stakes will be required, and that it makes sense to design with that in mind.
Nov 9, 2019 at 7:07 am #3617878I was talking to the local tech rep for Wacker about silicone polymers some years ago – they are a major mfr of them. When I asked how many different versions there are, he laughed. He said it was (either >1,000 or >10,000 but I can’t remember which).
Now, crossing poles. Yes, the sleeves on the Tarra dome will partly constrain the movement of the poles – but they can not prevent some movement. You only need a 1/2″ of movement for the fabric to go slack, leading downwards to pole buckling. Have a look at my pic of my blue tunnel above, and note just how taut the entire fabric is. (There was ‘some wind’ that night.) The poles are really constrained by the fabric. The end poles have single guy ropes because the fabric of the end bells applies extra restraint; the middle pole gets double guys because it lacks that extra restraint. In bad weather the inside of the tent also has a ‘storm guy’ running across between the upper guy rope anchors.
Sam’s yellow prototype is interesting. Assuming that the poles are all sleeved (!), that structure looks rather stable. You would of course need end bells to help support it. The one extra thing the design will need are internal storm guys, to prevent snow loading from pressing down on the peak and deforming it. Mind you, the pointed ridge should shed a lot of any snow (or rain) very well. This design has possibilities. Can you continue it Sam?
Are the longer poles in this design ‘really bad’? I am not so sure about that (imho). In some ways the elbows at the peak and the tight fabric there act to halve the ‘exposed’ length of pole. I can see some interesting problems in threading the poles into the sleeves, but that is another matter, albeit not entirely separate. Narrow external sleeves are a definite possibility here: That’s what I use.
Could you run this design without pole sleeves? Um – not sure I would want to. How about half-length sleeves? Hum … If the poles were relatively unsleeved or even half-sleeved, it would be crucial to have some tight constraint at the crossings between the two poles and the fabric. Without that coupling the poles would go everywhere in a storm. But it does have some possibilities.
The weight of stakes – yes, a serious matter. Ti wires are sufficient when you are not on snow (or sand), provided the ground has some coherence. I find alpine soils – well, grasses really, to be quite adequate for Ti wires. They are what is holding the blue tent up in the above photo. I do sometimes use longer (thin) tubes at the end corners.
But snow – there are problems. First, if the snow is at all wet (late afternoon in the sun), it is likely to freeze overnight, and ice bonds really well to the surface of aluminium. Now try getting your snow anchors out early next morning. Bent aluminium is one result. The next problem is when you are trying to get aluminium stakes into frozen boilerplate (ice layers on top of snow) in the evening. Aluminium is just not strong enough to slice into the stuff.
I use sheet titanium for this: see full articles here. The thinner Ti does slice into boilerplate very well, and ice bonds very poorly to titanium surfaces. One stomp (which the Ti can easily take) and the anchors just slide out.
https://backpackinglight.com/caffin_snow_camping/
https://backpackinglight.com/make_your_own_gear_titanium_snow_stakes/
https://backpackinglight.com/myog_ti_snow_stakes_part_2/But it cannot be denied that my bag of Ti snow anchors is a lot heavier than my bag of Ti wires. In (my) defense I will point out that I would prefer to carry the extra 100 – 200 g of hardware for the certainty that they will hold in any storm! Going UL in the snow is a delicate balance between sanity and ‘stupid light’.
Cheers
Nov 9, 2019 at 5:11 pm #3617922Tipi’s picture shows the problem with semicircle designs, though they are perhaps the lightest for the internal volume. The upper part is nearly horizontal and subject to water puddling (as pictured) and snow loading. Rogers Gambrel designed tents provide good shedding in that area with only slight loss of structural stability due to the increased size of the fly fabric. The Gothic arches provide good shedding, also. But this is a strictly static loading viewpoint.
Under any heavy dynamic wind loads, (say around 40mph and above) it is apparent that all tents will deform to some degree. The downwind side tends to billow out and the upwind side tends to press in. This is where the more asymmetric designs start to loose when compared to a symmetrical designed semicircle. The Gothic arch tends to collapse quicker than a similarly designed hoop tent. The Gambrell designs also loose integrity faster than a similarly designed Hoop tent.

In each case peak movement is very important. I highly recommend the addition of an internal or external webbed sleeve approximately 3″/7.5cm, preferably of some non-stretchy material such as DCF. In the case of the Gambrell and Gothic designs, the width will vary. This will add, roughly speaking, about 100% (min) in pole strength under dynamic loading. It really doesn’t matter too much whether it is internal or external, both have pros & cons. Internal volume, strength, weight differences, pole length, etc. Rogers external sleeve design does this but it is not wide enough. External designs also catch a lot more wind but I didn’t consider the effects of off angle stuff. But it appears that the gambrel design supporting a semicircular tent fly would approximate the webbing requirements.

Given that external guy-outs can be present all cases this is ignored. But, since the angle of deflection is generally slight for mid-pole systems (but does vary a bit between the three designs) the increase in loading on any midpoint staking system is very high for any real difference in benefits. Longer angled midpoint guyouts don’t seem to help much with loading against deflection with approximately a 60 degree angle a good compromise. Recommend single stake points to help with that as opposed to the V’ed architecture to a single stake that Roger uses will help stiffen against deflection.
Peak guyots appear to help the most on both the gambrel and gothic architecture where peak deflection is greater. With a simple arc’ed architecture, failure can occur without much actual peak deflection, except downwards. With the gothic architecture, and less arcing against the wind, failure can occur more quickly at the sides. With the Gambrell architecture, the actual upper section will tilt down on the windward side as the side wall deflects inwards and the leeward side bellows out, sort of pivoting at the peak.
Anyway, the overall pole strength will be much improved, even with longer crossed poles.
Nov 9, 2019 at 8:52 pm #3617949The downwind side tends to billow out and the upwind side tends to press in. This is where the more asymmetric designs start to loose when compared to a symmetrical designed semicircle. The Gothic arch tends to collapse quicker than a similarly designed hoop tent. The Gambrell designs also loose integrity faster than a similarly designed Hoop tent.
I don’t think the arguments presented here are valid in all cases as they don’t represent real life.The simple curved arches have the poles under considerable bending stress, which stiffens them when the pole ends are constrained. The drawings of the 2 versions with elbows omit the bending, and that is NOT what is used. To be clear: without any bending the elbow versions could indeed be a bit wobbly, just as a straight pole is.
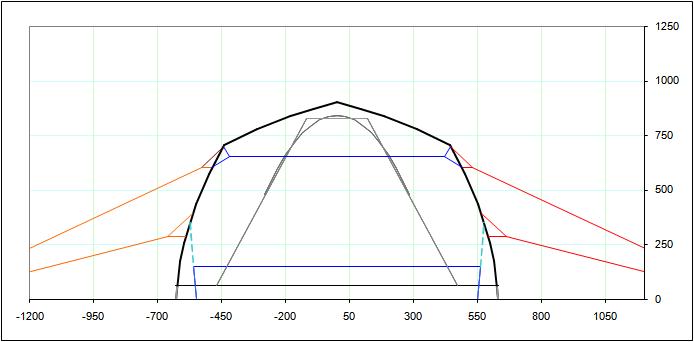
But my designs have the poles under the same bending regime as the simple curve. In fact, you could treat them as being the same as the simple curves as far as both static and dynamic analyses are concerned, as the elbows do not change the analysis. Here is a cross-section of one of my carbon fibre pole tents:

Both the lower pole sections and the upper pole sections have a radius of curvature of 2000 mm by design. This is a significant bending stress which adds a huge amount of strength.The chief difference between carbon fibre pole designs and aluminium tubing pole designs is that the latter can be given a static curvature: the poles in the middle can be ‘pre-curved’. This permits a design with a much tighter curvature in the middle, as you can see here:

Without this pre-curve the sections in the middle would be too highly stressed and could break (been there, done that). Yes, it is a very curious feature of the alloys used that you can put a pre-curve in them without causing them to work-harden and break. The metallurgy is complex.But you can not put a pre-curve into CF tubing. It just ain’t possible. And you can’t make pre-curved CF tubing either. Well, you could, but you would never get the mandrels out from inside. So I use elbows to get the overall shape instead. To be sure, the peak at the ridge-line helps shed rain and snow: a side benefit. The elbows at the sides are there to increase the shoulder space or living space inside.
I have built multiples of all three designs over the years: the smooth curve, the single elbow at the top, and the 3-elbow version. When properly designed with the right curvatures and bending stresses (and guy ropes!), they have all managed to survive severe storms without the distortions JM shows. That’s reality: they work.
Cheers
Nov 10, 2019 at 7:12 am #3618001Roger, re the following:
“You only need a 1/2″ of movement for the fabric to go slack, leading downwards to pole buckling. *** it would be crucial to have some tight constraint at the crossings between the two poles and the fabric. Without that coupling the poles would go everywhere in a storm.”
As with a tunnel, this is partially addressed by two-stake end covers, or bells, that tension the fabric taut over the whole tent.. But at the pole crossing points where the ends of the pole sleeves come together, there will be a reinforcement patch on the fabric wall, and the sleeves will be joined by being partially sewn together where they meet at their lower ends. In other words, where the sleeves meet just above the pole crossings, the two sleeves will become one sleeve, and the sleeve end will be reinforced with a tape loop. So long as the sleeve ends remain tight around the poles, there will be little or no room for pole movement in the sleeve opening just above the pole crossing point.
Please note that if pole buckling become an issue, bomber carbon pole sections from Easton are available from Quest Outfitters, and can be substituted, but with a weight penalty of around 30%..
That’s for the upper half of the tent, where the poles bend with a tighter radius. Because of the nature of parabolic curves, which are created with or without a gothic arch, the pole curvature in the lower half of the tent is almost straight, so decided to leave out pole sleeves below the pole crossings, as they would complicate set-up and not add any significant space inside the tent. However, if they appear needed for stability, the sleeves will either continue over the pole crossings for another foot or so, or the crossing reinforcement patches will the extended slightly downward, and pole clips sewn on in order to stabilize the poles below the crossings.
“The one extra thing the design will need are internal storm guys, to prevent snow loading from pressing down on the peak and deforming it.”
So with less than an ounce weight penalty, decided to add a 3 foot long sleeved ridge pole to deter rain or snow loading at the ridge between the peaks, and keep the ridge taut with the pole slightly bowed upward. Plan to use 1/4″ dia. Omnipotent FG tube sections (but not their heavy ferrules) for this pole, because they are more flexible and 33% lighter than the already very light carbon tubes used for the long poles (0.247 oz/running foot). Found some plastic outer (music wire inner) 14″ knitting needles that bend to tight arcs for the extensions from the ridge poles that will hold up the vent covers and keep the bowed ridge pole from rotating downward.
Please note that even without end covers, or bells, the above pictured prototype came out much more rigid than any other pop-up I’ve used, such as the MSR Hubba, and a couple Bill Moss designs, a tunnel from his Force series, and a Starlet, a double-cross hoop.
“Without this pre-curve the sections in the middle would be too highly stressed and could break.”
With the Gothic arches and the side guys from the pole crossings, this should not be a problem. Also, the upper ends of the poles slide snugly into elbows that are slightly flexible polypropylene and overlap the carbon pole by about an inch, performing a protective function similar to your DIY nock collars.
” … design has possibilities. Can you continue it Sam?”
This depends on health and father time, but certainly intend to. Am close to ironing out all the bugs. The public television “Weekend News Hour” had Graham Nash on tonight. He is back on the road doing concerts, and recommend this show. Pretty sure it can be streamed from the PBS website.
“Narrow external sleeves are a definite possibility here:”
Because the tent is designed to stretch on the bias over the partially dome shaped pole frame, the sleeves must also be cut on the bias (a little bit of fabric waste there), and be sewn to the tent wall with a zig-zag or diamond stitch. But there is a catch: There is no clipped-in inner tent as such. Rather, the end covers or bells are sewn onto a high DWR, breathable solid fabric inner (same shape as the canopy in the above photo) that will deflect rain during the few minutes needed for pitching. A fly is attached over the solid panel (with some overlap), and stretched tightly over the sleeved poles as with most pop-ups. This makes for a tighter inner, but still needs at least 1.5″ wide pole sleeves for adequate spacing between the inner and the fly.
Because the fly is long and narrow, UNLIKE full coverage flies that include the end covers or bells (vestibules), it will be much easier to attach in high winds than the ones in the LOL videos you posted not long ago. Still, the wider pole sleeves may be an issue; but due to the rigidity of the tent, I think they will work OK.
“…my bag of Ti snow anchors is a lot heavier than my bag of Ti wires. … I would prefer to carry the extra 100 – 200 g of hardware for the certainty that they will hold in any storm.”
Agreed. Don’t intend to do any snow camping, but if I did, would use Ti snow stakes like yours, In the meantime, use 3/16″ dia. Ti shepherd hooks that have worked fine. With only a few stakes, sturdier ones are possible without an excessive weight penalty.
I was shocked to hear about the severe fires in Australia on the news tonight. Hope you and your family are keeping safe.
Nov 10, 2019 at 8:09 am #3618003I am intrigued by the possibilities of your design. Most of my posting was meant to address some of James’ comments. I want to see how your design goes.
Fires – yeah. Of course, under the inspired leadership of our most brilliant Prime Minister, things like global climate change are not real in Australia and there are no problems at all. He and his mates are as bad as Trump and Boris: complete mindless idiots.
We have done our best to fire-proof our property and our house. Nothing is perfect, but a damn sight better than some of the houses around here. I used to be a member of the local volunteer bushfire brigade when younger, and that gave me a good education about walls of flame. There are only two things which stop a fire here: it runs out of fuel (having burnt everything), or a heavy bit of rain. Tankers and fire hoses are helpless against flame fronts running at several megawatts per metre (literally).
Cheers
Nov 10, 2019 at 10:39 am #3618005Roger, I ommited the guylines from all the analysis. All will benefit from guylines so it was kind of a moot point. But the angles involved in the overall deflections usually reside in the peaks with any midpoint or 3/4 height guylines. (The simple arced poles are a bit different allowing bending to occur at all stress points.) It would be interesting to put these into an engineering analysis program, like Mathematica, to do an actual 3D vectored analysis of the stresses, but I no longer have access to those programs.
Nov 10, 2019 at 1:55 pm #3618010Roger, I ommited the guylines from all the analysis.
I might have missed this, but what did you use for your analysis, and what did you analyse (I mean, inputs, outputs & assumptions)?
Nov 10, 2019 at 2:53 pm #3618013@tipiwalter – Why don’t you ask Hilleburg what product they would recommend using? I’m sure they would have a suggestion on what to use. My take would be to try the silicone waterproofing spray over the Nixwax (although I think the Nixwax brand now covers multiple styles of treatment).
I’m not to far from Tipi and I’ve had the same nasty phenomenon several times where you get a 1/4 inch sheet of ice over your tent and it doesn’t come off. I have that happen with several tents including Spinniker (sil coated poly), silnylon, and Cuben Fiber. The nastiest camp pack up I had was when I made the mistake of only bringing one set of gloves in the winter, went to bed after a long day hiking in the cold rain, and woke up to a quarter inch of ice on everything with 2″ of snow on top of that. I didn’t want to get my only pair of fleece gloves wet, so I packed up everything in bear hands. I’m not sure my hands have ever been so cold.
Nov 10, 2019 at 4:15 pm #3618023@tipiwalter – Why don’t you ask Hilleburg what product they would recommend using? I’m sure they would have a suggestion on what to use.
Tipi said, “I’m getting ready to re-coat the Keron’s kerlon tunnel fly with Nikwax waterproofing spray—on the advice of Hilleberg…”
Nov 10, 2019 at 4:50 pm #3618027Woops, missed that part. If that’s what they recommended, that’s what I’d use, but it doesn’t strike me as the right product off the cuff to me.
Nov 11, 2019 at 1:41 am #3618089what did you use for your analysis, and what did you analyse
Trying to do a full FEA of a tent surface when half the parameters are not known is ‘difficult’. In fact, unless you pitch the tent exactly right so that its shape is exactly known, the results will be vague, tending towards useless. Have you ever had a dead-flat pitch in the mountains? Does anyone know the coeffs of elasticity for silnylon? I do have some data on the CF poles – from my own measurements.So I built a tent (well, many tents) and very roughly measured the forces in the guy ropes under various conditions. Unlike theory, which requires all sorts of assumptions, experimental work is immediately applicable. (Disclosure: I am a retired physicist specialising in measurement.)
Cheers
Nov 11, 2019 at 1:55 am #3618092Totally agree there, Roger. That was a question for James Marco, though. Was wondering how he derived those pole deflection shapes.
I can’t work out how to quote posts properly, at least on my mobile.
Nov 11, 2019 at 4:47 am #3618112BPL has an icon with quotation marks on the bar above the box in which the posts are typed. Tried it, but it takes an enormous amount of space, so just use the key for quotation marks on my keyboard. Can’t suggest anything about smart phones as I refuse to use one.
Roger,
Thanks for the kind support. It will be a while before the construction begins, and I have your email addresses unless they’ve changed recently. There was once a BPL thread about how folks plan and proceed with MYOG projects. Most said to just dive into it, but I talked about almost obsessive planning. Keep a couple of scale models on the kitchen table, update them from time to time, and sometimes just stare at one of them for long periods, figuring out possibilities. It’s fun to the point of addiction, but hopefully relatively harmless.Hope that sample of the ET 20D reaches you soon. That Andrew (or his folks) was able to resolve some of the issues is cause for hope. Must really get going with the most recent tests I proposed on Andrew’s MYOG thread. If the ET sylnylon will keep from unraveling when cut a little away from the selvage, it will be good news, because a weight of virtually one oz/sq/yd on a 20D nylon, and over 6000mm HH, aged and with a ripstop weave, would be far and away the choice over anything else I’ve seen or even heard about. Plus it is very slippery as well. Tough to sew, but great for repelling snow. Am still concerned about the empty spaces in the weave shown on Stephen Seeber’s micrographs, though.
The Australian P.M. was on C-SPAN tonight, speaking to your legislature. See what you mean. The PBS coverage of the endless California fires has been excellent, and it is astonishing how rapidly a several miles wide wall of fire can move across the landscape in a strong wind. The closest I ever got to this was in Colorado’s Zirkel Wilderness one summer when the fire intervened, and I could not complete a loop as planned. But detoured above timberline and got to the car, and driving south, the prairie was filled with smoke on one side of the highway, and the air was colored an eerie bright red. It was about beetles that attack and kill fir trees in large numbers, but once the fires get going, they can burn right across large grassy areas as well.
Nov 11, 2019 at 5:17 am #3618119astonishing how rapidly a several miles wide wall of fire can move
Fire went past our farm some years ago – maybe 200 metres away on one side. It reached the edge of the plateau, some 200 m above the water, and was facing an estuary some 300 m wide. It leapt straight across the water. Fortunately the Brigades were expecting it.Obsessive? My CNC machine has been running for many years, and running well. How it does it I do not know right now, as the documentation (which I wrote) bears little resemblance to what is happening. signals on the wrong pins … Sigh. Debug – possibly the doco.
Cheers
Nov 11, 2019 at 11:22 am #3618155Cherian, I was an admin for a major university doing research analysis on many different projects. I used to run a few different programs against the actual values collected during my time there before I retired (about 10 years ago,) mostly in an effort to debug or apply various corrections to apparatus/data loggers. The diagrams were just some morphs of the primary structural component, the poles. I got very good at eyeballing a lot of that stuff from all the analysis I did. The diagrams were some quickie drawings of what I expect would happen at pole failure since I no longer have access to the programs.
Looking at them again, They likely exaggerate the billowing effect somewhat…but not real bad, likely close to 20% variance on the vectored angle.
Nov 12, 2019 at 2:58 am #3618260Roger,
CNC machine? That is quite a step beyond your Rolling Jenny.
But automation proceeds with leaps and bounds. As does hacking, involuntary (Cambridge Analytica) and voluntary (F-Book, Gurgle).
When I first saw the Matrix movies, thought they were ridiculous, and walked out of the last sequel.
What would happen if computer controlled automation were neutralized like Sony, many health providers and public agencies have been.
Good luck with that CNC machine. Maybe you will find something that will save us all.
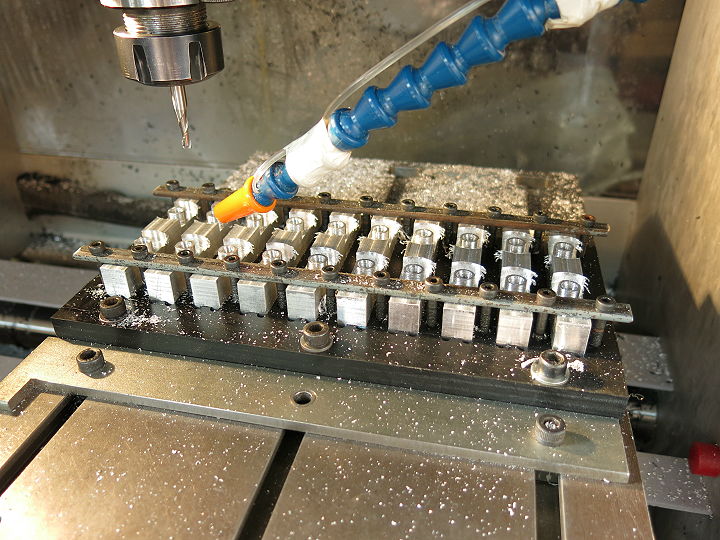
Glad to hear that you are experienced with and on top of the fire situation.Nov 12, 2019 at 3:46 am #3618263Yeah, CNC: a hobby. How do you think I made >100 V1 stoves all the same? No way could I do that on a manual machine. Ditto for V2 & V3 stoves. I did the rebuild after I bought it, and I write (longhand) all the programs. These parts are stove bodies.

I found the problem I mentioned: a wire was clamped by the insulation rather than the metal. Over time whatever metal contact had been was lost. Fix wire, fix machine.
Cheers
-
AuthorPosts
- You must be logged in to reply to this topic.
Forum Posting
A Membership is required to post in the forums. Login or become a member to post in the member forums!
Our Community Posts are Moderated
Backpacking Light community posts are moderated and here to foster helpful and positive discussions about lightweight backpacking. Please be mindful of our values and boundaries and review our Community Guidelines prior to posting.
Get the Newsletter
Gear Research & Discovery Tools
- Browse our curated Gear Shop
- See the latest Gear Deals and Sales
- Our Recommendations
- Search for Gear on Sale with the Gear Finder
- Used Gear Swap
- Member Gear Reviews and BPL Gear Review Articles
- Browse by Gear Type or Brand.

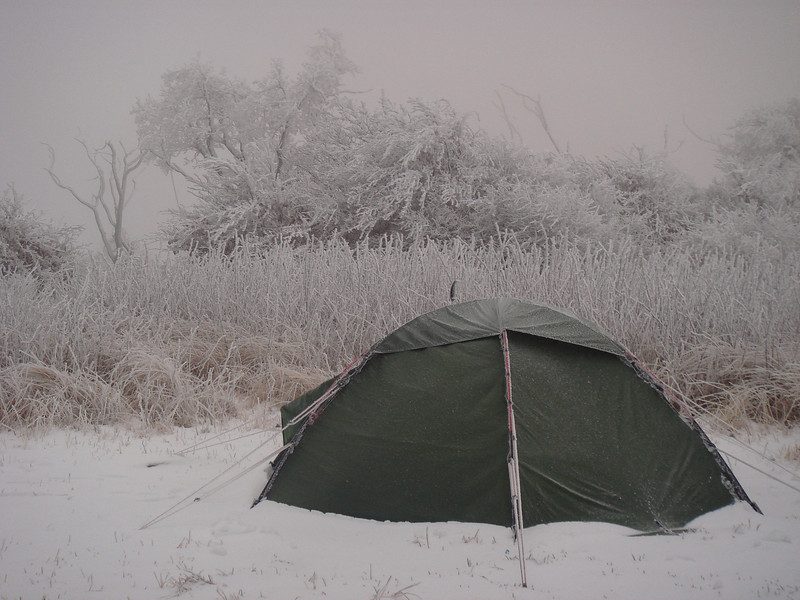 The Hilleberg Staika is very stable in high winds mainly because it has 6 guylines with 12 tent attachment points and uses beefy guyout tabs sewn onto the tent fly. The bottom perimeter has loops for 6 stakes. In a big blow atop 5,500 foot Haw Knob in TN it got walloped with 60+mph gusts and deformed a bit but the guyouts kept it from bending flat.
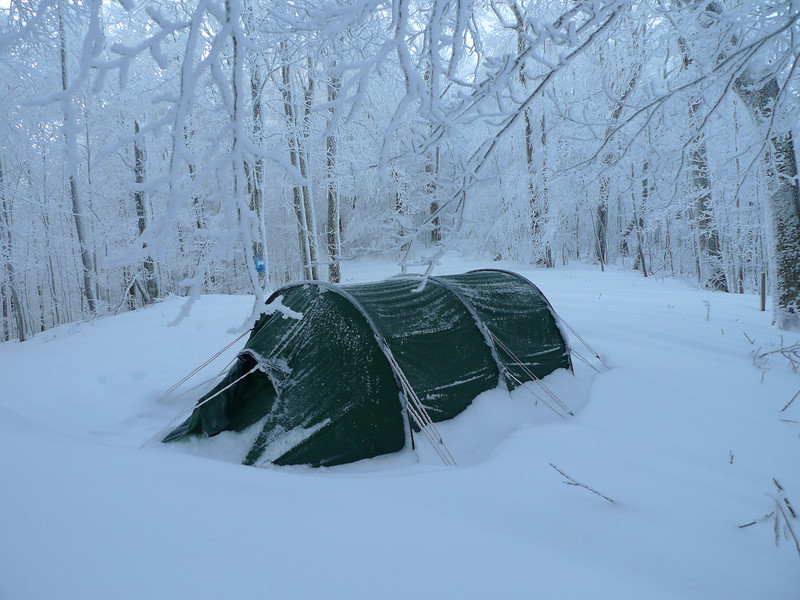
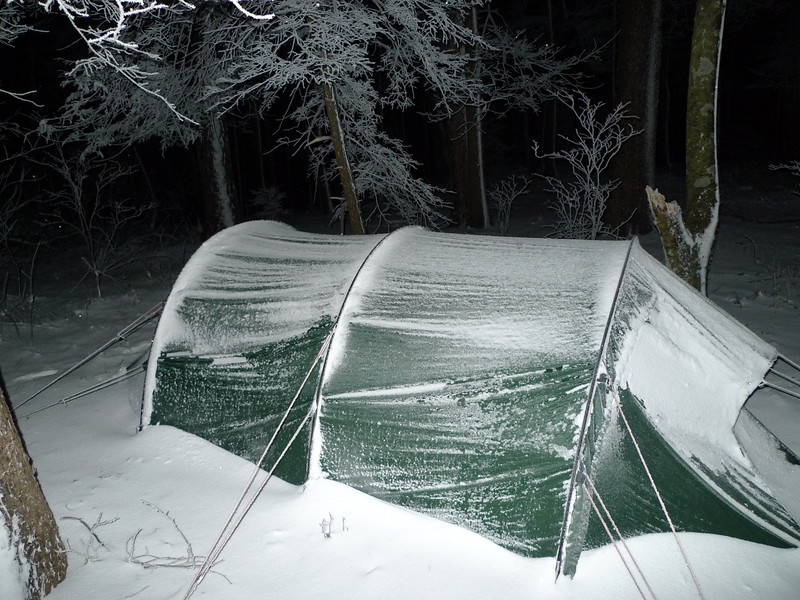 The Keron 3 on the other hand has a bit more “Swaying” but still has 12 stake out points (and 6 side guylines with 12 attachment points)—and also has 6 bottom perimeter peg loops. I’ve set up this beast in terrible winds and striked it in terrible winds and sure—with careful planning and procedures you can stay very low to the ground while inserting or removing poles etc.