Topic
MYOG 2P Trekking pole supported tent for more demanding conditions
Forum Posting
A Membership is required to post in the forums. Login or become a member to post in the member forums!
Home › Forums › Gear Forums › Make Your Own Gear › MYOG 2P Trekking pole supported tent for more demanding conditions
- This topic has 35 replies, 14 voices, and was last updated 5 years, 10 months ago by
 Gunnar H.
-
AuthorPosts
-
Apr 23, 2018 at 7:26 pm #3531901
- Hi,
Warning, long post. The reason I want to post my new MYOG 2P shelter is its rather different design from most trekking pole supported tents here and used material. I hope that especially used deflection of cat curves for 20D Silpoly XL (RBTR) can help someone with their project.
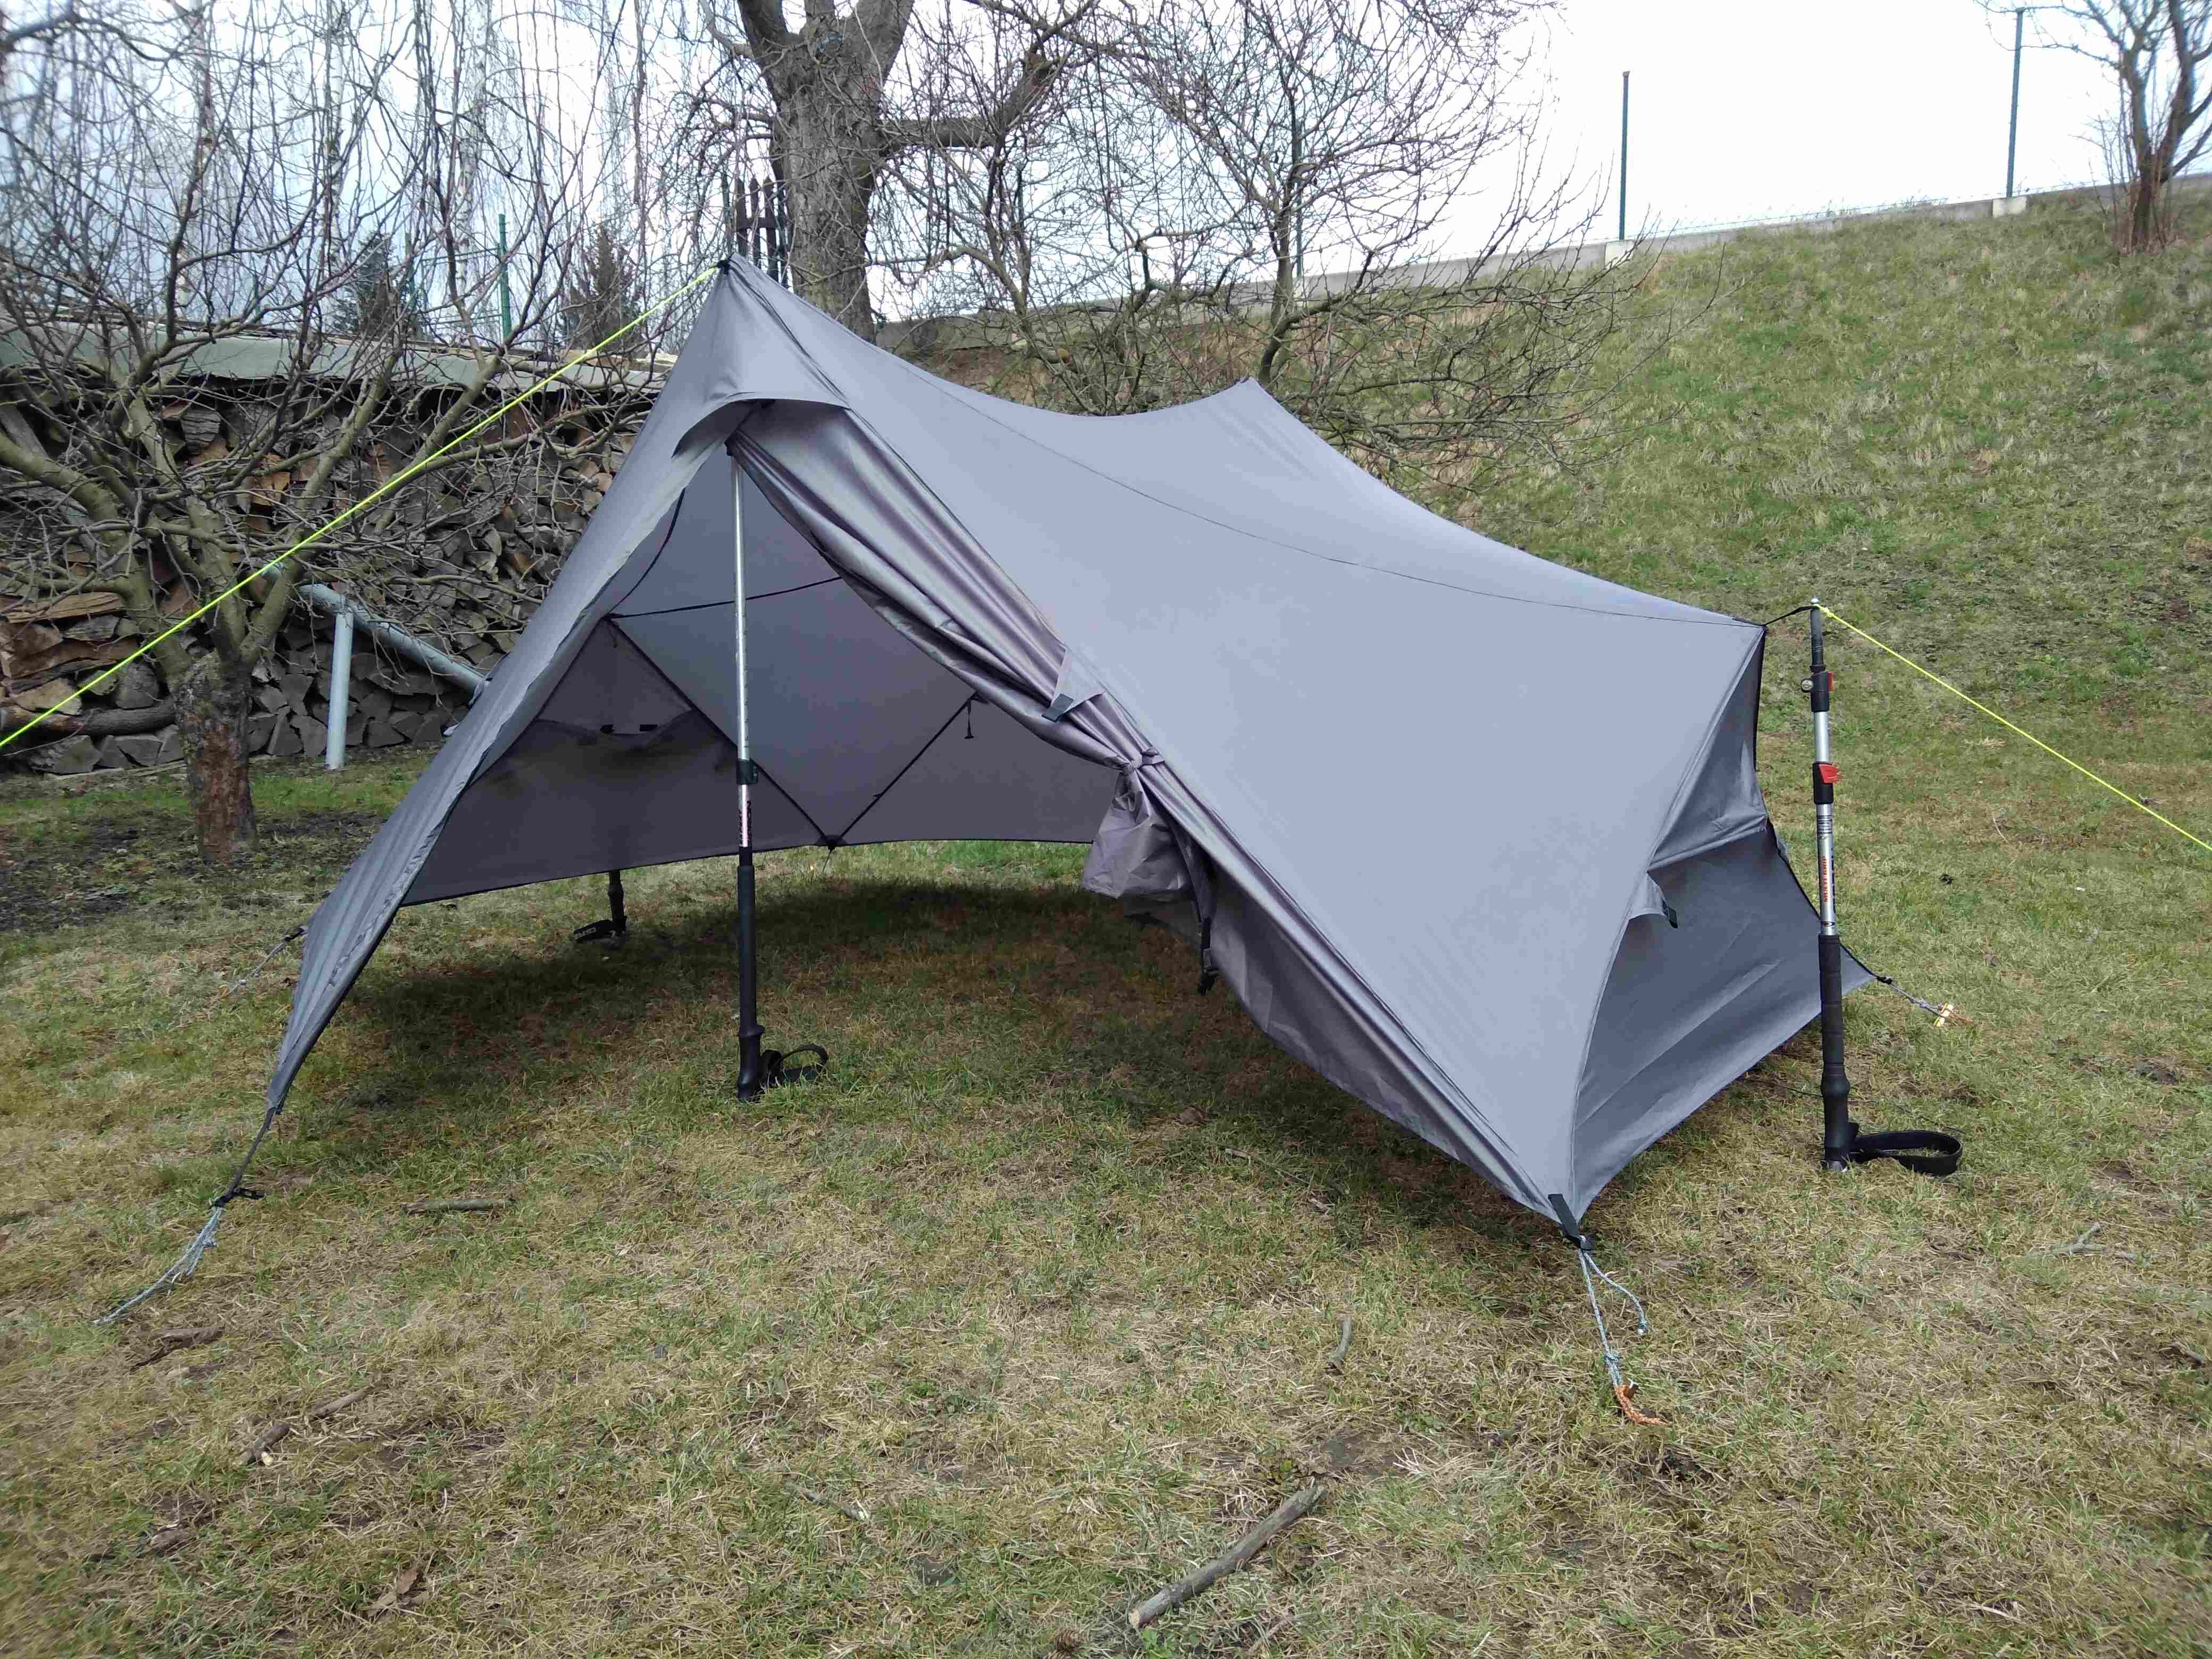
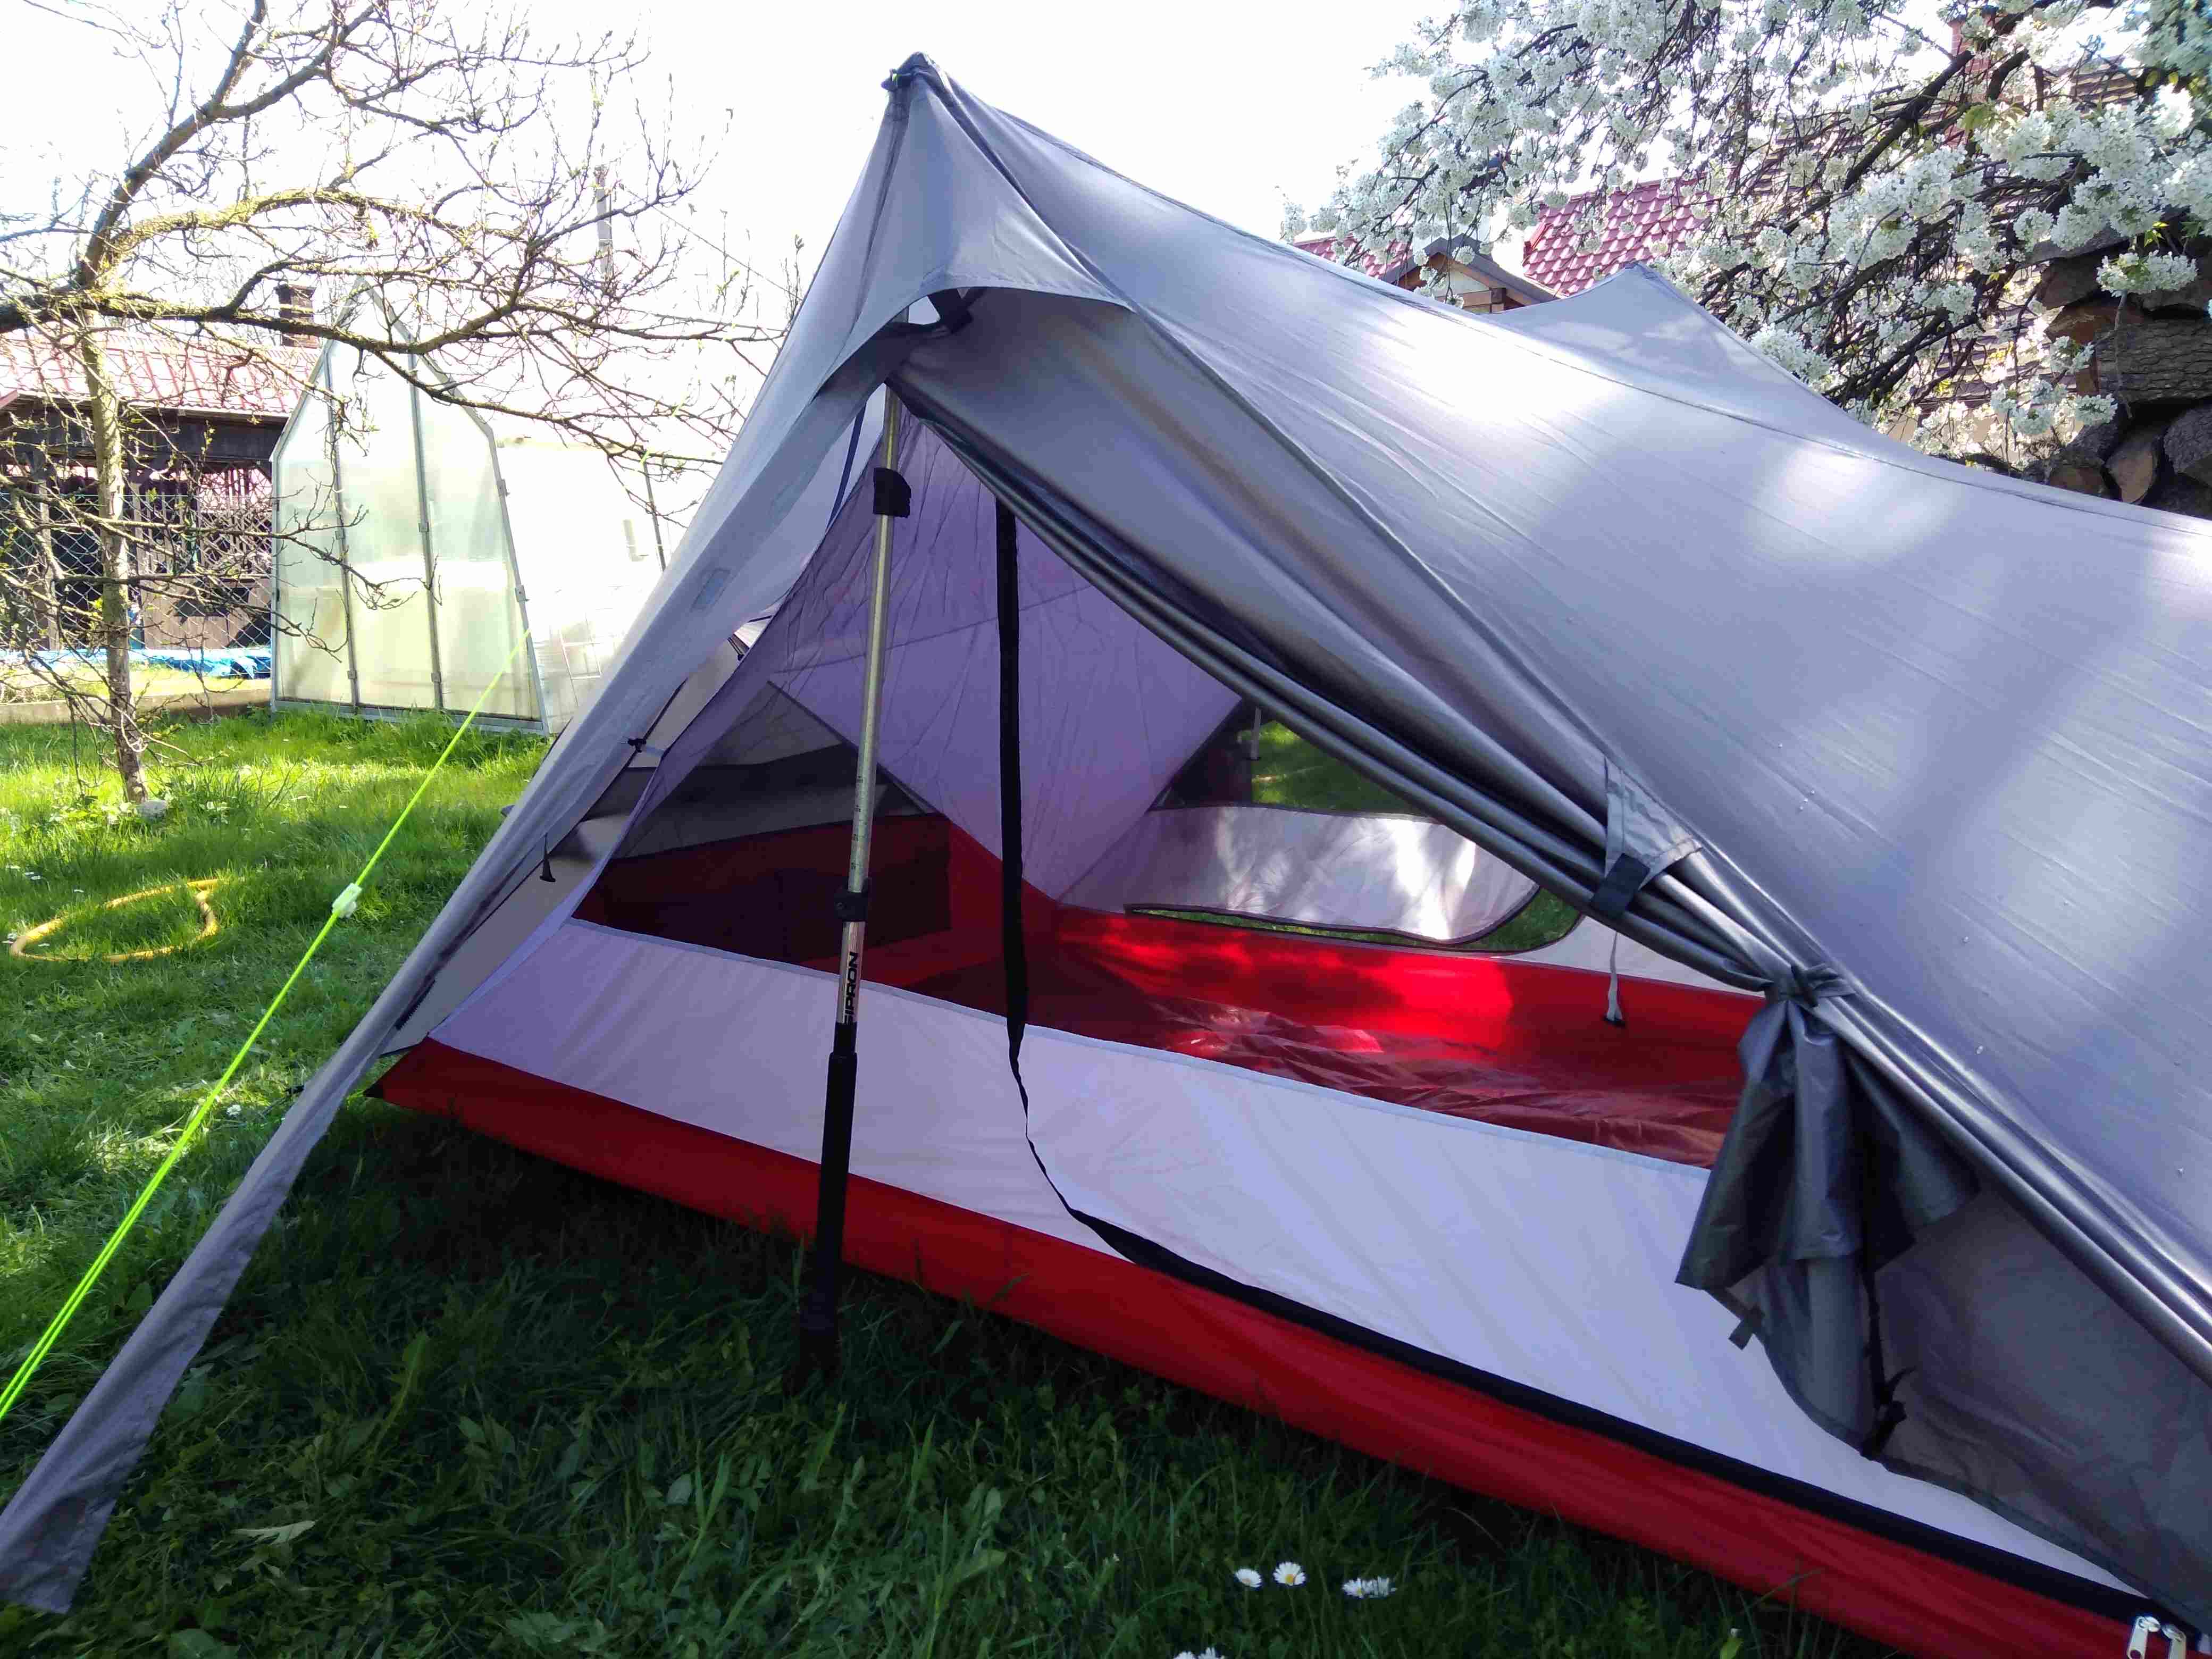
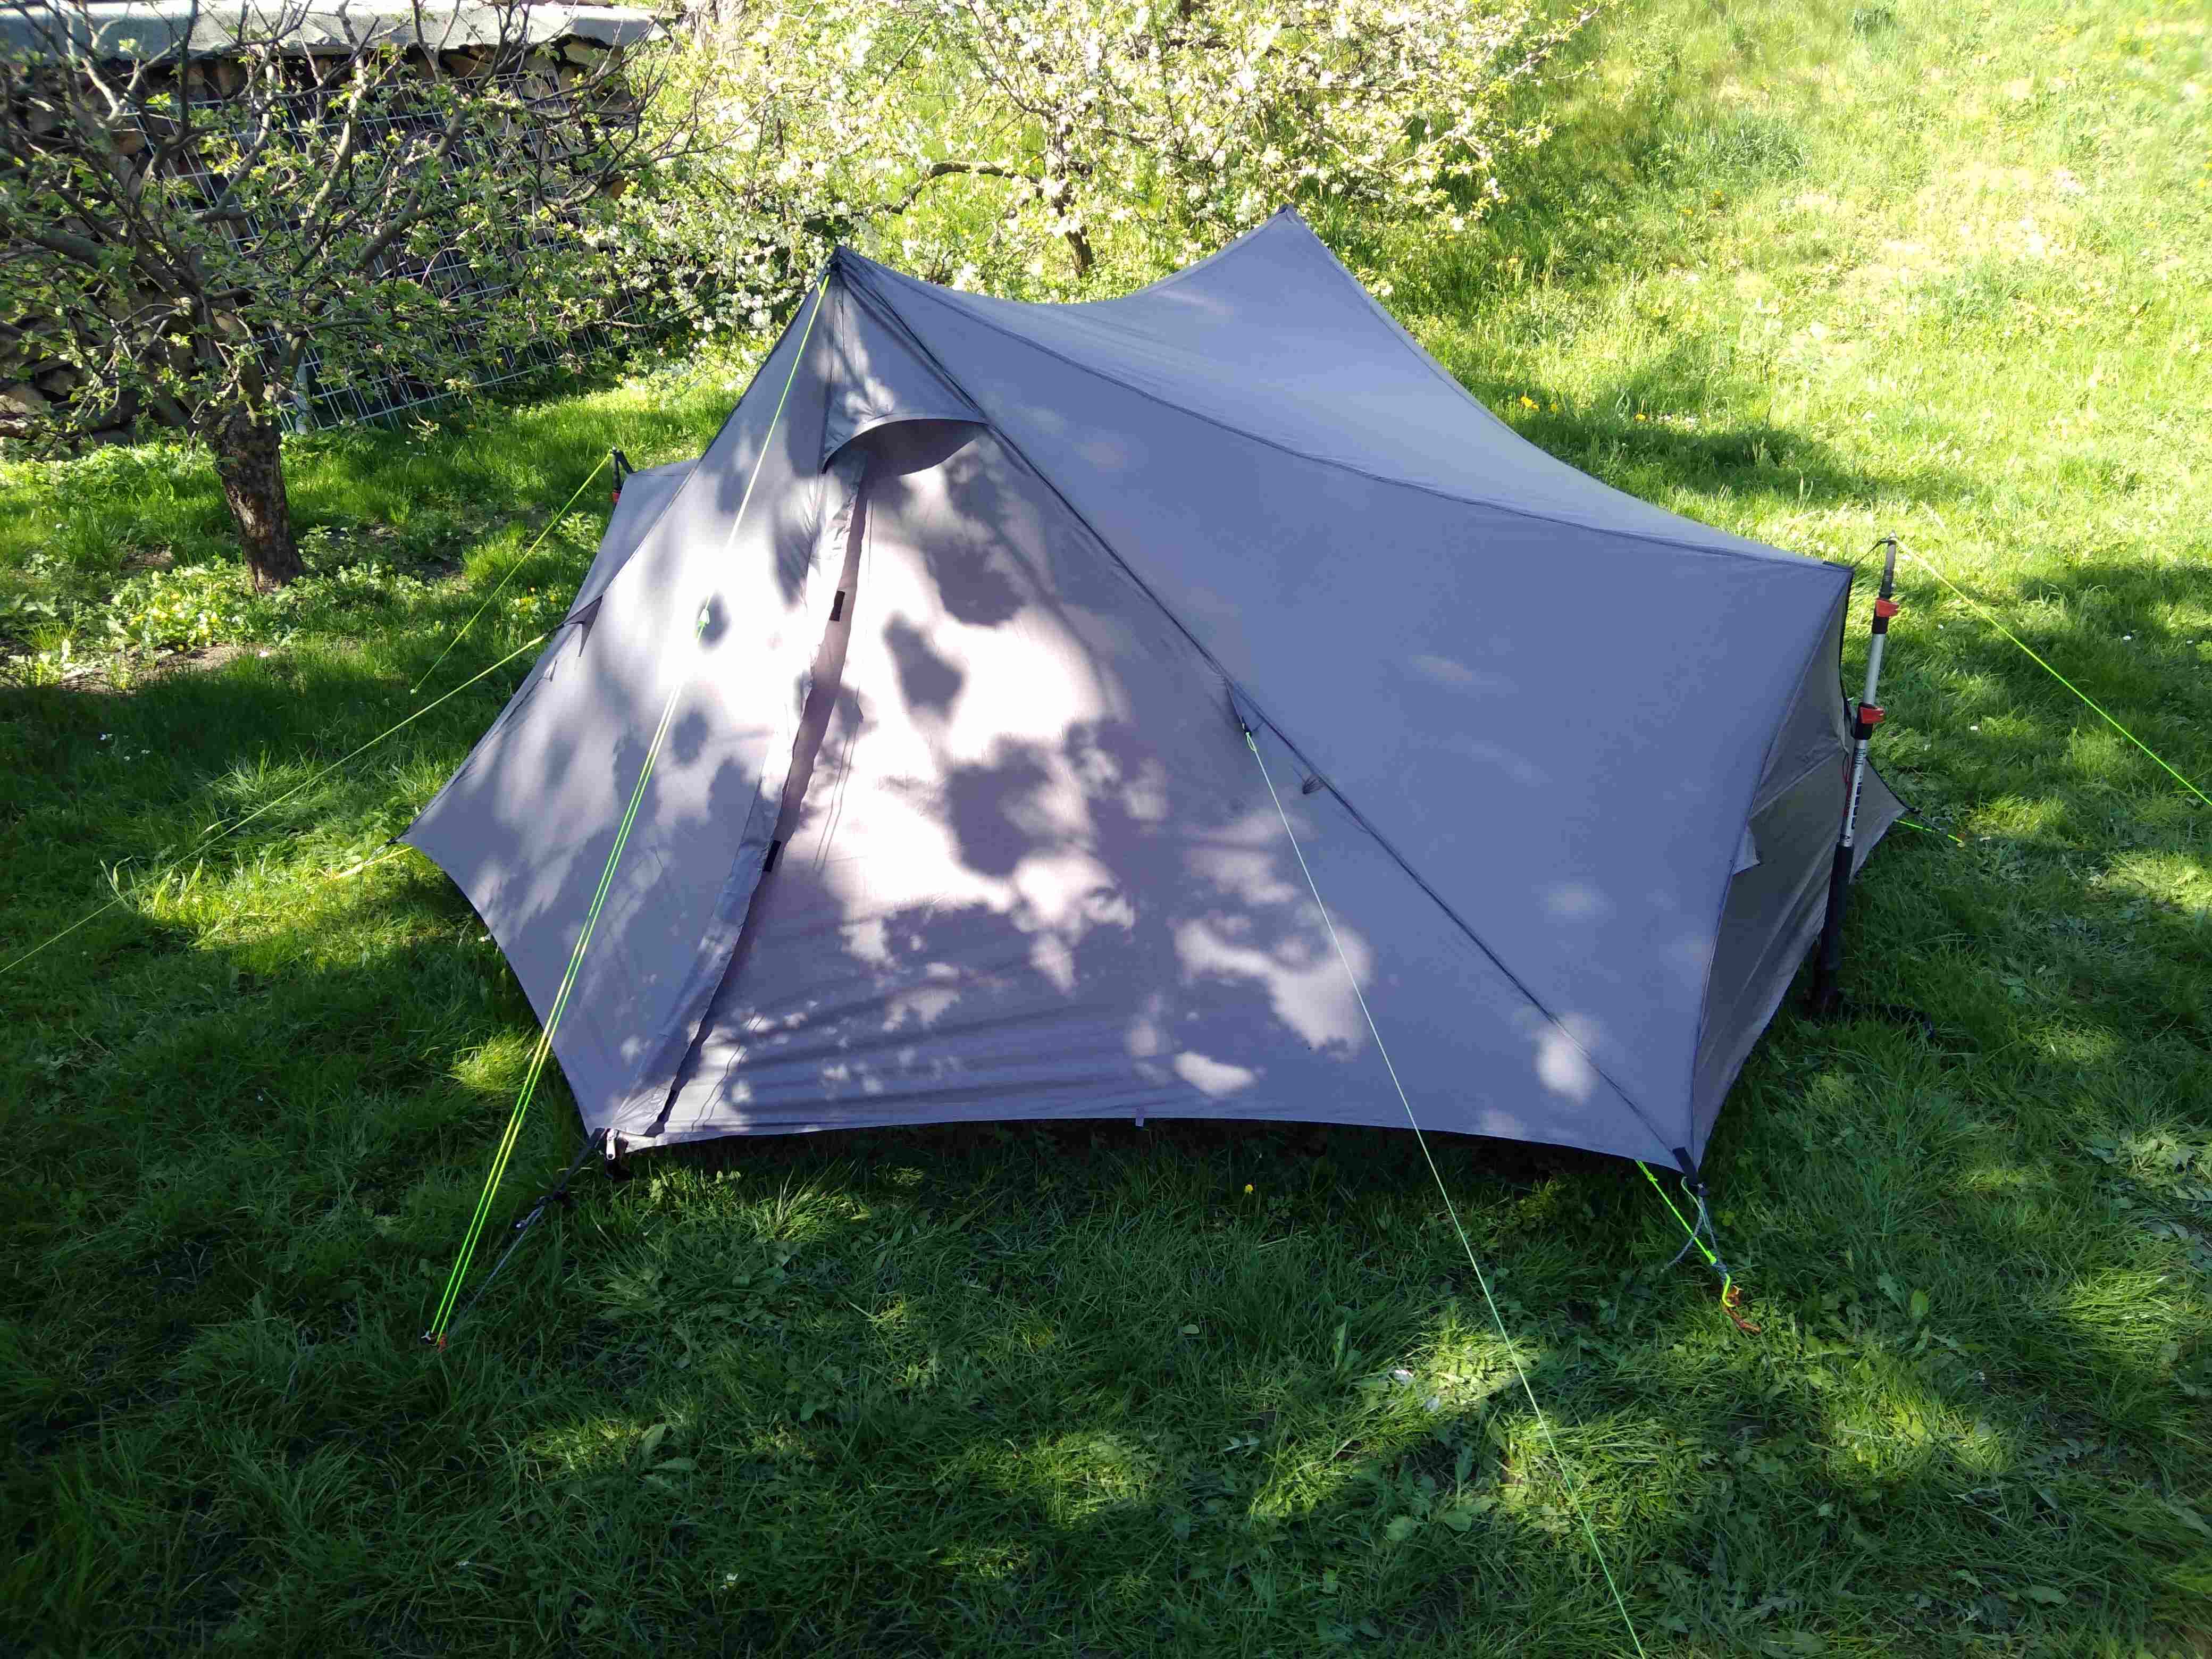
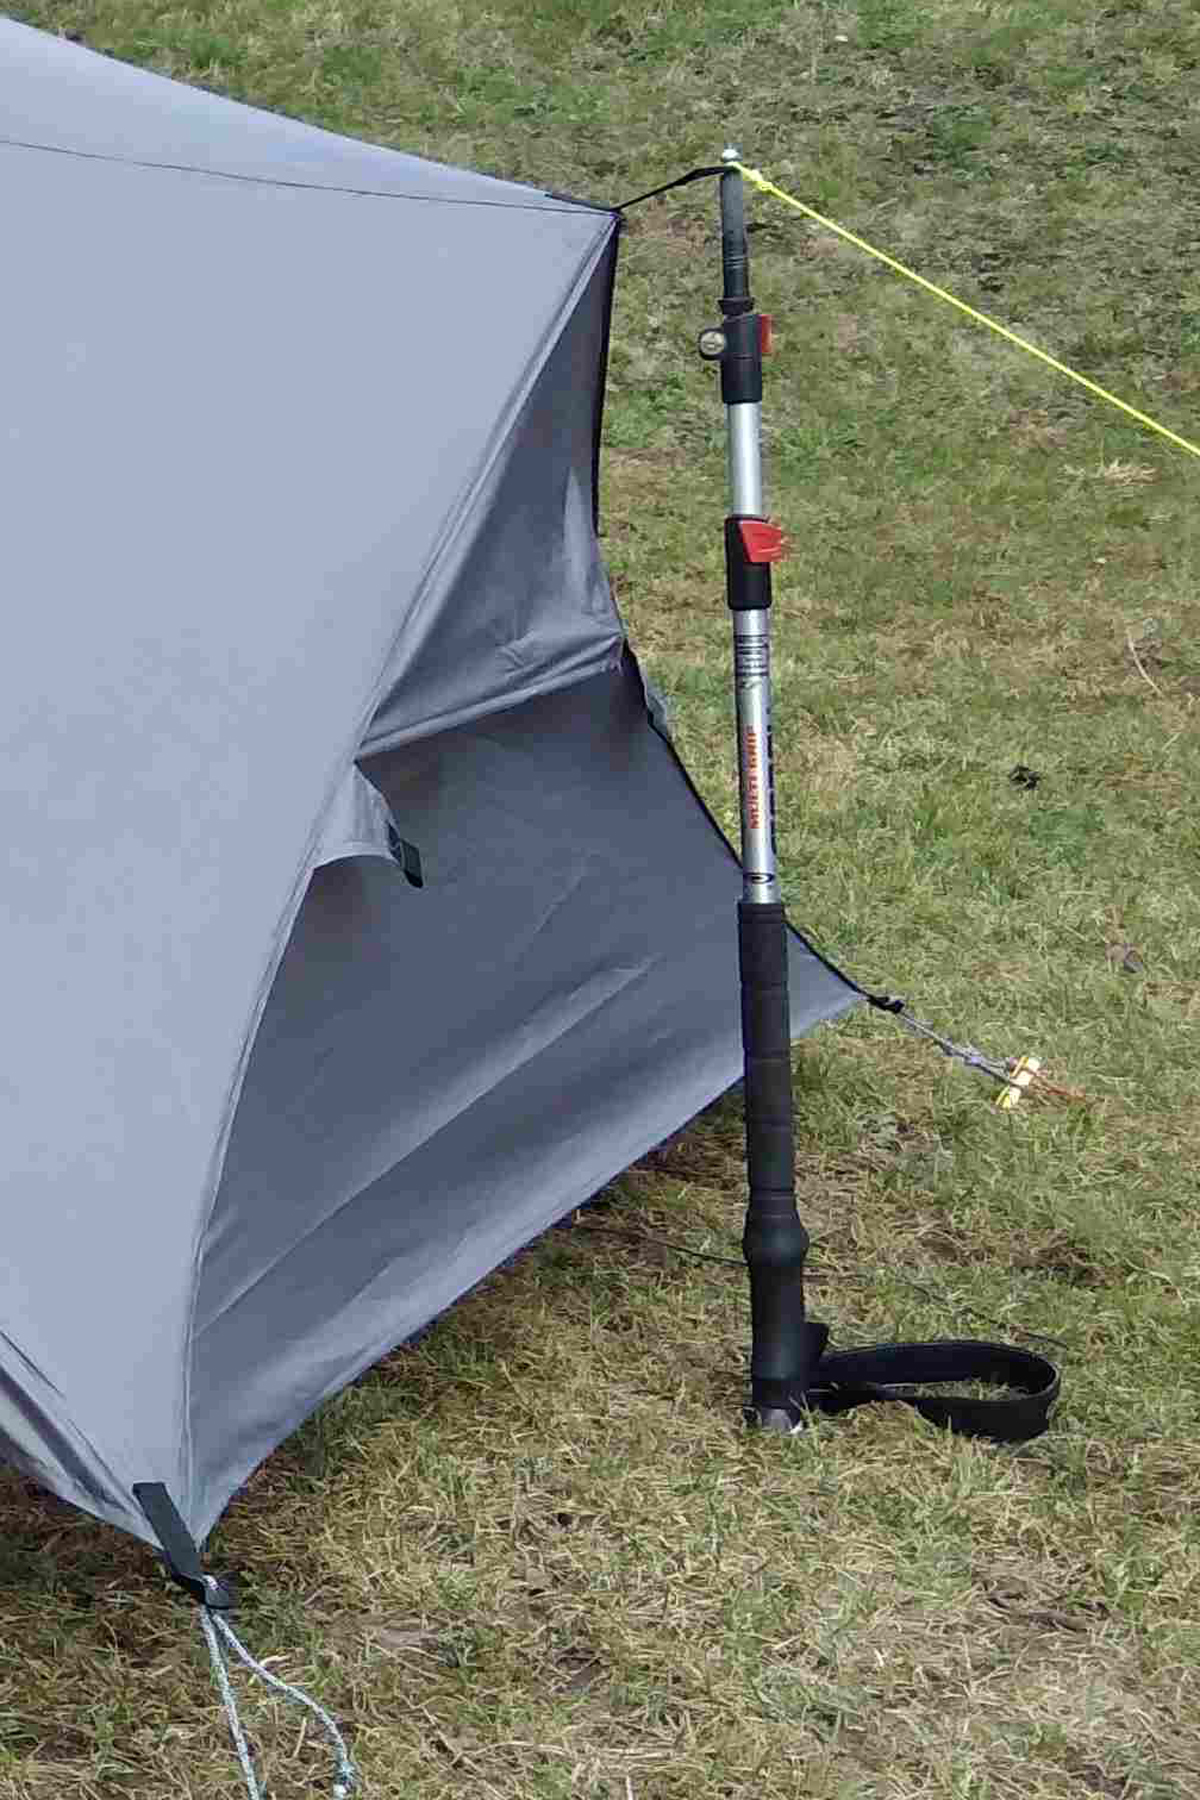
The tent is essentially a cross-breed of two shelters: TT Saddle and custom Tent from Trekkertent, photos recently deleted from their web-site. It uses 4 trekking poles as support to gain maximum stability in windy conditions and has additional tie-out points at side seams and front/rear seams. These are intended to be used in extreme conditions only.
It is important to point out that I have made a Pyramid shelter last year. I was quite convinced after reading a lot of posts here that it shall be sufficiently sturdy shelter for my needs. After 1 year of use I found out that it is not the case and I need more wind resistant shelter. Additional 2 end poles, lover profile, smaller panels and multiple angles all add together to its performance and its superior wind resistance compared to mid. I have made some small testing and am happy with its stability so far which seems far superior to large mid. I understand that it cannot compete to tunnel tents or other 4 season tents, but I hope that it can cope to above tree line 3 season conditions I need it to.
Basic information:
- (inner): 220 x 135 x 110 cm (86,6 x 50 x 43 inch);
- Size (fly): 245 x 148 x 115 cm (96,5 x 58 x 45 inch), porch 70 cm wide (28 inch);
- Materials: fly – 20D Silpoly XL from RBTR , Inner tent: 20D mosquito netting from Extremtextil (DE), 20D ripstop nylon from RBTR, 20D Silpoly PU4000 from RBTR;
- Whole tent incl. stuff sack, excluding stakes: 1135g (40 oz).
Main design features:
- Closed ends: open/close ends at TT saddle seem like obvious weakness for more demanding conditions. Therefore the ends are designed closed with closable ventilation at both ends;
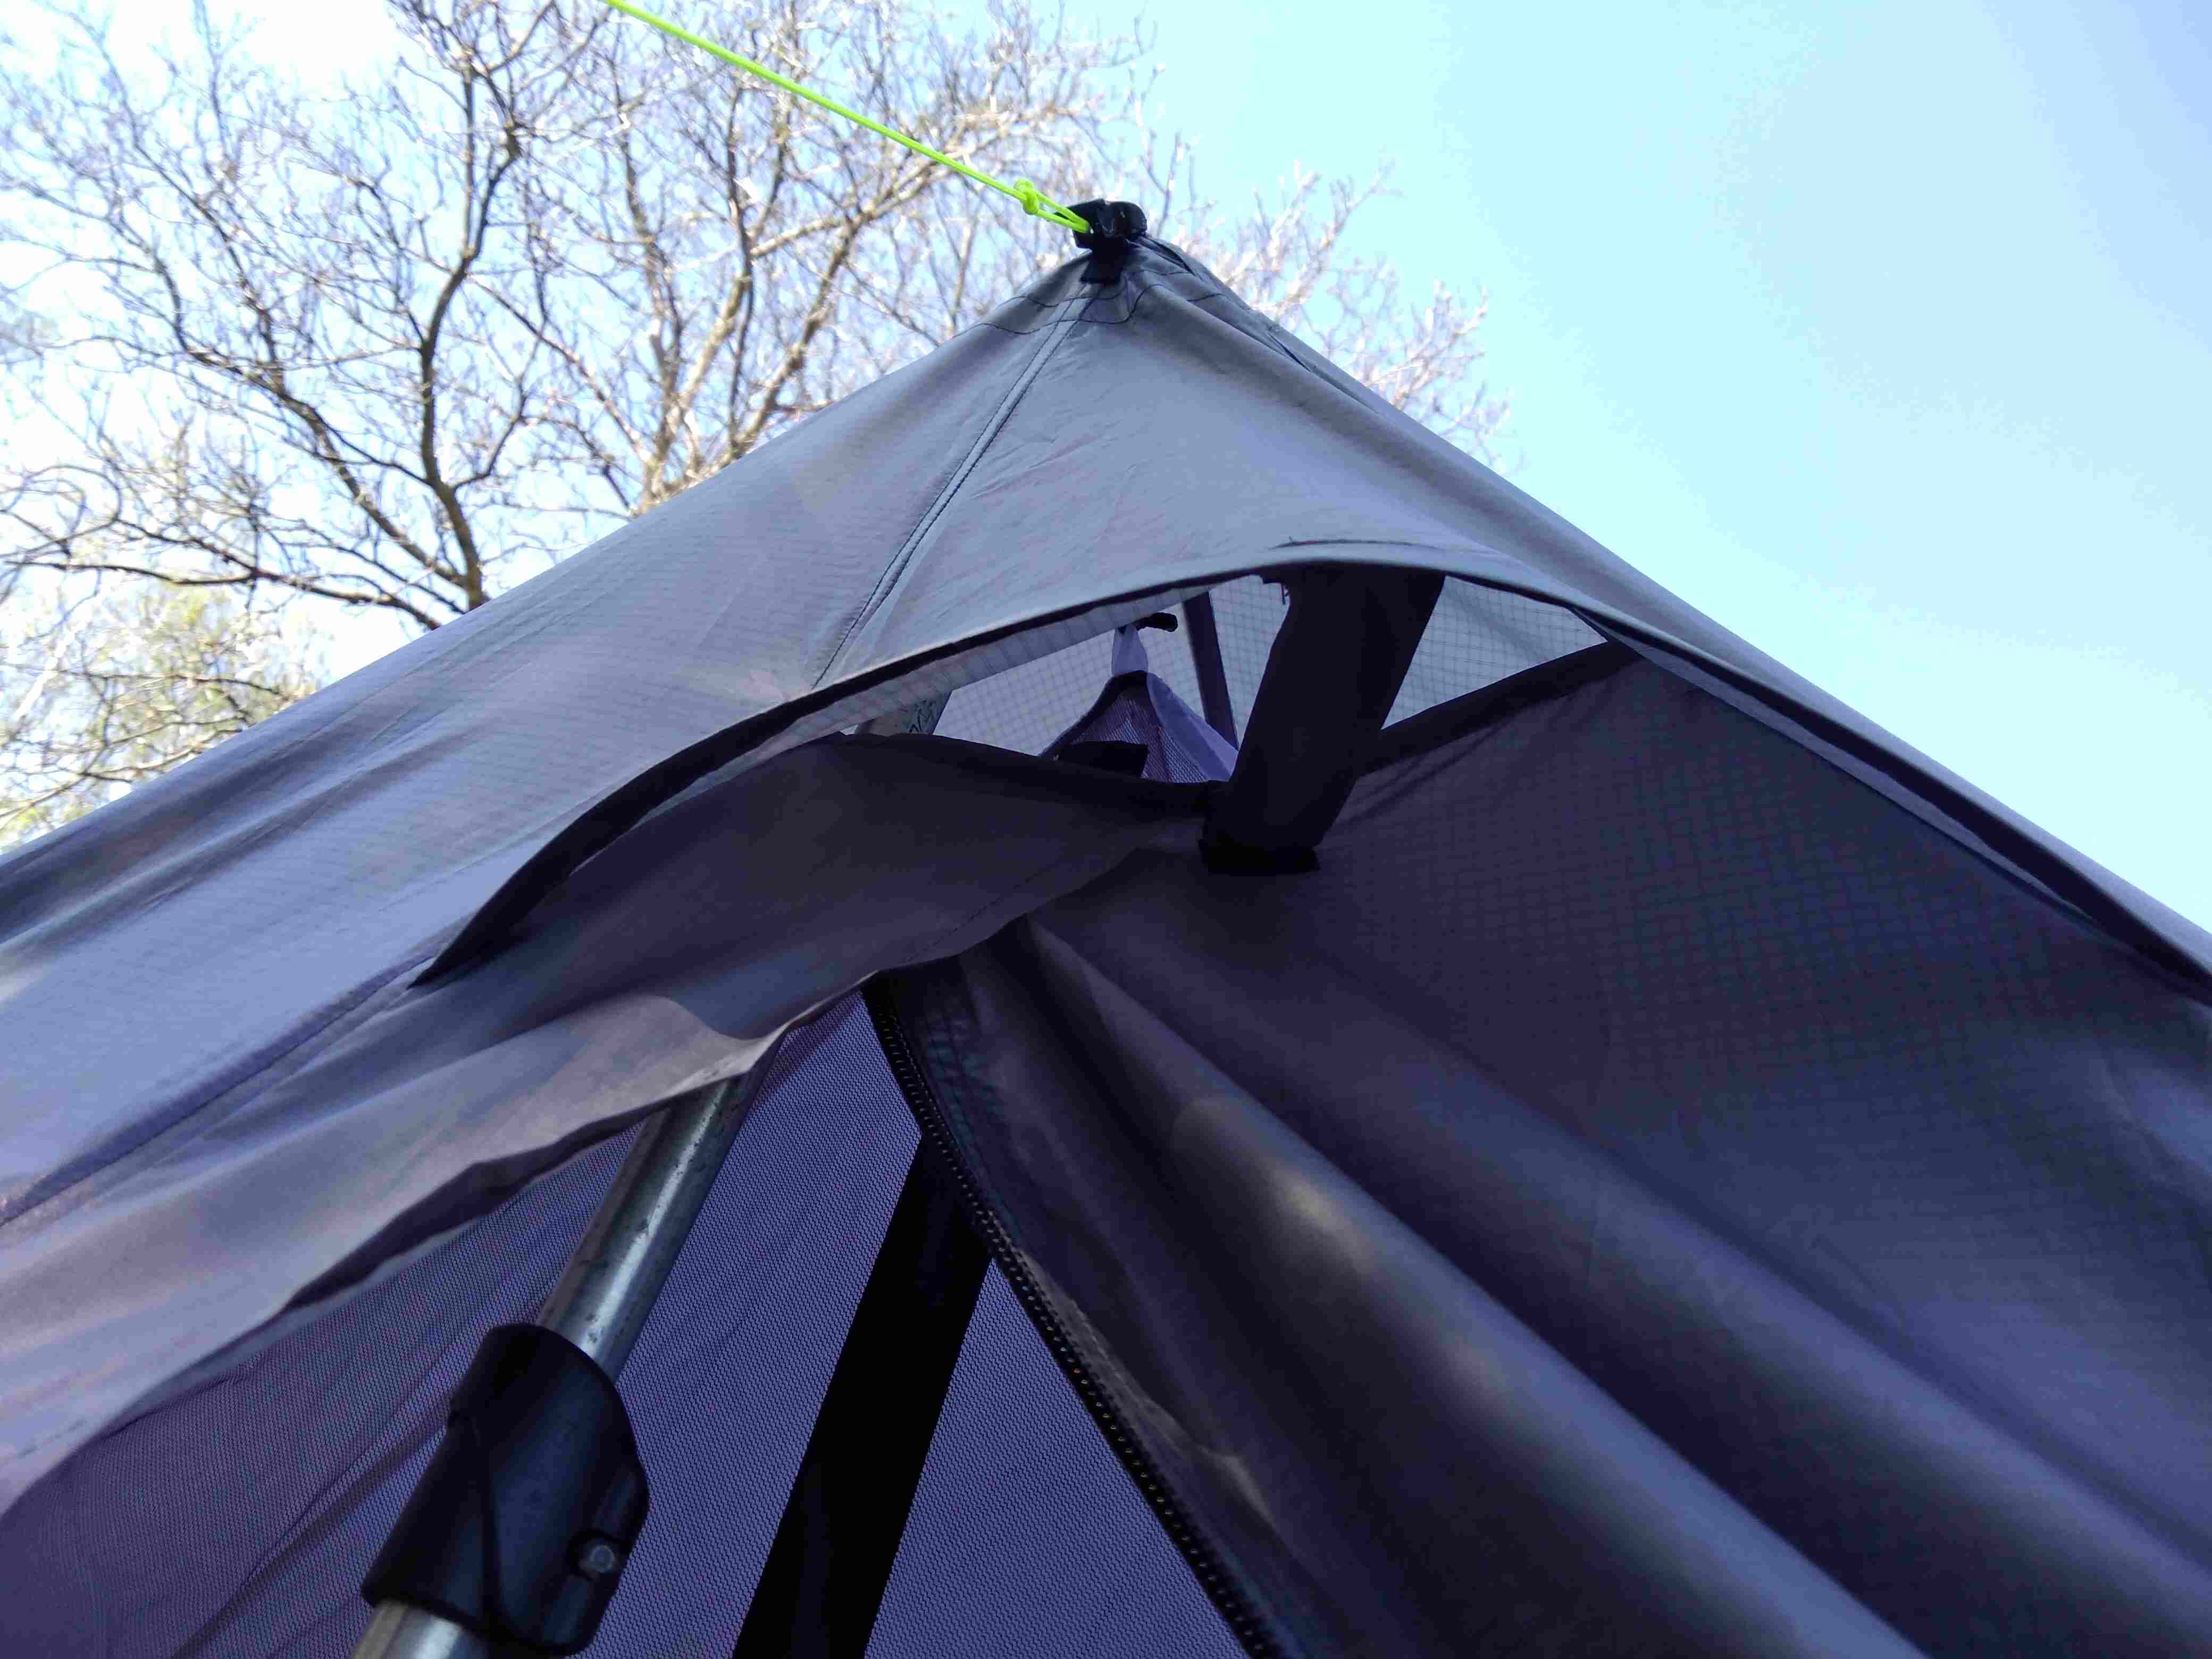
- Additional triangle at fly roof: Adding additional seam (triangle piece) at tent roof the design avoids possible water dripping into inner tent, contrary to TT Saddle;
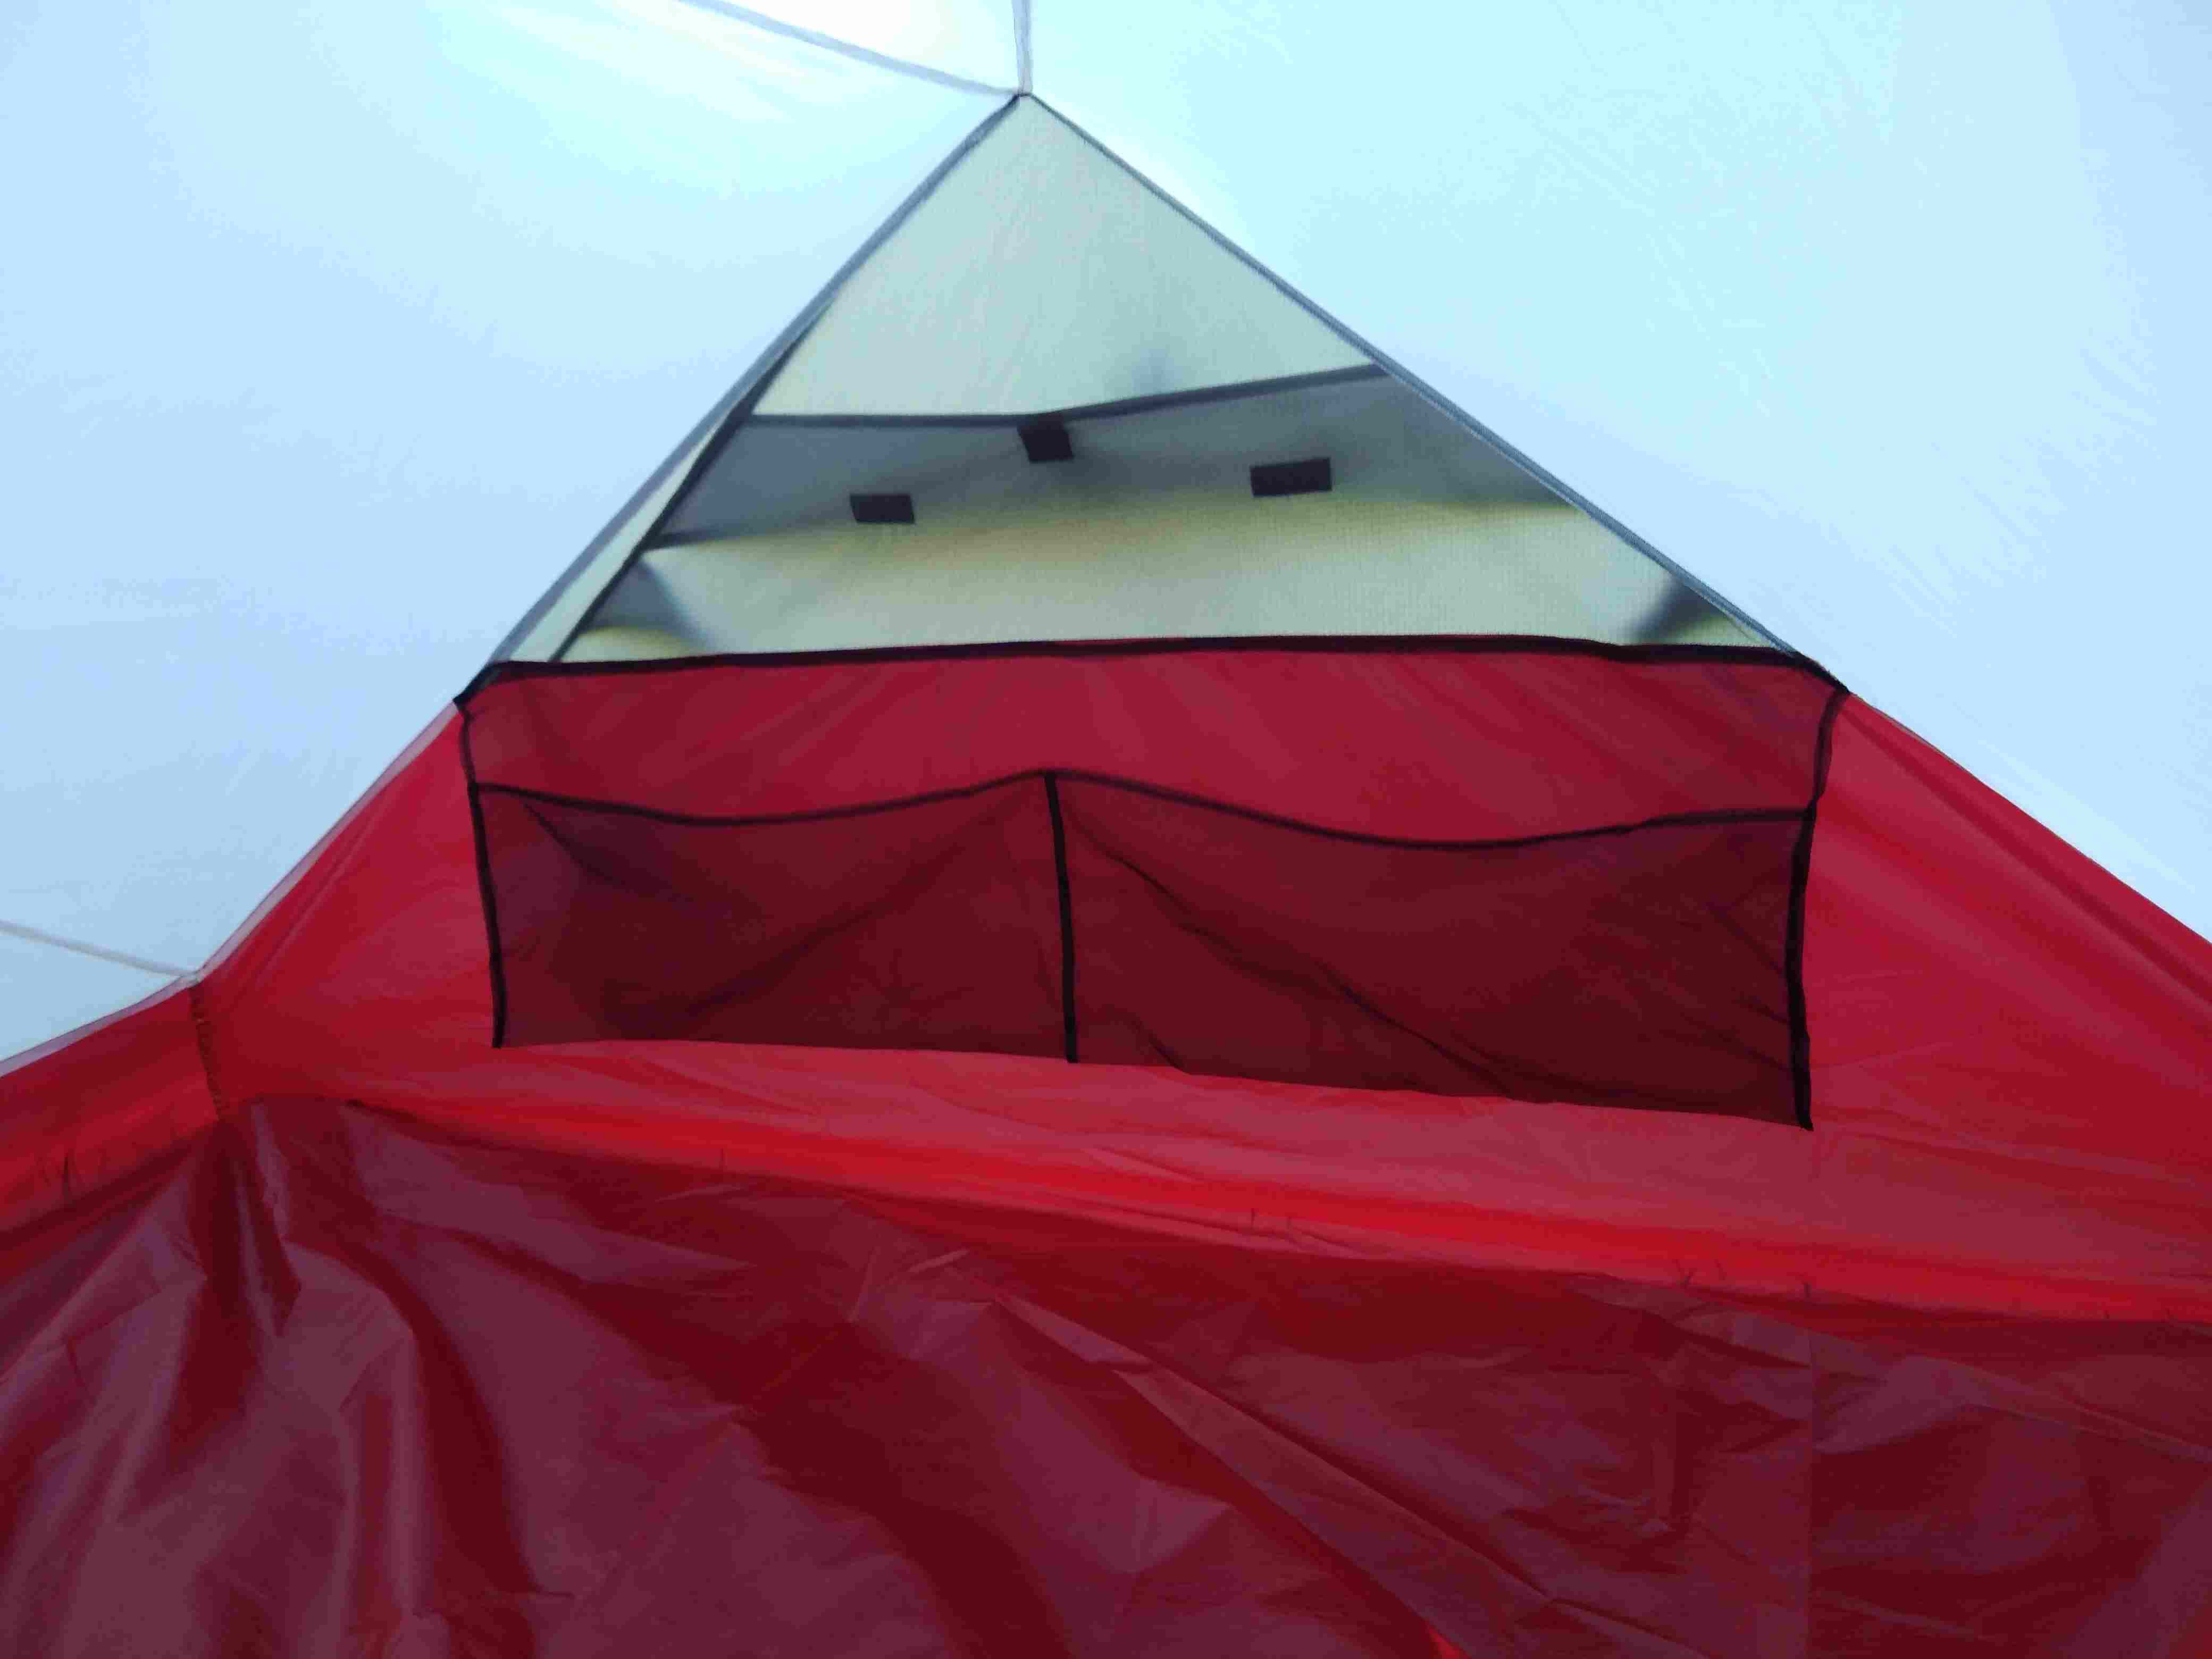
- Mostly solid inner tent: Due to intended use I wanted mostly solid inner to eliminate cold drafts. Moreover, due to more humid conditions single wall (hybrid) shelter was considered, but ruled out for time being. I have used this partly inner concept previously and am happy with it;
- Door vents: Used similar as for TT design;
- Cat cut deflection:
28 mm/ 1m length (about 1 inch / yard) on main seams
25 mm / 1m length (0,9 inch / yard) at doors bottoms
Due to relatively new fly material (SilPoly from RBTR) I did not manage to get any feedback on deflection per length for shelter cat-cuts. RBTR responded to my email, but with rather general recommendation that less of a deflection shall provide taught pitch compared to Silnylon. The material truly has much less of diagonal stretch than Silnylon I previously used. The deflection used provides quite taught pitch in my opinion. I am happy with the result considering the intended use;
Inner tent deflection: 25 mm / 1m length (0,9 inch/ yard)
- Zippers: 3C YKK for inner, 5C YKK for fly door for additional durability;
- Seam allowance: 15 mm (0,6 inch);
- Bathtub floor: 6 inch;
- Tie outs, loops: Rolled/sewn fly material except main tie outs (webbing). After using grosgrain ribbons before with the experience of water seeping into the seams along grosgrain ribbons and long drying time after rain I decided I will use Silpoly to eliminate this phenomenon. It was more time consuming, but I believe will have positive result.
A couple of pictures:


 Apr 23, 2018 at 10:31 pm #3531927
That looks fairly stable in the wind and roomy inside, but the flat top may collect snow rather well. You could end up with a lot of weight there.
Your vents are in the right pace, but may be a little too small to prevent condensation. The ‘flat’ roof may hold that condensation rather then letting it slide down to the ground.
You could easily replace the two trekking poles at the sides with some small light custom CF poles. This may be necessary if the 2nd person does not use trekking poles.
6″ bathtub floor – you bet!Cheers
PS: like the wood pile at the back.Apr 23, 2018 at 11:08 pm #3531935Geez, Roger. Quit being a wet blanket. You had more nice things to say about his wood pile than the shelter.
Milan,
I like the design and can certainly appreciate how difficult it would be to craft and sew. You’ve got a lot of hours in that tent. Look forward to your future posts.
Ryan
Apr 23, 2018 at 11:21 pm #3531939Ah Ryan, if it wasn’t well-done I would not bother commenting.
Like you, I will be interested in hearing how it goes.Cheers
Apr 24, 2018 at 5:16 pm #3532043Thanks both for your comments.
Roger: I am aware about flat roof. The concerns you raise I debated for quite a bit myself. I considered how the design could be tweaked to improve in these criteria (condensation mitigation, dripping and possible snow load), but came only with ideas compromising again on wind/storm resistance. That was not a trade-off I was willing to make. I remember far too well a pole connector failure due to wind loading last year with my Mid. In my opinion, seriously improved ventilation leads back to TT Saddle. If you have any such improvement ideas I would be grateful.
During the design, I simulated low ends with shortest possible poles (fully retracted trekking poles), but the angle changes only slightly. I did not want to go below min. trekking pole length. Mainly due to the fact that the tent was intended for 2 hikers with 4 poles. I fully acknowledge possibility of condensation dripping in some extreme scenarios. That was the reason why hybrid design (no inner tent roof) was dismissed and solid inner roof was used. The low end vents seem smaller on the pictures than they are. A too big vent is in my experience less stable and more problematic to keep open. I plan on having partly raised sides in good weather. In case of inclement weather, I will rather have a condensation than poor shelter:-) Regarding snow, the tent was not intended for 4 season use and in case of spring/fall snowfall, I will have to regularly shrug it off. A sum of trade offs:-)
I am planning on making CF poles for low ends as you suggest. Mainly for scenarios of less demanding trip where we might take only 1 pole each. So far, I was thinking about buying 10-12 mm OD CF wrapped tubes from China. I believe they are intended for plane models, available on Aliexpress. I consider arrow shafts you use for tent poles too weak for this type of loading. Any comment from your side are very welcome here.
As you might remember, you were king enough to send me design basis of your tunnel tent some time ago. I debated for some time whether to build this design or yours. The decision was made due to less complex design here (absence of CF poles with machined connectors) and mainly the fact that we take trekking poles nevertheless. I will see how it performs. I will take a shelter for moderate 8 day trek in 1 week. In case there will be something to report, I will post my findings.
PS: the wood pile is my fathers doing. He is trying to stock-up for upcoming decades of retirement:-) I will forward your kind words..
Apr 24, 2018 at 9:39 pm #3532076Hi Milan
<Geek mode>
Ah – 3 season use only, no snow. Fair enough.
Solid inner – I missed that, so my apologies. Yes, that should (mostly) solve the condensation problem.
Short end poles – I would trust the standard 2D wrap 7.5 mm arrow shafts for that. They are really strong.
I would place a lot of attention on the front and rear guy lines, the ones that make the ridge taut. I would even consider putting two guys splayed out at each end of the ridge in really bad weather.
</geek>Wood pile – we too have a wood pile for the winters ahead. Compliments to your father.
Cheers
Apr 25, 2018 at 2:36 am #3532124Amazing work Milan. I’m sure the tent will stand up to wind very well. Love how you’ve made sure every seam is curved – clearly you know your way around a CAD platform to have achieved this.
Apr 25, 2018 at 4:13 am #3532133That is truly outstanding, Milan. Lots of space and headroom for two. And all of the inevitable trade-offs were discussed in your posts. I’ve no experience with the Saddle design, but you obviously do and have based the design choice on that experience. Thank you much for taking the time to show us the result of your work, and please let us know your appraisal of the polyester fly fabric.
Apr 29, 2018 at 3:31 am #3532748Wow, that’s an incredible display of MYOG.
Apr 29, 2018 at 9:24 am #3532784just an observation…
Given that the tent is designed for extreme conditions and wind has been mention, I don’t think that those concave ends help in the respect.

Sails are designed to obtain that shape to collect wind not to shed it.
Apr 30, 2018 at 9:47 am #3532898ah well, 3 season use.
cheers
May 2, 2018 at 5:44 am #3533316Nice design. I’ve spent four nights on the trail in Dorset, UK in my poncho-hex-tarp. Some nights windy and rainy. 1. I didn’t notice any difference between the cat-curved panels and the straight across panels. (this is of course in wind–maybe 10-15 mph gusts. I think the shorter distances between stakes and guy-lines at some point makes cat-curves less critical. 2. For more extreme conditions I would just lower my poles, to lower the profile of the tarp. 3. I was concerned about my trekking poles (tops) damaging the sil-nylon. Not at all. 4. Taught lines, good staking, and keeping the panels tight seem to me like they could handle just about anything. I have the small lightweight stakes–these are probably the weakest link. (also after losing a couple of stakes I tied brightly colored line to them.) and 5?: I didn’t see your tie points, but I’ve found grosgrain loops to be infinitely more versatile than any D-ring. Often I just push a stake through the loop. If I want it tighter I’ll make a turn in the loop.
Looking forward to your progress on your tent.
May 16, 2018 at 4:17 pm #3535962Warning, long post.
@ Franco: Point taken. I admit this one particular cat cut was probably unnecessary. The tent design resulted in sewing together panels which sides were not identically positioned towards fabric bias, especially on low ends. I wanted to prevent possible sag. Finished tent proves that it was not necessary here. Original cat curve is further magnified by tension in the corners and support by trekking pole in the middle. Such shape would be there even without cat-cut, but less apparent. Moreover, point of view in this photo is a bit misleading of the shape. It is rather inclined with only small sail like shape at the top. The photo from the side shows it better. Concerning sail effect in this part, I think it will be marginal here. The end is very stable due to support by 2 stakes and trekking pole at small distance. The panel is a small surface close to the ground. There are also 2 additional optional tie downs on the seams.It is a first prototype. If I ever make another, I will make some small tweaks -> evolution:-)
Geek question:is the small sail-like shape going to outweigh inclination of the side, which shall result in lover perpendicular wind force on the panel due to force distribution into particular axis in the first place?
@ William: Taut pitch was intended. The cat cuts with this material could be a bit milder if one would prefer interior space. The tent pitches very taught, which I am happy with. I agree, you need proper stakes for high wind. I use stakes similar to MSR groundhogs (not mini, full size) for corners and main ridge lines ropes. I am thinking of getting some bigger Ti nail stakes for more rocky ground. For remaining stake-out points I have some lighter, thinner 15 cm Ti stakes. Additional tie down points are at door seams (last photo) and low end seems.
First use experience:
I took the tent for week long GR221 traverse in Mallorca. The tent was properly rain-tested. No wind to speak of to comment wind resistance though.
- Flat roof: Roger was right, in extreme scenarios condensation can drip from flat roof on inner tent. This happened after night+1/2 day trapped in the tent. Clear sky first, then rain, 100% humidity+ cooking in porch. Harder rain resulted in some condensation dripping on inner tent. I shook the drops from inner tent, unclipped inner tent from inside, wiped the roof and problem was solved.
- Condensation resistance in general: We had condensation all nights. But all nights we slept under clear sky, big temperature drops, no wind. Condensation on the fly inside often formed before we even entered the tent. In the morning similar amount from inside as from outside the fly. 1 night I let door fully opened, the same result. I will make conclusion after trying also different conditions.
- General use: Ample rain cover for backpacks and shoes in one half of the porch. Good cooking space in second half. Ton of space inside. Separate pitch of inner into the fly very convenient and easy by hook and loops and 2 clips.
- Silpoly fabric: doe not sag at all. Once tensioned, it stays that way. I find that a huge benefit over silnylon I used before, which sagged a lot. Seems strong enough despite lover tear strength compared to silnylon.
Milan
May 16, 2018 at 10:40 pm #3536071IF the poles are solid enough (likely) and IF the stakes are solid enough, the sail sides should survive most 3-season stuff OK.
Porch space – YEAH!
Cheers
May 17, 2018 at 12:08 am #3536092Well made tent, good job
I like it when someone comes up with an idea that’s different
Just because someone identifies some characteristic that might not be so good, doesn’t mean disrespect. No point dwelling on the ideas that I agree with.
Glad Roger stepped in this and not me : )
May 19, 2018 at 12:24 am #3536548Well beyond my own skill levels so I am impressed.
Looking at the general shape I can see Francos point but that would only take a small tweak and if it isn’t going to be used in winter perhaps not even worth contemplating
Mar 19, 2019 at 9:28 pm #3584492Was impressed by your MYOG pack so checked out your other posts. Once again, I’m blown away by your levels of design detail and craftsmanship – that is one slick and sophisticated shelter!
I wanted to ask about your experience of the SilPoly, now you’ve hopefully had more chance to test it in the field. I’m building an A frame tarp tent for exposed 3.5 season use and need it to survive big winds. I was initially attracted to the 20d SilPoly because of the lack of stretch, but two things are putting me off.
First, Richard Nisley found that it deteriorated rapidly in the aging test and was likely to mist quite badly. The SilPoly PU4000 would solve that, but is heavier and even weaker.
Second, despite an experienced professional designer telling me that the SilPoly would be strong enough for big winds if the stress points were properly reinforced, it’s a bit unnerving that none of the big brands are using 20D SilPoly for bad weather shelters. A couple of cottage makers do offer it, but were non-committal when I asked them about storm-worthiness. It’s also worrying that Nordisk, who test their designs in wind tunnels and use some very light SilNylons, were using a 60d SilPoly on their only bad-weather SilPoly shelters. And there’s also the issue of handling the weight of wet and heavy unseasonal snow if I get caught out in a blizzard….
The most obvious alternative is the RSBTR MTN SilNylon. As a quality 6.6 nylon, it only has half the stretch of typical nylon 6, and it’s a very strong fabric. With my design I can set the poles at a bit of an angle and re-tension from the inside just by straightening the poles. For safety and peace of mind, I’m tempted by the MTN SilNylon.
Given your experience so far, what would you recommend?
Mar 20, 2019 at 6:47 pm #3584670I consider a tent design far more important than fabric for sturdiness in wind. Just to add, due to the design and usually lack of tie down points, I do not consider any commercially available trekking pole supported 2P tent properly wind worthy (no matter what fabric) – that is the reason I made my own tent. But my opinion of “wind worthy” probably differs quite a bit from most US cottage manufacturers. Possibly because I backpack in Europe and often trek in Asia high mountains.
Well, I have 1 more year with the shelter. I experienced mid-strong winds in it and the tent took it well. I believe it can take anything any other 3 season shelter would take. My tent uses 4 poles and has multiple other tie-down points and I would rate it 3-3,5 season with thoughtful pitching. But for 3,5-4 season regular use and very windy places, I would not consider any trekking pole supported tent the best option. A Roger Caffin 4 pole tunnel tent would be my choice for such conditions. Once I will build one..
Regarding the 20D Silpoly, I used an XL version with higher HH rating (more silicon coating). So far no misting, but I have a double wall tent. I selected SilPoly mainly because of lack of sag when wet/cold and am happy that did so far. This annoys me greatly with Silnylon. I debated similar question as you do and have chosen this fabric in the end. If you prefer to have stronger fabric, probably select nylon and learn to live with the sag. Silpoly PU4000 is not intended for tent fly. I use it for a floor and am very impressed for that application. I hope it helps some..
Mar 20, 2019 at 8:22 pm #3584682Wow Milan excellent Job!! That thing looks legit.
Mar 23, 2019 at 5:34 am #3585124Milan,
Thank you much for the update. You addressed some of my concerns about using low denier polyester fabric for tent outers. I failed to notice the improved stats for RBTR’s XL fabric over the regular, although I see the specs are right there on the RBTR website (along with a little hype that is par for the course).One has to consider Roger Caffin’s oft reported experience with the strength of ~30D nylon outers. He has not reported any tears of the fabric walls from wind, snow and other loading. But as you noted, the larger manufacturers that must design for tough use and abuse appear to shy away from the lighter polyesters. If they do this because of the lower HH ratings, RBTR seems to have addressed much of that. If they do this because of polyester fabric deterioration and/or weakness, that is another story. But you appear not to have encountered much of that since your OP of almost a year ago.
I had pretty much decided to go with Sil/PU coated nylon because in addition to strength and durable high HH it has less sagging due to temperature drops and/or increased humidity, and that is probably due to the PU coat on one side of the fabric. However, that may not outweigh the sag resistance of polyester. The 0.25 oz/sq/yd weight increase of the XL polyester over 15D, 1.05 oz/sq/yd nylon is not great, and may be outweighed by the sag resistance and greater resistance to water of the polyester yarns compared to nylon. I’ve also noted that Dan Durston came down on the side of polyester with his tent venture.
A lot of food for thought, so thank you again for your follow-up reporting. As you noted, there are many trade-off involved.
Mar 23, 2019 at 7:30 am #3585130One has to consider Roger Caffin’s oft reported experience with the strength of ~30D nylon outers. He has not reported any tears of the fabric walls from wind, snow and other loading.
And that is over many years of fairly heavy high-altitude use too.But my preference for nylon over polyester is a preference, not an absolute. I prefer the nylon because it has significantly greater elasticity. Imho, this is a real benefit in a storm: the nylon absorbs the shocks.
As for the ‘sag’ – I have eliminated most of that by relying on some heavy bungee cord at the downwind end of the tunnels: that bungee cord is seriously stretched, and the stretch absorbs the sag if and when it occurs. Yes, that does mean my end stakes are always solid ones.
Also, I replaced the nylon guy ropes with Spectra to reduce and sag in them. This too seems to work well.
Cheers
Mar 23, 2019 at 10:52 am #3585136Yeah, well the silnylon/poly debate is for another thread.
I also use bungees (heavy duty hair ties) looped to the tarp tie-outs and twisted onto the stakes. I loop my guylines to them, too, meaning each bungee is doubled. Like Roger says, you really only need them on one side. But it doesn’t really matter which side. A good tug (about 20-30pounds or so) will usually pull them to about maximum extension. Using a single pole (similar to a Soloplex,) it will wobble enough to hold tension and prevent wind-hammer on both sides. While sustained winds are lesser through the ADKs (usually around 30-40mph,) we occasionally get some heavy duty gusts/downbursts of 60+mph…I expect them 2-3 times per year. The elasticity truly helps.
Mar 25, 2019 at 2:59 am #3585364Milan achieved a very taut canopy, partly by using polyester fabric, as he explains in detail earlier in this thread, and augmented by comments from Geoff.
The choice of fabric is a big deal when about to sink many hours into building a tent from scratch. So naturally, I’m looking for guidance wherever it can be found, and BPL-MYOG is one of the few places.The next tent has a less than one osy nylon inner and outer on the roof, but the bulk of the outer fabric covers both the vestibules and parts of inner, so could be polyester, and for this reason the details of Milan’s fabric choice interested me greatly. For the solo tent in mind, it comes out to about 1.78 oz added for the RBTR 20 D polyester XL, or with seam allowances, about 2 ounces. When attempting to get a wind resistant solo tent down to less than 2 lbs, 2 ounces here, or two ounces there, all add up and become an issue. Roger’s points make a lot of sense to me, are relevant to the OP’s quest for a more wind resistant shelter, and are helpful.
One thing, Roger. The walls of the longer dimension of the tent in mind are highly sloped, and supported by arched poles; but the shorter dimension of the side-entry tent covers the vestibules, both front and back, and are steeper. Will make them less steep, but they will be identical, so it makes little difference which side sports the shock cord connections to the stakes. Like Milan, wind resistance is the sine qua non for me, so the greater elasticity (not to be confused with sag) of nylon, as Roger outlines it, has be a consideration. But only so long as the design will keep the nylon from sagging to the point where flapping in the wind becomes a major issue, or even endangers the stability of the tent.
With tent design, I think all of the issues are ‘of a piece,’ as the saying goes, and must be weighed and considered together.
Mar 25, 2019 at 3:33 am #3585369@James
you really only need them on one side. But it doesn’t really matter which side. A good tug (about 20-30pounds or so) will usually pull them to about maximum extension.
@Sam
but they will be identical, so it makes little difference which side sports the shock cord connections to the stakes.I am not sure I am understanding either of these comments. What I am saying, and very strongly too, is that the anchors on the windward side or end must be solid cord (eg 3 mm nylon or 2 mm Spectra) and NOT elastic bungee cord.
If you let the windward anchors be bungee cord, the tent will move when hit by the wind. the panels will go slack and start to flap madly. That can easily lead to the destruction of the tent. I saw this demo’ed with a tunnel tent facing a large wind machine. There were bungee cords at the windward end, and when the wind machine was turned on the tent went … everywhere. It was awful!
But when my 4-pole winter tent was being hit by 100 kph winds from the end with solid nylon cord anchors, there was not a tremor of movement.
Yes, that does mean it’s the orientation of the tent (of whatever sort) relative to the wind which matters. It can be a big mistake to place more emphasis on the slope of the land than on the wind when pitching. Sure, you may end up with some tilt on your mat, but better that compared to losing the tent. Take that into account when selecting a site.
Cheers
Mar 25, 2019 at 1:19 pm #3585382you really only need them on one side. But it doesn’t really matter which side. A good tug (about 20-30pounds or so) will usually pull them to about maximum extension.
Sorry Roger, that was a bit unclear. The heavy duty hair ties I use are stretched out near maximum. This takes about 20-30 pounds of pressure. The mechanism was not explained. This also describes the hair ties acting similar to a solid line. Unlike the a plain old rubber band, which pretty much kept stretching to the breaking point, the hair ties are cloth covered (nylon or poly braid.) It has far less stretch than the maximum. So, by the time the poly shieth has been pulled out to the maximum stretch, it takes on a solid line characteristic. In a heavy sustained wind of 30-40mph they can take enough to hold soldly. On the four corners, I Sometimes I use two hair-ties together. Anyway, they are strong enough to pull two 7″ shepherds hook stakes loose. (Two together in a “claw” usually holds well on most ground.) Sometimes they break, for example when I tie the tarp off to a tree or rock. That’s OK. At this extreme (usually around 60+mph,) I would rather have them break, as opposed to the tarp being ripped. This has happened a couple times and makes for a rather uncomfortable night, though. But one or two in around 20 years, is OK. I usually carry about an ounce worth of spares. (I use them to tie stakes together, tie food packets in tight rolls, hold packets of chips closed, hold garbage bags together, etc…a few spares is handy.)
Those times really didn’t kill me, I don’t think. (‘Corse, that depends on your view point.) When the tarp does get wet and stretches, they take up the fabric slack, of course. Sometimes I find a hair tie broken into a single string, but still held together by the Loop-to-Loop connections I use. Not a big deal really, though it takes a minute to re-rig another in it’s place.
Hope that clears things up!
The hair ties perform both as a solid and an elastic line. Of course, good ones cost more than cheap ones. I far prefer the 1/8″ dia (or more), melted join, not the thin 1/16″ crimped metal join ones. - Hi,
-
AuthorPosts
- You must be logged in to reply to this topic.
Forum Posting
A Membership is required to post in the forums. Login or become a member to post in the member forums!
HAPPENING RIGHT NOW (February 11-21, 2025) - Shop Hyperlite Mountain Gear's Biggest Sale of the Year:
Our Community Posts are Moderated
Backpacking Light community posts are moderated and here to foster helpful and positive discussions about lightweight backpacking. Please be mindful of our values and boundaries and review our Community Guidelines prior to posting.
Get the Newsletter
Gear Research & Discovery Tools
- Browse our curated Gear Shop
- See the latest Gear Deals and Sales
- Our Recommendations
- Search for Gear on Sale with the Gear Finder
- Used Gear Swap
- Member Gear Reviews and BPL Gear Review Articles
- Browse by Gear Type or Brand.

