Topic
Membrane silpoly tarp advise needed
Forum Posting
A Membership is required to post in the forums. Login or become a member to post in the member forums!
Home › Forums › Gear Forums › Make Your Own Gear › Membrane silpoly tarp advise needed
- This topic has 19 replies, 5 voices, and was last updated 4 years ago by
 Sam Farrington.
-
AuthorPosts
-
Feb 1, 2021 at 10:11 am #3696696
Hi All,
I ordered some membrane silpoly to make a tarp for a hammock (fabric also on its way to Europe :)
I’ve read that with membrane silpoly it’s better to bond reinforcements on it and don’t sew it. Is that’s still the case?
And how do you attach the webbing for attachment points? I was thinking on a wider hem like 3/4″ and sew a xbox in the hem. Would that work?
Feb 1, 2021 at 12:22 pm #3696716Yes to the bonding, although, I didn’t bother bonding or sewing on my membrane PU4000 tarp, and they worked just fine. I just made a “sandwich” with the tarp and reinforcement sandwiched between the grosgrain on both sides, rather than just tacking the grosgrain to one side. This seemed to reinforce the area well. For attaching, I only used straight stitching. One in the hem of the tarp across the grosgrain, and then two more in the reinforcement area, spaced about 3/4” apart. The ridge line tieouts were done the same, except all of the tieout stitching was in the ridgeline seam. I didn’t have any issues with my pitching, but I also wasn’t dealing with high winds on any of my trips. Not that a 9×9 would be good for that anyway.
Feb 1, 2021 at 12:54 pm #3696726https://backpackinglight.com/forums/topic/best-adhesive-to-bond-silnylon-reinforcements-to-silnyon/

The x-mid tie out looks an idea in combination with a very low denier fly
Feb 1, 2021 at 1:31 pm #3696733OK thanks for the tips.
<p style=”text-align: left;”>The ridgeline tie out can be sewed on the seam. But for the corners it would more difficult. As its an 90 degree angle on the hem. Should I still sew the webbing in the hem or on the reinforcement?</p>
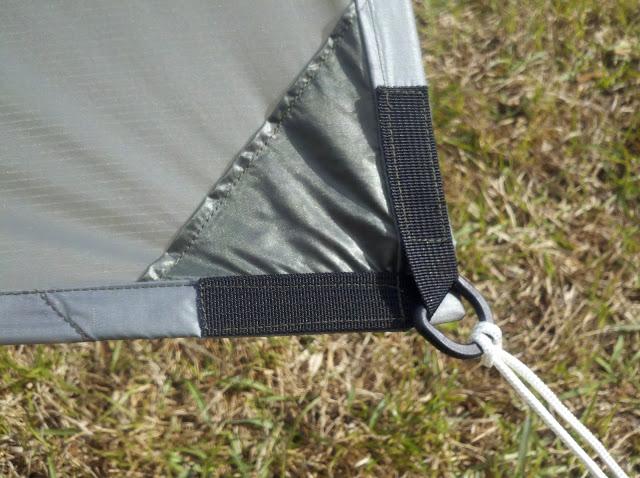
Like this? (hammock forum)Feb 1, 2021 at 1:57 pm #3696744on corners of my mid with membrane silpoly, I just sew webbing to the flat felled seam, no other reinforcement
at the peak, I put a reinforcement. I just sewed on some of the same fabric, no bonding. But that’s a good idea. Then, with a double layer of fabric, I sewed on another layer of 200D nylon.
Feb 1, 2021 at 2:27 pm #3696752you can use the same technique as with cuben tarps: sew on the reinforcement
https://backpackinglight.com/forums/topic/testing-cuben-fiber-d-c-f-tarp-tieouts/#post-3645554
same application on
Feb 1, 2021 at 2:42 pm #3696755my stitch method is similar to that shown on the x-mid picture above except for 2 things:
1) straight stitch instead of bartack
2) grosgrain is attached on both outside and inside, sandwiching the tarp fabric instead of tacking on top. As I said, I suffered no issues, even without gluing the corner reinforcement, or sewing, as you show in the picture above.
You could do it along the seams and put a d-ring if you wanted to, that would probably work fine also.Feb 1, 2021 at 9:19 pm #3696850Re: https://backpackinglight.com/forums/topic/best-adhesive-to-bond-silnylon-reinforcements-to-silnyon/
Ivo, you posted this link above. In the linked thread, you indicated that the silicone adhesive you use bonds very quickly. Also in that thread, Roger Caffin described his use of Permatex clear flowable windshield sealant, available in NAPA stores in the USA.
I tried Roger’s method, and it does work well, although it requires clamping for several days, 48 hours at a minimum, and with sil-coated fabrics, still can be peeled apart. Also, I’ve no idea how long the bond will hold up in outdoor use. But Roger’s method is far superior to the results I’ve had with the GE silicone glue. Have not tried the GE 2 sealant, either the indoor or the outdoor.
However, a silicone adhesive that bonds very quickly might be a major improvement. Could you describe more specifically that adhesive you use, along with sources if possible. Thank you.
Feb 2, 2021 at 12:00 am #3696870Thanks for the tips everybody!
What I have used for bonding is Elastosil E43.
Very strong and keeps its elasticity. The Vaude seamless is made entirely with elastosil. But its not cheap..
Now to determine what amount of cat cut on the ridgeline and for the sides..
Feb 2, 2021 at 2:08 pm #3696980Sam,
I use pure silicone such as https://www.bison.net/en/product/silicone-glass/2600
I use a spatula to apply a thin layer on the patch but not on the edge (twice the seam width) these still need to be folded (see pictures inside)
https://goo.gl/photos/tckGzwLfDUjKxdNT7
Fix the fly and mark the spot with a few pins. Silicone is very sticky so it has to be done fairly accurately. With a roller
I press the two parts together and this also removes air bubbles. Silicone cures through humidity (I think that can take a long time), but you can continue to work on your project because there is no load yet.You can easily peel a silicone bonding but this connection is strong in shear that is the purpose
Feb 2, 2021 at 3:54 pm #3697002I wonder if you might do a wide zigzag stitch around the border of the reinforcement after it has been glued and cured. I know there is likely an issue of it gumming up a needle, but it might prevent the peeling issues you are talking about. The peeling issue was precisely the reason I didn’t even bother gluing or sewing the perimeter of my reinforcements. The reinforcements for me were primarily to beef up the area right where the stitches are – the stitches are pulling on minimum 2 layers of fabric, more if the the stitch is in a hem or seam.
Feb 3, 2021 at 1:03 am #3697080Here are some links about elastosil and silnylon. These videos were the reason why I bonded all seams on my Trailstar copy. I did sew then too for extra duribilty. But bonding all seams with cat cuts is extremely difficult to do nice and neat. And takes a lot of time and patience.. But elastosil is a very strong glue and I still use it for patches.
 Feb 3, 2021 at 9:14 pm #3697266
Joost D,
Thank you. Ordered a small tube of the product you use. Like others, am looking for a product to bond sil-coated fabric patches to sil-coated canopy. Will try it out.
Feb 3, 2021 at 9:31 pm #3697267Ivo,
Per my last post, your contact adhesive for silicone sounds like what I need to avoid clamping. Do use a rubber roller much like the one pictured.Unfortunately, your supplier does not do sales on its website. But will spend some time looking for same or similar products in USA or Europe for that matter. Have found that the problems with the US postal service are improving, and also, I’ve had faster deliveries from the UK than other states in the USA.
Do plan some reinforcement sewing, but a good adhesive would keep the edges of the patches glued to the fabric from peeling around the edges. As for the needle gumming mentioned by Michael B, I just experiment to see what works. Will see what products provide the best adhesion, and which ones minimize needle gumming. So far, have used only Permatex noted above, and found no needle gumming; but as said, the clamping is tedious, and takes several days for each patch. Not my first choice.
Feb 3, 2021 at 10:41 pm #3697272I made a membrane flat tarp for my brother-in-law and recall the tediousness of the adhesive process. I think it is mostly because I don’t have a huge table to just lay stuff out on and leave it there for several days (I blame my toddler).
Feb 4, 2021 at 1:14 am #3697280I’m going for a flat tarp that I can use on the ground and for a hammock. 11ft ridgeline, and full width of the fabric (twice of course :) so should be about 11*9ft total I guess.
Any recommendations on cat cuts?
Feb 4, 2021 at 8:00 am #3697315Is there a flat felled seam on the ridgeline?
If so, you could do the first row of stitches of the flat felled seam with no cat cut.
Finish the flat felled seam only at the very ends. Sew on the guy line loops.
Suspend the tarp. Look at the ridgeline and pinch out with your fingers where a reasonable curve would be. Measure the deflection at the center.
Then go back and lay out a cat curve with that deflection and finish the flat felled seam.
Feb 4, 2021 at 8:21 am #3697320If you are making a flat tarp, I would caution against a cat cut in the ridge, as it will limit your pitching options. I would do a couple inches on the sides to help with a tight pitch along the edges. If you want to do a cut cut along the ridge line knowing that you will only pitch it one way, I would say 2 to 3 inches would probably get you where you want.
https://dutchwaregear.com/2017/07/21/diyers-guide-to-cat-cuts/
Feb 4, 2021 at 9:54 am #3697350Primarily I’m going to use it for a hammock. (hammock fabric is on its way with the membrane silpoly)
So I am considering 2 design. A hex tarp, but that wil limit ground use a bit I think. Or a flat tarp that can be used for ground use too. If I use a flat tarp it will be mostly an a frame configuration.
Feb 5, 2021 at 10:10 pm #3697687Michael B,
The best thing I’ve found is one of the ping-pong tables where the sides fold up to a vertical position. They have four legs toward the middle of the table, on casters, and there are legs near the four outer corners that unfold from the the table bottom when the two table halves are lowered. So the table can be folded up close to flat and wheeled about to some place where you want it, usually against a wall.The cheaper tables, from places like W-mart are made of particle board, which is great for pinning or tacking fabric, but eventually the table top will cave a little, and a nice flat surface is gone. The more rigid tops are quite heavy. Found one in the local classified, and the owner of the estate was kind enough to use his truck to bring it to my place and leave it just outside the basement walk-out, where tarps were wrapped over it to keep the rain and snow off it. So recommend installation in the room where it will be used ASAP.
The tables when opened are 5′ wide and 9′ long. Also use one end of the table for holding up large fabric panels while sewing them, or assembling them and pinning the lapped seams just where they should be before sewing. Pinning lapped seams on the flat table takes a while to learn, but beats doing it on a fiberboard laid on the floor. Kudos to those who have machines that do it, and have learned how to use them.
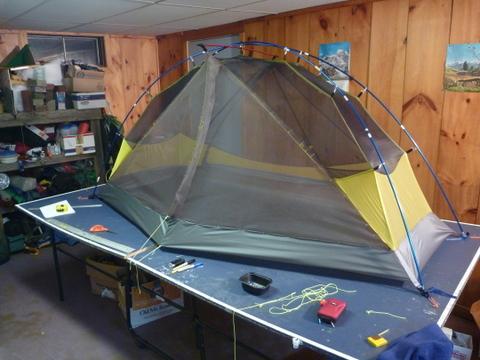
The biggest challenge has been finding places to put all the stuff that accumulates on the table between projects. Here’s a photo of the table in use, though:
As you can see, the table had begun to cave even then. The biggest deal will be getting it to the dump after the new table goes in. Visible is the seam being pinned. I think it would have been better to first trace the cat-cut, pin the seam, and see how it looked with the inner tent set up as in the photo.While the ‘draping cord’ method is better to locate the seam than numerous dots like points on a graph, tracing on the fabric from arcs made of old tent poles has worked as well or better so far. They form an arc called a parabola, which is very close to the formula for the cat-cut arcs. But liked the picture of the cat with the knife.
-
AuthorPosts


 I press the two parts together and this also removes air bubbles. Silicone cures through humidity (I think that can take a long time), but you can continue to work on your project because there is no load yet.

- You must be logged in to reply to this topic.
Forum Posting
A Membership is required to post in the forums. Login or become a member to post in the member forums!
HAPPENING RIGHT NOW (February 11-21, 2025) - Shop Hyperlite Mountain Gear's Biggest Sale of the Year:

Our Community Posts are Moderated
Backpacking Light community posts are moderated and here to foster helpful and positive discussions about lightweight backpacking. Please be mindful of our values and boundaries and review our Community Guidelines prior to posting.
Get the Newsletter
Gear Research & Discovery Tools
- Browse our curated Gear Shop
- See the latest Gear Deals and Sales
- Our Recommendations
- Search for Gear on Sale with the Gear Finder
- Used Gear Swap
- Member Gear Reviews and BPL Gear Review Articles
- Browse by Gear Type or Brand.
