Topic
Lateral tunnel tent?
Forum Posting
A Membership is required to post in the forums. Login or become a member to post in the member forums!
Home › Forums › Gear Forums › Make Your Own Gear › Lateral tunnel tent?
- This topic has 87 replies, 10 voices, and was last updated 5 years, 9 months ago by
 Sam Farrington.
-
AuthorPosts
-
Sep 27, 2018 at 2:03 pm #3557547
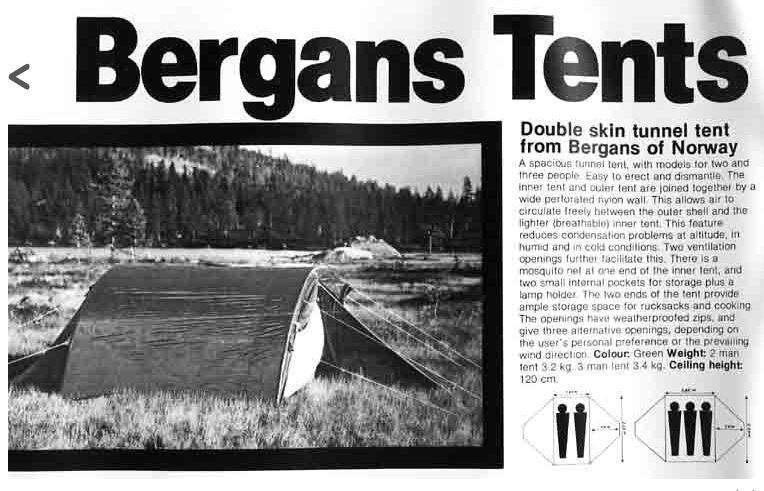
“but this thread I understood to be about getting into the tent directly from the side”
looks like that’s precisely what the Bergans tent does:
 Sep 27, 2018 at 10:28 pm #3557584
I see now…

what we see there is the end of the tent (narrow side) not the long side…
I had this version in mind…
 Sep 28, 2018 at 2:41 am #3557615
My experience was in the 2 man version.
Perhaps the larger 3-P version behaves differently?
If the floor plan on the inner tent was square and there was a third pole in the middle would that also change the way the tent behaves>?
I am becoming more interested because I have the makings of 3 poles
Sep 29, 2018 at 4:30 am #3557755Franco and Edward,
As often happens, the term ‘side entry’ or ‘lateral’ are not entirely clear.
The photos on the first page(s) of this thread suggest that the OP raised different options in readers’ minds.
For a solo and perhaps even a 2P tent, the best option I think is to lengthen the distances between the pole ends of each hoop so that one end is at the sleeper’s head, and one at the foot. This leaves the structure with hoop openings on each side of the sleeper that are better suited for placement of vestibules. Alternatively, putting the door(s) on the side of the tunnel shape, as in Franco’s image posted above, has some shortcomings and only one advantage I can see, which is the large porch. That is fine for campground use, but not what I would take above timberline, or to the very windy terrain in Scotland, Australia or even the open prairies in the USA.Edward’s image of a Bergans tent, linked above, shows the hoops are spaced widely apart, suggesting that the tent is a 2P or 3P tent. How hoops separated that much from each other could clap together in the wind is a mystery to me. But I can see how with enough wind pressure, hoops angled away from each other at the peaks, and joined at ground level could pull out supporting pegs and clap together, like the closing of a clamshell. My argument has been that such an event is much less likely to happen if the hoops angle or cant outward at the peaks, coming together at their base. It is a basic matter of leverage, where a support is not vertical; but rather canted or angled toward the wind so that the tent will be less likely to blow over onto the occupant. Hence, the hoops on tunnels from the late Jack Stephenson’s tents were angled away from each other. Protection from the force of winds hitting the tent between the hoops can be addressed by side-guys, as well as gothic arches formed by adding an elbow at the top of each hoop. I think this approach creates a more wind stable tent, with the added advantage of side entries protected by vestibules, which is what the OP may have been looking for.
May 5, 2019 at 3:24 am #3591692Bringing this back to life, as I’m slowly getting the pieces together.
Here’s a proof of concept model for the structure. Not the easiest images to make sense of as the white wire coat hanger looks about the same as the string. The tent will use two poles, not just one like the model. The purpose of this is to prove the design’s stability. There was some mention of the ground lines pulling the pole tips together. That happens in free space, but not when pressed against the ground. What may not be readily apparent is that this is actually half of a bicycle wheel – a structure known for it’s high strength to weight ratio. It just has a very wide ‘hub’ and few spokes. I can pull fairly hard on the strings before the wire starts to bow.
The two photos show the strings at different lengths. They represent the end bells for the vestibules. Their slope would be more like 45d – 60d in the real tent. The strings will be replaced by seams joining triangular panels.

 May 17, 2019 at 5:22 am #3593373
Rene,
The top photo looks quite cramped at the foot end, but liked the bottom photo, especially for its use of Caffin-shaped hoops. It has close to a square footprint, so suppose the direction of sleepers might be oriented either way. Not sure what you’d like the models to look like with an additional hoop.Since I’ve designed only solo tents, forgot to note above that for larger hoops on a 2P lateral tunnel, when hoops are separated by more than three feet at the apexes, there should be a short spreader pole between the apexes to hold them apart, and also prevent rain or snow from collecting on top. This should not add much weight if the pole is, say, 4 feet long. A carbon pole that weighs around a quarter oz per foot, can do this with an oz, plus ferrules, shock cord and end tips.
The trick is to design the spreader pole and its connections so that it sheds precip by bowing upward but will not rotate to bow downward – truly a disaster. But some of the designs by Steve Noall and others more recently, do this effectively by having an extended spreader pole supporting vent covers. On other models Steve also had the spreaders extend even further to form another hoop, creating support for vestibules or extended floor space.
In the days before carbon, this added a lot of weight, and with a priority on cutting weight, even with carbon poles, the goal is to limit pole length as much as possible. So would suggest a design that keeps the spreader pole as short as possible.
May 17, 2019 at 5:47 am #3593376Hi Sam
But NONE of my tunnels have ever had a ridge or spreader pole as you describe – yet they function very well. “Why is this so?”
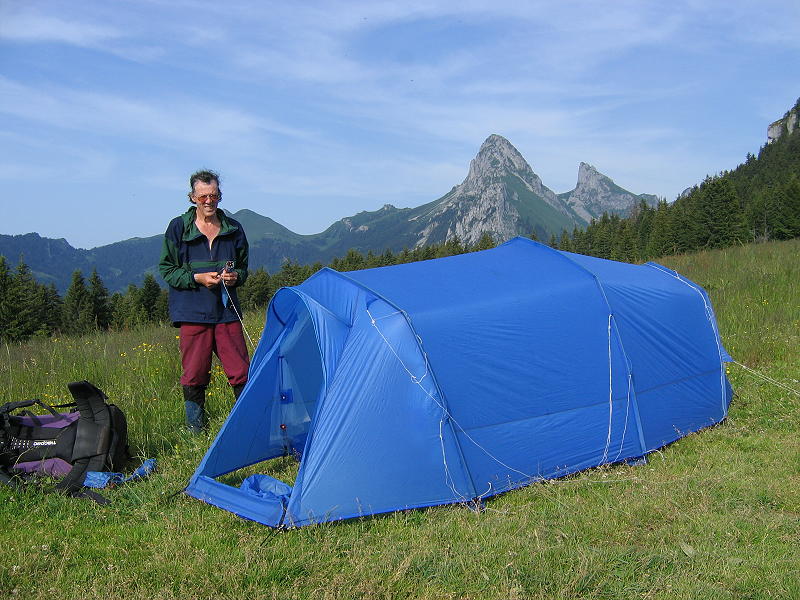
Basically, the answer lies in getting lots of lengthwise tension into the fly, especially around the ridge. Then any ridge pole is redundant. In fact, tension in the fabric is MUCH better than compression in a pole. How to do this? There are two answers.
The first is in the design of the tent itself, coupled with firm anchors at the windward end and strong (bungee) tension at the lee end. This in itself is sufficient, as you can see in the photo below.

The second is that on my tunnels at least, there are genuine end guy ropes at each end, and these pull the tops of the poles arches apart. You can see two of these in the photo below – taken at Mt Brevant opposite Mt Blanc in a fairly strong wind. They are not essential, but they sure do guarantee things.

Can you see the tent deflecting in the wind? Nope – it just sat there all night. Obviously I could decorate this thread with lots more photos of my tents – but I should not.
Cheers
May 19, 2019 at 5:07 am #3593627Hi Roger,
Did not mean to suggest that your tunnels would benefit from spreader poles (Gasp!). This being Rene’s lateral tunnel tent thread I think he is talking about ‘side entry’ tunnels, not in the side of the tunnel; but rather where the sleeper(s) lie parallel or perhaps diagonally to the hoops, and not perpendicular as in your tunnels. Rene can correct me if I’ve got it wrong.These tents use much larger hoops, especially if for 2-3 persons, as I believe you pointed out in a recent thread. This creates a less stable structure for which the addition of a spreader pole on the ridge becomes a consideration. However, you’ll get no argument from me since I’m focused on side entry solo tents with ridges no more than 3 feet, or less than a meter long, and the goal is to avoid the additional weight of a spreader or ridge pole between the peaks of the hoops, whether they are elbowed once, twice, thrice or not at all. I like the way Rene’s models are designed so that the fabric seams cross the elbows and continue into the vestibules, adding a lot of strength to the structure I think.
Those are great looking tents in your photos, and the scenery is marvelous. Hope I can get to Colorado this summer to enjoy the alpine scenery in the Rawahs and Never Summer ranges. Every time I go, the glaciers in the Rawahs seem to have melted yet more, and assume they will eventually be totally gone. But it is protected wilderness, and it will still be beautiful to hike and camp there.
May 19, 2019 at 7:45 am #3593642I went back to Rene’s 1st posting and had another look at the tent he started with. I stand by my original comments about the long poles, and will add that imho that is more of a tarp tent than a tunnel. Yes, it has two hoop poles, but they are very long. The web site claims good wind resistance, but they don’t mention from what angle. I imagine that the design, with adequate anchors, could take a fair bit of wind at right angles to the poles, but I would not want to be in the tent if the wind swung around to align with the poles.
I have not crawled all the way through the thread, so I can’t remember what other designs there were.
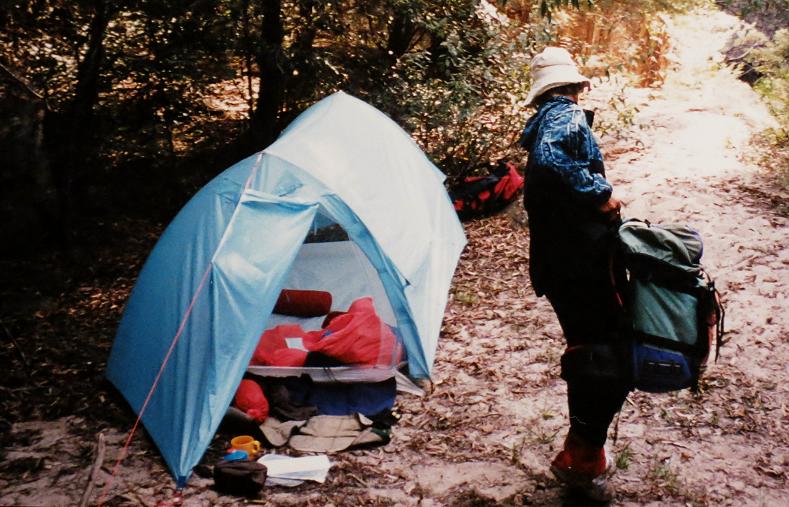
Anyhow, it is possible to get a sort of side entry with a tunnel tent. I would NOT want the side entry to be over the groundsheet, as that would put rain into the bathtub groundsheet, and getting in with wet clothes would also put mud and water on the groundsheet and my gear. So this is the first tunnel tent I made, with a sort-of side entry.

Night 2, Coorongooba ck, Jan 2001, in Wollemi NP. Rough country.Cheers
May 19, 2019 at 11:22 am #3593650Actually, with the lighter poles in sleeves, you could add a bit of a flap inside to add extra stiffness.
 May 19, 2019 at 8:47 pm #3593708
You could, and that would add a bit of stiffness.
Unfortunately, my gut feeling is that the flaps could also make the design a bit more susceptible to catastrophic failure at some point. The bending force could be concentrated a bit more on the opposite side to the wind – but one would need to do some experimental work to see whether I am right. FEA is fine, but it can seldom handle large distortions.Cheers
May 20, 2019 at 12:16 pm #3593780Mosty statics from roof truss design. However the main problem is it only works in a single direction without a rigid crossmember. Billowing out on the lee side would simply bow the roof member removing the tension, though this is a lesser stress component than the windward side. However, the windward side would remain very stiff, given firmly anchored endpoints.
Since the pole/web structure is quite stiff (using a 3″ spectra DCF/cuben cloth) most of the stress would be concentrated at the joint between the web system. (In your case with straight poles and angled joints, all the flex would be concentrated at the angled joints leading to potential catastrophic failure at the joint. Of course you could simply use spectra in a continuous 3″ flap.) Unfortunately it only addresses stress in a single direction.
You could try some light poles using a dual pole architecture, an inner and outer in a 3″ dual sleeve. You add a lot of complexity (for erection and design) but a dual hoop separated by a 3″ web would increase wind resistance and snow loading a LOT. Considering the entire system, the windward pressure should transfer to the leeward side (well about 50% of it anyway.)
 May 21, 2019 at 2:15 am #3593890
First, posters should be able to use pictures of marketed tents to illustrate a concept, regardless of the merits of that particular tent, and I took Rene’s link to a pic of a Goshawk with that in mind.
Without pictures and diagrams, discussion can become so obtuse that there is not much understanding. And it is a lot easier to copy and paste or link some photos to illustrate a concept than building a prototype, or even just a model. If we had to build a prototype every time to illustrate a concept, MYOG would be out of business.
Second, I think Rene’s models earlier on this page illustrate some innovative concepts, and suggest how Roger’s 3-elbow pole design might be incorporated into a lateral tunnel design. And while Rene’s models do not show where the doors would be, side entries may be what he had in mind, as that is clear from his OP and Goshawk picture.
Without getting into semantics about what is and is not a tunnel, it is obvious that Roger is correct about the considerably greater length of the Goshawk poles than those in his tunnels, and he is right about the stability issues created by the longer poles. However, James suggested some ways to address those issues, as have I, on this and other threads. We may eventually get to an optimum solution for a lateral, side entry tent. Some of the pics on this and other threads suggest that progress is being made.
Granted, I’d love to be a first across the finish line, but would be just fine with building from other’s designs, as have been doing for years with modded tents, some of which have been posted here. Suggest that what will actually happen is a variety of ideas will be combined and incorporated into a design for an optimum tent.
That would be great, because IMO you certainly can’t just go out and buy one. -
AuthorPosts
- You must be logged in to reply to this topic.
Forum Posting
A Membership is required to post in the forums. Login or become a member to post in the member forums!
Trail Days Online! 2025 is this week:
Thursday, February 27 through Saturday, March 1 - Registration is Free.
Our Community Posts are Moderated
Backpacking Light community posts are moderated and here to foster helpful and positive discussions about lightweight backpacking. Please be mindful of our values and boundaries and review our Community Guidelines prior to posting.
Get the Newsletter
Gear Research & Discovery Tools
- Browse our curated Gear Shop
- See the latest Gear Deals and Sales
- Our Recommendations
- Search for Gear on Sale with the Gear Finder
- Used Gear Swap
- Member Gear Reviews and BPL Gear Review Articles
- Browse by Gear Type or Brand.


