Topic
Extremely wind-resistant 4 fuel SUL cooking system
Forum Posting
A Membership is required to post in the forums. Login or become a member to post in the member forums!
Home › Forums › Gear Forums › Make Your Own Gear › Extremely wind-resistant 4 fuel SUL cooking system
- This topic has 37 replies, 10 voices, and was last updated 2 years, 11 months ago by
 David Gardner.
-
AuthorPosts
-
Jan 5, 2022 at 6:33 pm #3736207
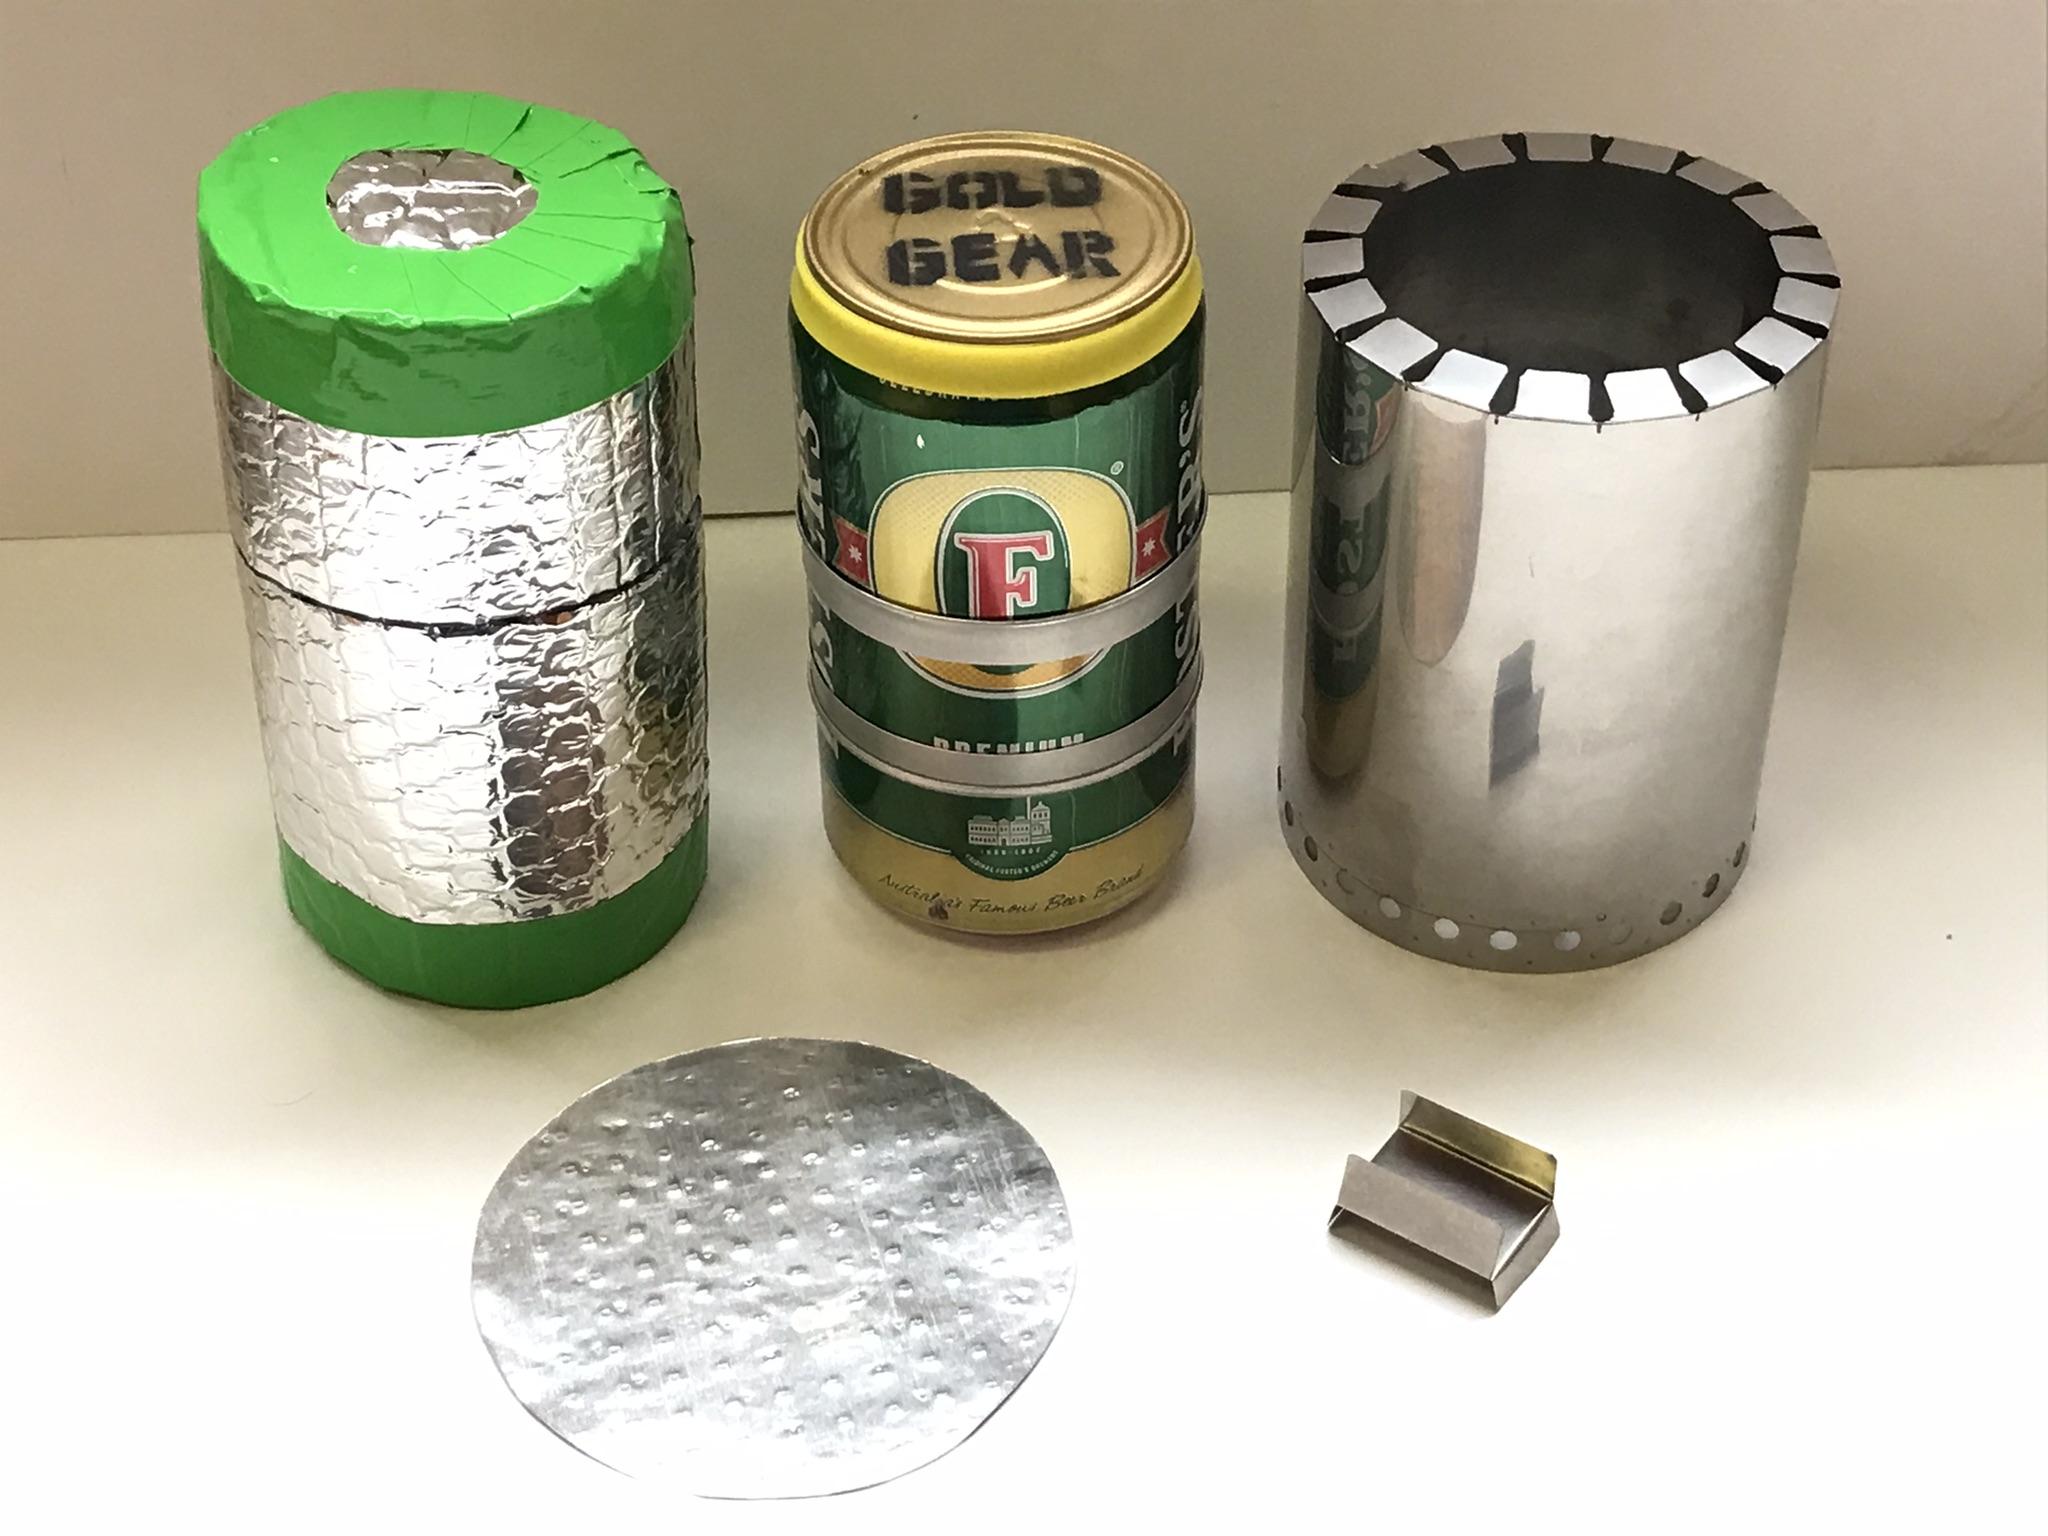
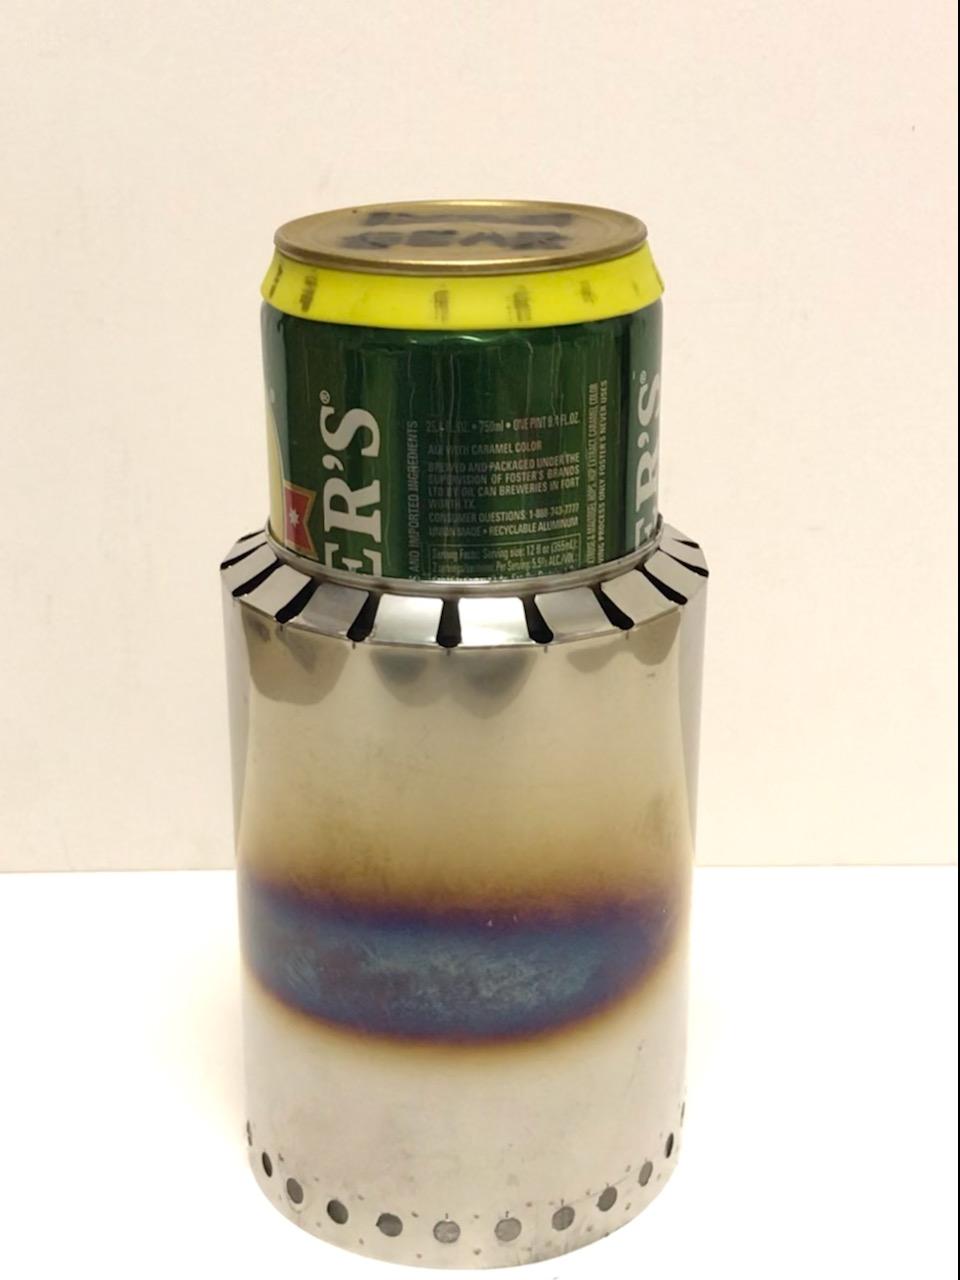
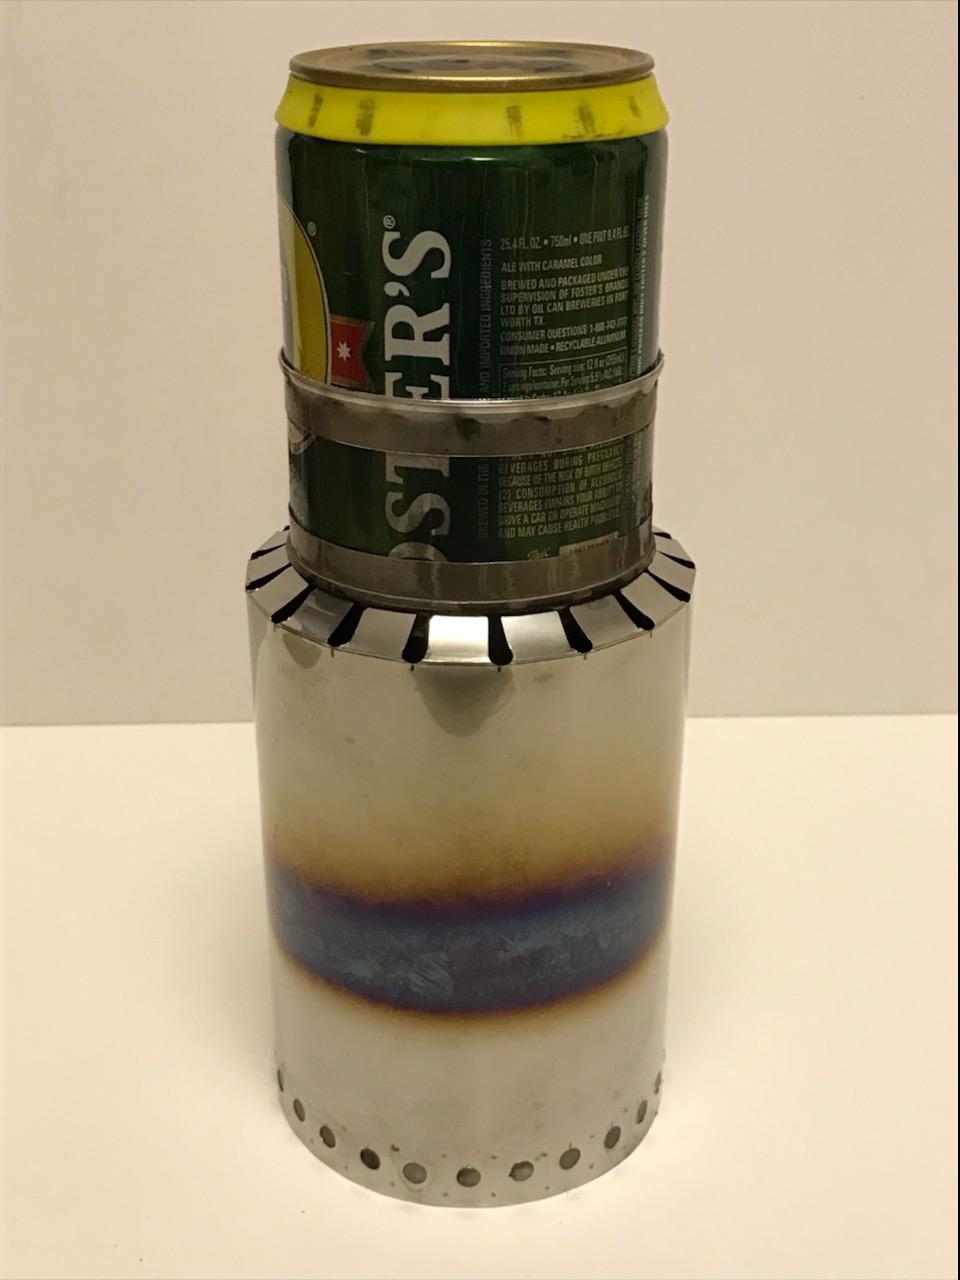
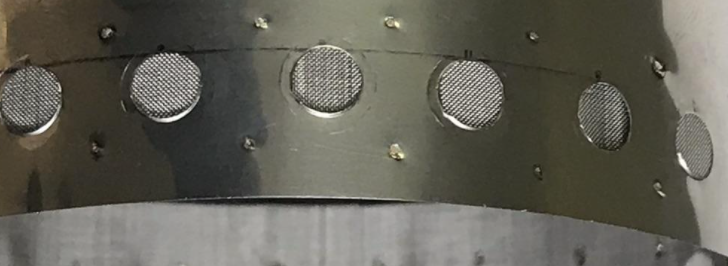
Top exhaust with stainless steel mesh spot-welded to the air intake holes. Works with Esbits, alcohol, canister stoves and wood. Boiled 2 cups of 50* F water in 6:32 min. using 14 gm of alcohol. Haven’t tried the other fuels yet.
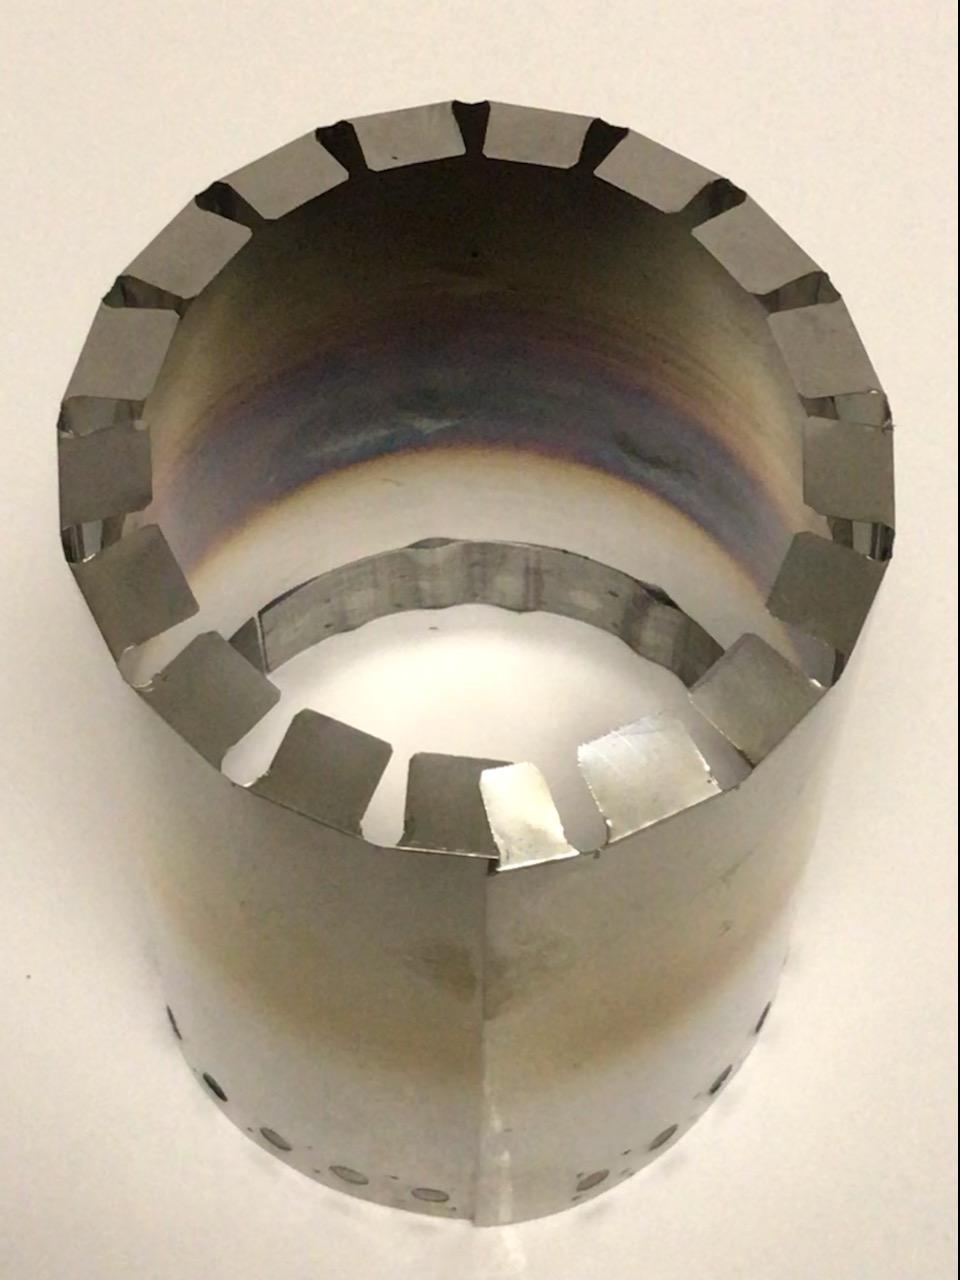
The .003″ stainless steel windscreen:


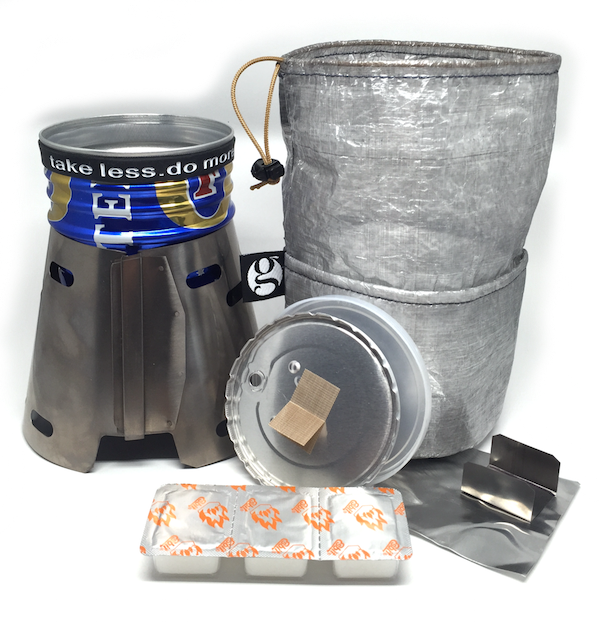
For packing, everything goes in the can, the windscreen wraps tightly around the outside of the can and the cozy holds everything in place. This packing system is very strong and resistant to damage or deformation.
3.1 oz set up for Esbit:

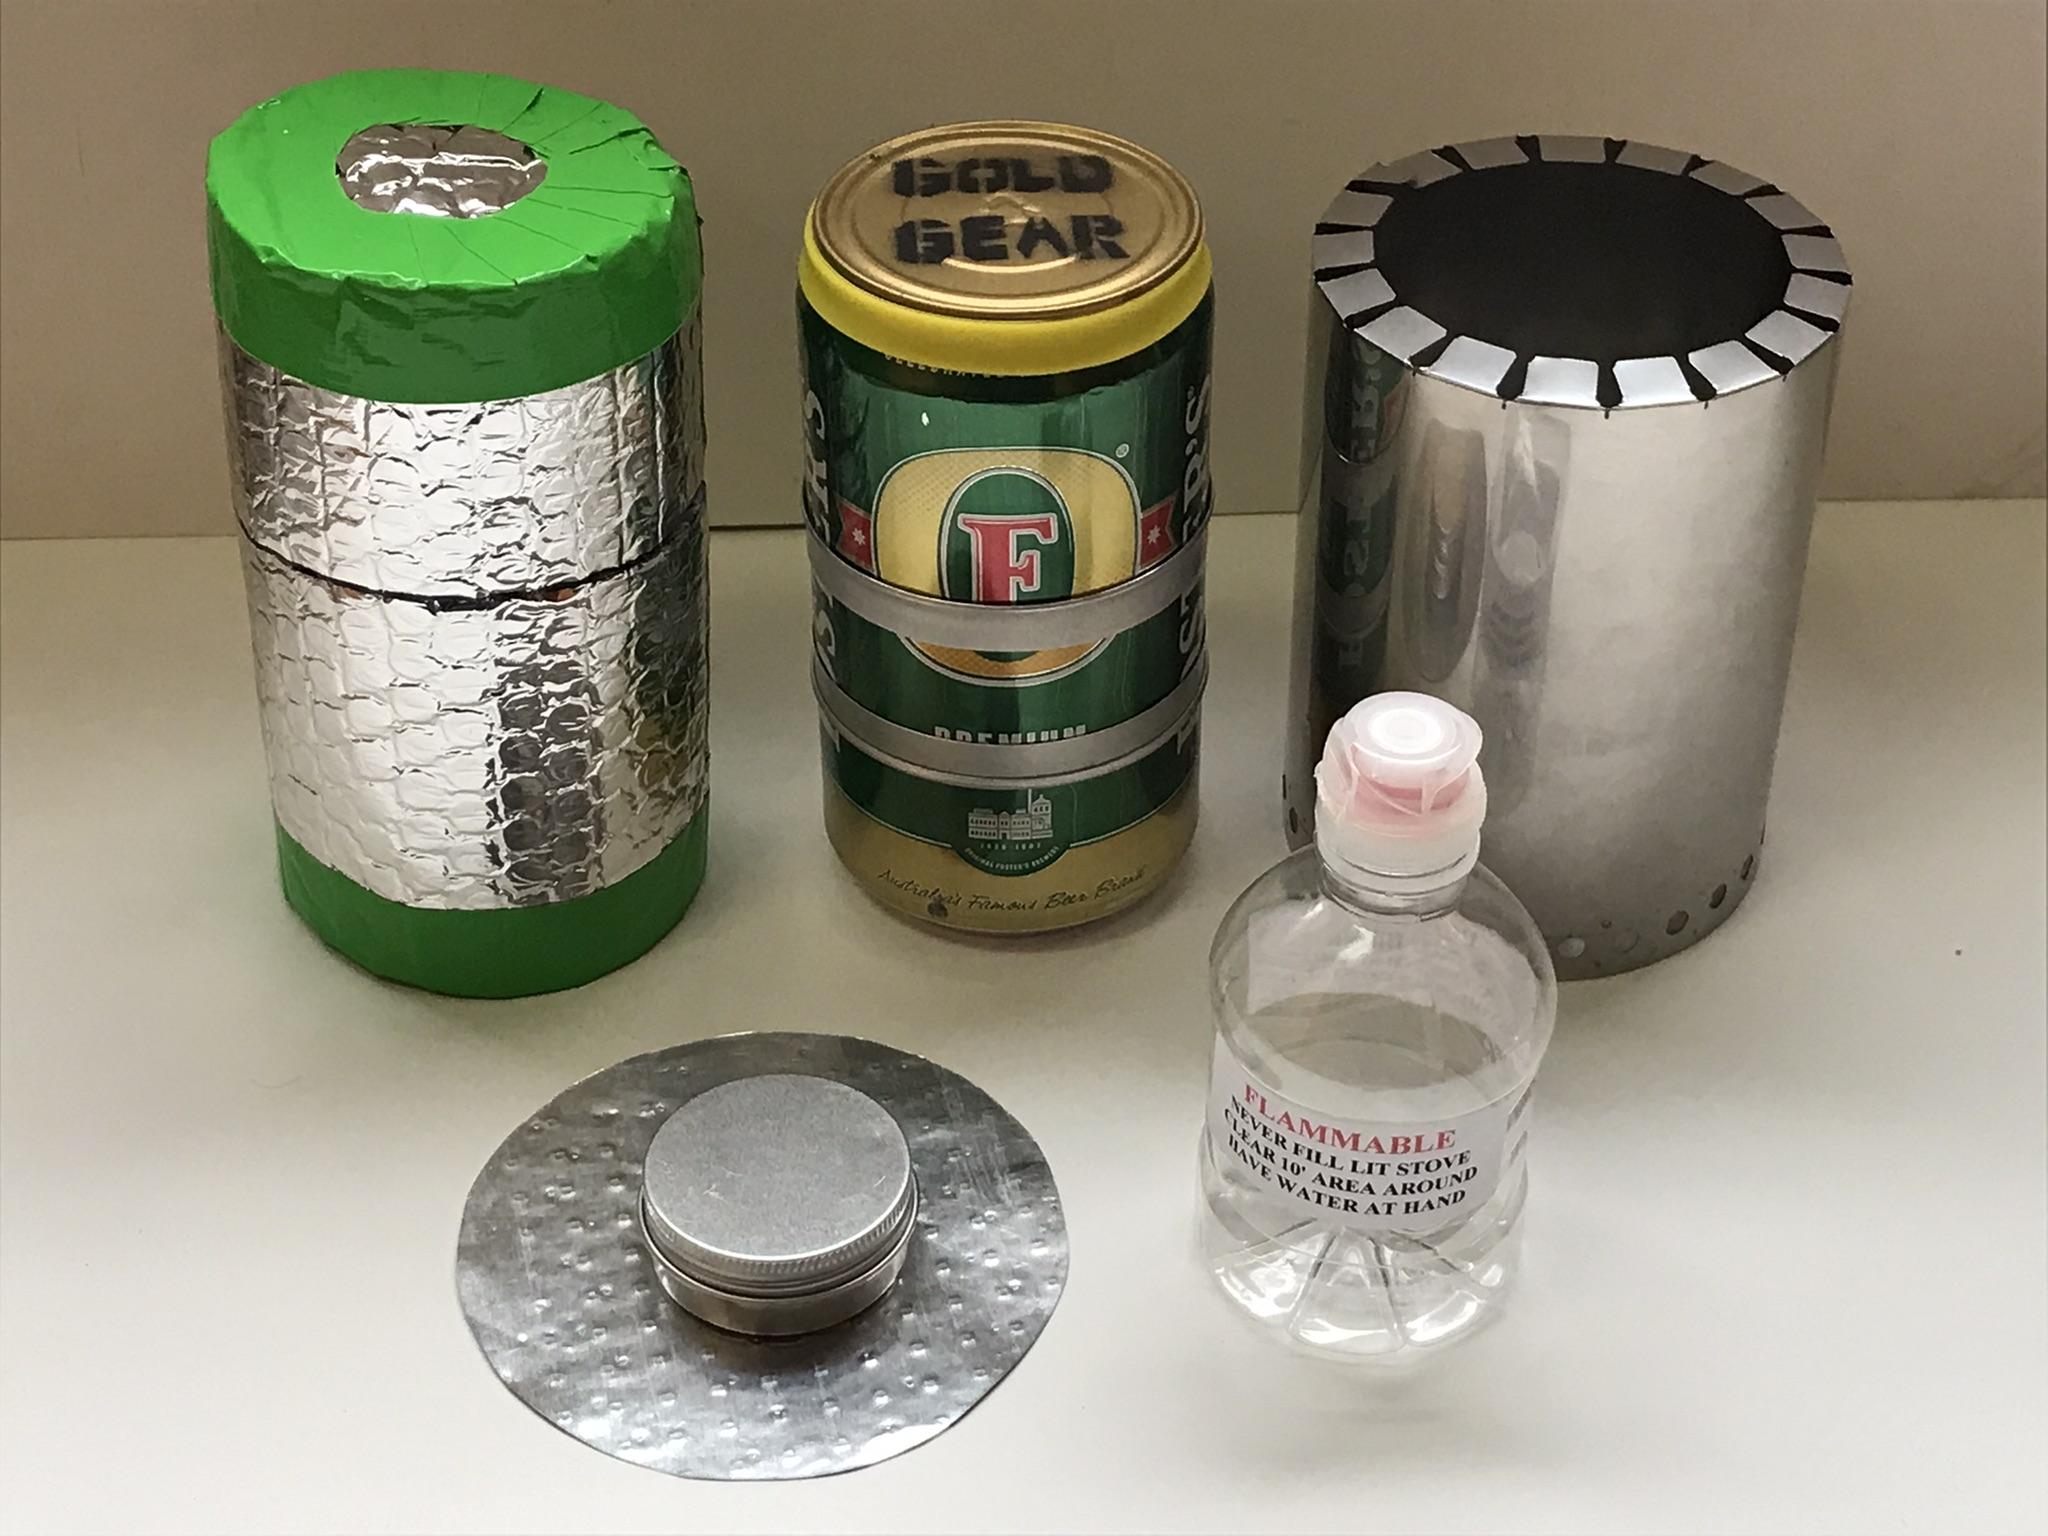
The 4.2 oz alcohol system, with ceramic wick burner and 8 oz fuel bottle:

The 4.0 oz canister stove system for a BRST3000T, which includes a burn chamber baffle and canister heat shield:

The wood kit weighs 3.1 oz and substitutes a titanium base sheet instead of aluminum.
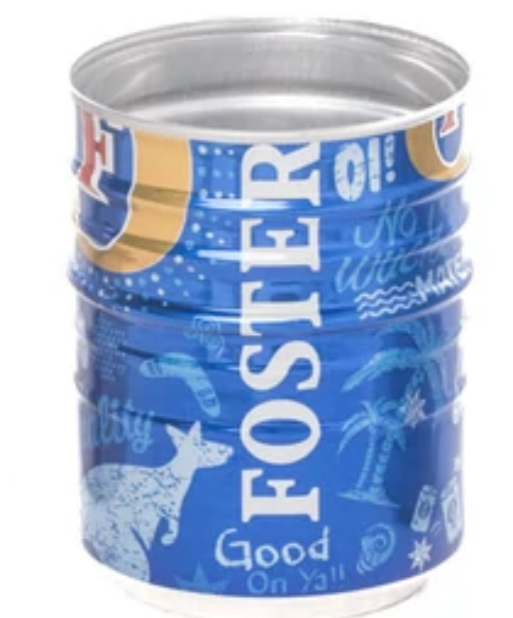
The Foster’s can is reinforced with 2 ribs cut from cat food cans, set at 1 cup and 2 cup heights.
When using Esbit or alcohol:

When burning wood:

When using the BRS3000T:
 Jan 5, 2022 at 7:29 pm #3736211
Nice work David – I know you’ve been working with all of these components for a long time. It’s fun to see it all come together!
Jan 5, 2022 at 7:30 pm #3736212Very slick, very nice, very light. Great job David!
Jan 5, 2022 at 8:05 pm #3736214Thanks guys. I first started messing around with UL alcohol set ups in 2012, and I don’t know how many thousands of different stove/pot/windscreen I’ve made and tested. I lost count a long time ago. I did the math once and there was something like a million different possible combinations of the various components. So it has been a long process of prototyping, testing, and refinements.
The goal of a very weather-resistant, SUL 4-fuel system came after I bought an MSR Windburner. I love everything about it except its staggering weight, and single fuel option. And if you’re a prepper/survivalist type you don’t want to have to rely on obtaining canisters or Esbits, but you can usually find methyl or ethyl alcohol, and nearly always wood/twigs/leaves. (Throw in one of Jon’s isopropyl burners and you really be set!)
I’ll be doing some measured wind tests and report the results. Just ordered some ethyl denatured with methyl and isopropyl, and hopefully zero petrochemicals. Should be interesting.
Making and testing these cook kits and my saws has basically been a very advanced form of arts & crafts therapy to cope with a ton of personal crises that started 4 years and then blew up during the pandemic, lockdowns, etc. Really looking forward to 2022 and retiring at the end of the year. From my day job as a bankruptcy lawyer. Never from making!
Jan 5, 2022 at 8:18 pm #3736216Thats sweet!! I too like my windburner but I dislike that it only works with cannister. Would have loved it to to be multi fuel.. even able to throw it on a fire.. which unfortunately is not possible. That set up you created is awesome!!!!
Jan 5, 2022 at 8:30 pm #3736218Very sweet. Much envy.
Jan 5, 2022 at 8:36 pm #3736219I hope to be selling them soon. Working with a local shop to water-cut the stainless steel, and possibly the Reflectix for the cozy too. Also trying to figure out who to contact about making heat-welded cozies to avoid the assembly time and extra grams of the tape.
Also working on an aluminum heat exchanger base to graft the Foster’s cans onto. Almost done building a propane-fired forge, and plan to try some investment and sand casting of these:
 Jan 5, 2022 at 8:40 pm #3736220
David these look fantastic. Alcohol, esbit, gas and wood at this weight is amazing. Well done!
Jan 6, 2022 at 9:03 am #3736237Add me to the list!!!
Jan 6, 2022 at 2:42 pm #3736322Roger that dirtbag.
I’ve been trying to source 750 ml aluminum, SS and Ti bottles/pots/bots/mugs at a reasonable price point with dimensions similar to the Foster’s can, or perhaps with a slightly better width-to-height ratio. I’ve spent hours online searching but haven’t come that close. It would be ideal to find replacements in all three materials so I can offer them as customer options. Anybody have any ideas?
Jan 6, 2022 at 3:58 pm #373633121.7 oz aluminum screw top can. They also have just cans with a push on lid.
https://www.usplastic.com/catalog/item.aspx?itemid=142241
500 ml beer can (BPA free) for home canning
Happy Hunting!
Jan 6, 2022 at 4:19 pm #373633332 oz beer can for the home made brewing crowd. 149 cans for $200
Jan 6, 2022 at 5:25 pm #3736335David that rig is amazing! The execution in really impressive! I’ll bet you are a very thorough legal counselor! One I’d like to have on my side.
Hey what is the green tape? on the coozie? (or cozy) I use a metallic tape on the reflectix and can keep the top ‘half’ (absent the lid) on the pot while heating to a bare beginning boil roll; then I slip on the bottom, throw in the food and let it steep for @ 15 minutes.
Jan 7, 2022 at 10:59 am #3736399Thanks for the links Jon. I checked them out, and I really like the 21 oz screw top and slip top storage cans. I’m ordering one of each to compare and test IRL.
obx, the tape is some generic “duct tape” that I saw at a Staples store in the school supplies section next to glitter and patterned tapes used to decorate notebooks or something. Huge variety of bright colors. Super sticky and thinner than real duct tape. I’ve tried a cozy hat on my cans in the past, but the heat of the stove melts the mylar of the Reflectix, regardless of what tape I use. Do you run the metallic tape all the way around the edge of the cozy to protect the mylar, or just the seams like on mine? I use the same cooking/simmering technique as you, which saves fuel and eliminates the need for a simmer ring or adjustable flame. Reflectix cozies are incredibly effective – I’ve tested a can full of boiling water nestled inside a cozy and found that the temperature at 30 minutes was still 191* F, at 60 minutes 165* F, and 130* F at 90 minutes. Plenty of time to “cook” anything I ever take backpacking.
Jan 7, 2022 at 2:02 pm #3736404Nice work David. Many years ago, I purchased a Fosters can from Zelph Stoves and it had several ridges formed into the weakest part (the middle) of the can. This made it stronger, provided a bit of a lip and also showed you the fill lines for 1 cup, 1.5 cups and 2 cups. Not sure how he did this, but it did not look to be added later like your two ribs. Something to consider saving you a few grams for your set up.
Jan 7, 2022 at 2:24 pm #3736405I wish I could. I tried for years to figure out how Zelph did that. I was able to do it only if I annealed the cans first, but then they are so soft and ductile that you have to be super careful with them. I recently got on to something else though, a couple in Europe who used a hydraulic press to push down on the top of soda cans, and when they did so, at a certain point, ridges that looked just like Zelph’s would just pop out. I have acquired a hydraulic press. Now I’m trying to make a couple of fixtures so that the ridges pop out only where I want them. We’ll see.
Ultimately I intend to source or make an aluminum Foster’s Can Subsitute (FCS) with walls thick enough to be truly robust.
Jan 7, 2022 at 2:56 pm #3736407A bead roller should work. Or a DIY version
https://www.instructables.com/Tiffin-Box-from-Tuna-Cans/
Jan 7, 2022 at 5:43 pm #3736422Beer can with ridges:
 Jan 7, 2022 at 8:17 pm #3736430Jan 7, 2022 at 9:03 pm #3736431
I tried both professional and DIY bead rollers. Tried everything I could think of and had help from a machinist too, modified them and tried again, etc., but it never worked for me. The can always split at each ridge before they were even 1/16″ out, unless I annealed the cans. I obviously missed something, but I could never figure it out. I remember at one of the NorCal GGG’s many years ago Trail Designs showed me some cans they had ridged, but their ridges were a spiral that wound up the can and wouldn’t work to support the pot on the windscreen.
Dan, I remember your Conquistador rig very well. You figured out how to make ridges long ago. Now that you’re retired from the can business, would you be willing to share your technique? I’m sure the community would appreciate it, and it would be nice if the knowledge wasn’t lost to the world.
Jan 8, 2022 at 7:28 am #3736443I’m not able to pass along the manner in which I create the ridges and wide mouth features.
When the pandemic is over my son will continue making the Fosters pot as seen in this link:
 Jan 8, 2022 at 5:55 pm #3736466
Something like this: Nashua 2.83 in. x 50 yd. 330X Extreme Weather HVAC Foil Duct Tape. There’s lots of variations. I put a ring around the bottom and cover the exposed reflectix cells. I use an original jetboil which by now is probably judged to be extremely heavy and almost retro but I like the speed and simplicity. I do use a ti caldera cone. I kept meeting guys on the AT who convinced me the elimination of FAF was worth it.
My coozies don’t look anywhere near as crisp, neat and precisely executed as yours but they work and no melting issues and yes I can walk around and do all sorts of stuff with a hot cup of Joe or while a meal is soaking. I’ll try and get a photo sometime tomorrow. We are currently crazy busy.
Jan 8, 2022 at 7:44 pm #3736473David, what is the reason for blocking most of the air from your air intake holes on the windscreen?
Jan 8, 2022 at 11:26 pm #3736482Making ridges which bulge outwards is a LOT harder than making ones which bulge inwards. The reason is that the aluminium in a can is highly tempered and does NOT want to stretch any more. But it is willing to be compressed a little bit.
However, there are ways . . .
You will need to make up some jigs and have a lathe. If you clamp one end of the can in the lathe chuck and support the other end with something held in the tailstock, and then spin it, you can slowly change the shape of the aluminium a little bit. This is called ‘spinning’. Emphasis on the SLOWLY bit.I will add that commercial spinning machines are massive and usually use hydraulics to generate the forces required, but they are making far greater changes in shape. I can do similar on my lathe, but it puts a very high force on the saddle leadscrew.
You will probably need need to support the inside of the can where it is held in the lathe chuck, otherwise the can will just buckle and slip. A custom round block of hardwood comes to mind.
Now, if you can hold the bottom of the can nicely, properly supported, you could also try slowly stretching the wall outwards, using a modification of an English bead roller inserted from the open end. You would need ball races with special custom rims inside and outside. Yes, a bit of custom engineering is required, which has some cost. I imagine Dan has been through all this.
Cheers
Jan 9, 2022 at 12:10 pm #3736515David, what kind of wood burning stove do you use with the system, any photos of the stove in use? How is the pot supported?
Wood is my goto fuel :-)
-
AuthorPosts


- You must be logged in to reply to this topic.
Forum Posting
A Membership is required to post in the forums. Login or become a member to post in the member forums!
HAPPENING RIGHT NOW (February 11-21, 2025) - Shop Hyperlite Mountain Gear's Biggest Sale of the Year:
Our Community Posts are Moderated
Backpacking Light community posts are moderated and here to foster helpful and positive discussions about lightweight backpacking. Please be mindful of our values and boundaries and review our Community Guidelines prior to posting.
Get the Newsletter
Gear Research & Discovery Tools
- Browse our curated Gear Shop
- See the latest Gear Deals and Sales
- Our Recommendations
- Search for Gear on Sale with the Gear Finder
- Used Gear Swap
- Member Gear Reviews and BPL Gear Review Articles
- Browse by Gear Type or Brand.
