Topic
Attaching hipbelt to pack
Forum Posting
A Membership is required to post in the forums. Login or become a member to post in the member forums!
Home › Forums › Gear Forums › Make Your Own Gear › Attaching hipbelt to pack
- This topic has 23 replies, 8 voices, and was last updated 7 years, 1 month ago by
 Jerry Adams.
-
AuthorPosts
-
Jan 8, 2018 at 4:30 pm #3511301
I’m in the process of making a pack that will work well for 10 lb base weight and thru hiking. Because of some bad back disks, I find it helpful to use a full wrap around hip belt. The attachment technique of most packs I see seems too heavy and complicated. I am thinking about simply stitching the belt directly to the back panel. Is there some reason that won’t work? (I wonder because I don’t see it done on ‘professional’ quality packs)
Jan 8, 2018 at 4:42 pm #3511303Not a MYOG person yet, but thinking through this logically…..
If you sew it directly on you would lose the ability to swap it out or make any adjustments. “Professional” manufactures have to make gear for many people / body types. The beauty of MYOG is that the only person you have to please is you.
Jan 8, 2018 at 5:38 pm #3511306Patrick – have you seen an MLD Burn backpack? There are simple fabric “wings” that have a substantial surface area that attach the thin webbing of the hip belt to the backpack body seams. These wings are rather small for weight distribution on the Burn, but if you were to extend them longer and taller (more surface area to the wings), you would have a very simple, unpadded hipbelt that distributes weight over a large area of the hips.
 Jan 8, 2018 at 5:53 pm #3511308
I did it on the orange pack I referenced in your other thread. No real use on it yet, but it seems to work just fine.
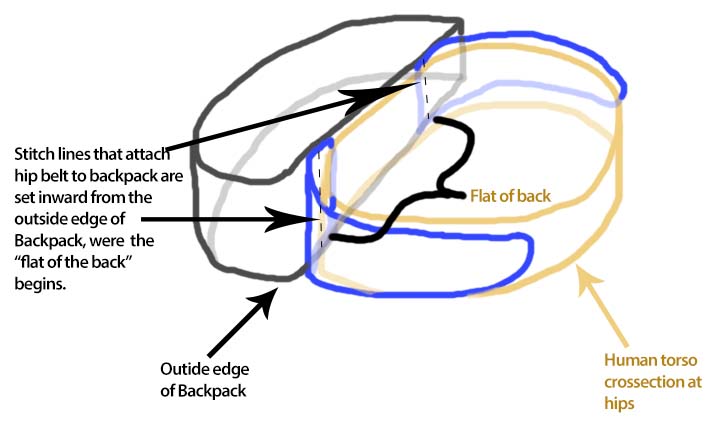
To determine how far apart to make the seams that attach it to the back panel, I held a straight edge against my lower back to determine how wide the ‘flat’ part of my back is. I think it was around 8″. I just wanted to avoid pulling the back panel around the sides of my pelvis. This ensures only the weight of the pack is on the seams, rather than additionally supporting belt tension. I also made the belt taller at the back to allow a longer seam for greater stress distribution.
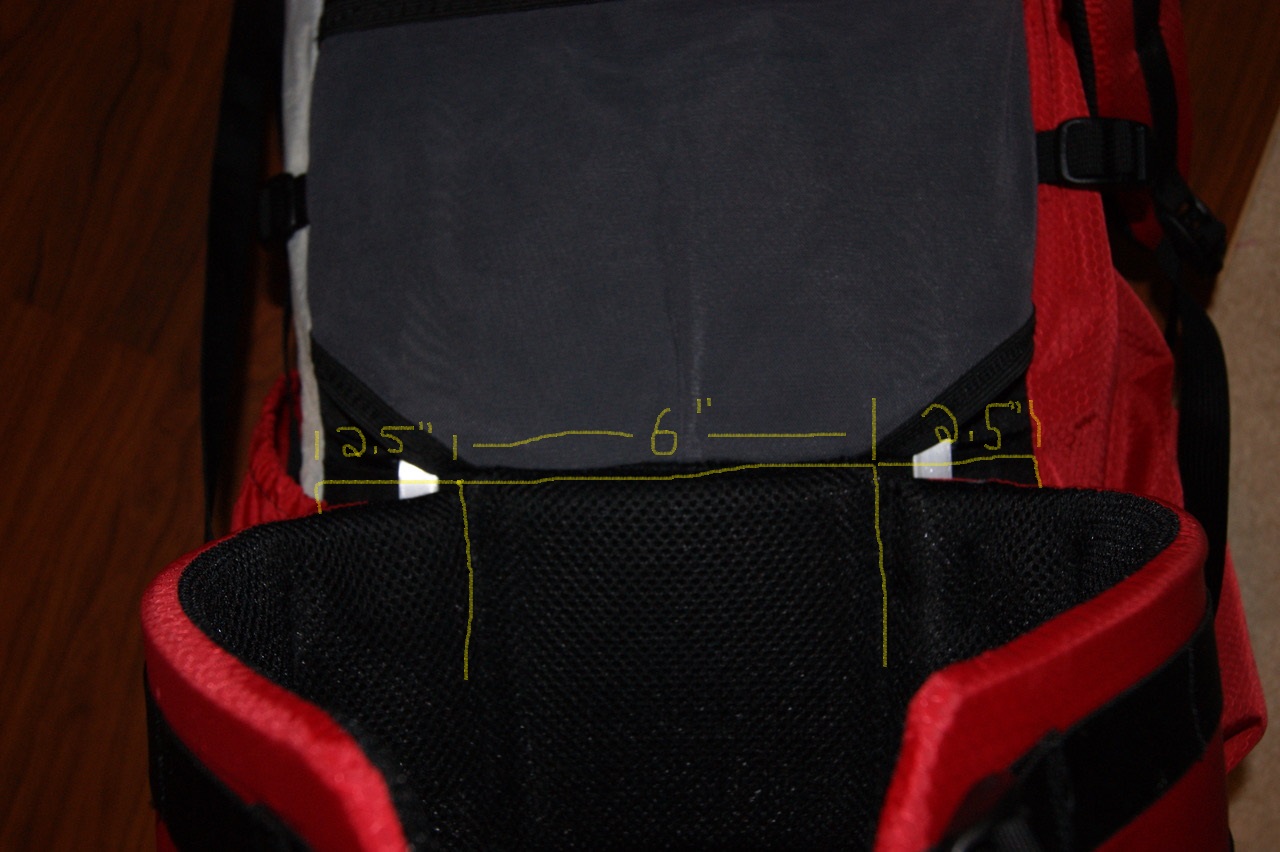
Jan 8, 2018 at 6:08 pm #3511310This is how I chose to do it. Separate the bottom of the back panel into three sections. The middle section gets the same padding and 3d mesh as the hipbelt as to simulate a full wrap with the actual pack fabric as the backing. Then the hipbelt is two separate wings that are sewn in.
 Jan 8, 2018 at 6:37 pm #3511313
Good explanation Hoosier. Does the diagram below also show what you are doing, but with the additional variable of the “flat of the back” that Rene mentioned above?
 Jan 8, 2018 at 7:43 pm #3511322
Bingo! That’s exactly right. This is a look at how the back panel of my pack is constructed. The red seams are where the hipbelt wings are sewn in. Just like Lester’s illustration, just another angle (and his is prettier :) ).
 Jan 8, 2018 at 8:57 pm #3511333
Hootsier, what material have you used for that hipbelt? That might be common knowledge for everyone who makes their own backpacks, but I have just started thinking of making a backpack and it looks like it is exactly what I would want, so I ask anyway…
Jan 8, 2018 at 9:10 pm #3511334Not a problem at all. The red face fabric is Hex70 PU3000. The mesh on the inside is 1/8″ 3D mesh. The 3/8″ foam inside s actually a combo of two different types sandwiched together but the cost of ordering the foam and paying shipping from two different places becomes cost-prohibitive. I would recommend just using a single layer of 3/8″ FY20 foam. The reason I went the route I did was for the combination of comfort and stiffness in the belt. Specifically, I stuffed the belt with a layer of 1/8″ EVA foam sandwiched (actually adhered) to a layer of 1/4″ FY20 foam.
 Jan 8, 2018 at 10:19 pm #3511366
I wish the ‘wing’ type belt would work for me because they are simpler and lighter, but I’ll be using a wrap around type hipbelt, rather than a ‘wing’ type. My experience has been that I get the needed weight transfer on to my hips better with a full belt.
Jan 8, 2018 at 11:01 pm #3511381Here’s why I think full wrap does better. The hipbelt portion against your lower back creates a bump out from the pack body and that shelf that exists rests nicely on your hips so that it holds up the pack. This is the reason I padded that center panel on mine. It ultimately achieved the same thing and is technically no different than stitching a full wrap directly to the pack. IMO, as long as the area along the center of your back is “raised” from the actual pack body, it will create the needed shelf for better load transfer. On the right, you will see the curve of the back with a “pack” conforming to it. On the left, you will see a pack with padding (doesn’t matter if it’s a true full wrap belt or padded panel built in) which promotes the testing of the pack onto your hip shelf. I’m not an expert by any means but this is at least my analysis of it. P.S. most winged packs match the drawing on the right because there is no padding between the wings so it doesn’t really rest on your hips.
 Jan 8, 2018 at 11:06 pm #3511382
I’ll add that full wrap or not, I think this is the reason so many people love the GG Gorilla. Not only is the belt padded all the way around but the sit pad actually goes over it too. It creates a large bump out from the plane of the pack body that forces it to sit firmly on your hip shelf.
Jan 8, 2018 at 11:58 pm #3511388Hoosier, I’m listening and appreciate what you’re saying. I am definitely no expert. My experience has been with a full wrap belt, and a wing belt WITHOUT the center pad. Full wrap has worked well for me and wings w/o the center pad have worked less well. I have never had a pack that had wings AND a center pad. So no experience with that. But I dinged up some lower back disks in the military and getting the weight on to my hips is essential for me. Hence my attraction to the full wrap belt. And as we say in North Carolina, “just gimme something I’m used to”
Jan 9, 2018 at 5:07 am #3511424Thanks Hoosier, that information will be very useful for me.
Jan 10, 2018 at 12:31 am #3511566I deleted the confusing entry my brother put here and posted a less confusing? one below.
Jan 10, 2018 at 2:58 pm #3511636Daryl, I like the simplicity of the design. If I understand it correctly, the 2 inch webbing would be attached to the pack back panel and also to the belt. The belt would be folded down for wear. Once the pack is loaded, would the webbing pull down on the top of the belt, making it curl over at the top?
Jan 10, 2018 at 10:26 pm #3511721 Patrick,
I apologize. My post above was very confusing. I’ll go back up and delete most of it after I post this one. Let’s start over and see if I can redeem myself.
This photo is a mock-up that pretends the following:
(1) I’m standing behind you and you are wearing your pack with its newly sewn on waist belt.
(2) I have x-ray vision and can see through everything when I want to.
(3) Black waist belt = black waist belt.
(4) Orange rope = outline of pack. I’ve erased all but the pack’s perimeter.
(5) White tape = 2″ wide webbing. Webbing is sewn to the shoulder-strap side of the pack. Webbing is sewn to the side of the waist belt that is away from your back. An inch or two of unsewn webbing separates the pack from the waist belt so it doesn’t interfere with the wrap-around draping of the waist belt.
(6) Blue foam = blue foam. Added to top of pack’s outline to make things look more realistic..
The belt is in the correct position for use “as is” in photo. No folding required.
Webbing shouldn’t pull down on or curl the top of the belt. Pull is from the bottom half of the belt.
Jan 11, 2018 at 12:58 am #3511755OK, i get it now. Thanks! That is an interesting idea. And a new one to me. I guess the concern that springs to mind is the stress of the two pieces of webbing on the pack’s back panel. Of course, that can be strengthened.
Is there a reason that you like this better than sewing the belt directly to the back panel?
Jan 11, 2018 at 2:03 am #3511776If you’re going frameless, I’d caution the use of this approach. I tried something similar in a tyvek mock-up once and found that it encouraged sag. The bottom center of the pack was slipping up and around the gear inside it.
If you have a frame, align the lower end of the frame with the point where the webbing leaves the pack body. Basically, the webbing should be lifting up on the bottom end of the frame.
Jan 11, 2018 at 3:27 am #3511784Rene,
Good points.
Most of my experience is with frame packs so my idea lacks a lot of real world experience with a totally frameless pack.
Maybe test things out first with scrap materials? A pillow case makes a good starting point for a bag. Second hand stores are a good source of waist and shoulder straps.
Jan 11, 2018 at 3:47 pm #3511827Rene, Oh, this is really interesting. I was planning to use two metal stays on the outside of the pack, running parallel to the seam between the back panel and the side panel(s). I have a pack that employs this method, but it also has a wing style hipbelt. On this pack, the bottom of the stay is sewn into the seam along with the hipbelt. But, If I sew the wrap around hipbelt directly to the back panel, there will be no physical overlap between the bottom of the stay and the hip belt. Just some 3-4 inches of thin pack material between the bottom of the stay and the contact point of the hipbelt. I hope I am making sense.
This makes me think that I should rather use stays on the inside of the pack that can physically overlap the shoulder straps AND the stitching for the sewn on hip belt. Right?
Jan 11, 2018 at 3:52 pm #3511829Can you sew the stay sleeves directly to the hipbelt immediately outside the stitch line where you attach the belt to the pack? This has worked very well for me.
Jan 11, 2018 at 4:00 pm #3511830That’s what I was thinking I could do. Otherwise the stitching would get crazy. Nice to have the confirmation that it has worked well for you.
Jan 11, 2018 at 4:00 pm #3511832yeah, maybe another way to look at it, if you sew the pack to some webbing, and the webbing to the hipbelt, there will be more sag.
better to sew the pack directly to the hipbelt
if you’re making a commercial pack it has to be adjustable so this doesn’t work, but if it’s for yourself it doesn’t need to be adjustable
with my home machine, a Janome, I can sew through pack fabric, 3D mesh, foam, if I go slow
-
AuthorPosts
- You must be logged in to reply to this topic.
Forum Posting
A Membership is required to post in the forums. Login or become a member to post in the member forums!
Trail Days Online! 2025 is this week:
Thursday, February 27 through Saturday, March 1 - Registration is Free.
Our Community Posts are Moderated
Backpacking Light community posts are moderated and here to foster helpful and positive discussions about lightweight backpacking. Please be mindful of our values and boundaries and review our Community Guidelines prior to posting.
Get the Newsletter
Gear Research & Discovery Tools
- Browse our curated Gear Shop
- See the latest Gear Deals and Sales
- Our Recommendations
- Search for Gear on Sale with the Gear Finder
- Used Gear Swap
- Member Gear Reviews and BPL Gear Review Articles
- Browse by Gear Type or Brand.


 Patrick,

