Topic
Advice: MYOG Silnylon Ultamid
Forum Posting
A Membership is required to post in the forums. Login or become a member to post in the member forums!
Home › Forums › Gear Forums › Make Your Own Gear › Advice: MYOG Silnylon Ultamid
- This topic has 25 replies, 9 voices, and was last updated 4 years, 7 months ago by
 Roger Caffin.
-
AuthorPosts
-
Apr 24, 2020 at 2:30 pm #3642912
I’ve got another hopeful MYOG project and would love some input. I would like to make a large 4 person tent (supported by 2 trekking poles ideally). My wife and I have our second on the way, but I also occasionally take trips with two older guys who like their space on the tent floor (i.e. a 60″ wide tent floor isn’t going to be enough for all of us, especially with them and their wide and comfy pads). I haven’t really been super happy with my MYOG 3 person designs, and I keep thinking I might as well make a 4 person as I already have a 1p, 2p, and 3p setup.
My current 3p is the REI Half Dome 3 Plus (which I got at a REI garage sale for $40!), but with a footprint and stakes and whatnot it’s about 7 lb. We did some hiking in the Tetons last year and I had to strap it to the front of my child carrier on the hip belt. Actually worked out AMAZING for anyone needing to attach extra gear, but it was still heavy regardless.
Here’s some of the design ideas I’ve got so far:
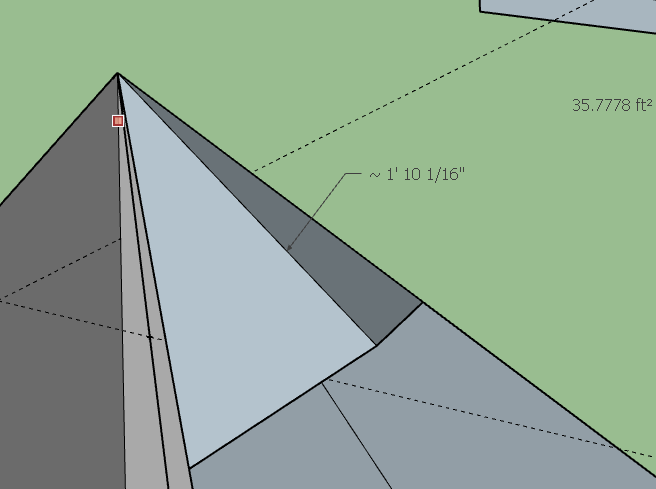
- Dimensions: 10′ square outer, 9′ square bathtub floor, 7.5′ height at the peak. So it’d be slightly larger than an HMG Ultamid 4p. I can’t imagine livability will be too bad if the tent is this large. TBH, this could probably fit 5 (4 against on end and one perpendicular to the 4 up against the wall… albiet that might be tight though). (see design below)
- Material: 1.1 oz silnylon (30D, ~1.3 oz/sy actual)
- Bathtub floor, single wall, with no see-um mesh at the bottom (downsloped away from bathtub floor? Not sure on this yet…
- 2 EXTRA large vents at the top (I’m thinking about 2′ at the base of the vent and 2′ tall) protected from rain by silnylon (see design below)
- <span style=”display: inline !important; float: none; background-color: transparent; color: #333333; font-family: Georgia,’Times New Roman’,’Bitstream Charter’,Times,serif; font-size: 16px; font-style: normal; font-variant: normal; font-weight: 400; letter-spacing: normal; line-height: 24px; orphans: 2; text-align: left; text-decoration: none; text-indent: 0px; text-transform: none; -webkit-text-stroke-width: 0px; white-space: normal; word-spacing: 0px; word-wrap: break-word;”>12 or 16 tie outs (8 around the bottom, 8 about mid way up).</span>Double felled seams.
- Catenary cut curves.
- Shock cord and linelocs on the bathtub floor so I can adjust the separation if I raise or lower the outer by a few inches for airflow.
- Total estimated weight: Under 3 lb w/ stakes and cordage. My calcs estimate the fly to be about 24 oz just for the silnylon.
Potential issues I can think of:
- Screwing the whole freaking thing up :)
- Too much sagging at the side walls. I can’t justify or afford Dyneema by any means. I’d have to sell a kidney. would the tie out half way up the wall mitigate this?
- Condensation (getting caught in the mesh at the ground as it drips down the outer or falling from the outer with every gust of wind).
- Wind wind wind. The tent may be so tall/large to where the wind load will rip out the tie outs or the stakes. I don’t plan to take this thing up above tree line though. Those adventures are probably some number of years away for me.
- Trouble finding a spot to set up due to footprint size.
Worse comes to worse, I can always make an inner too, but it’s extra weight and extra cost, so it defeats the purpose in my mind if I can tackle the condensation with those huge vents.
I’ve also read through the posts here. Good info:
https://backpackinglight.com/forums/topic/myog-ultamidish-pyramid-tent/
https://backpackinglight.com/forums/topic/myog-ultamidish-pyramid-tent/
Any additional input is welcome. Questions:
- Am I crazy?
- Will silnylon sag too much on something this large?
- Should I make it shorter? Kinda wanted to be able to stand adequately and look out the vent (idk why… just thought it’d be nice).
 Apr 24, 2020 at 4:21 pm #3642933
Good project
I’ve switched to silpoly, then it doesn’t stretch and sag if the temperature changes or it gets wet like silnylon does. I’ve used 0.93 oz/yd2 membrane silpoly from RSBTR. Maybe since your tent is larger, mine is 9′ x 9′ x 5′, that fabric is too light? They have a thicker silpoly.
Apr 24, 2020 at 4:51 pm #3642944Thanks Jerry. I appreciate the input. So from research, the biggest con of using silnyon is the stretch/sag, where as the biggest con I see in using silpoly is that once it tears, it rips easier than silnylon. I’ve never actually worked with either. Jerry, I know I’ve seen you specifically in many other posts here as a verbal proponent of silpoly. Is it really all that much better than silnylon in your opinion?
Price between the two isn’t all that different, so that makes it harder for me to choose!
Also, if anyone is by some odd chance curious at making a large pyramid tarp as well, here’s another great post, of which Jerry is also a contributor :)
Apr 24, 2020 at 8:16 pm #3643016In my experience, with silnylon, I’ll set it up taut, in the morning it’ll be all saggy. Not so much with silpoly. That’s the only advantage.
But, if its saggy, I’ll just get up and tighten it. Not that big a deal.
Another thing is, that 0.93 silpoly is pretty light, yet strong enough. It’s never ripped on me.
I used to use 1.5 oz/yd2 silnylon which is way overkill.
There’s a 0.66 oz/yd2 silnylon that would be interesting
Apr 25, 2020 at 6:40 am #3643052I’ve got two seams in mind for joining the pieces, one SIGNIFICANTLY easier in my mind assuming either sil material won’t hold a good crease enough to sew being so thin.
- Flat Felled Seam
- Double Lapped (Double Felled?) Seam
Both of the above seams I’m referring to as shown at this website, but I’ve found some confusion online calling them by other names and sometimes calling one the other. Regardless.
I do have some knockoff wonder clips on order that I’m assuming would make the former easier, although I think I’d need double sided fabric tape (1/2″?) for the latter.
The double lapped would seem to be harder, and would require 2 stiches and seam tape or 4 stitches per panel edge, but also wouldn’t require trimming like the flat felled.
Thoughts? What type of seams did you use in your pyramid, and how are they holding up? Is one more waterproof than the other if both sealed sufficiently?
Apr 25, 2020 at 8:57 am #3643071Good tutorial. I just do flat felled seam.
Mark a line on each piece of fabric where you want them joined. Sew through both pieces along that line. Then just fold over twice, press flat with your hand as you’re sewing, sew another row of stitches.
If you try to pull the seam apart, you want both rows of stitching to share the load. If you press flat properly with your hand as you’re sewing, you can make this so.
With thick fabric you could cut off one side to 1/4 inch, but with thin fabric there’s no reason to. Maybe if there’s another flat felled seam perpendicular it would be thick enough to just cut that off to 1/4 inch.
I have never had a seam rip out.
With Gutterman sew all thread I do another row of stitches just to make sure. With Gutterman mara 70 I don’t bother, it’s a little thicker.
Where the ridge seam reaches the edge, it stretches a lot (because it’s on the bias), and the thread in the seam breaks. So I do a zigzag stitch. Except maybe my new technique of sewing a strip along the ridge to reduce stretching would obviate the problem. Regardless, it’s a non catastrophic failure – it doesn’t make any difference when it happens and can just be fixed when I get home, mostly just aesthetic. There’s no sideways force across the seam and if there’s a hole, it’s at the bottom next to the edge so water would just fall onto the ground.
Another thing is, when you sew a long seam, the top fabric sticks on the sewing machine foot so it slides relative to the bottom piece of fabric. So, I do a few hand stitches first and make sure they stay aligned, as I’m sewing along. Practice first with some long strips of fabric.
Apr 26, 2020 at 12:06 am #3643172You nailed it when you commented about the size. That is a huge area of unsupported fabric on the four walls. If nylon, it will sag big time and flap like crazy, creeping into your internal space already reduced by the cat-cuts on the four corner ground-to-peak seams. So Jerry’s preference for polyester applies with much greater force here.
But a concern about strength was also expressed. My experience with RBTR membrane is that once punctured, it will rip along the grain. At one time RBTR warned about the weakness of the fabric, and they may still have a note on a chart indicating it is much less tear resistant than heavier fabrics. But only a little heavier. Up from just under 1 oz/sq/yd to 1.2-1.4 osy depending on how waterproof a coating you want.
If you haven’t made a mid before, suggest using some light but cheap fabric to see if you can arrive at the correct cat-cuts for the corner seams. They will be the same cuts for almost any polyester fabric the size of your tent. Once you have a pattern, it will make the rest easier, and help prevent things from going blooey, freaking things up as you put it. For a structure that large, I think the cheap polyester prototype will be well worth it, and you can keep the pattern pieces for future projects.
The polyester is not as strong as nylon, so it is even more essential to sew and/or bond in reinforcement patches at all stress areas, especially at stake points or where guy lines will be installed.
Happy Trails with the gang that will be living in the mid.
Apr 26, 2020 at 3:44 am #3643176Here’s how Yama Mountain Gear does their seams.
 Apr 26, 2020 at 8:07 am #3643196
he uses a few hand stitches to initially align the two pieces of fabric, rather than pins
on his machine, the top piece of fabric doesn’t seem to slide relative to the bottom piece of fabric. I wonder why that is.
Apr 26, 2020 at 1:24 pm #3643227I think he’s using a needle feed machine. It’s on my wish list but that’s gonna take a while 😉
Jul 8, 2020 at 9:08 pm #3657102A question for those who have mids: does attaching cord from a hip-high panel tie out to a trekking pole first, and then from to pole to the ground, effectively increase livability?
Or does it make the shape all wonky when you are tensioning everything?
Jul 8, 2020 at 9:26 pm #3657105I think that’s a good idea
But, I have a line on just one side and go directly to the ground. But, when there’s a tree or log to tie it to, that’s better, that sort of accomplishes the same thing as a trekking pole. It’s a little better inside, no wonkiness
Easy enough for you to try both and do what works best
Jul 9, 2020 at 1:50 pm #3657198The trekking pole idea is often accomplished using skis in winter. Here in the boreal forest we would cut branches or willow stems to make these, usually termed pickets. The idea is to ensure the pull out tensions the fabric above and below evenly. On of the problems with tying to a tree is it blocks access around the tent, creates a trip line.
Jul 9, 2020 at 7:46 pm #3657278If you’re at all daunted by the labor, hassle, etc., I recommend this.
Octagonal fly is, IMHO, superior to square for three reasons: 1. Aerodynamics, 2. Panels about half as wide, So stiffer Against the wind, 3. Square inner leaves 4 small vestibules; very handy.
Its also cheap and its silnylon sags less than any other ive seen. Ive used one for 25+ nights with no complaints; solid and mesh inners are both just fine. 20d fabric was savaged by MLD in a video in a vendetta, but I think its pretty good, certainly stronger than the 10d films used by Big Agnes, et al.
If youre at all uncertain about suitability of a big mid for your family, this is the way to go. You can spend more money building a DCF one later.
Jul 10, 2020 at 3:21 am #3657335Just to clarify, Yama only recommend that seam for MYOG – they use a conventional flat felled seam on their own products. Personally, I’ve found that the flat felled seam is perfectly practical even on fabrics that won’t take a crease if you use basting tape.
I’ve been a bit wary of the RSBTR 1.1 silpoly because Richard’s test showed poor aging qualities and I suspect it might start to mist after a few dozen uses. Can anyone comment on this? I just can’t bring myself to trust their Membrane for exposed camping, and they do carry a warning that it’s not intended for that kind of use.
Dutchware have a 20d silpoly with a reassuringly high 5300 HH @ 1.35oz finished. Colour choice is limited, but it looks interesting for any project where you want low stretch and a reasonable level of strength.
Jul 10, 2020 at 3:47 am #3657337Biased opinion here.
Imho, most if not all reports of ‘misting’ are really spray from condensation found on the inside of the fabric, caused by the impact of heavy drops of rain on the outside. No water actually goes through the fdabric. Under suitable conditions, you could probably get the same misting effect with a new space blanket.Biased, partly by experience.
CheersJul 10, 2020 at 6:25 am #3657341A few questions/comments:
Just based on availability/price, I’m just looking at some 1.1 oz silnylon from Quest. They advertise it as 62″-65″ widths, so I’d be able to have a true (or close to true) 10×10 base. It seems easiest and like the least amount of waste if I want a 10×10. The Oware 10×10 is pretty tempting though…
Stumphges : Also, for that price, that’s pretty tempting. What’s the actual livability/interior dimensions? Says 2.8m (9.2 ft) on the site measured from the square corners. While it does have an octagonal shape, from what I’ve seen online (as I don’t have one to compare), when you pitch a traditional square pyramid with 8 stakes (4 at corners, 4 at midpoints), it pretty much has the same effect of creating the same shape. I’m worried 9 ft is a little small for 3 adults with the center pole? I don’t think it’d be an issue with my wife and two kids, as they’re both small… so my wife and I would just sleep in the middle, and them on either side. Obviously, the larger it is, the heavier it is – all things being equal. I just picture my kids knocking the walls and dropping a whole bunch of condensation on everyone lol.
Geoff: Does a true flat felled seam have any advantage over using the basting stitch and double stitching? Seems like you get the same effect? It seems tedious to me to have to fold the silnylon over to stitch it. I’ve heard of people ironing it to crease it, but man that seems like no fun. If I were to make it, I wouldn’t use tape (an extra cost, and I don’t have any familiarity with it).
Roger: I was thinking about this last night fully expecting you to comment against some knockoff product from China :)
Jul 10, 2020 at 6:58 am #3657345Does the flat-felled seam have any advantage?
Yes – every stitch is through 4 layers of fabric, with even tension on each stitch.
With the French seam, one of the stitch lines is through 2 layers of fabric. Put tension on the seam and you can see the stitch-holes elongate and open up. Potential for leaking and even for fabric failure in extreme scenarios – so you are sacrificing performance for convenience.
It’s easy enough to try this for yourself and decide which you prefer.
Basting tape is cheap and quick to apply. Plus it adds a little extra structure to the seam reducing stretch, and I’m pretty sure it helps prevent leakage through the stitching, but I need to do a more careful experiment to be sure.
For me, the classical flat felled seam is worth a little extra effort. There’s a reason why it’s universally used on commercial products, I think.
Jul 10, 2020 at 7:39 am #3657353I see what you’re saying. I think I dismissed basting tape a while ago for various reasons (not having ever used it), and just haven’t thought about it TBH. So you join opposite sides of the fabric (inside and outside) with a slight overlap of the basting tape, and then roll to make your seam, then double stitch, correct?
I guess it probably greatly helps with slide between the layers…. I have a regular old home machine and was anticipating a good bit of that.
Jul 10, 2020 at 7:43 am #3657354I baste the two edges together with an overlap. Roll the seam. Then if it’s a slippery fabric I’ll baste again.
To work it out, I simply overlap my fingers palm facing palm, then bend at the knuckles to simulate the seam. I’m a simple minded soul, and it works for me…
Jul 10, 2020 at 8:15 am #3657361I’ve been using RSBTR membrane silpoly 0.93 oz/yd2 for a mid – more than a year – doesn’t seem to be misting. I think like Roger said it’s sometimes hard to tell whether it’s misting or condensation. Since condensation sometimes “mists” onto you, your gear has to tolerate this, so even if there was a little misting it wouldn’t be the end of the world. I haven’t noticed the fabric ripping or anything.
What Geoff said about flat felled seam – seam goes through 4 layers of fabric. Plus, the 2 rows of stitches share the load, fabric slides past each other, vs the two layers of fabric being pulled apart in a french seam – all load on one row of stitches
Jul 10, 2020 at 11:48 am #3657405Christian, the inners are 240 cm x 240 cm. So, yeah, probably a little small for 3 adults. My wife and I have slept on one side of the pole, but the outer person is wedged a bit. I was thinking of 2+2 kids, for which it would be great.
In general, the octagon for mids this size, IMHA, are superior to squares. A square mid with 10 foot sides will have unsupported panels that are simply too large to be stiff enough to resist deflecting and forming sails, especially in silnylon, where the bias stretch will make things worse.
Jul 10, 2020 at 5:10 pm #3657445My thoughts:
Yeah, sewing silnylon without slippage is tricky. Me, I use lots of pins. Takes time, but it works.
Basting tape does not always work with silnylon: many forms just won’t adhere to the silicone surface.
Sewing through adhesive tape of the sticky variety can be horrible. The eye of the needle fills up with adhesive, gets it on the thread and drags the thread, often to the point of breakage (of thread and needle).
Yes, seam design can be really important for strength and waterproofness. If the load goes on one row of holes, they can all open up and leak. Dealing with that takes more effort, but this IS MYOG after all.
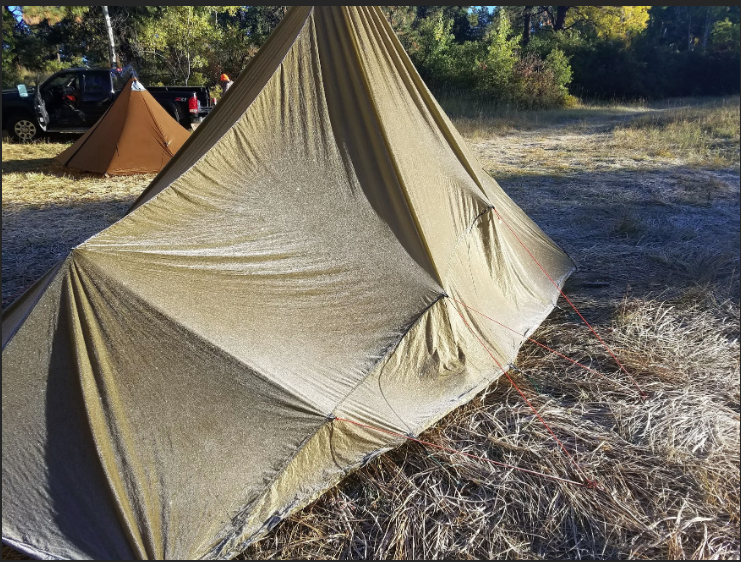
I have seen many photos of tents with sloping sides in the wind, with 2′ of the side flat on the ground due to wind pressure. Simple design maybe.
Cheers
Jul 10, 2020 at 5:29 pm #3657451Maybe I’ve been lucky with the tape I use, but I’ve not had any problems with it sticking to sil well enough to hold things in place. In the US you can get the SailRite tape, which people seem to like, though I’ve not tried it myself.
The needle does gum up a bit, but I only need to clean it once per seam. Dipping the needle in washing-up liquid seems to help.
If the fabric takes a crisp crease, you don’t really need the tape. Just press the folds, slot them together, and hold in place with pins or clips to prevent slippage.
If you do go with silnylon rather than silpoly, you might want to try and find nylon 6.6 instead of standard nylon. Much stronger, and with much less stretch. But it’s in short supply – RSBTR haven’t had any for some time. With standard ripstop, the stretch might be unmanageable with such large panels:
Jul 13, 2020 at 9:41 pm #3659435“I use lots of pins. Takes time, but it works.”
Yes indeed. And you don’t have to introduce messy sealant goop into the process until after the seam is done.
-
AuthorPosts


- You must be logged in to reply to this topic.
Forum Posting
A Membership is required to post in the forums. Login or become a member to post in the member forums!
LAST CALL (Sale Ends Feb 24) - Hyperlite Mountain Gear's Biggest Sale of the Year.
All DCF shelters, packs, premium quilts, and accessories are on sale.
Our Community Posts are Moderated
Backpacking Light community posts are moderated and here to foster helpful and positive discussions about lightweight backpacking. Please be mindful of our values and boundaries and review our Community Guidelines prior to posting.
Get the Newsletter
Gear Research & Discovery Tools
- Browse our curated Gear Shop
- See the latest Gear Deals and Sales
- Our Recommendations
- Search for Gear on Sale with the Gear Finder
- Used Gear Swap
- Member Gear Reviews and BPL Gear Review Articles
- Browse by Gear Type or Brand.
