Topic
Caldera Cones – My Adventures in Improving the ULC system
Forum Posting
A Membership is required to post in the forums. Login or become a member to post in the member forums!
Home › Forums › Gear Forums › Make Your Own Gear › Caldera Cones – My Adventures in Improving the ULC system
- This topic has 114 replies, 35 voices, and was last updated 5 years, 4 months ago by
 DAN-Y.
-
AuthorPosts
-
Feb 15, 2012 at 2:58 pm #1839933
Hehehehe
Dandydan and I submitted comments at the same time and my comment came up short end of the stick………oh well
Feb 15, 2012 at 3:09 pm #1839938"I'm interested in your improved draught through the cone. What is the total area of air holes you have now ?"
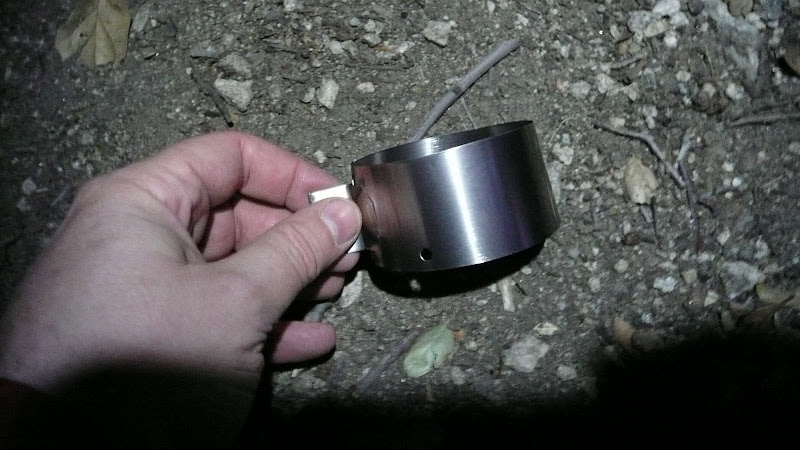
The picture below shows the 8 standard sized hole punch holes that I added in addition to the 5 larger ones that were original.
Adding these holes definitely increased air flow and improved the combustion efficiency, since before the boils were both slower (10:07 average) and fuel hungry (17.25g average). With the 8 added holes, boil time average went to 9:45 and fuel economy improved a lot to 15.65g. It's clear that combustion wasn't very efficient in the original setup.
However, it's possible that simply lifting up the pot a bit would have had the same air flow increasing effect as adding the holes. I did some quick pot height tests prior to modifying the cone, and raising the pot up 0.2" gave nearly the same results as adding the extra holes. So you've got two factors to play with here to get the combustion dialed in. The nice thing with not adding extra holes is that it might perform better in windier conditions. I didn't add too many holes though, so I don't think windy day performance will be too bad. I could easily set a rock or two in front of a couple holes on the wind ward side if it was really gusting.

BTW, this silicone band is now down to 2.5g and 1/4 of its original width, but it was a 'thick' wrist band that was about twice as wide as a normal wrist band. Even cut down this skinny, it seems to hold very well. I can pile at least 5 lbs on my pot without the band slipping, and a full 750ml pot would only weigh about 1.5 lbs so there seems to be no danger of that. I'm really happy with it.
I've ordered two normal wrist bands off of eBay ($0.99 shipped each) to experiment more with.
One thing to mention is that if you have a pot with lower handles, that could cause interference with the silicone band. The Evernew ECA278 750ml pot is the ultimate because it's high handles allow you to both use a silicone band and eliminate the handle cut out. Other pots could work with the band too, but you need a pot with removable handles so you can remove them to get the band on.
Feb 15, 2012 at 4:02 pm #1839959Hey Dan, I love that you dive head first into modifying every piece of gear you get. A thought about the air holes: I think fewer holes might be beneficial in the sense that you can achieve higher air velocities and can get a chimney effect. Of course, too few might suffocate it, but "less is more" might be the case here. Of course, I think at a certain point it is splitting hairs.
Feb 15, 2012 at 6:56 pm #1840019Forgive me if I am being obtuse. I just received my StarLyte (awesome by the way Dan/Zelph) and I am debating whether or not to mod the stainless stand.
DandyDan's StarLyte data shows bringing 500ml (2.1 cups) of 60-70degree water to boil in 13 minutes with a 1.4" gap (minus stove height = about a 1" gap) between stove top and pot bottom … target range would be 2" (1.5" not including stove height) for best all around by DandyDan's account.
Dan/Zelph's StarLyte data states bringing 2 cups of 69 degree water to boil in 6.5 minutes with a built-in pot stand that provides 1" gap between stove and pot bottom height.
Why are these data sets so different? Is the variable air? Fuel?
Dan/Zelph, I have read through most of your original posts as to how you developed the StarLyte, but I never really saw how you determined a 1" pot stand to be the right height.
Feb 15, 2012 at 9:49 pm #1840081Chris, I made a mistake in my previous posts when I was talking about the gap. I was mistakenly thinking the Starlyte was 0.5" tall, so when I had the pot at 1.8" I was saying my gap was 1.3". In reality, the stove is 0.8" tall so my stated gaps were off. My conclusion still stands that 1.8 to 2.0" pot height is ideal for my cone, but this corresponds to a 1 to 1.2" gap, not a 1.3 to 1.5" gap. So this is consistent with Dan/Zelph's findings that a 1" gap is ideal, and the slight difference is likely because of my cone environment needing a little more space to mix in the air. 1.0" is probably ideal with a windscreen, and 1.1" may be ideal in a cone, but it depends on the specifics of your cone. I'll correct my earlier posts.
The reason my testing results at 1" gap are worse than Dan/Zelph's with a 1" gap are:
1) I'm using 40F water, not 60-70 as you mention, so much colder than Dan's/Zelphs 69F water.
2) I'm using methanol, which is about 25% less energy dense and hot than denatured alcohol.
3) I'm boiling 6% more water (500ml vs. 473ml) as you mention.For a better apples to apples comparison, I just boiled 2 cups (473ml) of 69F water with a 1.8" pot height (1" gap), so the only difference in the fuel being used (methanol vs. ethanol) and that I'm using a cone.
It took 8:10 and burned just 11.4g (0.53 fluid oz) of methanol, which frankly is unbelievable. If I was using ethanol/denatured alcohol, it would be have around 9g or ~0.4 fl oz of fuel (25% better). That's just one test though. Small sample size.
Feb 16, 2012 at 1:02 am #1840098I misread your water temperature, where you were talking about how it would be even better if the water was 60-70 degrees.
Thanks for clarifying.
I think this also intuitively answers my other question as well … Dan/Zelph must have tested his way methodically to get to the 1 inch stand height … which I probably never should have questioned considering his well honed reputation as a stove-wizard.
Hmmmm …. to cut or not to cut.
Feb 16, 2012 at 3:45 am #1840111With a cone, height beyond a standard between stove and pot doesn't hurt that much. Many years ago when I first tested the cone, I did some tests with the 12/10 stove and found that the cones were generally spaced a bit close to the pot bottom.
Betwen 1-1.5" there was little change. From 1.5 – 2" there was a sligt change, about 5-10%. Between 2" and 3" there was only a 25% change in boil times (2cups of 40F water heated to 200F.) This is likely due to the cone trapping so much heat to begin with. However, dropping it from standard to 3/4" dropped output 25%.Just some aditional data to work on. I had a chart of about 80 runs but it was lost when the old computer died. I have some old backup tapes…no interface to the tape drive (older SCSI) on modern machines.
Feb 16, 2012 at 3:46 pm #1840392n/m – double post
Feb 16, 2012 at 3:50 pm #1840395"With your new half band the total drops to 125.3g (a 61g savings over your previous system). Pretty sweet!""
The main way to save weight at this point would be to ditch the pot handles, which weigh a combined 17.9g. Due to the low thermal conductivity of Ti, I could easily ditch the handles and just lift the pot up by the rim as I do with my 1.3L Evernew pot. However, I'm going to be eating/drinking out of this pot a lot when it's filled with really hot food/drinks (ie. mashed potatoes) so the handles are worth the 17.9g to me.
One possible avenue to explore would be the use of a neoprene cozy that would both protect me from the hot pot, and act as a cozy to keep the food/drink warm. If this could be the same or less weight, it would be an improvement.
Besides the handles, there's virtually no weight left to be saved. A 2.5g silicone band doesn't leave much room to shave weight, the 25g cone can't be made lighter, the only lighter pots are either smaller or fragile (beer cans) and the 7g carbon fiber lid is as light as it gets. I could save a few grams switching to a micro-Starlyte stove (http://www.youtube.com/watch?v=VT1gU7BUcF8)
I've basically accomplished all of my original goals as I laid out in my first post:
1) Simpler than 4 pieces (cone, 2 stakes, stove)
Now down to two functional pieces (cone, stove) and one static piece (silicone band)
2) Lights better in winter than 12-10 stove
Accomplished by Starlyte
3) Lighter
Now 125.3g instead of 186.4, a one third reduction.
4) Packs better
Everything (cone, stove, my spoon) now stores in a 750ml pot with no fry pan lid needed and lots of volume left over.Feb 16, 2012 at 3:55 pm #1840399"The main way to save weight at this point would be to ditch the pot holes, which weigh a combined 17.9g. "
Please clarify. Holes don't have weight.
–B.G.–
Feb 16, 2012 at 4:10 pm #1840407Better make that 'handles'.
Feb 16, 2012 at 4:14 pm #1840410That makes much better sense. For a second there I thought you were going to repeal the Laws of Physics, and Roger Caffin really hates that.
–B.G.–
Feb 16, 2012 at 6:37 pm #1840489The most efficient stove we ever made didn't achieve boil until 37 minutes…..and used almost no alcohol to get there. Slow = efficient….almost always….
Good One Rand Good belly laugh on that one.
Here is how I determined rough pot support to pot. Used a pyrex pot. I would view the flame pattern through the water from above.
<center>

</center>Feb 16, 2012 at 8:17 pm #1840556>The most efficient stove we ever made didn't achieve boil until 37 minutes…..and used almost no alcohol to get there. Slow = efficient….almost always….
>
>Good One Rand Good belly laugh on that one.I'm serious….and it's true.
Feb 16, 2012 at 9:18 pm #1840582I'm serious…..it's true.
No photos, no videos, it didn't happen
Tony would have had a good laugh also.
Dan :-)
Feb 16, 2012 at 11:48 pm #1840621Well, interestingly enough, Rand recently sent me a sort of choke device to beta test. Using the choke, I got a boil at about 30 minutes and a run time of about 45 minutes about 3 or 4 weeks ago in Monrovia Canyon using 0.75 fluid ounces of alcohol.
This is totally experimental beta gear, so don't anybody bug Rand for one. I'm just saying that what Rand posted above is for real.

Flame without choke:
Flame with choke:
Feb 17, 2012 at 7:56 am #1840688I got a simmer ring too from Rand last month : )
He sent it with the ULC/Inferno set I got.
I have been using it to heat up thick soups and it works well. I have a mini fry pan with a copper bottom that it works great with to cook eggs.
Feb 17, 2012 at 10:18 am #1840768It does work well. Omelet:
Feb 17, 2012 at 11:54 am #1840831Ok … that looks good!
Edit: back to thread : )
Feb 20, 2012 at 9:36 am #1841896Rand's choke looks like the same concept as the Featherfire choke. Only at a fixed setting (can't tell from the photos).
I've played with a variable choke on a chimney stove before; actually, it happened by accident when making a dual-wall chimney burner for my vaned kelly kettle…
I made the burner using techniques used in the 'Pepsi can burner'; i.e. a fuel cup base into which is inserted another can. Since I wanted to make a chimney burner, I punched holes in the outer can, and then punched mating holes in the inner can before assembling the two. Assembly proved to be tricky, so I ended up opening up the inner holes (since I didn't need a good seal, unlike in a jetted burner). This meant that the inner can was relatively loose, and could be rotated. Thus, the alignment of the two sets of holes could be changed, and, in doing so, the cross-section of the holes could be changed.
I can't remember the results…
I've suggested the same overlapping circles method for air control for wood stoves (to allow experimenting with primary and secondary airflows, and to 'bank' the primary air flow to reduce the heat output).
Feb 27, 2012 at 11:24 pm #1846002> Rand's choke looks like the same concept as the Featherfire choke. Only at a fixed setting (can't tell from the photos).
Nope….it's variable….we'll be releasing it soon. Here are some pictures in the mean time:
 Feb 28, 2012 at 10:01 am #1846129
> Nope….it's variable….we'll be releasing it soon.
Ah, so it's practically identical to the FeatherFire adjustment then? A band surrounding the air intakes that can be constricted to reduce the airflow into the burner.
Nice pictures of the FeatherFire at Hikin' Jim's blog
Feb 28, 2012 at 11:51 am #1846193I notice a lot of these home built stoves have the chimney port made in the same way as the 12-10: the bottom bulge of the can is punched upwards, then the can inverted to make the top of the stove (you know what I mean!). The results are really neat. Is there some nifty trick for doing this, or is it a closely guarded secret?
MattFeb 28, 2012 at 9:39 pm #1846549>Ah, so it's practically identical to the FeatherFire adjustment then? A band surrounding the air intakes that can be constricted to reduce the airflow into the burner.
Nope….not at all….it does not constrict. We tried a few prototypes in the field similar to the FeatherFire and couldn't get the reliability we wanted. We went a different direction.
Mar 2, 2012 at 2:00 pm #1847950Re the 12-10 simmer control/choke—
a remote control option would be nice: e.g. a rod with knob rotatable from outside the cone and another static rod/strip to counter that rotation:
then, with 1 to 100% simmer control, the caldera cone would be "cooking on gas", in a (metaphorical) sense.
-
AuthorPosts


- You must be logged in to reply to this topic.
Forum Posting
A Membership is required to post in the forums. Login or become a member to post in the member forums!

Our Community Posts are Moderated
Backpacking Light community posts are moderated and here to foster helpful and positive discussions about lightweight backpacking. Please be mindful of our values and boundaries and review our Community Guidelines prior to posting.
Get the Newsletter
Gear Research & Discovery Tools
- Browse our curated Gear Shop
- See the latest Gear Deals and Sales
- Our Recommendations
- Search for Gear on Sale with the Gear Finder
- Used Gear Swap
- Member Gear Reviews and BPL Gear Review Articles
- Browse by Gear Type or Brand.
