Topic
tieing 2 poles together
Forum Posting
A Membership is required to post in the forums. Login or become a member to post in the member forums!
Home › Forums › Gear Forums › Make Your Own Gear › tieing 2 poles together
- This topic has 30 replies, 26 voices, and was last updated 6 years, 4 months ago by
 Kevin Sweere.
-
AuthorPosts
-
Oct 6, 2018 at 7:47 pm #3558709
That’s a pretty cool method! Might have a tough time keeping the loop on the tip w/o baskets though. Gotta be super light!
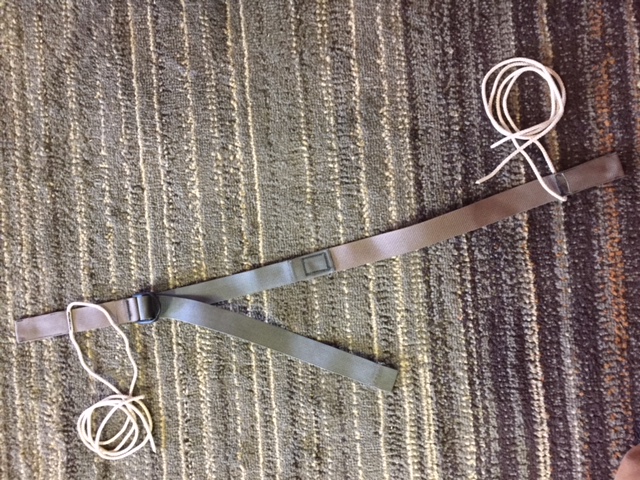
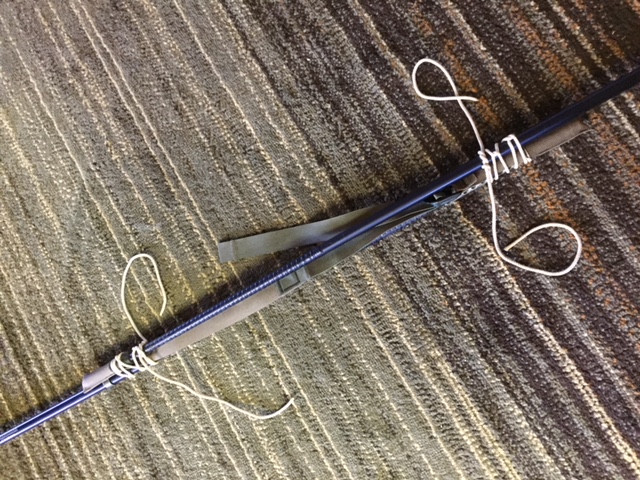
When I got my MLD SuperMid for family camping, needed an adjustable method to use my fixed length GG LT3 poles. I think I ended up doing about the same thing as Jordo_99 above. 3/4” strap folded over on itself & sewn on the edge to create a pocket for the pole tip. I have a ladder lock integrated in mine to be adjustable and some basic braided polyester line to hold it all together. Only 1.4 oz so I’m pretty happy w/ it.


 Oct 9, 2018 at 1:41 am #3559051
Isn’t the easiest way to use them tip to tip using a strong aluminium tube?
Oct 9, 2018 at 3:14 am #3559056But he has non adjustable length poles
Oct 9, 2018 at 4:04 am #3559062Like Ken said, that wouldn’t work for me cuz mine aren’t adjustable. But even w/ adjustable poles, I personally wouldn’t be a big fan of a short rod that you stick the tips of the poles into. It would only be work well if you had just the right diameter to fit over the pole tips, but not slide past the tips butt section. And that would ups only give you 2-3” if overlap per pole, which I’d expect to be fairly wobbly and puts a fair bit of leveraged pressure right where you don’t want it… the top of the tip. I like that the various crossing methods give you MUCH more overlap, thus reducing leverage and giving a stiffer overall unit, w/ or w/o fixed poles.
Oct 9, 2018 at 6:37 am #3559066OK I ski so my poles have big baskets. Solution? Fit baskets. It just happens that old ski poles use a tube just the right size for this to work [ usually] and old broken ski poles as donors are free and almost everywhere on the hills and slopes
Oct 26, 2018 at 3:23 am #3561381This method produces a very strong connection that self-tightens. It can be used tip-to-tip, handle-to-handle, tip-to-handle, and w/ or w/o straps … and only needs 12′ of 550 cord. It also works on non-adjustable, muddy or clean, foam or cork, thin or thick poles. Plus, the cord is still multi-use.
- Cut 12′ of 550 cord and melt the ends
- Make pen marks at 12″ and 24″ from one end. Tie a small overhand loop at each mark. Small being that loop is tight on the tip end so that it slides tight a bit before the stop or basket (typically 2″ from the carbide tip. (It will loosen up in time.)
- When using a tip, the end loop will go over a tip. When both tips then both loops. When using straps, the end loop will tie the straps together. When connecting a handle w/o a strap the loop(s) is used to create slip knots around the base of the handle. (Pro-tips for handles: Feed a bight into the loop, not the long end of the cord. Make sure the loop when placed won’t slide in direction of compression.)
- You’ll find the next steps easier when the sections not being tied together are collapsed.
- Self-tightening comes from wrapping the cord tightly around both poles between the loops when they stretched out (i.e. the tips are closer together than in the final state). By adding compression, the wrap pulls the two poles closer together. Typically this is 3-7 wraps depending on basket thickness.
- Resistance to bending comes from tightly wrapping the long end of the cord around the very end of one pole and then also at the very end of the other pole. The cord should continue in the same direction as the previous step so that when the cord is wrapped from one end to the other a diamond pattern is formed. Strength comes from many tight wraps on the ends of the poles, not in the middle.
- The diamond pattern (formed by wraps going opposite directions) also help to self-tighten under compression and keeps it all from untwisting.
- To finish up the lashing, tie the short end to the long end with a square knot or in the case of having only one end, use simply wrap the line around itself a few times and pull hard… no knot required.
- If you have non-adjustable poles but want adjustable heights when tied together, add a few more small loops then experiment to find the resulting double-pole height.
- Depending on your specific poles (2 or 3 sections, section length available, diameter, etc. you might have to shorten the gap between tied loops by 2 or 4 inches. You won’t know this until trying Step 4 in various configurations.
- After you try it on your poles in various configurations, feel free to trim the cord down a bit. (I have 3 different makes of poles. The full 12′ is needed on only the fattest ones.)
- To untie, collapse the poles, untie the knot, stand up, and let the poles spin to unravel the whole thing.
Bonus pro-tip: Wrap a piece of reflective tape near the top of your pole for traffic safety, finding your tarp or trail to the cathole at night, your loose pole in the early morning, and to make it readily different from all the similar poles in your Boy Scout Troop.
-
AuthorPosts
- You must be logged in to reply to this topic.
Forum Posting
A Membership is required to post in the forums. Login or become a member to post in the member forums!
LAST CALL (Sale Ends Feb 24) - Hyperlite Mountain Gear's Biggest Sale of the Year.
All DCF shelters, packs, premium quilts, and accessories are on sale.
Our Community Posts are Moderated
Backpacking Light community posts are moderated and here to foster helpful and positive discussions about lightweight backpacking. Please be mindful of our values and boundaries and review our Community Guidelines prior to posting.
Get the Newsletter
Gear Research & Discovery Tools
- Browse our curated Gear Shop
- See the latest Gear Deals and Sales
- Our Recommendations
- Search for Gear on Sale with the Gear Finder
- Used Gear Swap
- Member Gear Reviews and BPL Gear Review Articles
- Browse by Gear Type or Brand.


