Topic
Son of Balrog – The Real Stove
Forum Posting
A Membership is required to post in the forums. Login or become a member to post in the member forums!
Home › Forums › Gear Forums › Make Your Own Gear › Son of Balrog – The Real Stove
- This topic is empty.
-
AuthorPosts
-
Jan 4, 2006 at 5:53 pm #1217467
Son Of Balrog is a real UltraLight Stove in the early stage of its development. I have chossen to make a totally new stove starting with the last version of my modified Xtreme stove. Son of Balrog will be an UltraLight Remote Canister Stove based on a few parts from best of two Coleman stoves and one MSR stove. Many of the parts are home made or custom made. With a custom made fitting this remote style canister stove will be able to adapt to both a Regular Canister and the Coleman PowerMax Canister. The weight goal in the Standard Canister mode is under 5oz. The weight goal in the PowerMax Canister mode is under 7oz. The Standard canister can be used upside down if necessary.
A custom fitting is being made to join the MSR Valve Body and Gas line to the Coleman Burner head. It will take a couple days to finish this fitting. During the time necessary to make this fitting I will try several new leg/pot stand combinations.

Ideas and or comments are always welcomed.
Jan 4, 2006 at 6:11 pm #1347921Bill, the potstand you got is heavier than it needs to be, I think all you need is three pot suports.
mabey try something like the lightest windpro mod legs, sorry I forgot who came up with it.
Jan 4, 2006 at 7:00 pm #1347924Ryan, Thanks for your comments. I think we are all in this “make it lighter” mode. You are right about three legs. I am working on a three leg version as I type. The first three leg version will be like the four legged version just three legs. I will then try a couple of other three leg ideas and see if I can cut more weight.
I am not in a hurry I just want something stable when holding a good size pot of water or something on the stove support.
I like the WindPro idea with the screw in the top of the burner head as a leg support. I will get there in a couple of days.
Ryan, Have you thought about making the holes in your “can” stove support like the “cyclone scoops”? The gas might have to much pressure to get the cyclone effect but it might make an interesting test.
Jan 4, 2006 at 7:27 pm #1347925Interesting idea Bill, I am not quite sure my way of “cycloning” a can is the best way or if it really works, the only time I attempted was on my wood stove, and I cant exactly measure it from that, how do you do it. Thanks for the idea, the pressurization could make it not work right like you said,but why not give it a try.
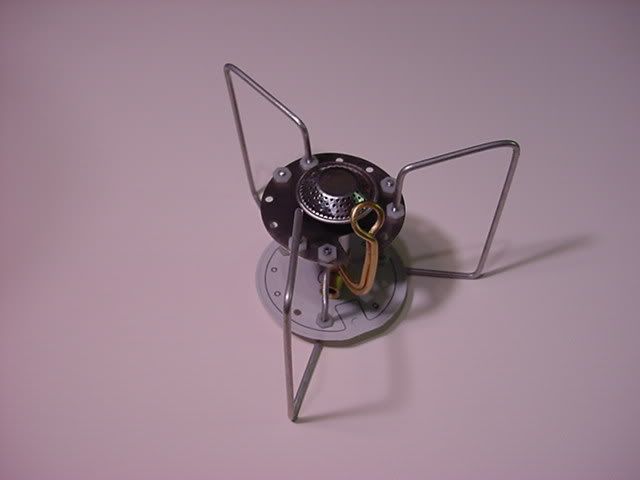
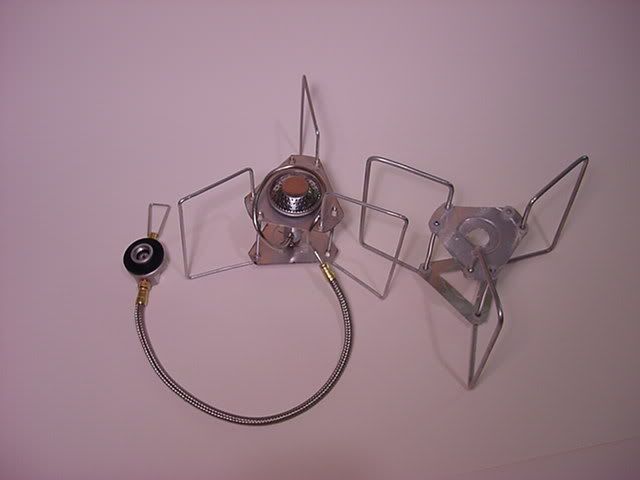
Jan 4, 2006 at 8:51 pm #1347931I went from 4 legs to 3 legs and dropped .25oz. Support for a full pot of water is still real good. I will trim the top and bottom disks and see what I get from that.
===============================
Ryan asked: I am not quite sure my way of “cycloning” a can is the best way or if it really works, the only time I attempted was on my wood stove, and I cant exactly measure it from that, how do you do it.
Thanks for the idea, the pressurization could make it not work right like you said,but why not give it a try.
===============================Ryan I will try and take some pictures that show how I cut the holes and make the scoop. You may not get the cyclone effect but you might get a better gas/air mix.
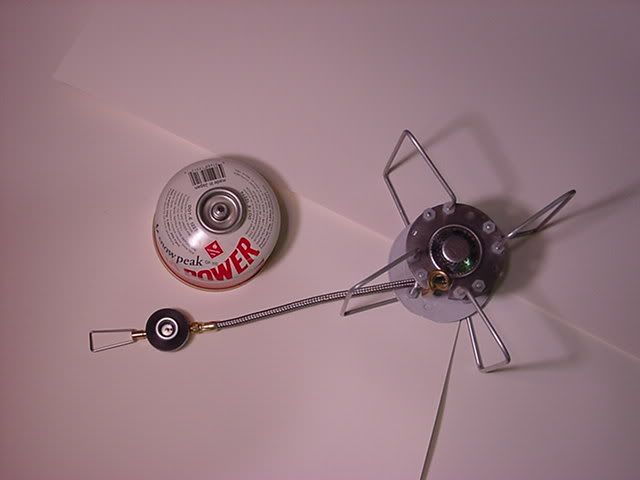
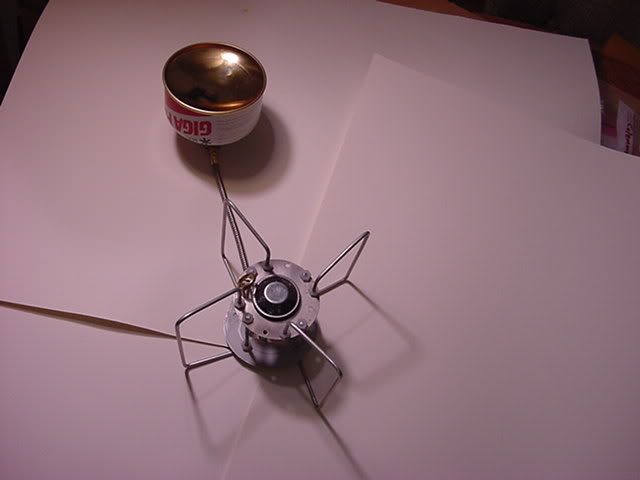
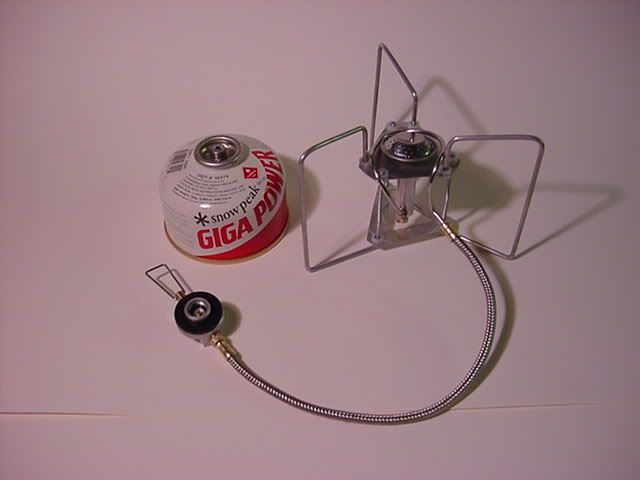
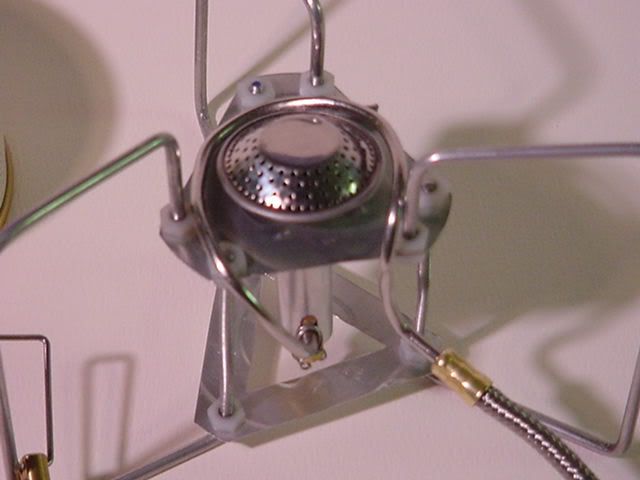
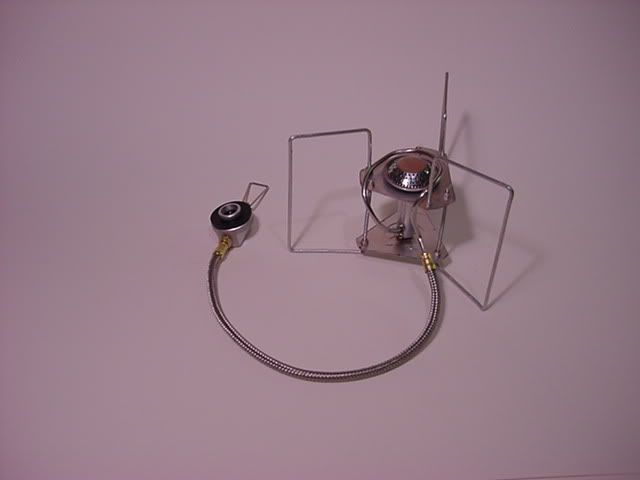
Jan 6, 2006 at 8:07 pm #1348024This is the first version of my own Remote Canister Stove. I do use a couple of parts from a MSR-WindPro and one part from a Coleman F1 Ultralight Stove. Everything else I made. The metal is from the lids of 2 cat food cans, the legs are made of 1/8″ aluminum rod and I made one part out of some 1/2″ aluminum tubing. The MSR gas line and gas control valve were used except for the MSR burner head. I adapted the burner head from a Coleman F1 stove to the MSR gas line. I had to make a fitting to make this change. The hardest part was reshaping the pre-heat tube from the MSR gas line to fit around the smaller burner head. The legs fold like the earlier version pictured above.
The Coleman Xtreme gas line/ Mag casting/valve assembly will connect to this stove with a fitting I am working on. This will allow me to use the Coleman PowerMax canister during cold weather hikes. Even though the control valve from the MSR gas line can be turned upside down I would still change to the PowerMax system if I was going to melt much snow or ice for my water.
Jan 6, 2006 at 8:13 pm #1348026nice,
have you tried with Ti rods instead of aluminum?
and dose the feul line tubing need to wrap around the top? if not you can loose a few inches of tubing, if this is possible. if the flexible fuel line was connected directly to the burnrer, it will be the UL stove I have been dreaming of all along but have not had the tools to construct.
Jan 6, 2006 at 8:17 pm #1348027or, have you tried incorporating the tubing into the stand?
Jan 6, 2006 at 8:39 pm #1348031Ryan,
I have 1/8′ titanium rod but the aluminum is just a small amount lighter and a lot easier to work with.
Yes, the steel line on the end of the WindPro is for pre-heating the gas. It needs to be close to the burner head. The MSR burner will “lift off” the little fitting at the end of the WindPro gas line. That burner head and brass looking tube part weighs about 56 grams. What I replaced it with only weighs 16gr. Big difference and where I reduced a lot of the stove weight.
The MSR fuel line and valve counts toward the 4oz total stove weight.
To make this stove you will need a couple of different size taps to make thread for the legs and the 1/2″ aluminum tube that the Coleman Burner head. If you look at your burner you will also file that small cutout where it connects to the MSR fitting at the end of the gas line. I threaded the legs so I could connect the legs tighter and have greater stability for the cook pot. I am getting some 3/32″ aluminum rod next week and will try legs out of it. I might be able to drop a little more weight. The other tool you will need is a couple of good files. A round one and maybe a half-round. Small files and the round needs to be small enough to go inside the 1/2″ tubing. If/when you make something like this I will explain the file business in more detail for you. It is hard but takes a little time. Bending the steel line was a real pain.
I am not sure I understand “incorporating the tubing into the stand?” question.
Jan 6, 2006 at 8:41 pm #1348032Hi Bill,
That’s truly an amazing weight, it’s down in the range of what regular canister stoves weigh!
These remote canister stoves are interesting, but I don’t know too much about them. I notice you and others seem to like them.
Could you summarize the advantages of these stoves vs a regular canister stove?
I’m guessing more stability, ability to use a normal windscreen, etc might be major advantages. Also I’ve seen that some people will hold the canister upside down, though I can’t recall the reason.
Thanks!
Dan
Jan 6, 2006 at 9:00 pm #1348034Daniel,
You are right as you stated:
===============================
“I’m guessing more stability, ability to use a normal windscreen, etc might be major advantages. Also I’ve seen that some people will hold the canister upside down, though I can’t recall the reason.”
===============================
I never liked a liquid fuel stove except for alcohol. I bought a MSR Rapid Fire remote canister stove 12 to 15 years ago. I liked being able to just light the stove and not mess with the white gas stuff. The small canister stoves are sort of recent and as you say very light. The Coleman F1 Ultralight is only 2.7oz. I have another brand that also is about the same weight. I don’t care for them as it is hard to use a windscreen with them – safely. So say the makers. The pot stand part of them is also really small and I just don’t like them as much as a remote canister. The remote is easy to put a good windscreen around. The MSR WindPro comes with a really good windscreen. I still use the windscreen that came with my Rapid Fire many years ago. You can turn the canister upside down in really cold weather but I don’t like that idea. I made a cozy for mine and use a small chemical pack when it is really cold. Some canisters are made to work better in cold weather and those are the ones I always use. I like to be able to simmer so I can cook real food and not just boil water. The Rapid Fire is great when it comes to simmering. That is why I had never replaced all these years. But it is heavy by my today standards. These new stoves I am making will replace my old Rapid Fire I expect. I did adapt the Rapid Fire to use the PowerMax canister.Jan 6, 2006 at 9:38 pm #1348035Bill,
Wow! My original post mentioning a stripped Xtreme sure has evolved. You’ve really made some amazing things here. Well done!
It’s got me now thinking of a remote “mini” stove. I’m thinking something like the F1 or a Pocket Rocket or Snow Peak, but with the ability to attach to a PowerMax fuel canister.
There are the obvious advantages of a windscreen, but I’m thinking more of total system weight. The PowerMax canisters are much lighter. I’m going by memory here, but I believe the 6 oz. PowerMax canister weighs right around 3 oz. (maybe even lighter??) while my lightest regular canister is a hair over 3 oz., but only holds about 3 oz. of fuel. Particularly for longer trips, that’s half the canister weight.
I know the Pocket Rocket is only 1.6 oz. with just the valve and burner assembly. I imagine the F1 is similar or even lighter. Sooooooo…..
How difficult would it be to turn a Pocket Rocket or F1 into a mini remote canister stove that could run on the PowerMax?? It seems you’ve figured out about every combination. Couldn’t this be done for under 3 oz.??? I figure it could come pretty close.
-Curt
Jan 6, 2006 at 9:44 pm #1348036Actually, now that I look closely at your picture, it looks like that’s kind of what you’ve already done. Is that an F1 head? Also, you mentioned you figured out a way to attach normal valves to the PowerMax cansiters. How? Finally, if you weren’t going for cold weather performance, couldn’t you leave the heater tube off? I’m thinking just a “normal” canister stove, but instead of sitting on top of the canister, it’s remote. Am I missing some important piece here?
Thanks again!
Jan 6, 2006 at 11:37 pm #1348039Curts comments:
============================
“It’s got me now thinking of a remote “mini” stove. I’m thinking something like the F1 or a Pocket Rocket or Snow Peak, but with the ability to attach to a PowerMax fuel canister.There are the obvious advantages of a windscreen, but I’m thinking more of total system weight. The PowerMax canisters are much lighter. I’m going by memory here, but I believe the 6 oz. PowerMax canister weighs right around 3 oz. (maybe even lighter??) while my lightest regular canister is a hair over 3 oz., but only holds about 3 oz. of fuel. Particularly for longer trips, that’s half the canister weight.
I know the Pocket Rocket is only 1.6 oz. with just the valve and burner assembly. I imagine the F1 is similar or even lighter. Sooooooo…..
How difficult would it be to turn a Pocket Rocket or F1 into a mini remote canister stove that could run on the PowerMax?? It seems you’ve figured out about every combination. Couldn’t this be done for under 3 oz.??? I figure it could come pretty close.
Actually, now that I look closely at your picture, it looks like that’s kind of what you’ve already done. Is that an F1 head? Also, you mentioned you figured out a way to attach normal valves to the PowerMax canisters. How? Finally, if you weren’t going for cold weather performance, couldn’t you leave the heater tube off? I’m thinking just a “normal” canister stove, but instead of sitting on top of the canister, it’s remote. Am I missing some important piece here?
===============================Hi Curt, One of the nice things about the Coleman F1 Ultralight (2.7oz) is that the burner head is smaller than most (lighter) but still a good burner. It will also come apart so the top part of the burner could be used like I have. You do need to make and adapter tube to mate it to some other stove parts. This required figuring out the thread size on the burner head and the thread size where you want to use it. Finding the thread size is not rocket science and stores that sell tap and die for making thread can do that for you. I email a lot with our new stove editor Roger Caffin and he helped identify some of the thread sizes for me and shared a lot of other good information with me.
Making an adapter for a really light canister stove such as the pocket rocket, the F1 and a few others seemed to me something that would be easy to do. Not, I got fooled, but not stopped. The key which I somehow missed is the valve body or gas control On/Off thing. That is what screws onto the canister and most are built into the bottom of the stove. To remote the stove you need to be able to disconnect the on/off control valve so it stays on the canister. That means you need a fitting or something on top of the control valve that has a piece of the correct type of gas line and that line goes to the bottom of you stove.
Most little stoves only come apart so you can do this by breaking them. Bad. It was an interesting moment when that light came on in my head. I don’t know what stoves will come apart so you could do this. I have 2 little stoves like these and I haven’t been able to take them that far apart.
This is doable but it may take a home made fitting or connector to make it work. At least two people are working on this.
Connecting the PowerMax canister to any remote stove can be done with a couple of fittings to mate the Coleman Mag Casting (how you connect the PowerMax Canister) Control Assembly/Hose line complete. You have to have all this because the PowerMax Canister does not have a threaded connector like all the other canisters being sold. You then need a pre-heat line or loop as on the Xtreme. For really cold temp’s you need the pre-heat. The small canister stoves do not have a pre-heat system or I haven’t seen one that does. By milling away a lot of the casting on the Xtreme I have the casting, gas line, control valve etc down to 3.67oz. I have to say that this 3.67oz set of parts is a one-of item.
I am starting to think that by the time you go to all the trouble to turn your little canister stove into a remote you could just make a 4oz remote stove like this one I just finished. I also think I can get the weight of this stove down a little more.
I think we need to have two stoves, one very light little sit-on canister stove for warmer weather at 2 to 3oz max or a remote stove like the one I made at about 4oz max. Then for cold weather the SUL standard changes and we add an ounce or 2 and go with the PowerMax system mated to the lightest stove/pot stand we can come up with. This might be the summer stove or another stove.
When I mate the PowerMax stuff to my 4oz stove I lose that gas line (about 2oz +/- a bit) but pickup the extra stuff necessary to use the PowerMax – add 3.67oz and the fitting necessary to mate the two. This weight should be should be somewhere around 6oz. I will not know for sure till I have the fittings.
Jan 9, 2006 at 1:08 pm #1348182Remind me again, why aren’t you working for Snowpeak or MSR or someone?
;) Great job as always, Bill.
Jan 9, 2006 at 8:55 pm #1348201Ok, how about you chop off two of the legs completly, and replace them with 2 rods sticking straight up where they were before. Then, chop off all of the rest of the third leg to make an L shape, with the leg of the L attached to the burner to complete the 3 sided support. Then, on the very bottom of the stove, attach a rod for pushing into the snow or soft dirt for stability instead of the 3 legs. The disk or triangle, when pulled into the snow/dirt by the rod should provide enough stability to hold a pot of water.
Jan 9, 2006 at 11:03 pm #1348205Peter, I think your idea would be OK for warmer weather but for cold and the need to melt snow/ice for your water I don’t think you would have the stability necessary. Remember melting snow for water takes a little time and putting the pot on and off your stove stand a lot.
I did change the 1/8″ aluminum rod used for the legs to 3/32″ aluminum. I was also able to find some very small aluminum nuts for the threaded part. The 18 aluminum nuts weigh 1 gram. The stove stand alone without the burner head now weighs 0.49oz.
Total stove weigh ready to burn but without the gas canister now weighs 3.84oz.
Jan 10, 2006 at 8:08 am #1348217Hey MSR are you paying attention? I have my credit card out.
I want one.
Jan 10, 2006 at 9:11 am #1348219Bill,
I got an idea this morning on a modification for your stove. The picture tells most of the story. Note that the black rod continues in its spiral to touch the ground, keeping the stove slightly elevated. What are your thoughts?
Jay
MYOGAdded thoughts: The rod would have to be stiff enough to provide its own stability. You might need something for the ground in soft soil, or use a rock.
Jan 10, 2006 at 11:39 am #1348232Hi Jay, Thanks for sharing your idea and that is a really nice drawing. It is an interesting design and one that is sure to be very light. However
One of the problems I had with this stove was being being able to stabilize the fitting that holds the burner head, the gas jet and has the metal part of the gas line welded/brazed or however to the bottom of it.
There is an amount of torque or twist that wants to pull against the stand so the stove will not sit upright. The material in the stove stand weighs 13.9 grams. The materials that makes up the rest of the stove weighs 94.9 grams. My stove designed evolved into what you see to control that torque/twist and weigh. I was trying to do this as light as I could discover/design to date.
One of my early ideas (I think I have made about 12 stove stands so far) used legs that connected only to the top disk and the legs were a little like yours. That stand could not control the twist or support my 1.5Lt cook pot full of water.
For this stove and its torque problem I don’t think a design such as yours has the mass to keep the stove in the proper upright position at the same weight level, 13.9 grams.
A different stove and we have a whole new set possibilities.
Thanks
Jan 10, 2006 at 2:16 pm #1348246Bill,
think you could use the fuel tube as part of the stand
Jan 10, 2006 at 2:49 pm #1348251Ryan, It is in a way now part of the support. The stove is now light enough that the extra time trying to reduce a couple of grams would be better applied to a greater weigh reduction on a heavier piece of gear. I also need to really get back to making my SUL AT Gear.
Jan 10, 2006 at 2:55 pm #1348253Good, I enjoy your tarps, hammocks, sleeping bags ect. more than the same stove over and over with just a few modifacations.
you said you were going to make a 4.5mm silk hammock, as you know I am interested in making my own hammock, have you made it yet, if it is sucessful, or if you are sure it will work, I will get this instead of the 8mm I was planning on.
Thanks
and by the way, I am going to make a 45″ wide hammock, I modified my eagles nest to this width and it is perfect, but for you, using a DAM, will probably need the 54″ width, but I am going to buy a no sniveller for under insulationJan 10, 2006 at 3:00 pm #1348254???
just a question, when are you planning your thru hike for?
Jan 10, 2006 at 5:39 pm #1348272Hi Bill,
Your stove design is a work-of-art. Would you use a wind screen with this stove? If so, do you think it possible to design a wind screen that would function as both burner support and pot support? Just a thought.
Paul -
AuthorPosts

- You must be logged in to reply to this topic.
Forum Posting
A Membership is required to post in the forums. Login or become a member to post in the member forums!

Our Community Posts are Moderated
Backpacking Light community posts are moderated and here to foster helpful and positive discussions about lightweight backpacking. Please be mindful of our values and boundaries and review our Community Guidelines prior to posting.
Get the Newsletter
Gear Research & Discovery Tools
- Browse our curated Gear Shop
- See the latest Gear Deals and Sales
- Our Recommendations
- Search for Gear on Sale with the Gear Finder
- Used Gear Swap
- Member Gear Reviews and BPL Gear Review Articles
- Browse by Gear Type or Brand.
