Topic
Ultralight Front/Back External Frame Pack
Forum Posting
A Membership is required to post in the forums. Login or become a member to post in the member forums!
Home › Forums › Gear Forums › Make Your Own Gear › Ultralight Front/Back External Frame Pack
- This topic has 13 replies, 9 voices, and was last updated 4 years, 5 months ago by
 David Chenault.
-
AuthorPosts
-
Sep 9, 2020 at 3:35 pm #3675425
Introduction
I’ve had a few backpacks over the years starting with the old Kelty-style external frame types. I then moved to a mass market REI internal frame type, and finally to a Z-Packs Arc-Blast ultralight pack. All of these packs had one thing in common; after wearing them for a while, hot spots would develop somewhere under the hip belt. After contemplating how the structure of the hip belt and frame supported the weight inside the pack, I decided that it was the inherent nature of this type of setup that was leading to most of my pain and discomfort with these packs.
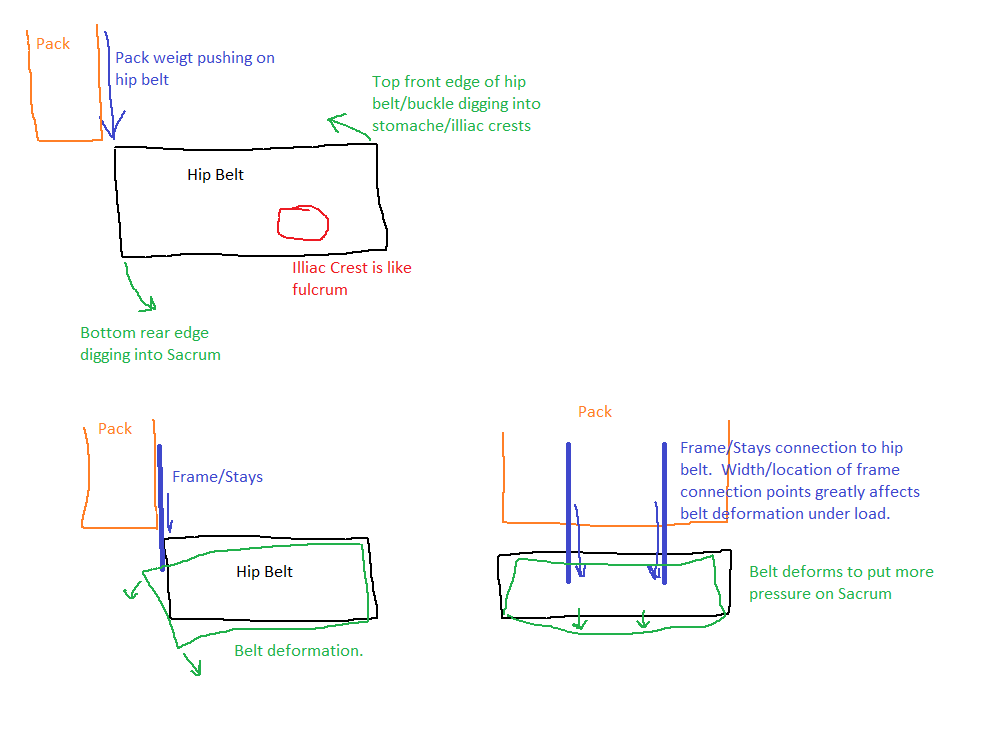
Here’s a crude diagram of the main forces that a hip belt experiences due to the weight of the pack through the frame/stays. This is true for both internal and external frame packs.

The first diagram in the upper left shows generally what the hip belt wants to do even if it were perfectly rigid and did not deform. This ‘rotation’ action will be reduced the more rigid the hip belt itself is and the more rigid the connection to the pack (how well the pack and hip belt retain their L-shape when viewed from the side). The taller the hip belt is, the more it will resist deformation in general. When you look at well regarded internal frame packs such as McHale’s, you can see his hip belts are very tall where they connect to the pack, and there’s also a lot of padding that covers the Sacrum area. That’s probably about the best way you can possibly distribute the forces onto your hips/sacrum with a backpack. However, a lot of weight is used making these features rigid enough to resist deformation, and you still have the general tendency of the hip belt wanting to ‘rotate’ around the fulcrum of your iliac crest.
Front/Back Pack Design Goals
My main design goals for this project were the following:
- Transfer all weight from the pack bag(s) to the sides of the hip belt rather than an intermediate point toward the center.
- Have both back and front pack bags arranged in such a way that there is no ‘rotational’ force on the hip belt, only radial compression and downward forces supported mainly by the iliac crest.
- Carry up to about 25 Lbs.
- Match the weight of my ‘ultralight’ Z-Packs Arc-Blast pack with extra lumbar pad and pouches (23 Ounces).
Secondary design goals were:
- It can be put on/taken off relatively easily.
- The smaller front pack can be reconfigured for use as a day pack by itself.
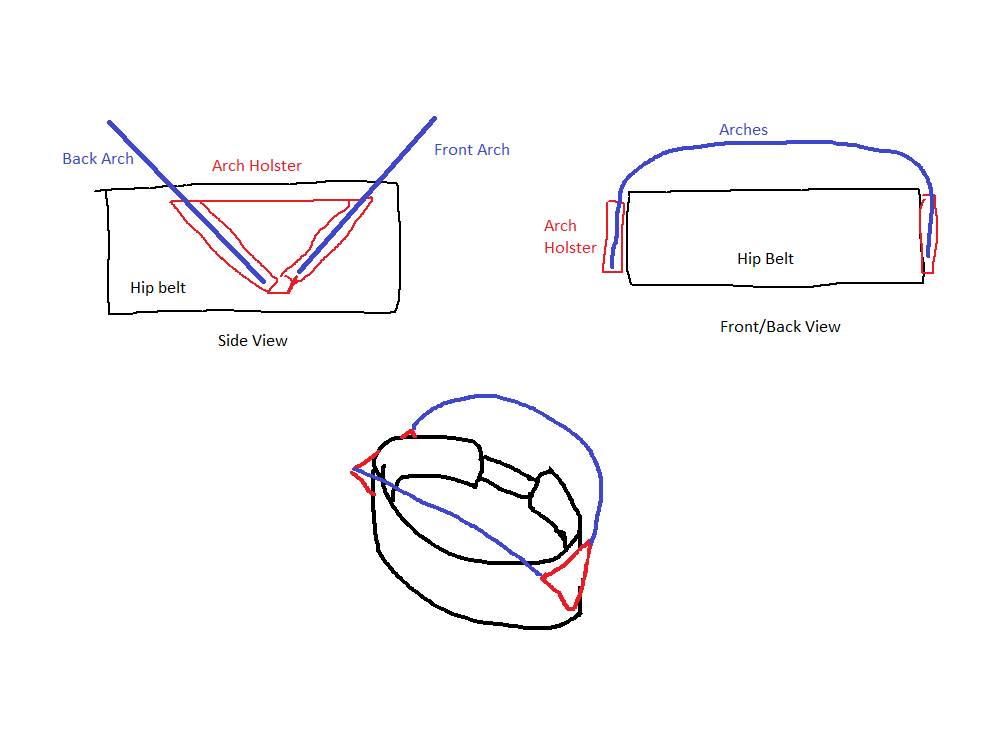
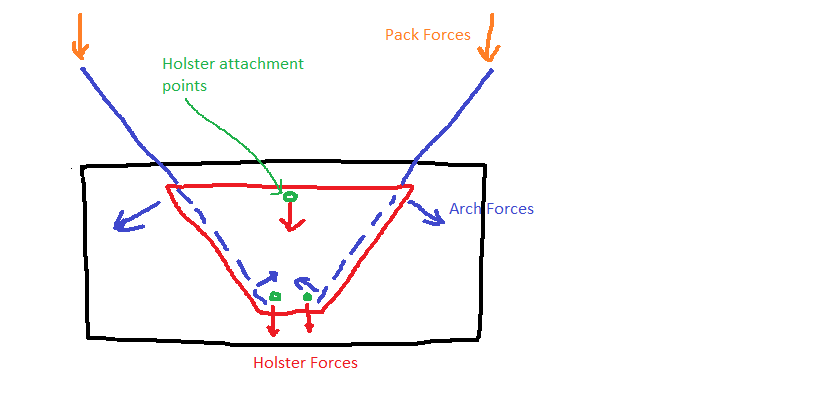
I started with the hip belt design since that is really the foundation of the structure and needs to support all the weight above it. Here’s a diagram of the basic structure I came up with:

Each pack bag will be supported from the bottom via an arch. The arches will be supported by ‘holsters’ or socket pieces that are attached to the hip belt on the sides. For this to work, the arches must be stiff enough to not bend when the pack bags rest on them, the holsters must be stiff enough to hold the angle of the arches, and the sides of the hip belt must be stiff enough to support the weighted holsters without deforming. Here’s a diagram of the forces on the structure:

Version 1.0
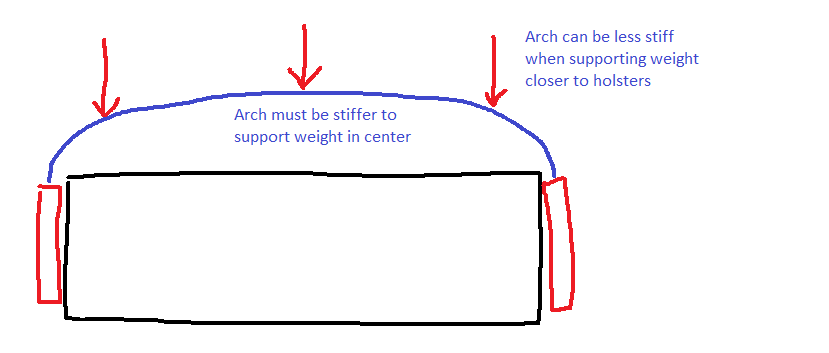
For my first try, I used 1/16” thick Polypropylene for the hip belt with two different foams lining the inside. The holsters I made out of 1/16” High Density Polyethylene. I attached the holsters to the hip belt with three 2-56 screws and nuts at the attachment points noted above. Initially I experimented with bending different diameters of fiberglass rod into the arches, but they ended up being too springy so I went with aluminum. The thickness of the aluminum rod or tubing used for the arch depends on how much weight it will support and where that weight is applied. If the weight is applied in the center as far from the holsters as possible, the aluminum needs to be thicker than if the weight is applied on the sides close to the holsters:

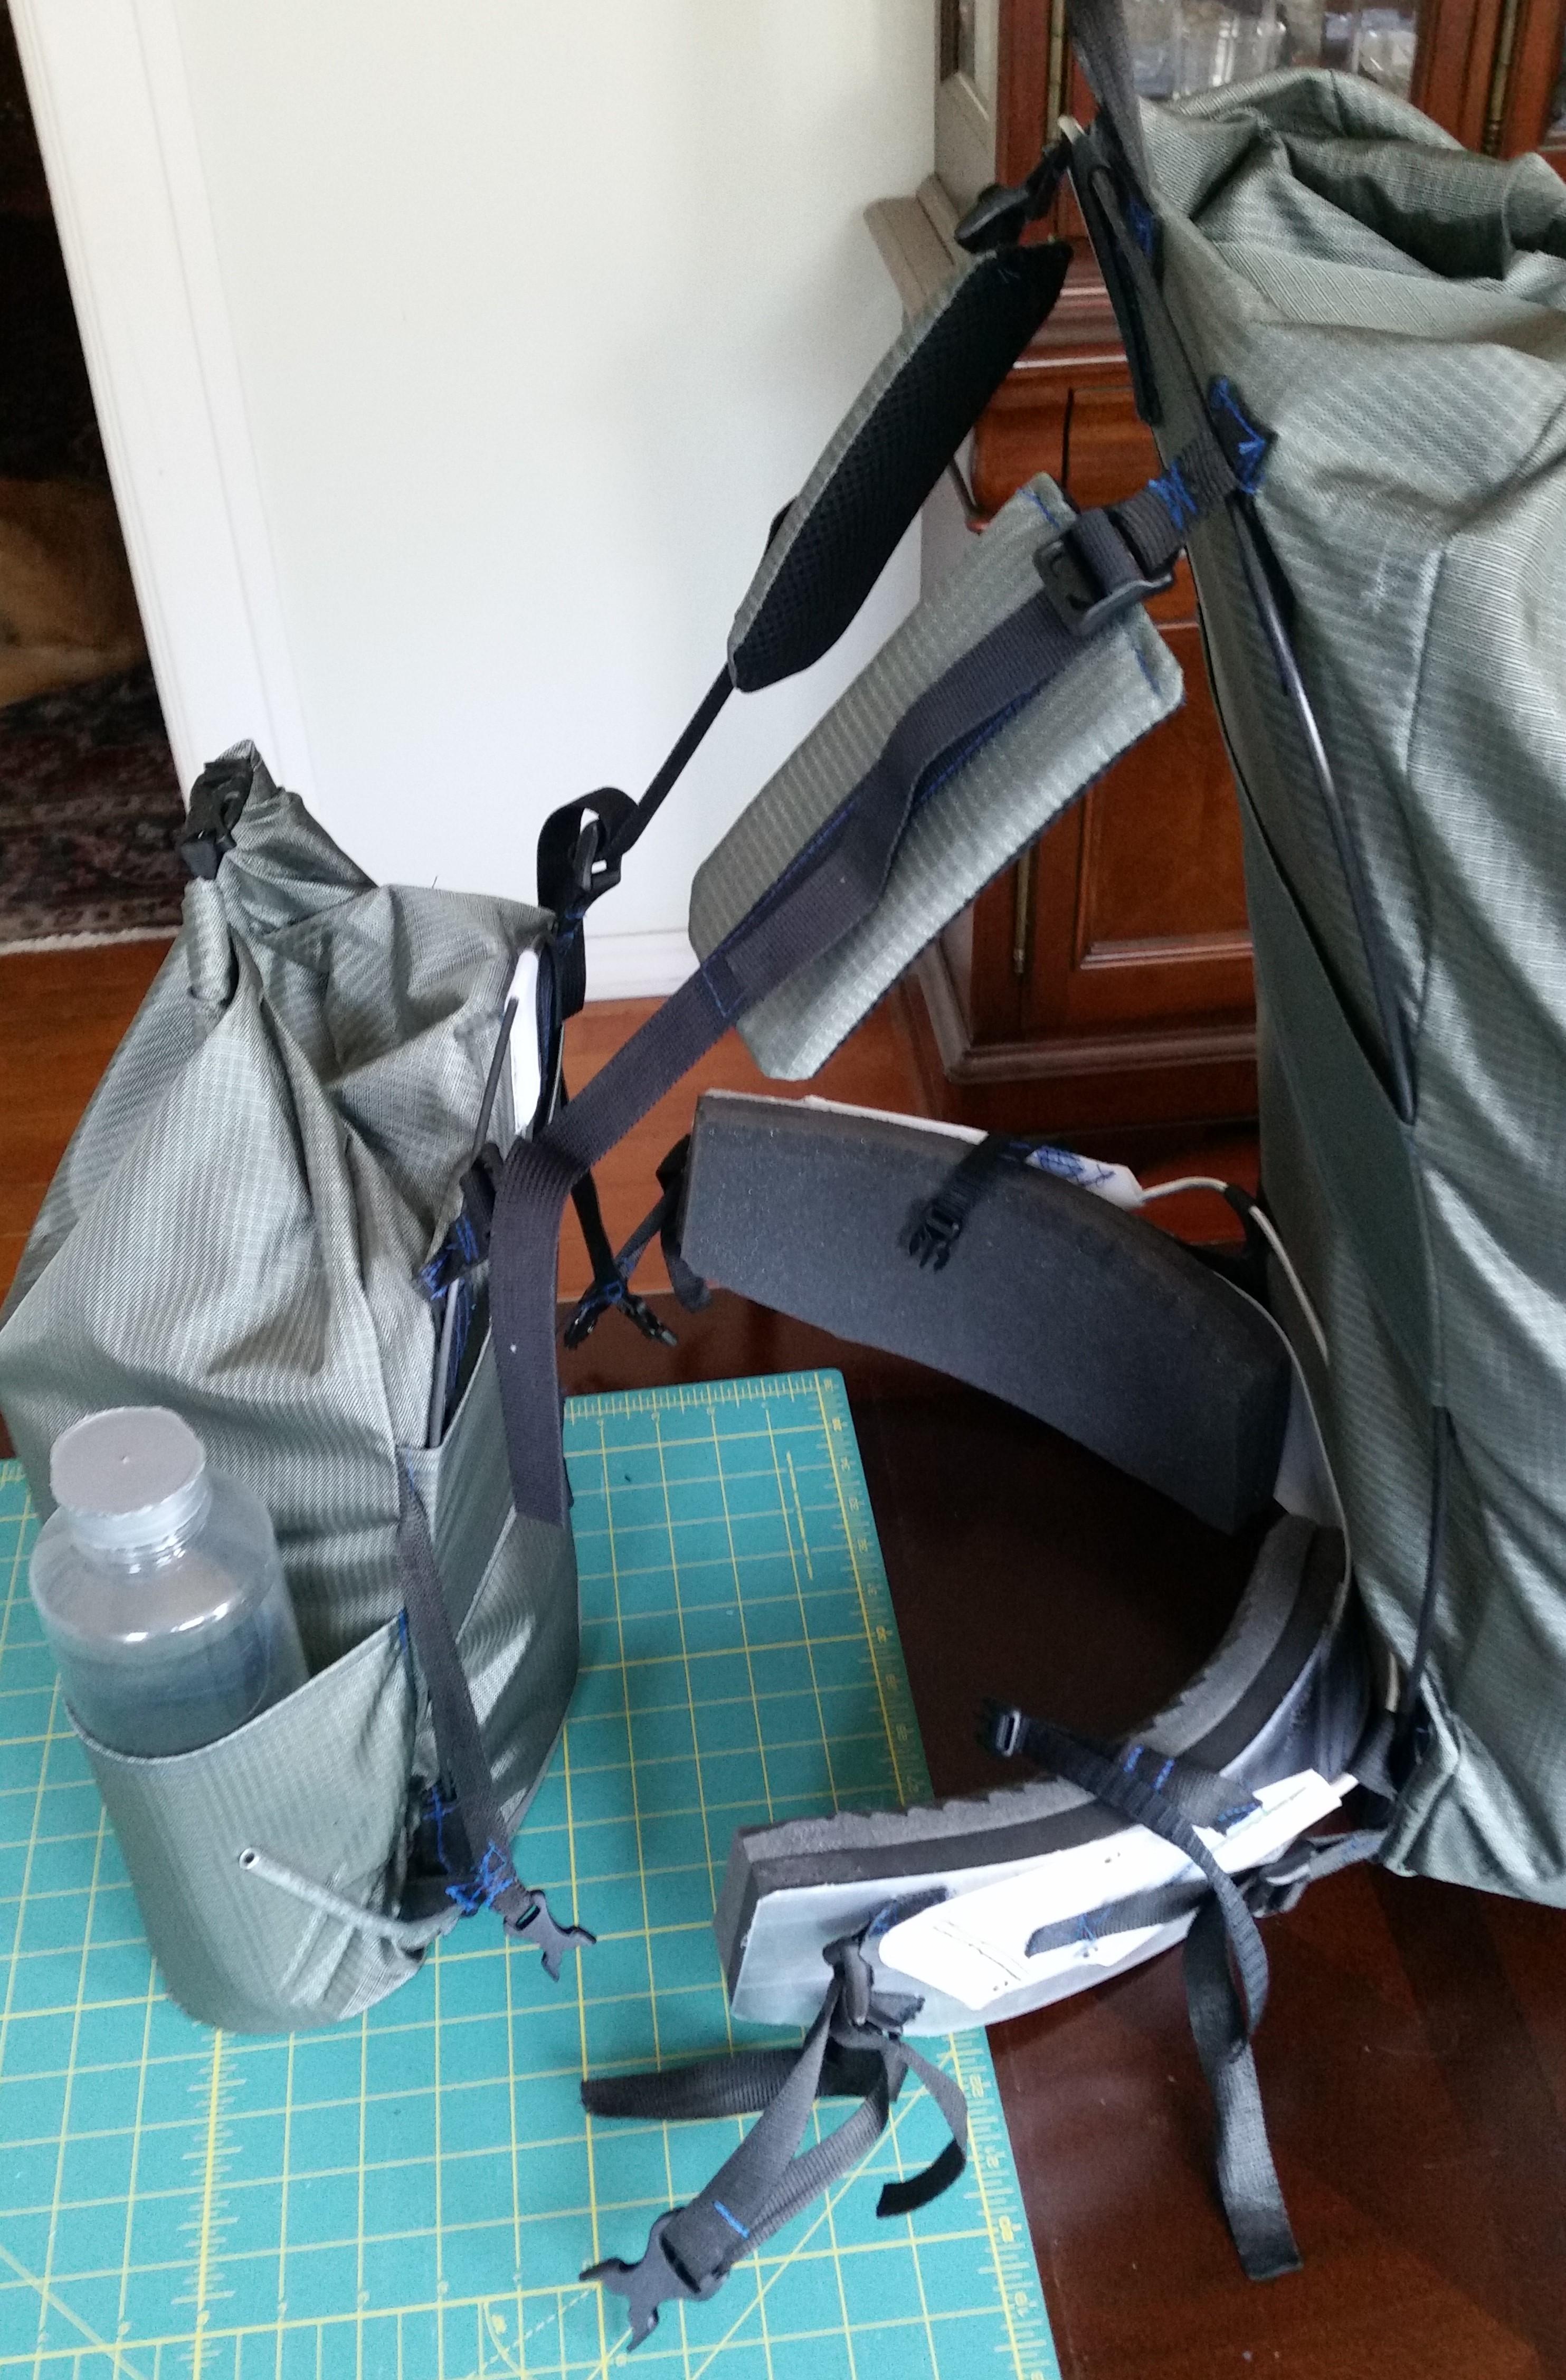
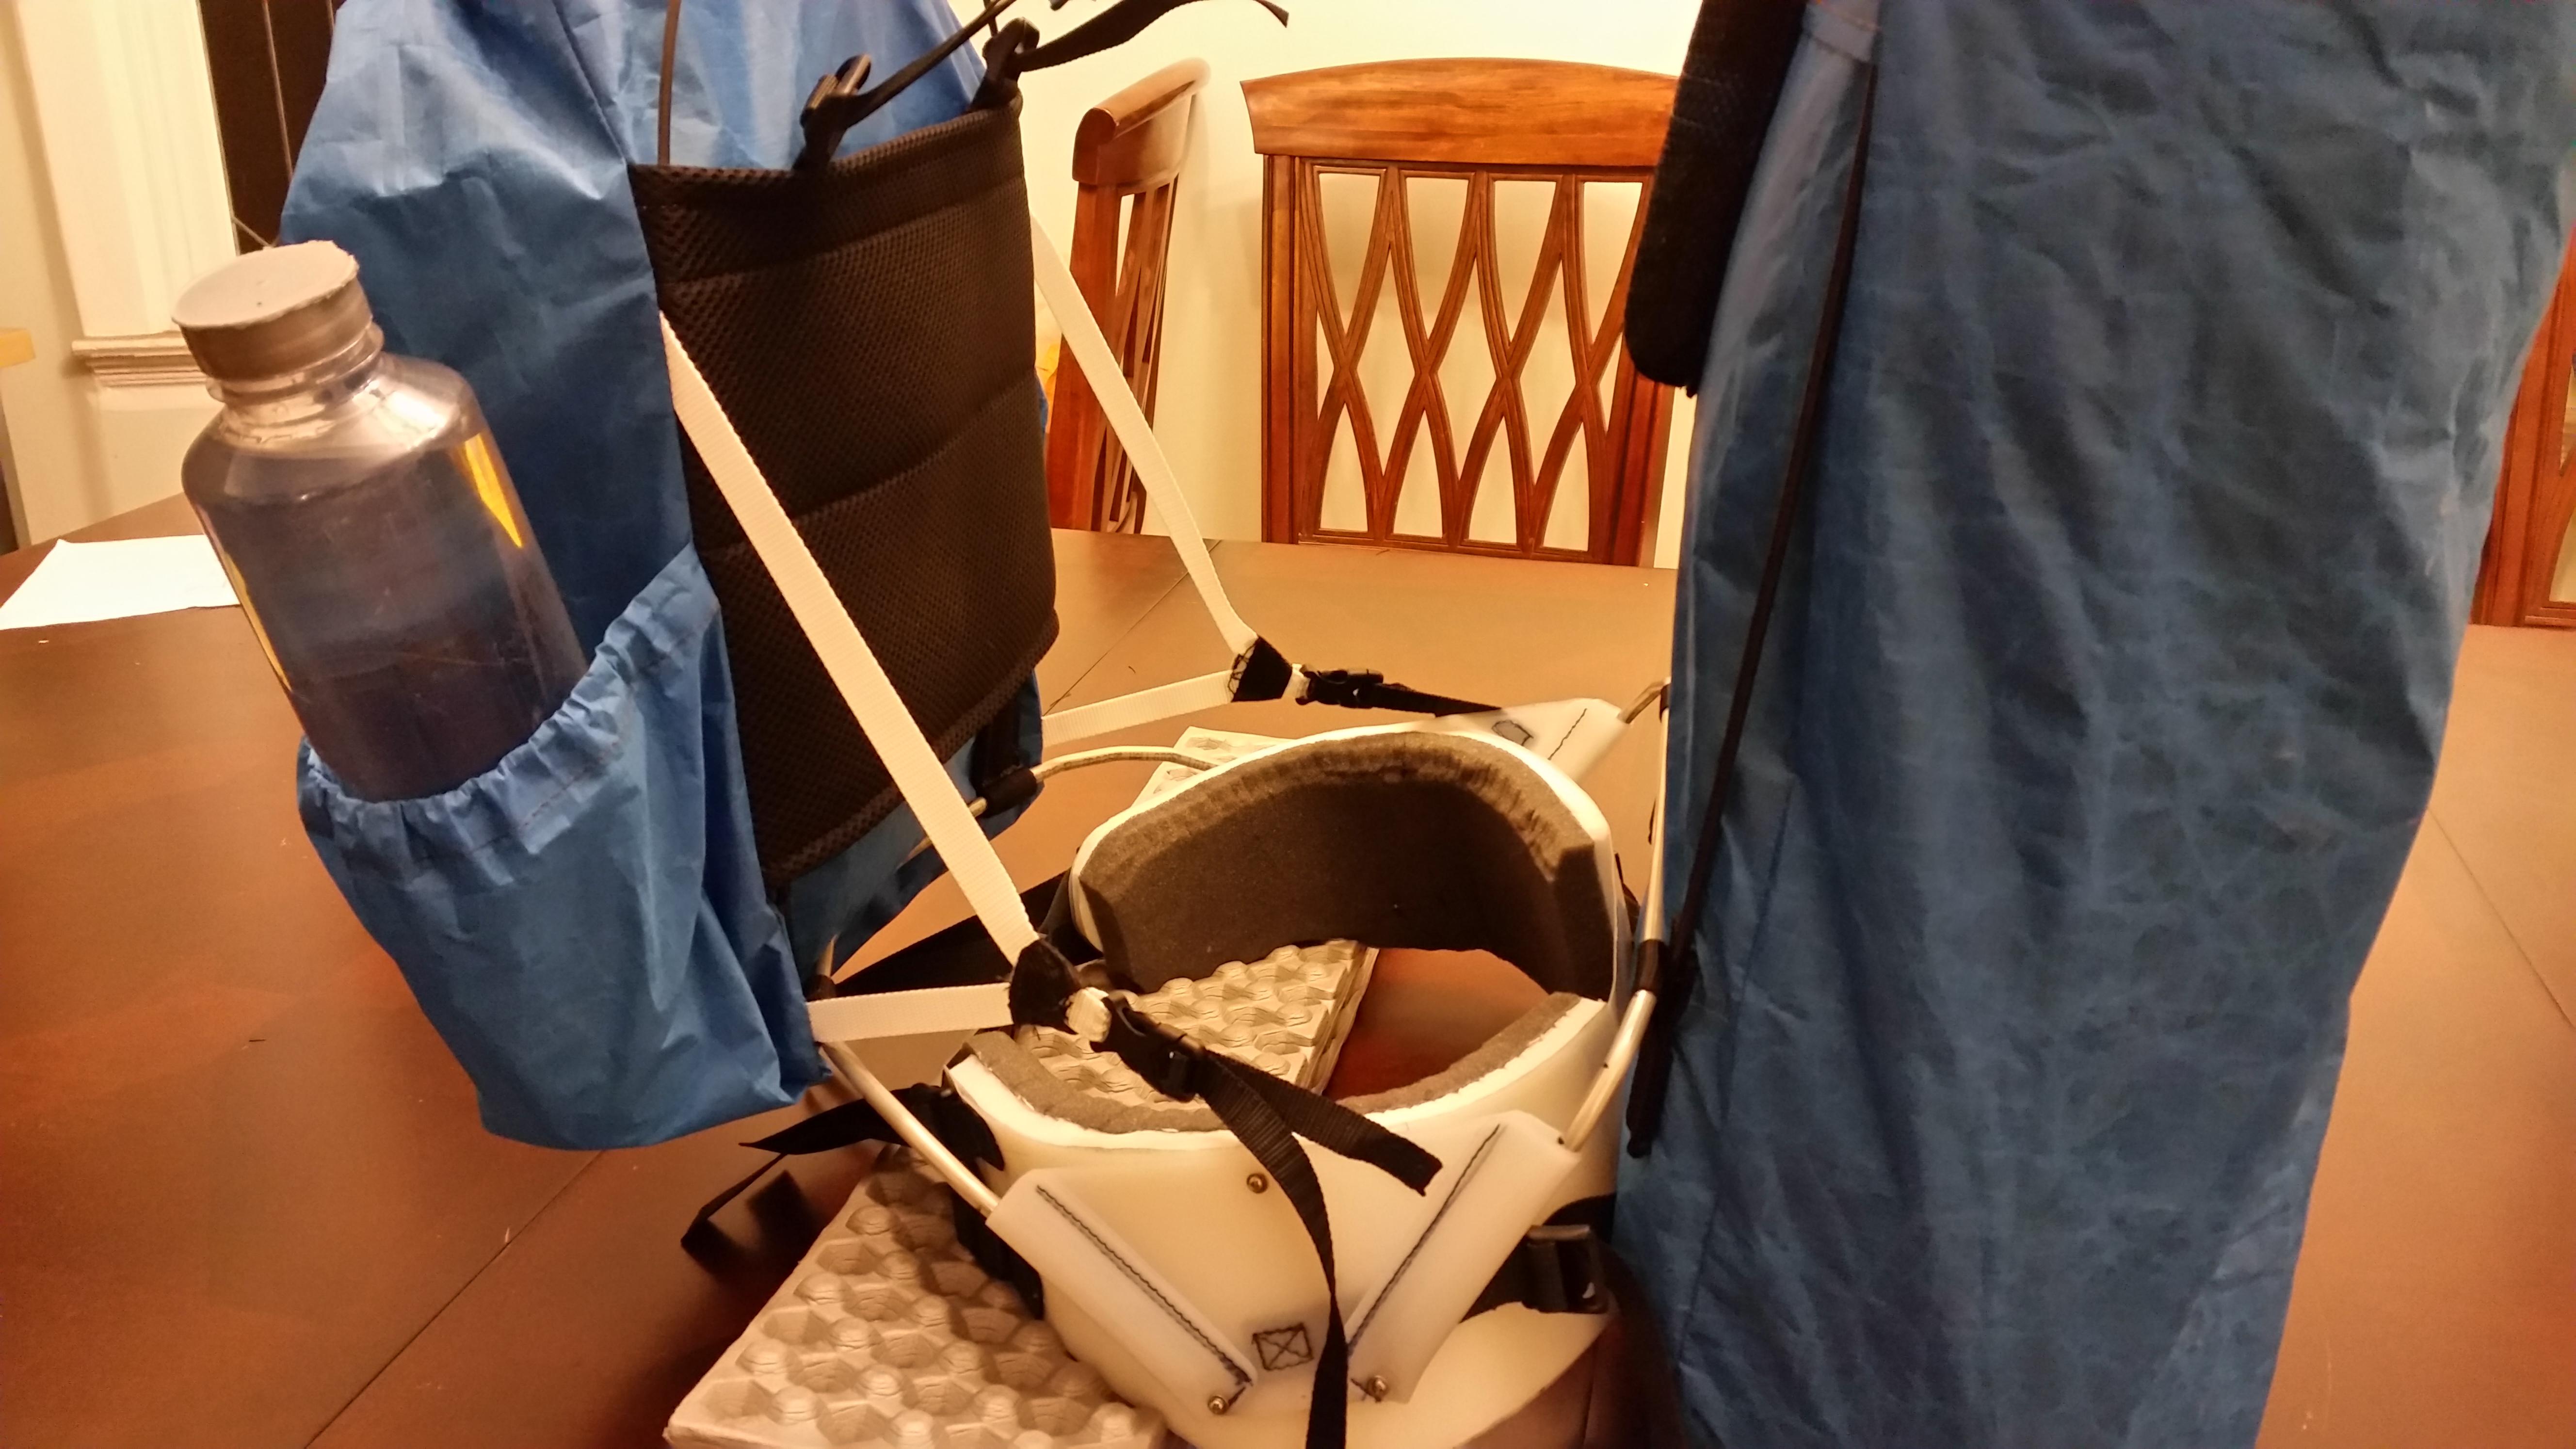
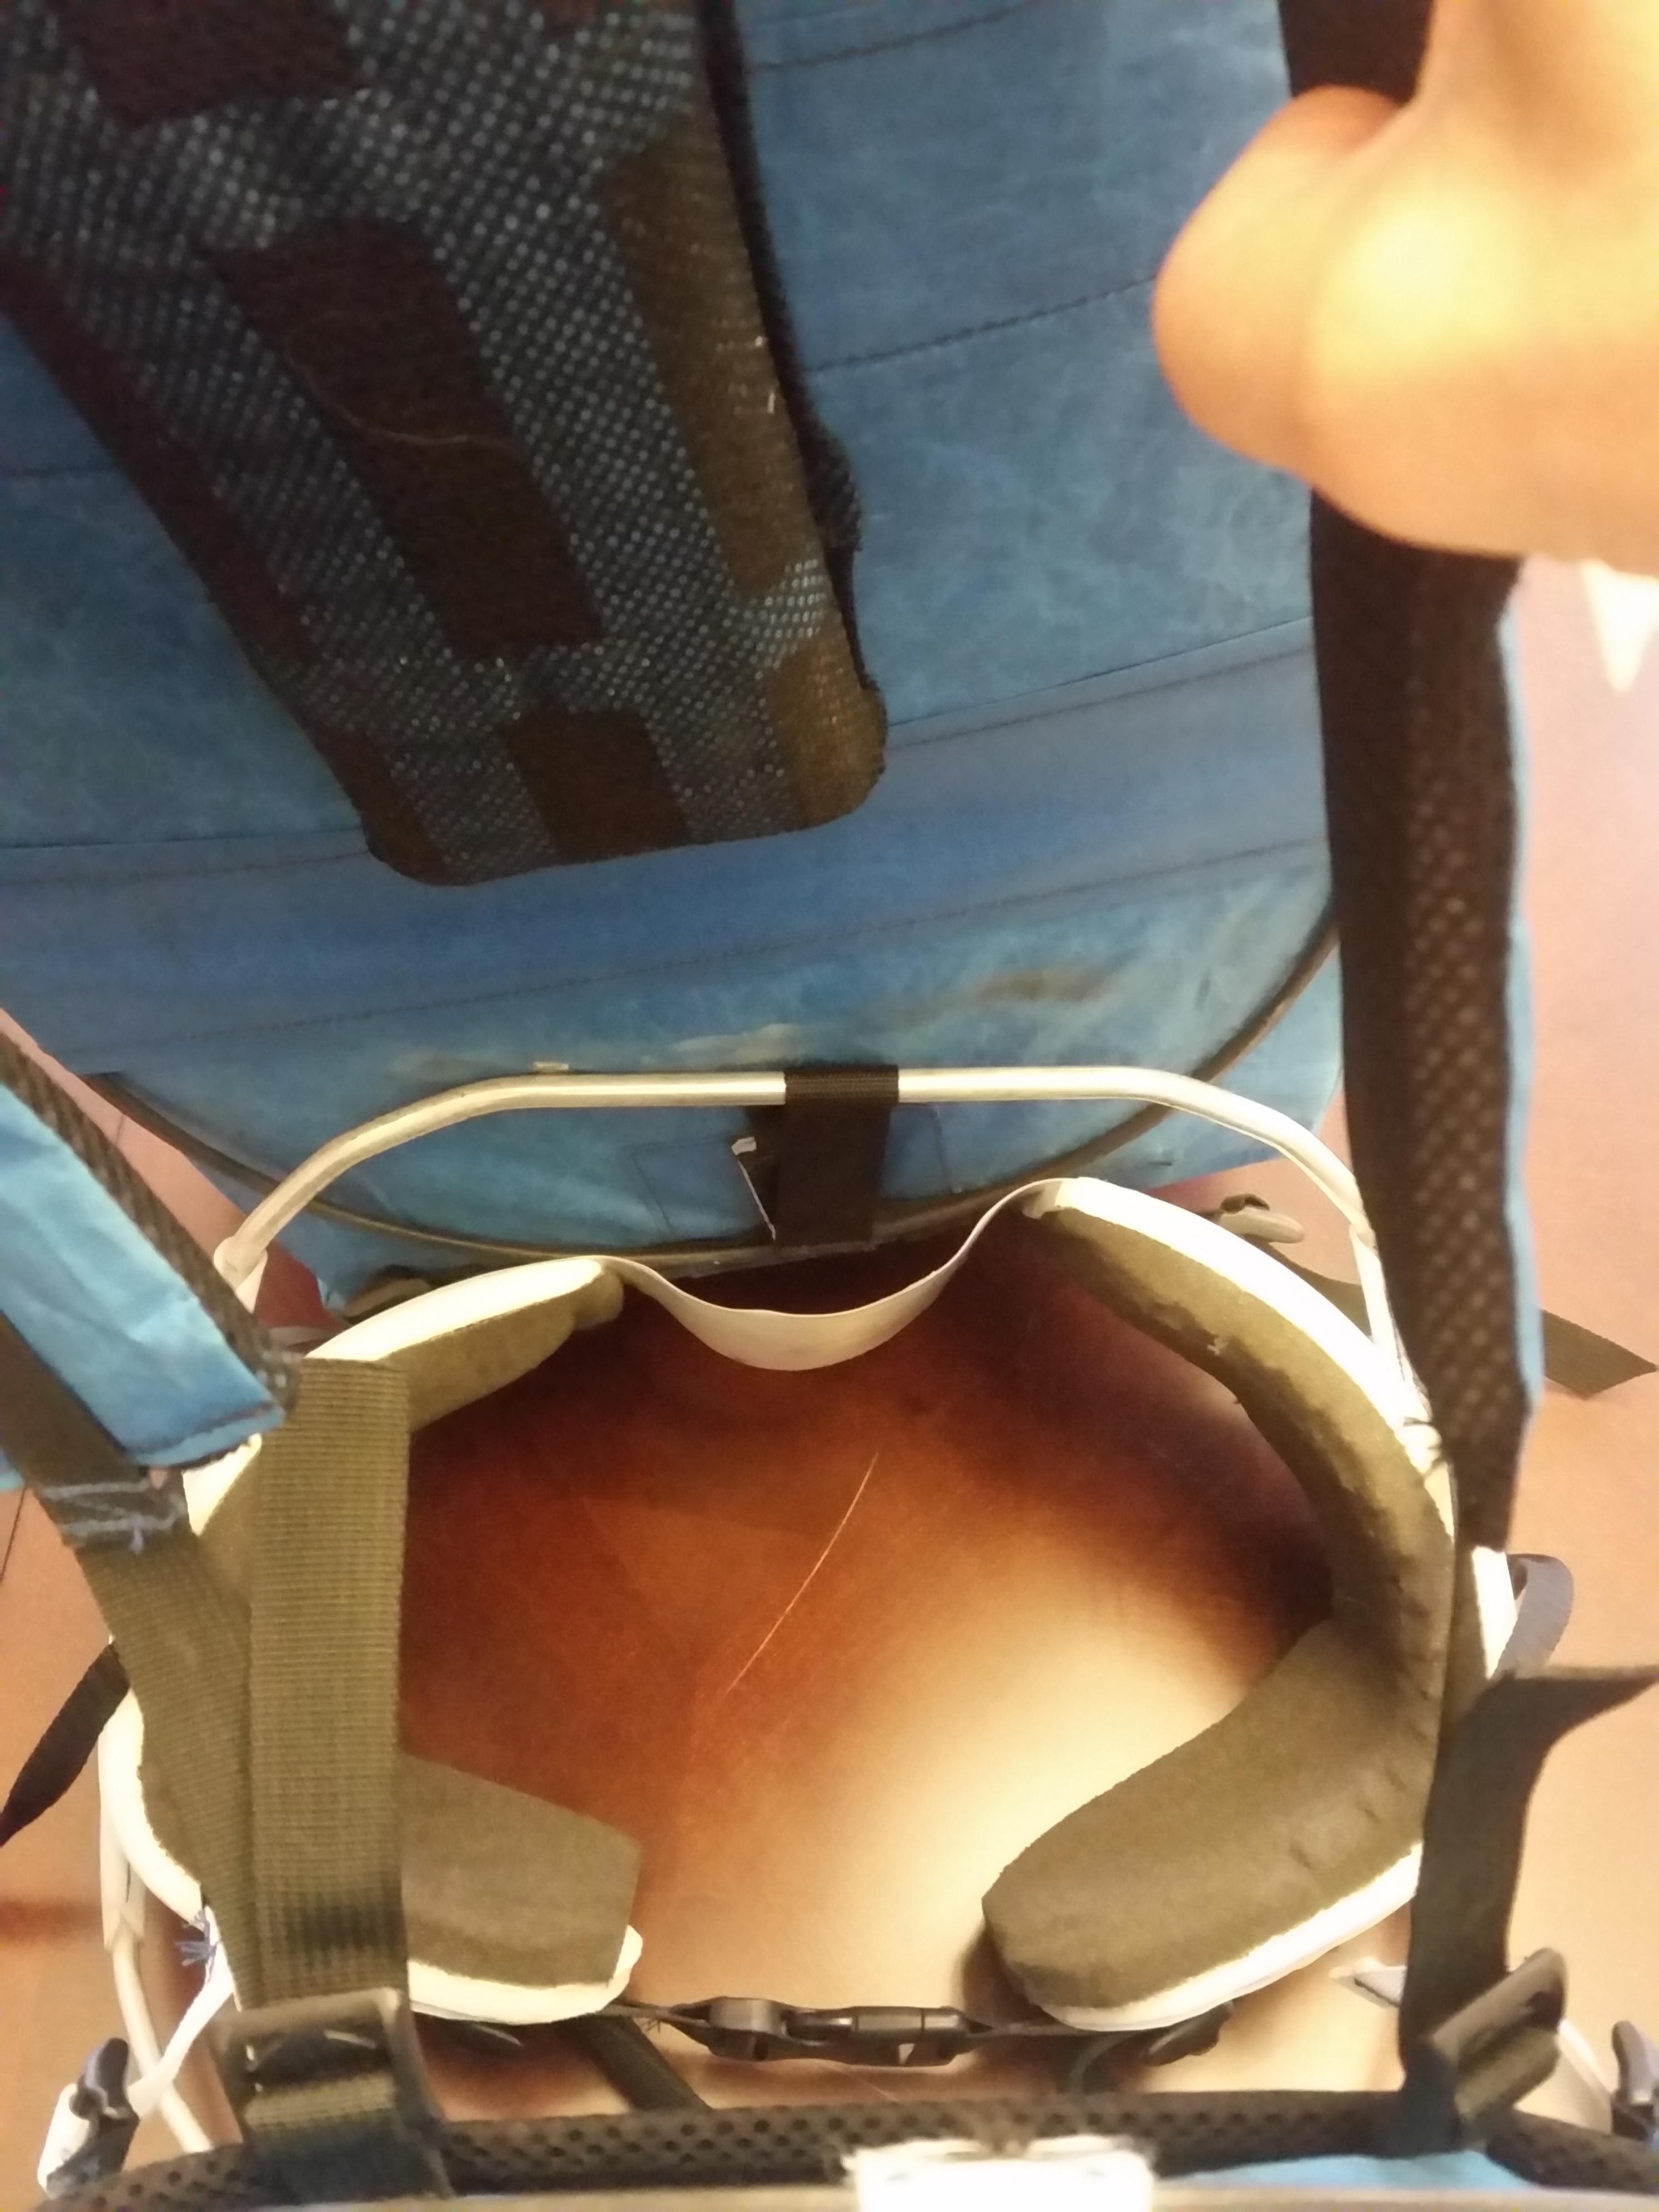
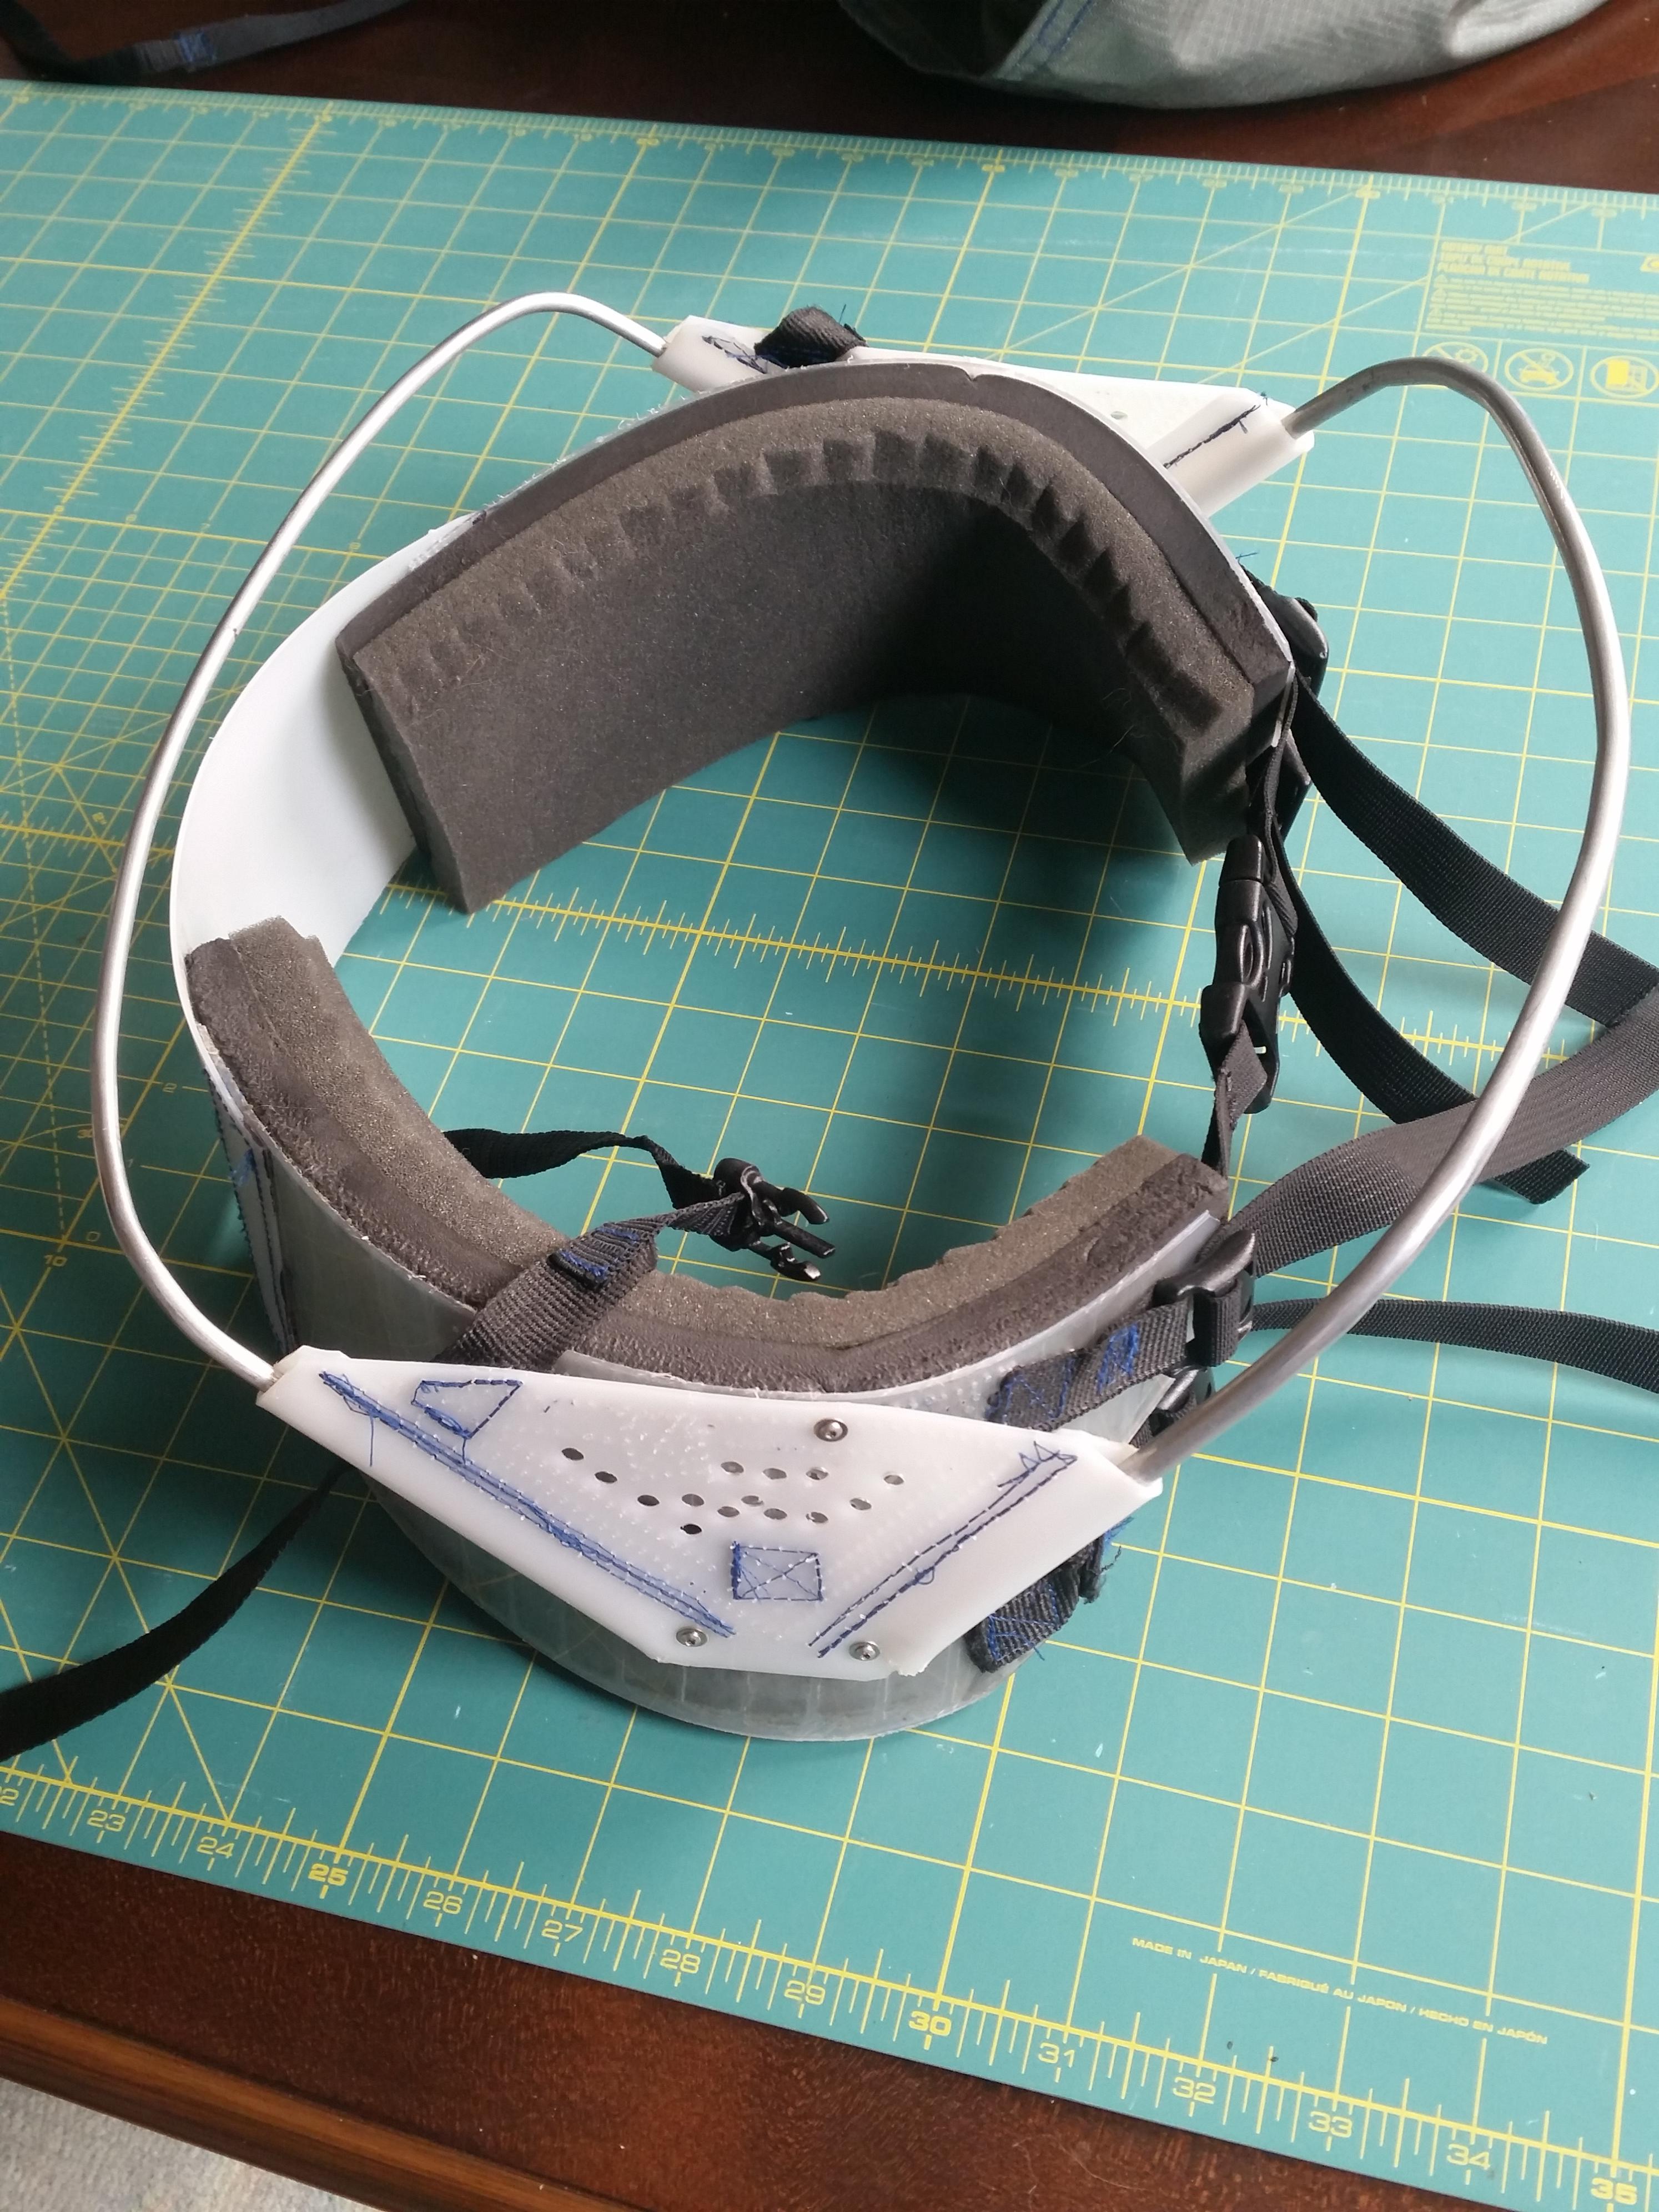
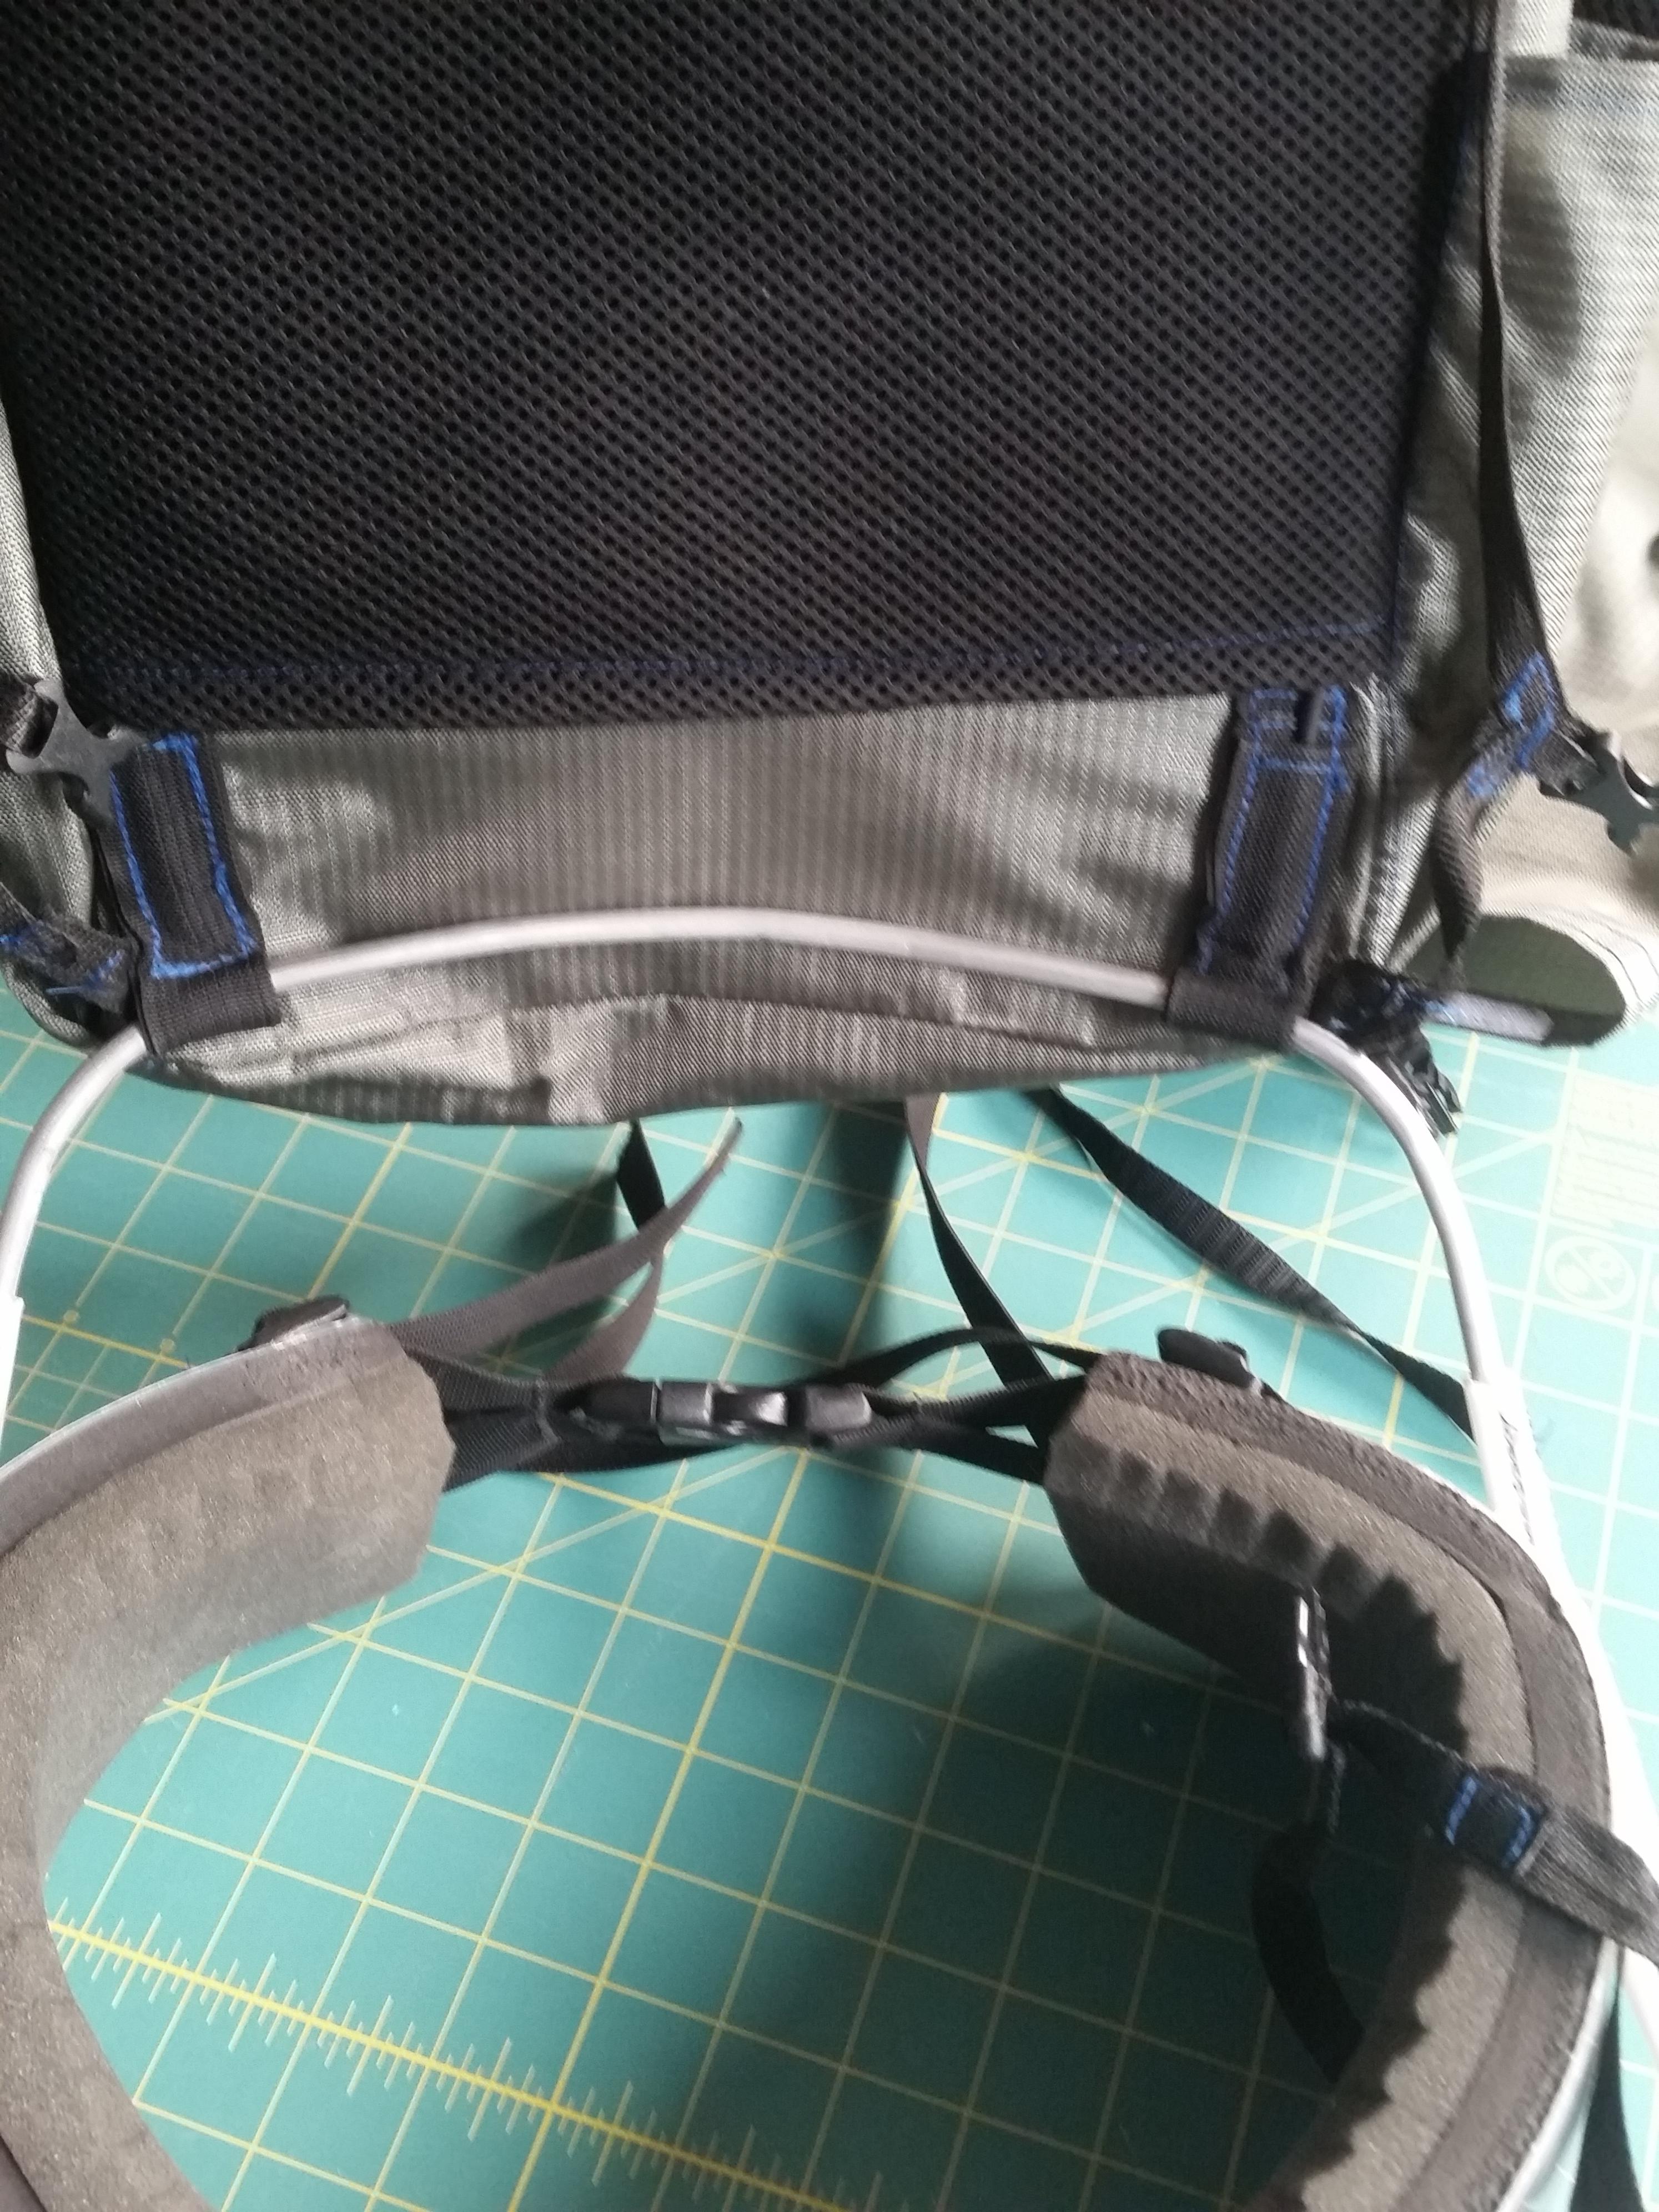
I ended up using 3/16” 2024 Aluminum rod for the back pack and ¼”OD x 0.035” wall 6061 Aluminum tubing for the front pack. Each pack bag had mounting loops close to the edges to minimize the thickness of Aluminum needed. Here’s the prototype hip belt with arches, and the front pack bag mounting points:

 There’s no foam in the center back of the hip belt because all the weight is supported by the outside of the hips, so I saved a bit of material there. Initially I tried having the hip belt be essentially two halves, joined at the back center with just 2 straps of webbing, but it did not work very well. Having it be a single piece was important, but on the second iteration I tried lightening up that area a little more, which I’ll get to later.
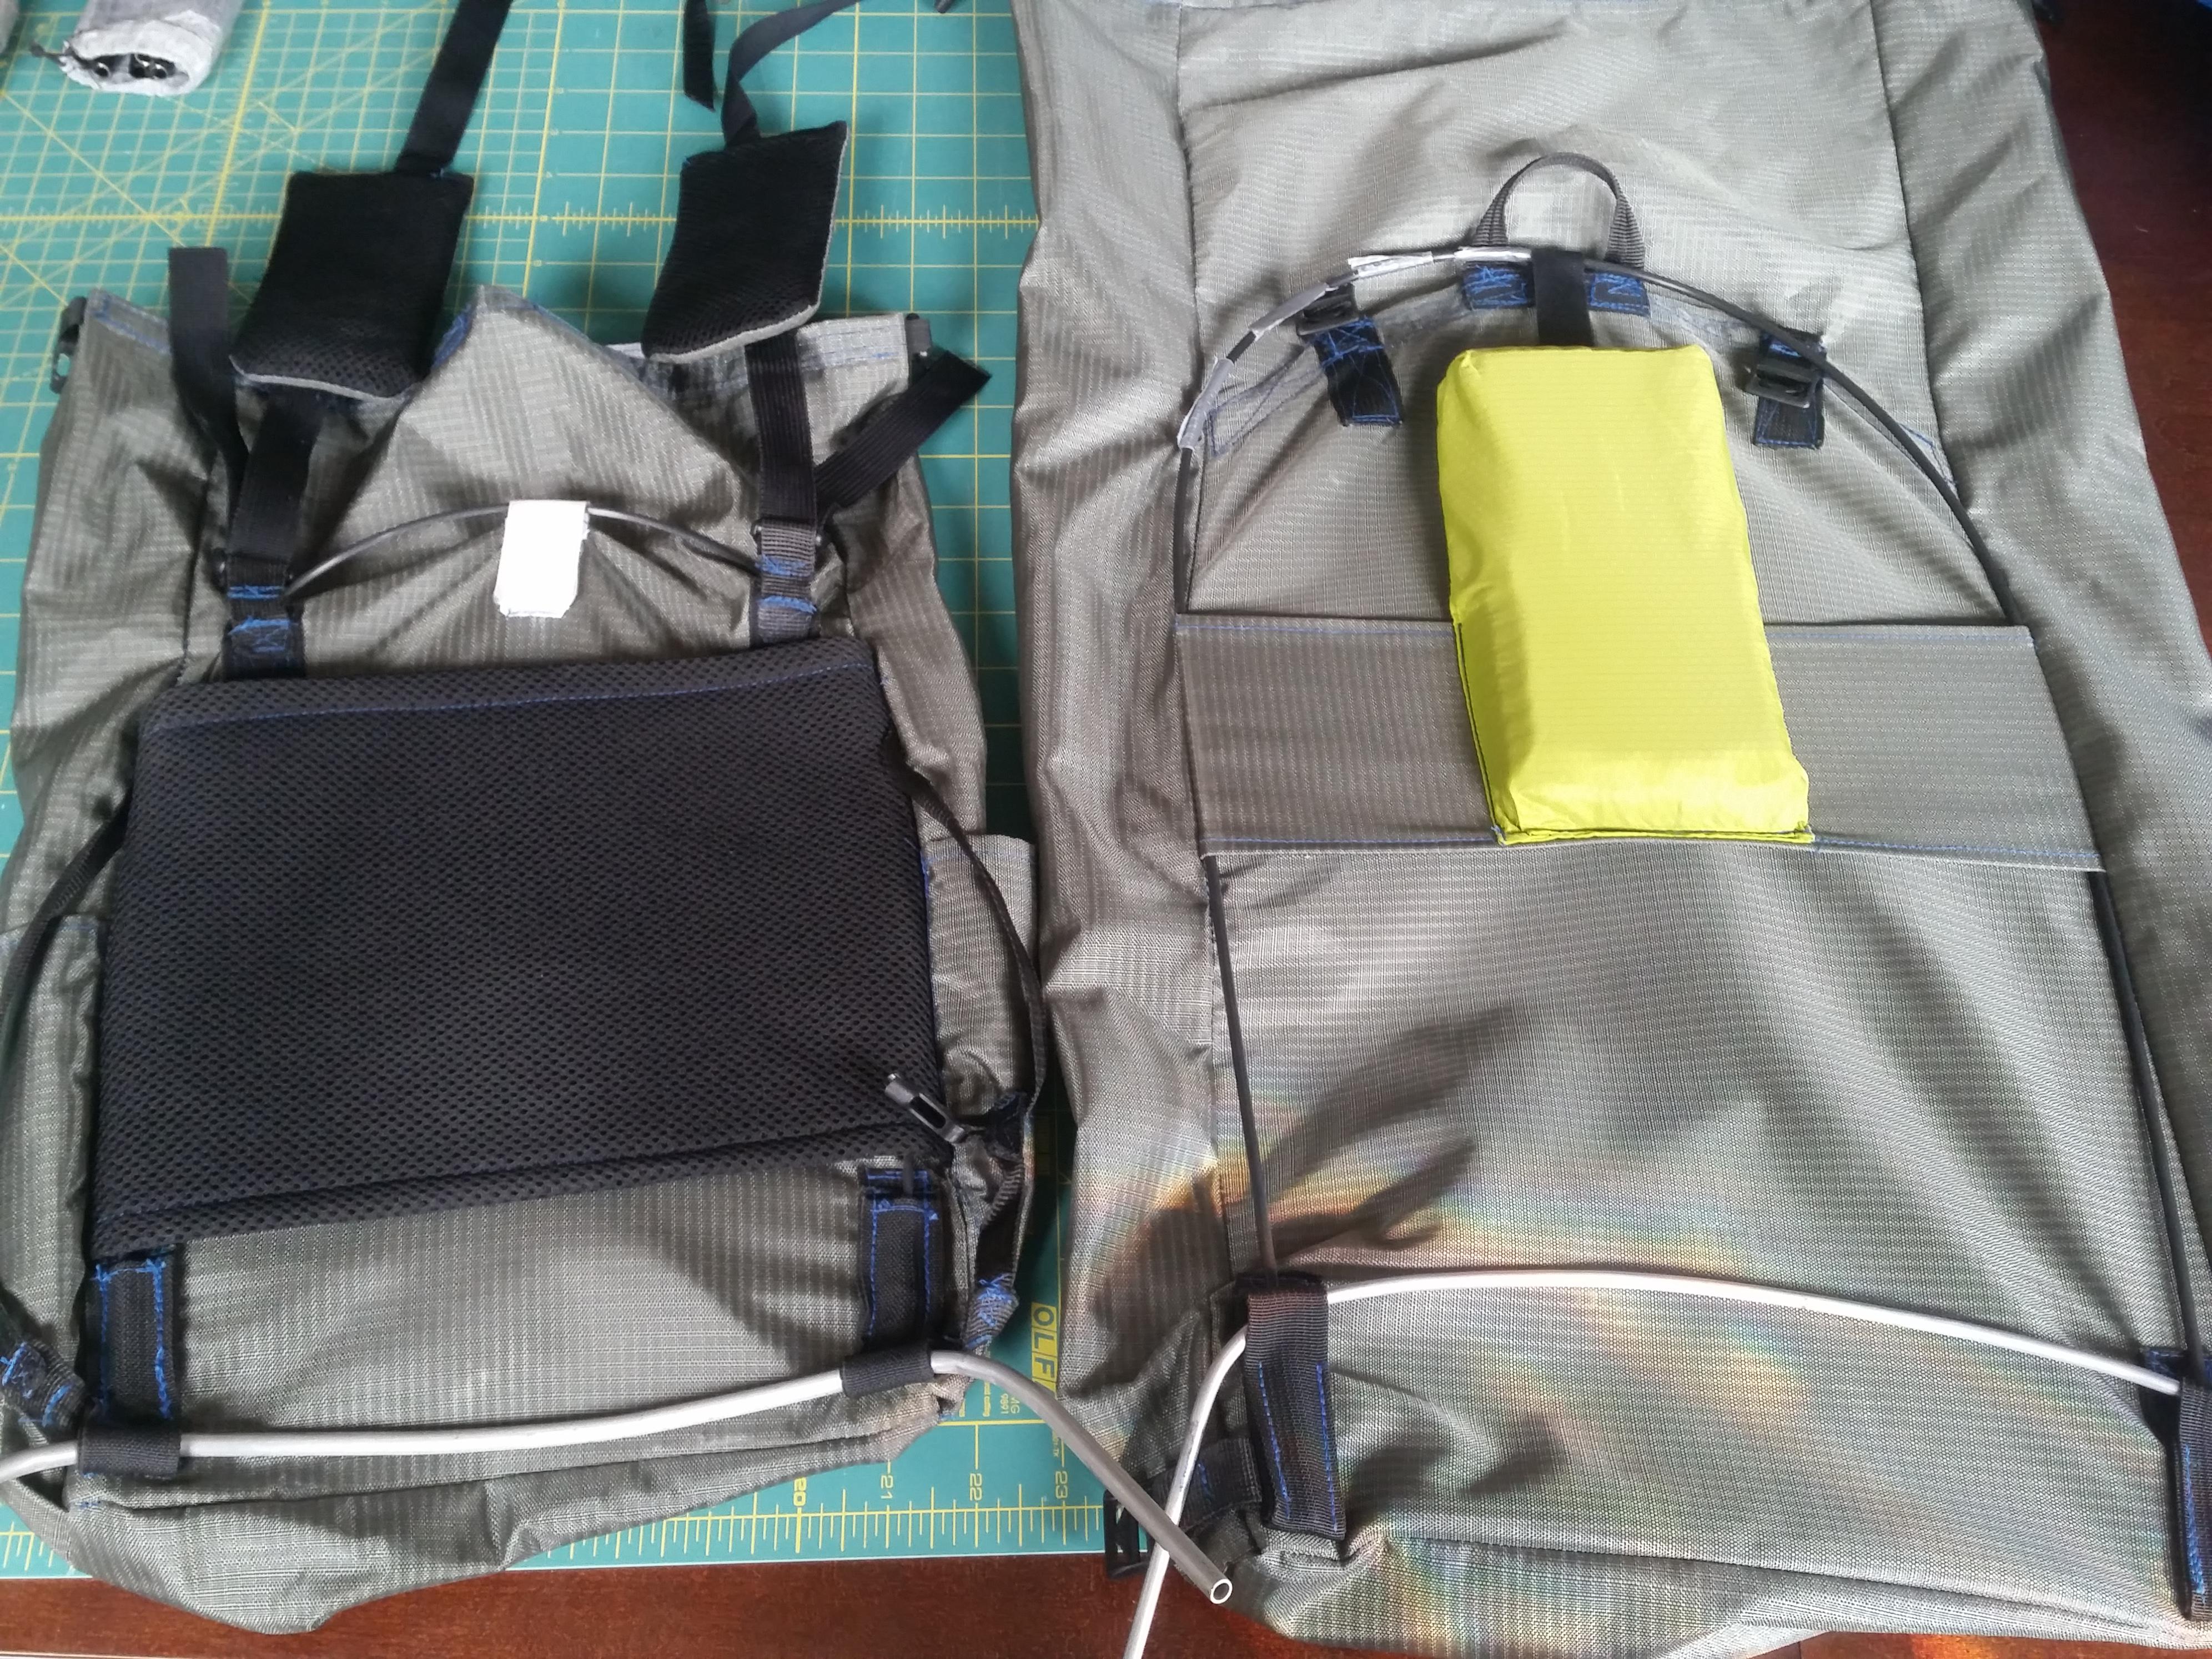
The bags themselves also need a bit of a frame, so I again experimented with fiberglass rod to better results this time. The rods are bent into a u-shape that go into webbing pockets at the ends and center of the U is held in place with a strip of velcro sewn to the bag. The force of the fiberglass trying to straighten makes a decent panel for each bag. The webbing sockets that hold the ends of the fiberglass rod are also the attachment points for the aluminum arches:

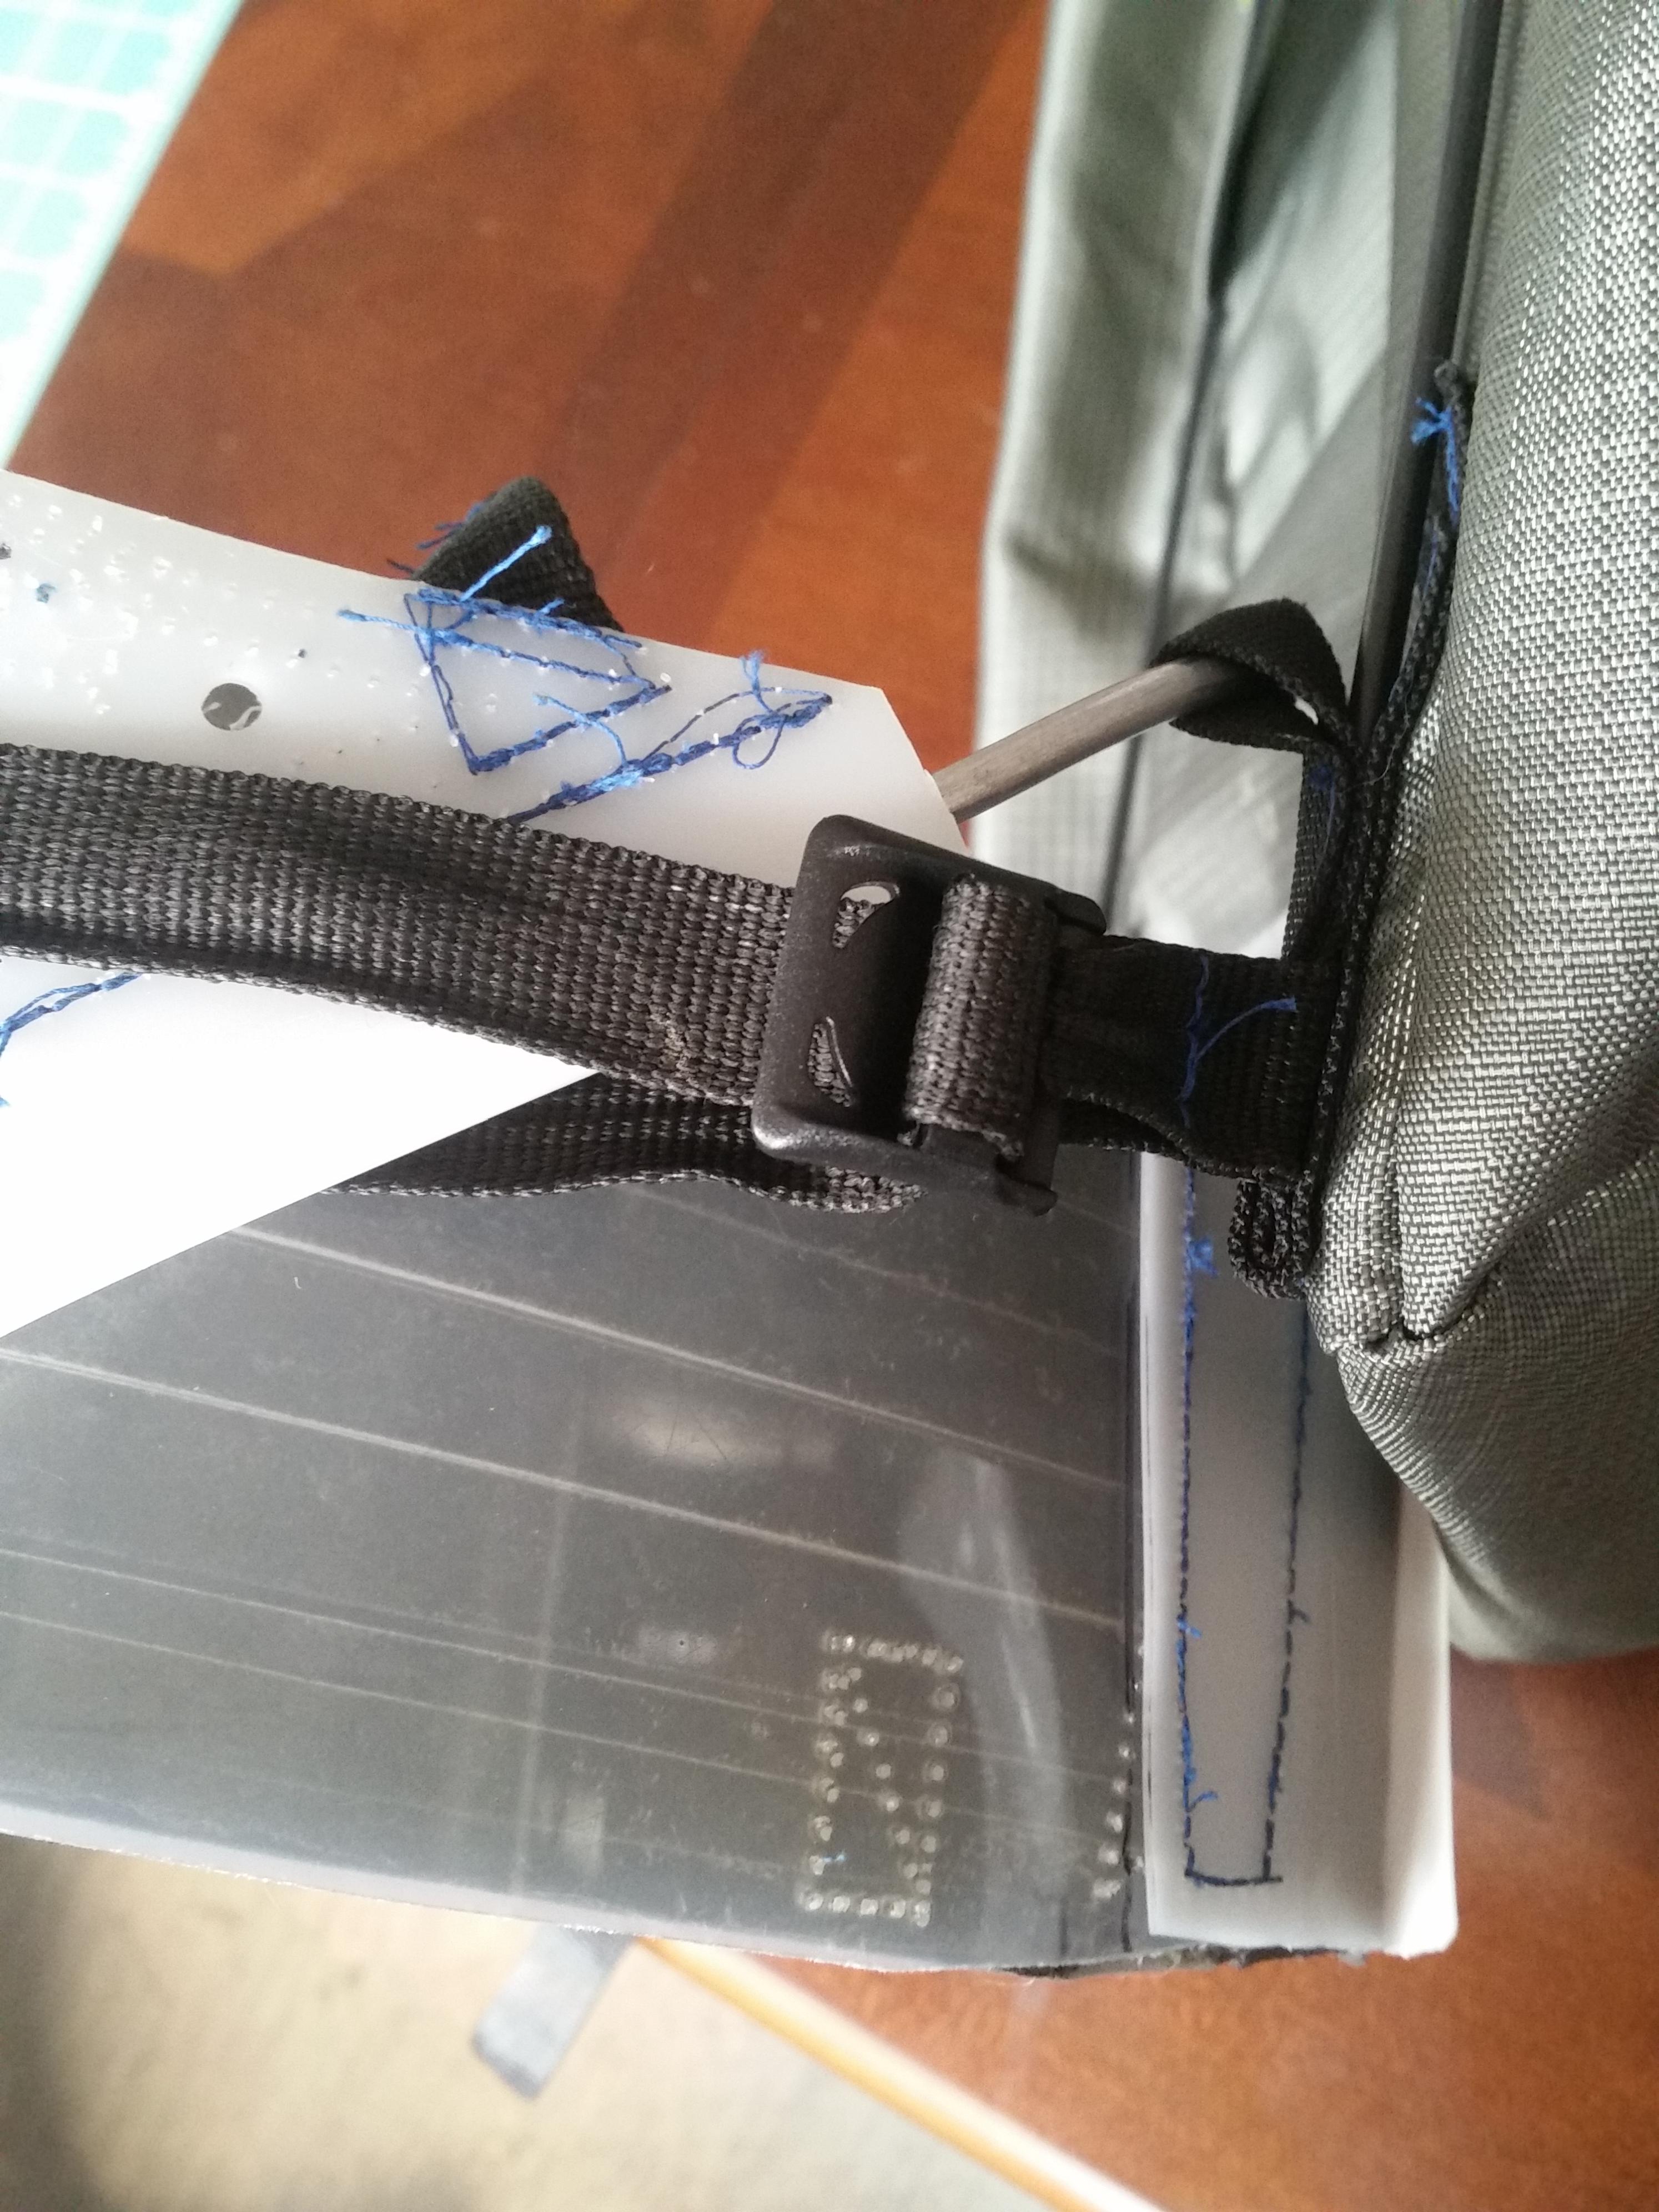
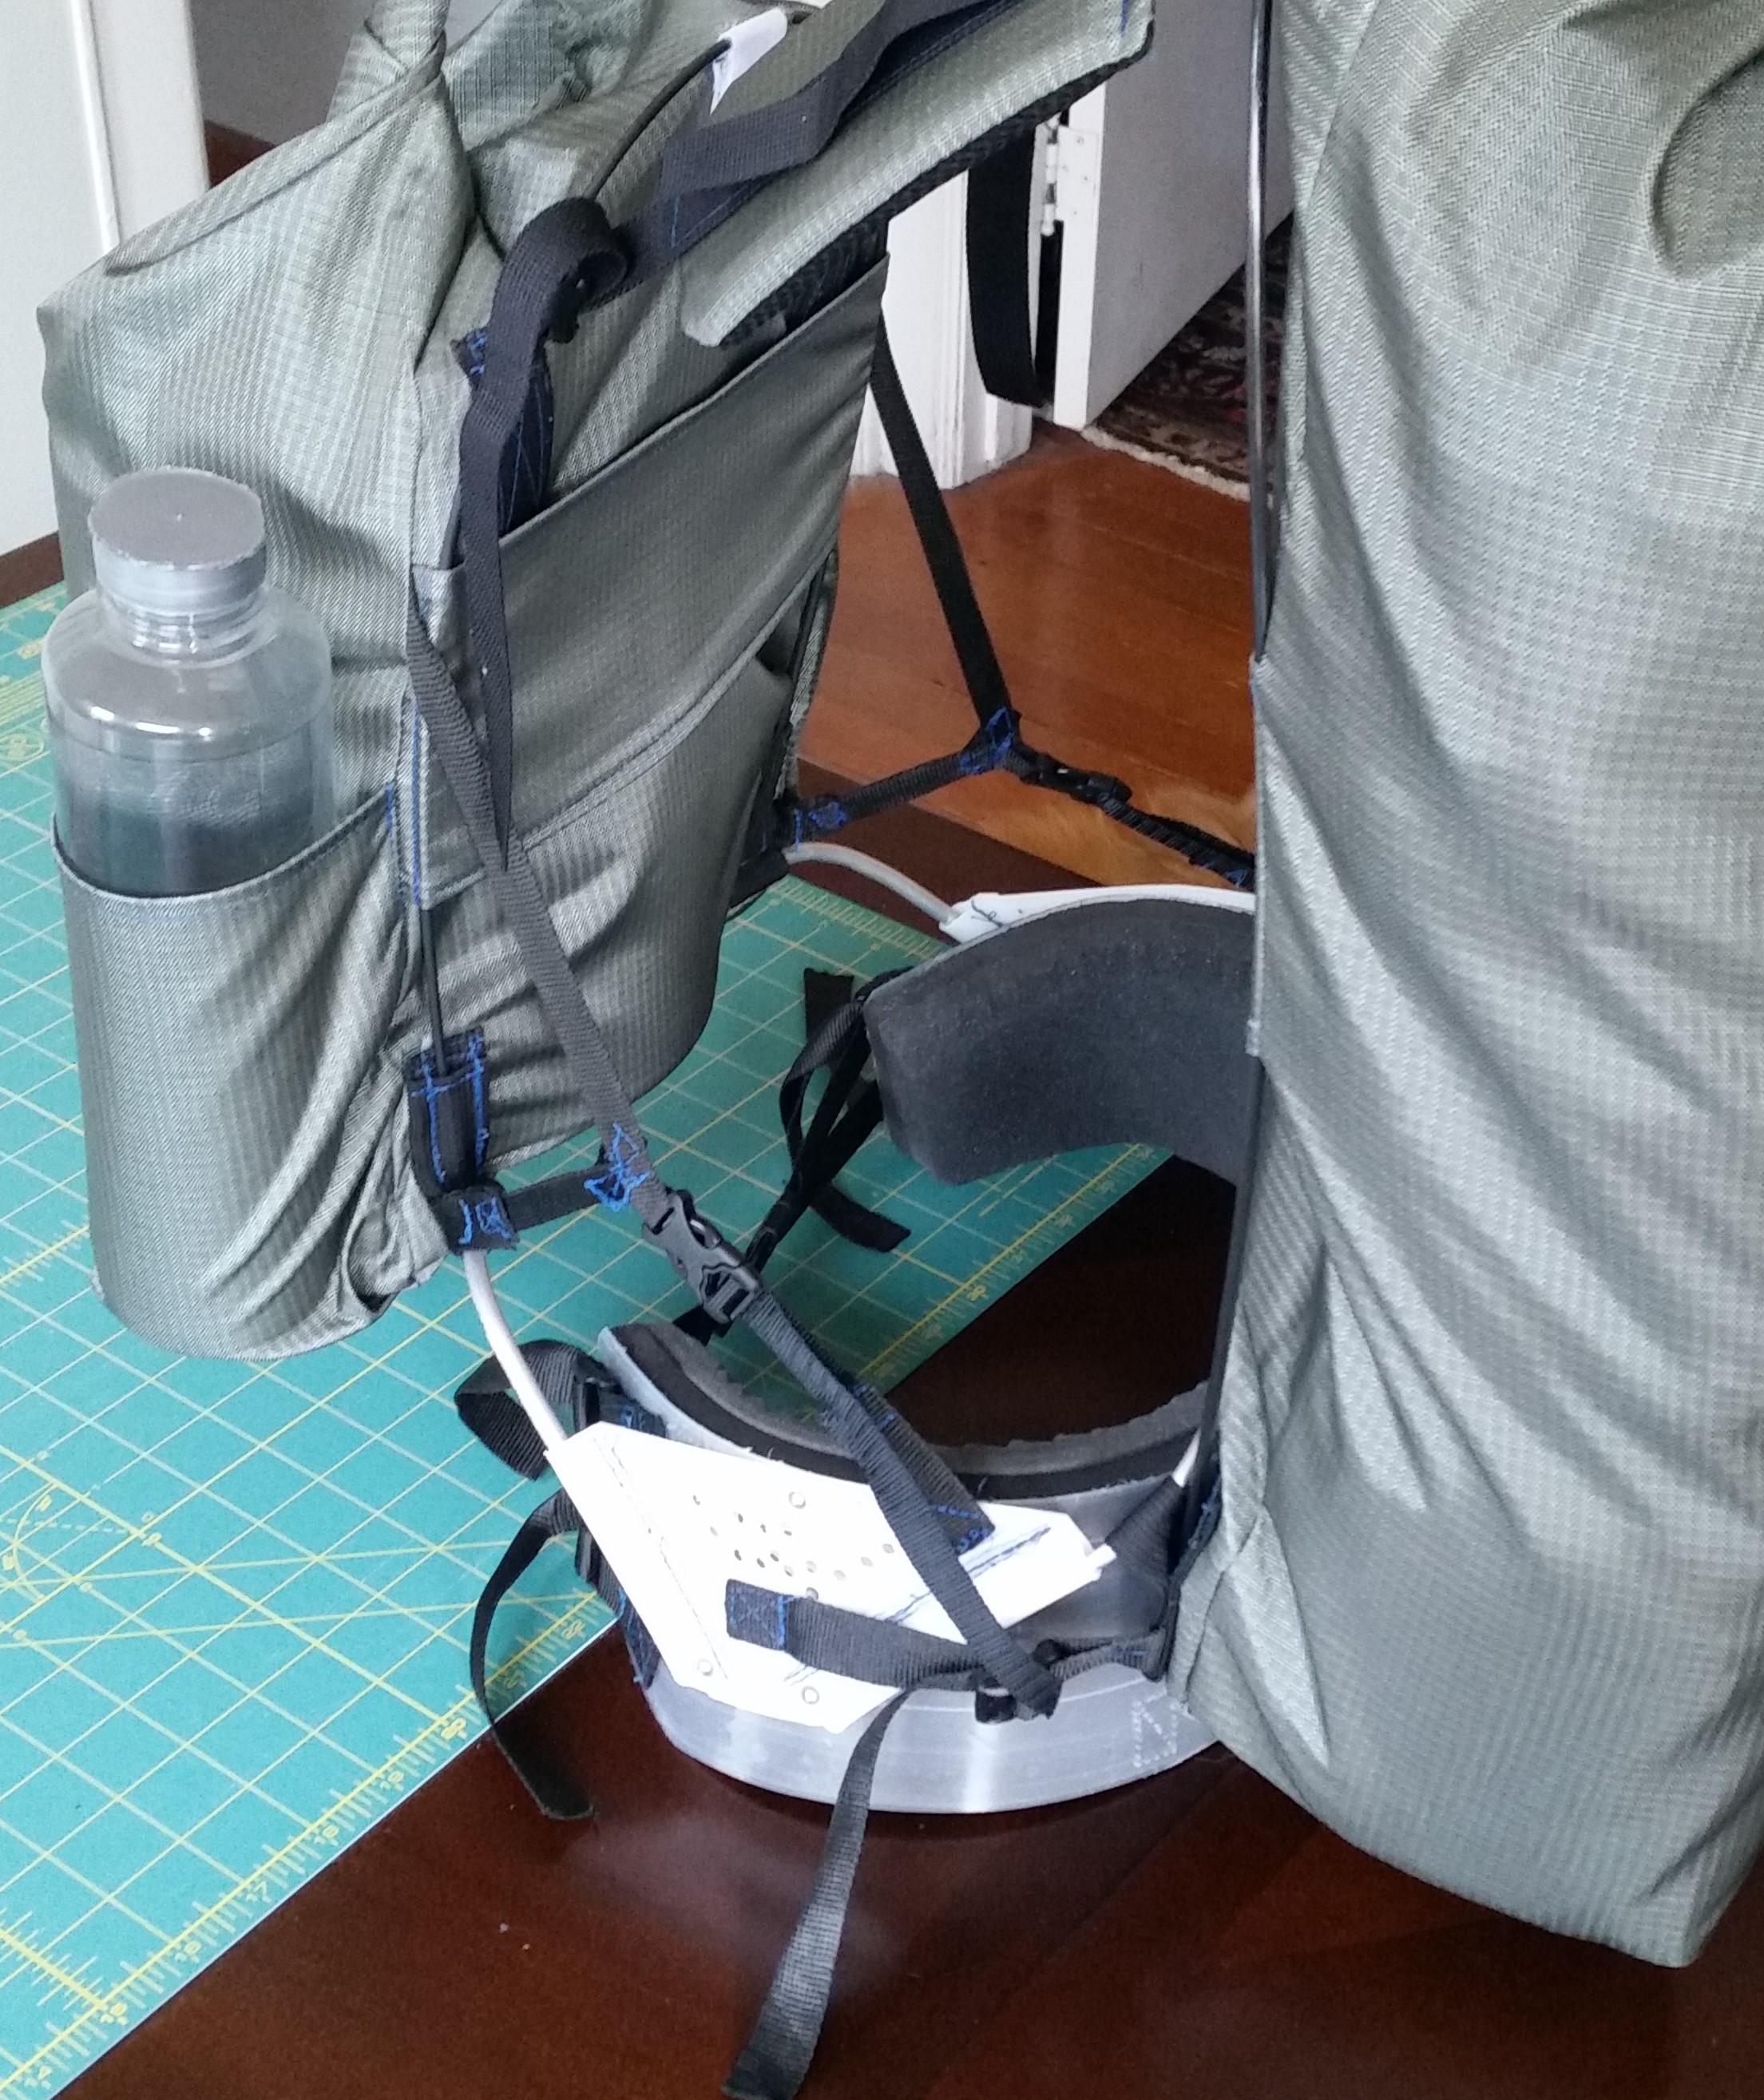
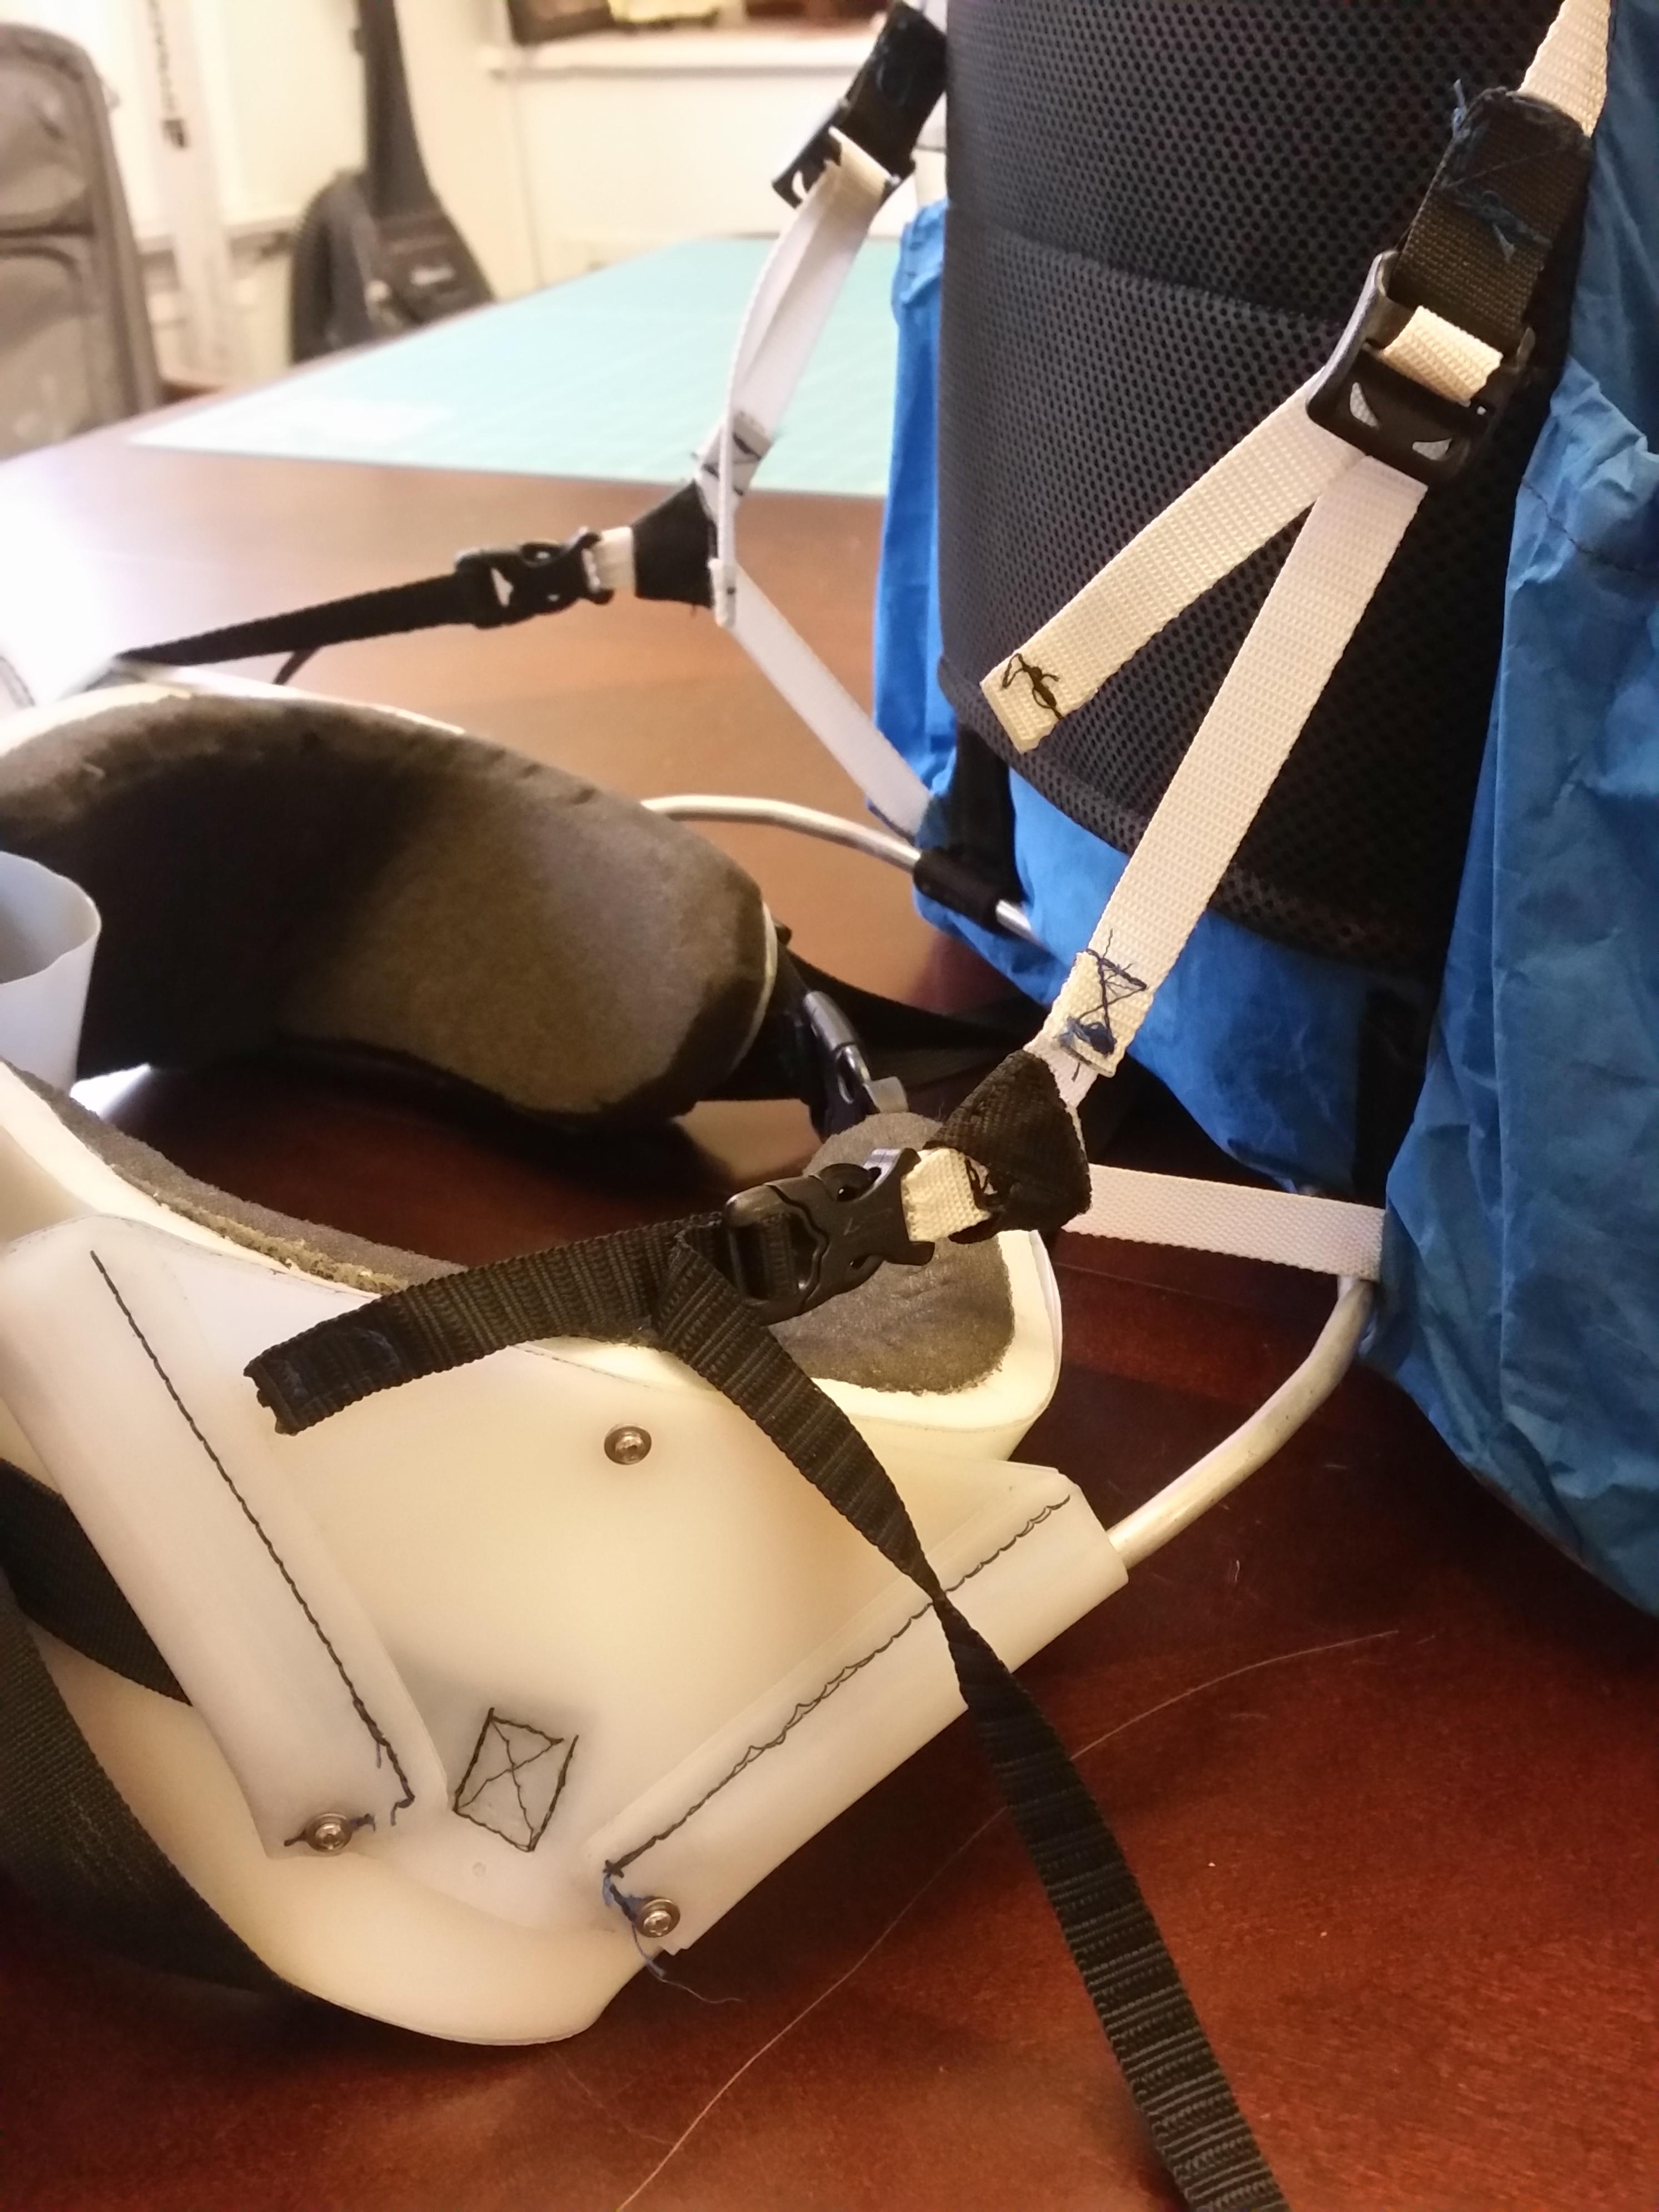
The pack bags are centered via straps that attach to the holsters on either side with ladder locks:

The front bag has an additional strap that makes it hold a rigid L-shape with the hip belt. This helps prevent the hip belt from ‘rotating’ if the weights of the front and back packs are not perfectly matched in weight. If the back pack bag is heavier, the front bag will act like a big lever arm from the upper strap attachment point to counteract the rotation from the weight of the back bag.

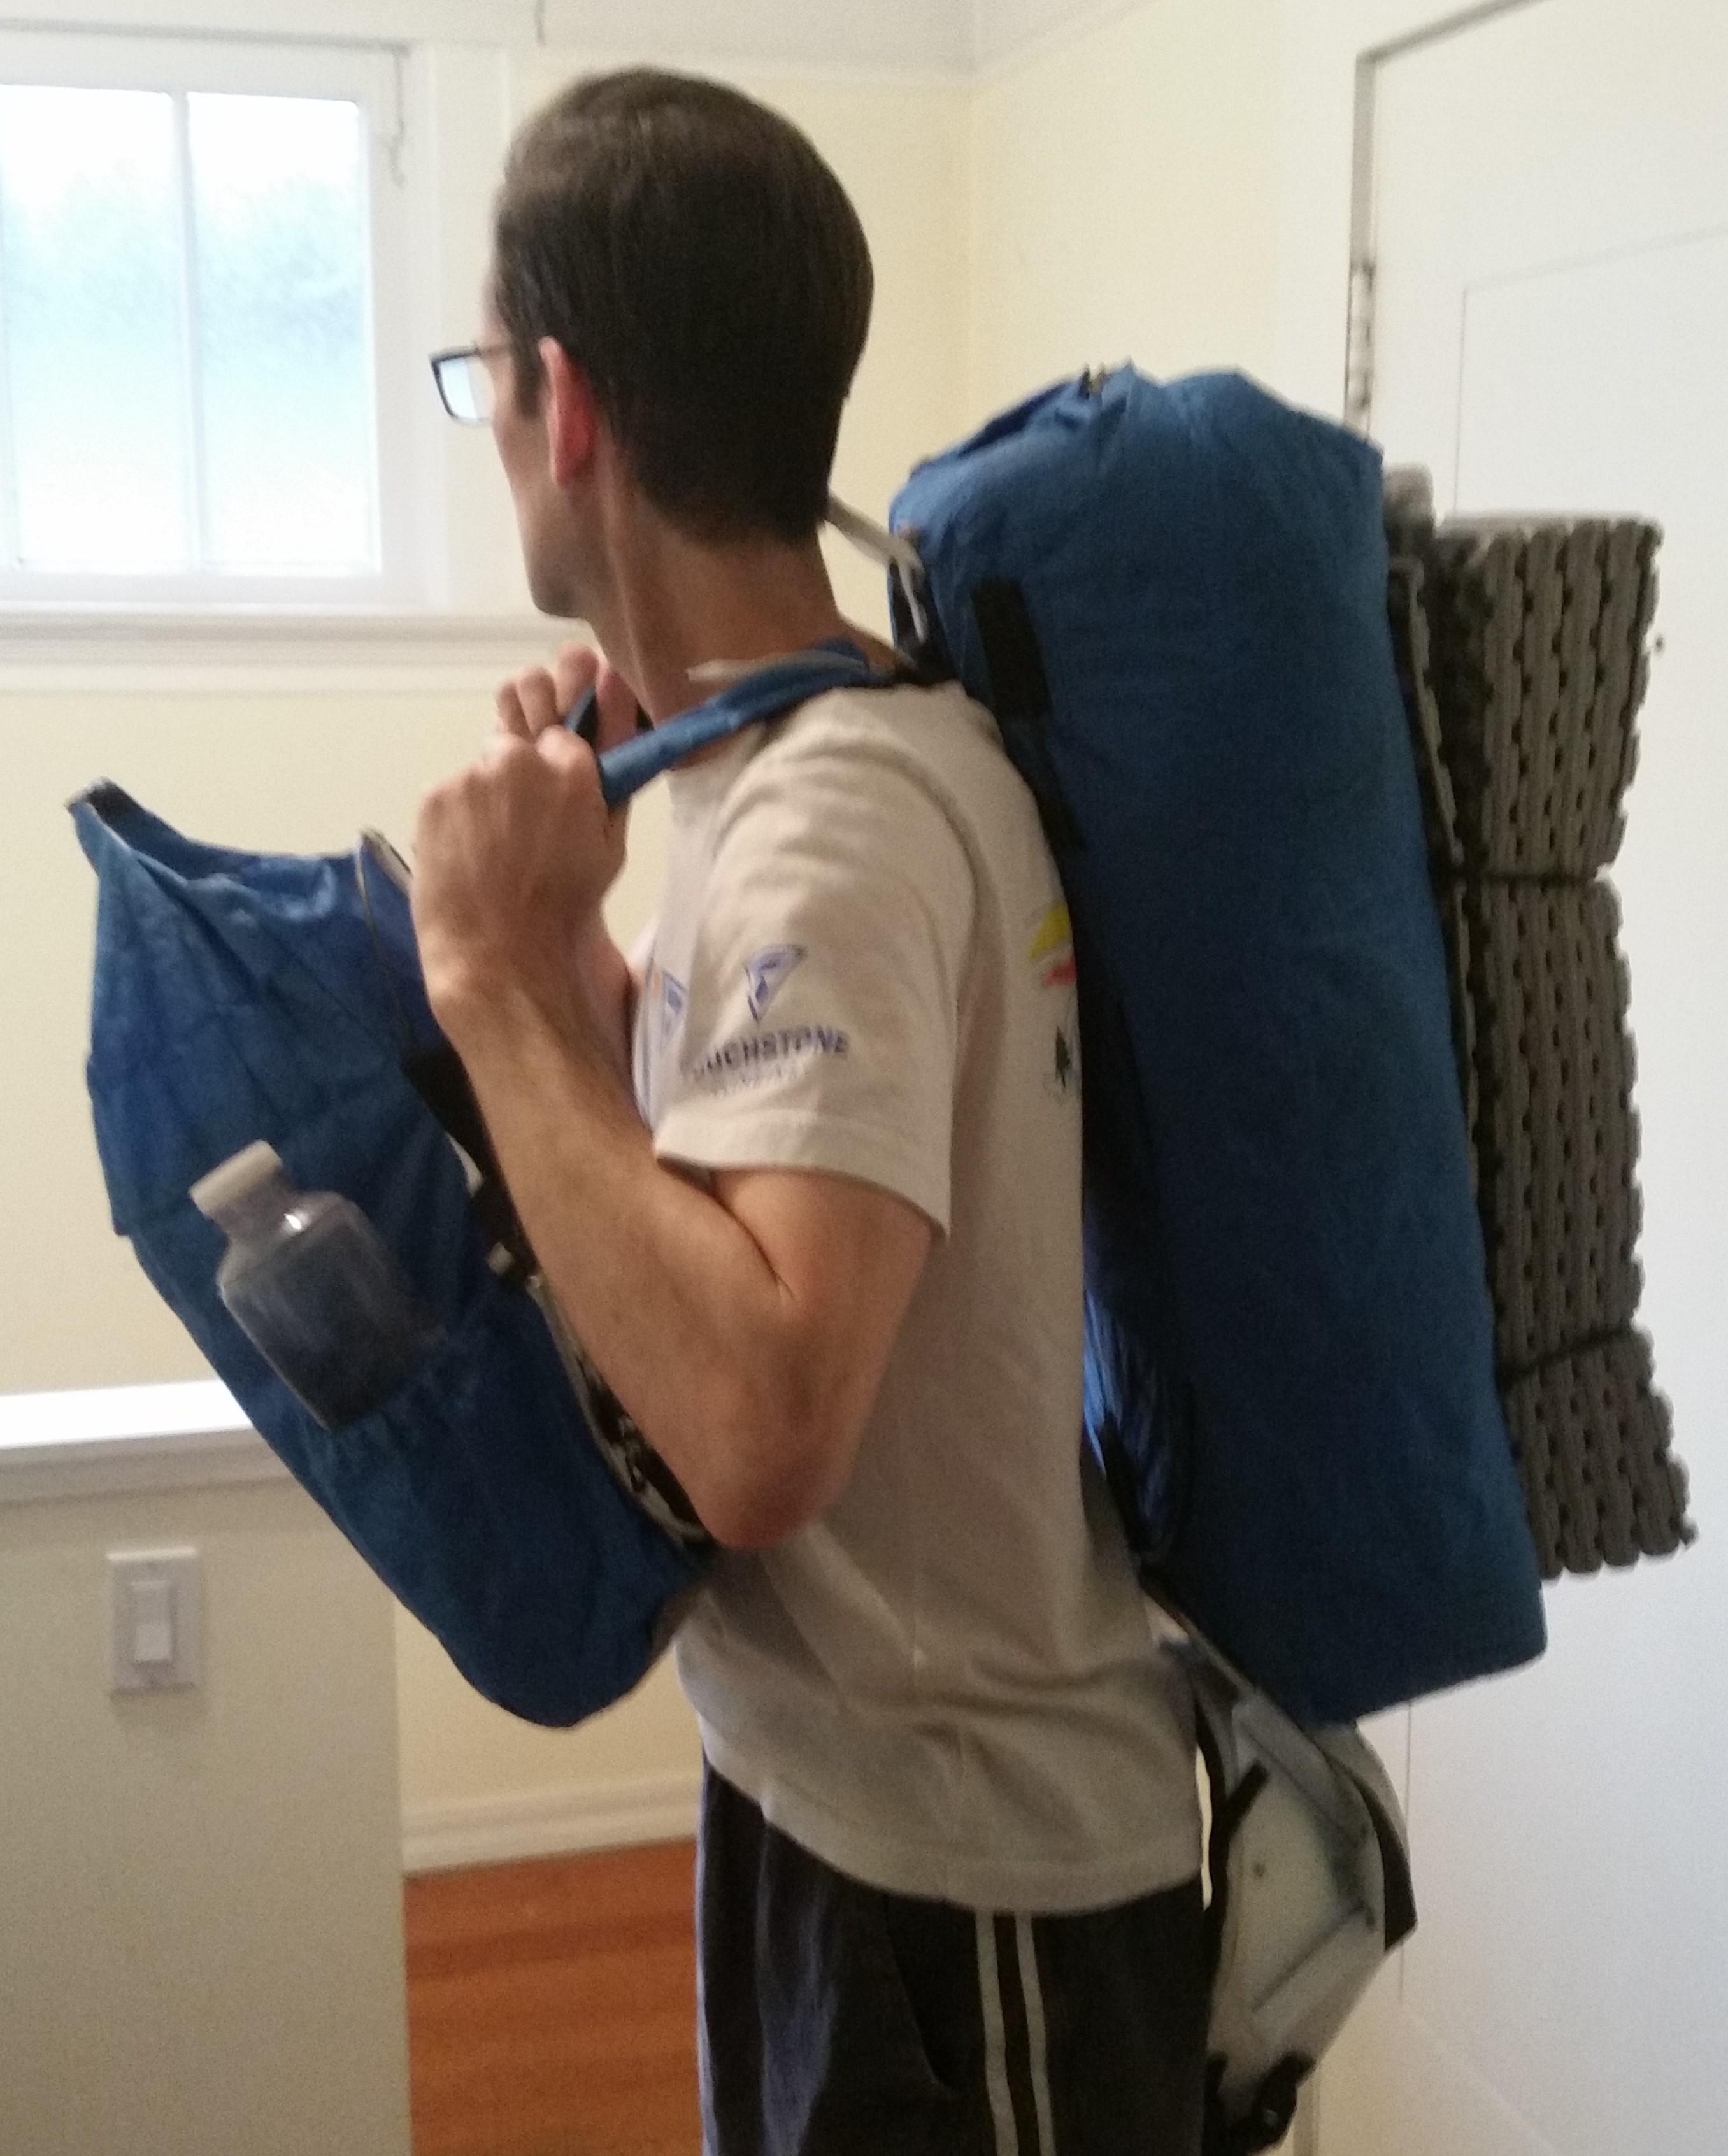
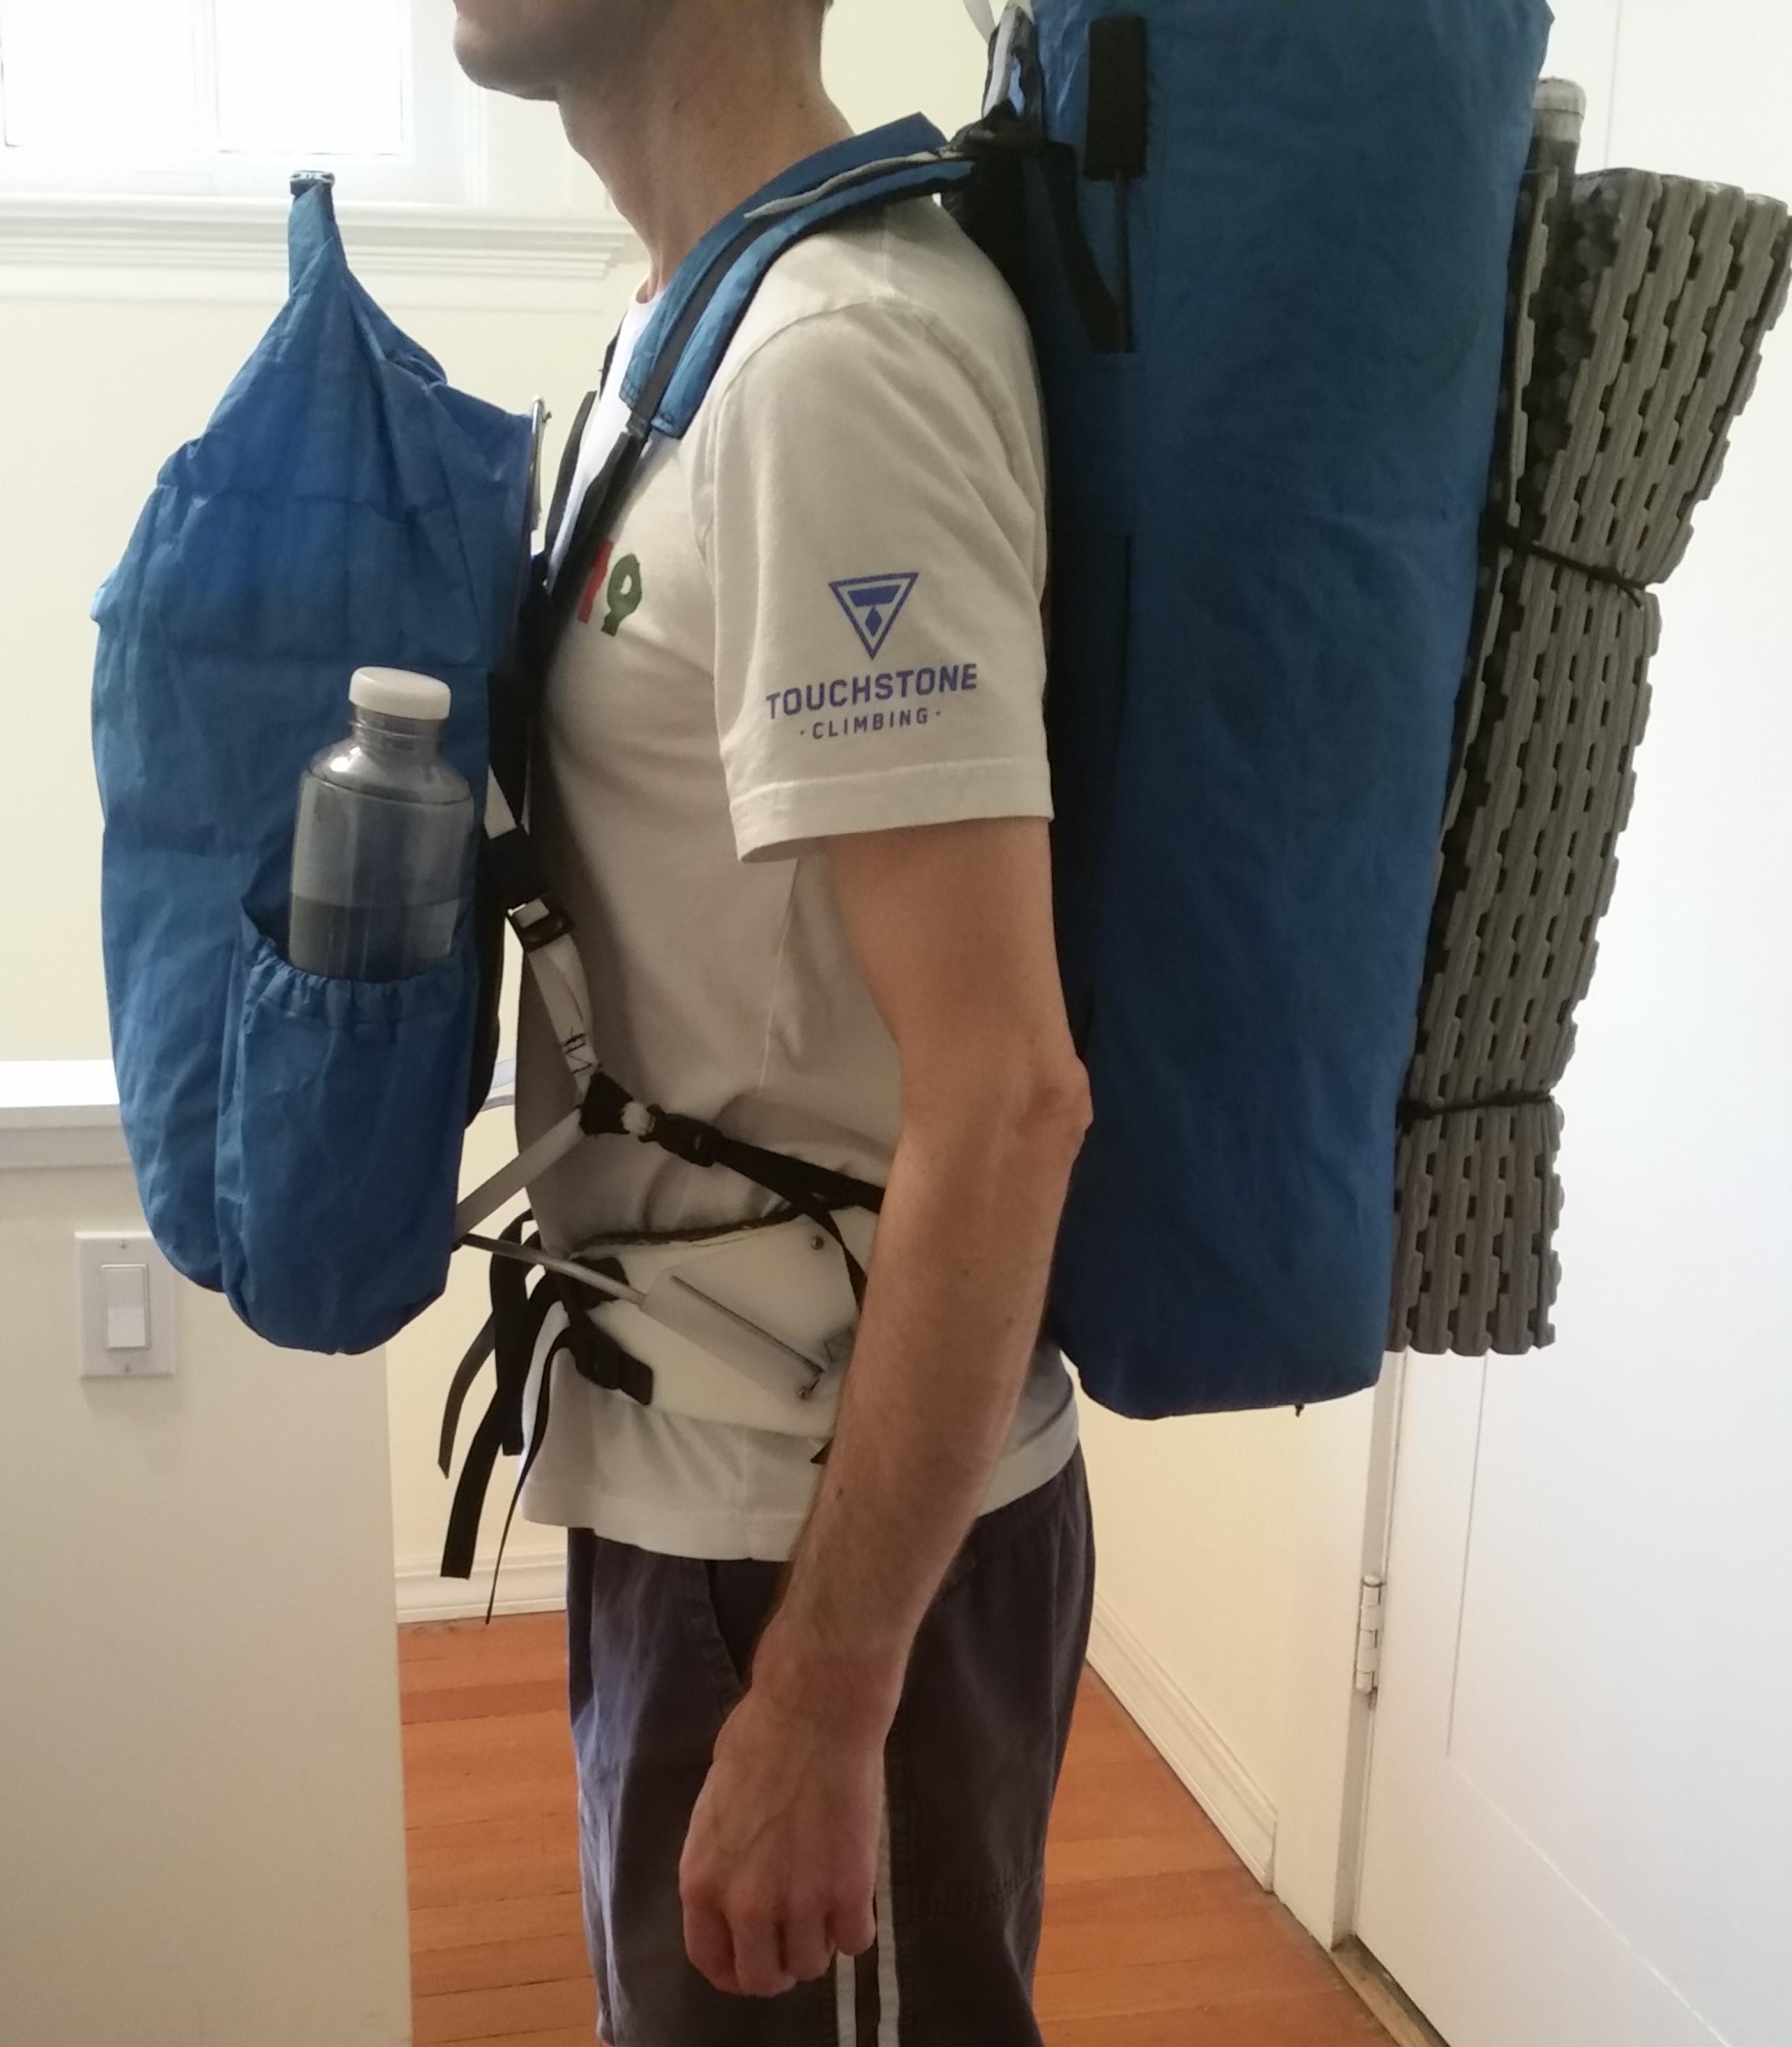
With the weight of each bag being supported by the arch underneath, all that’s left is to pull the top of each bag close to the body. This is done with some short shoulder straps. Here’s the whole thing:


The v1.0 prototype worked fairly well on a 3 night 70 km hike a couple years ago, part of which was a decently long off-trail class II/III scramble. I started out with a total pack weight of about 18 Lbs, so there was not a huge amount of stress on the frame. V1.0 weighed in at 28 Oz total with the main bags being made out of 420D Robic (6 Oz/sq yard).
V2.0
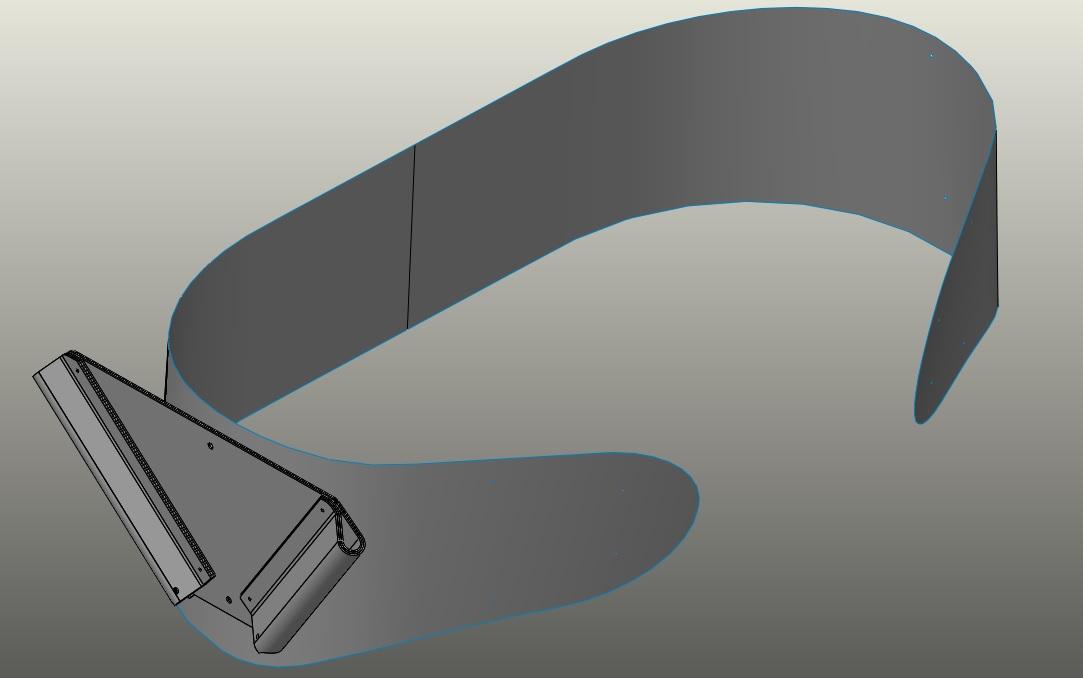
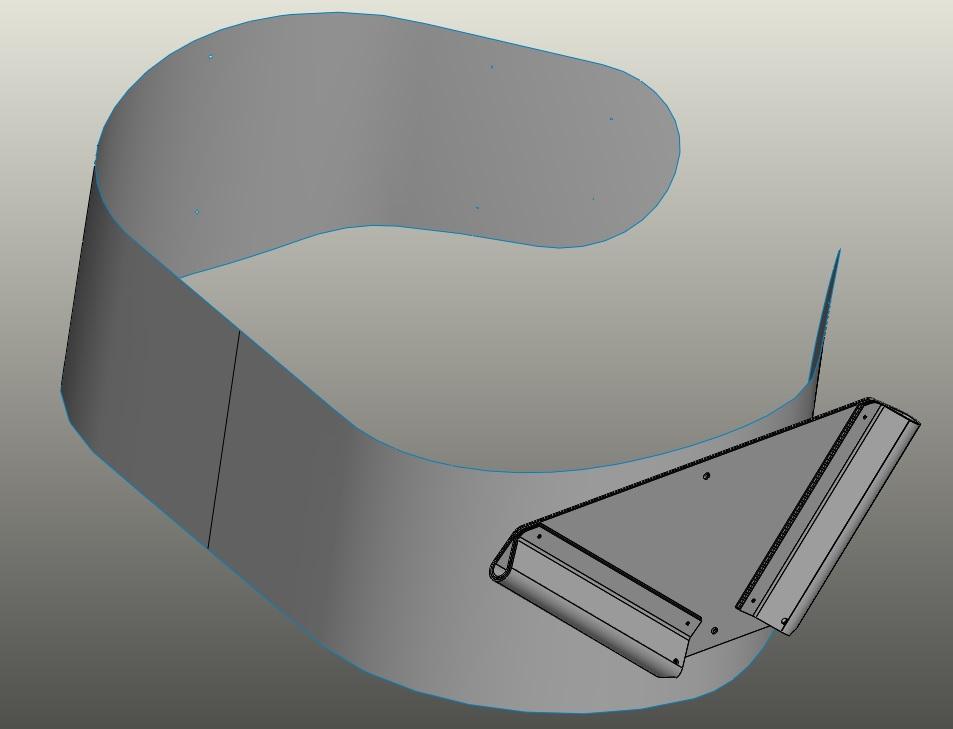
For the second iteration of this design, I wanted to see how much extra weight I could cut out. I moved to 2.92 Oz DCF (CT5K.18/wov.32c) for the bags, the same material as the Z-Packs Arc-Blast. For the hip belt, I figured I could use different thicknesses of plastic sheet for the outside, based on where it needed the most strength. I made a model for the shape of it, then cut out 3 different layers of 0.02” HDPE (two of the layers were adhesive backed). Here’s what the model looks like:


The layers were built up as shown in this sketch:

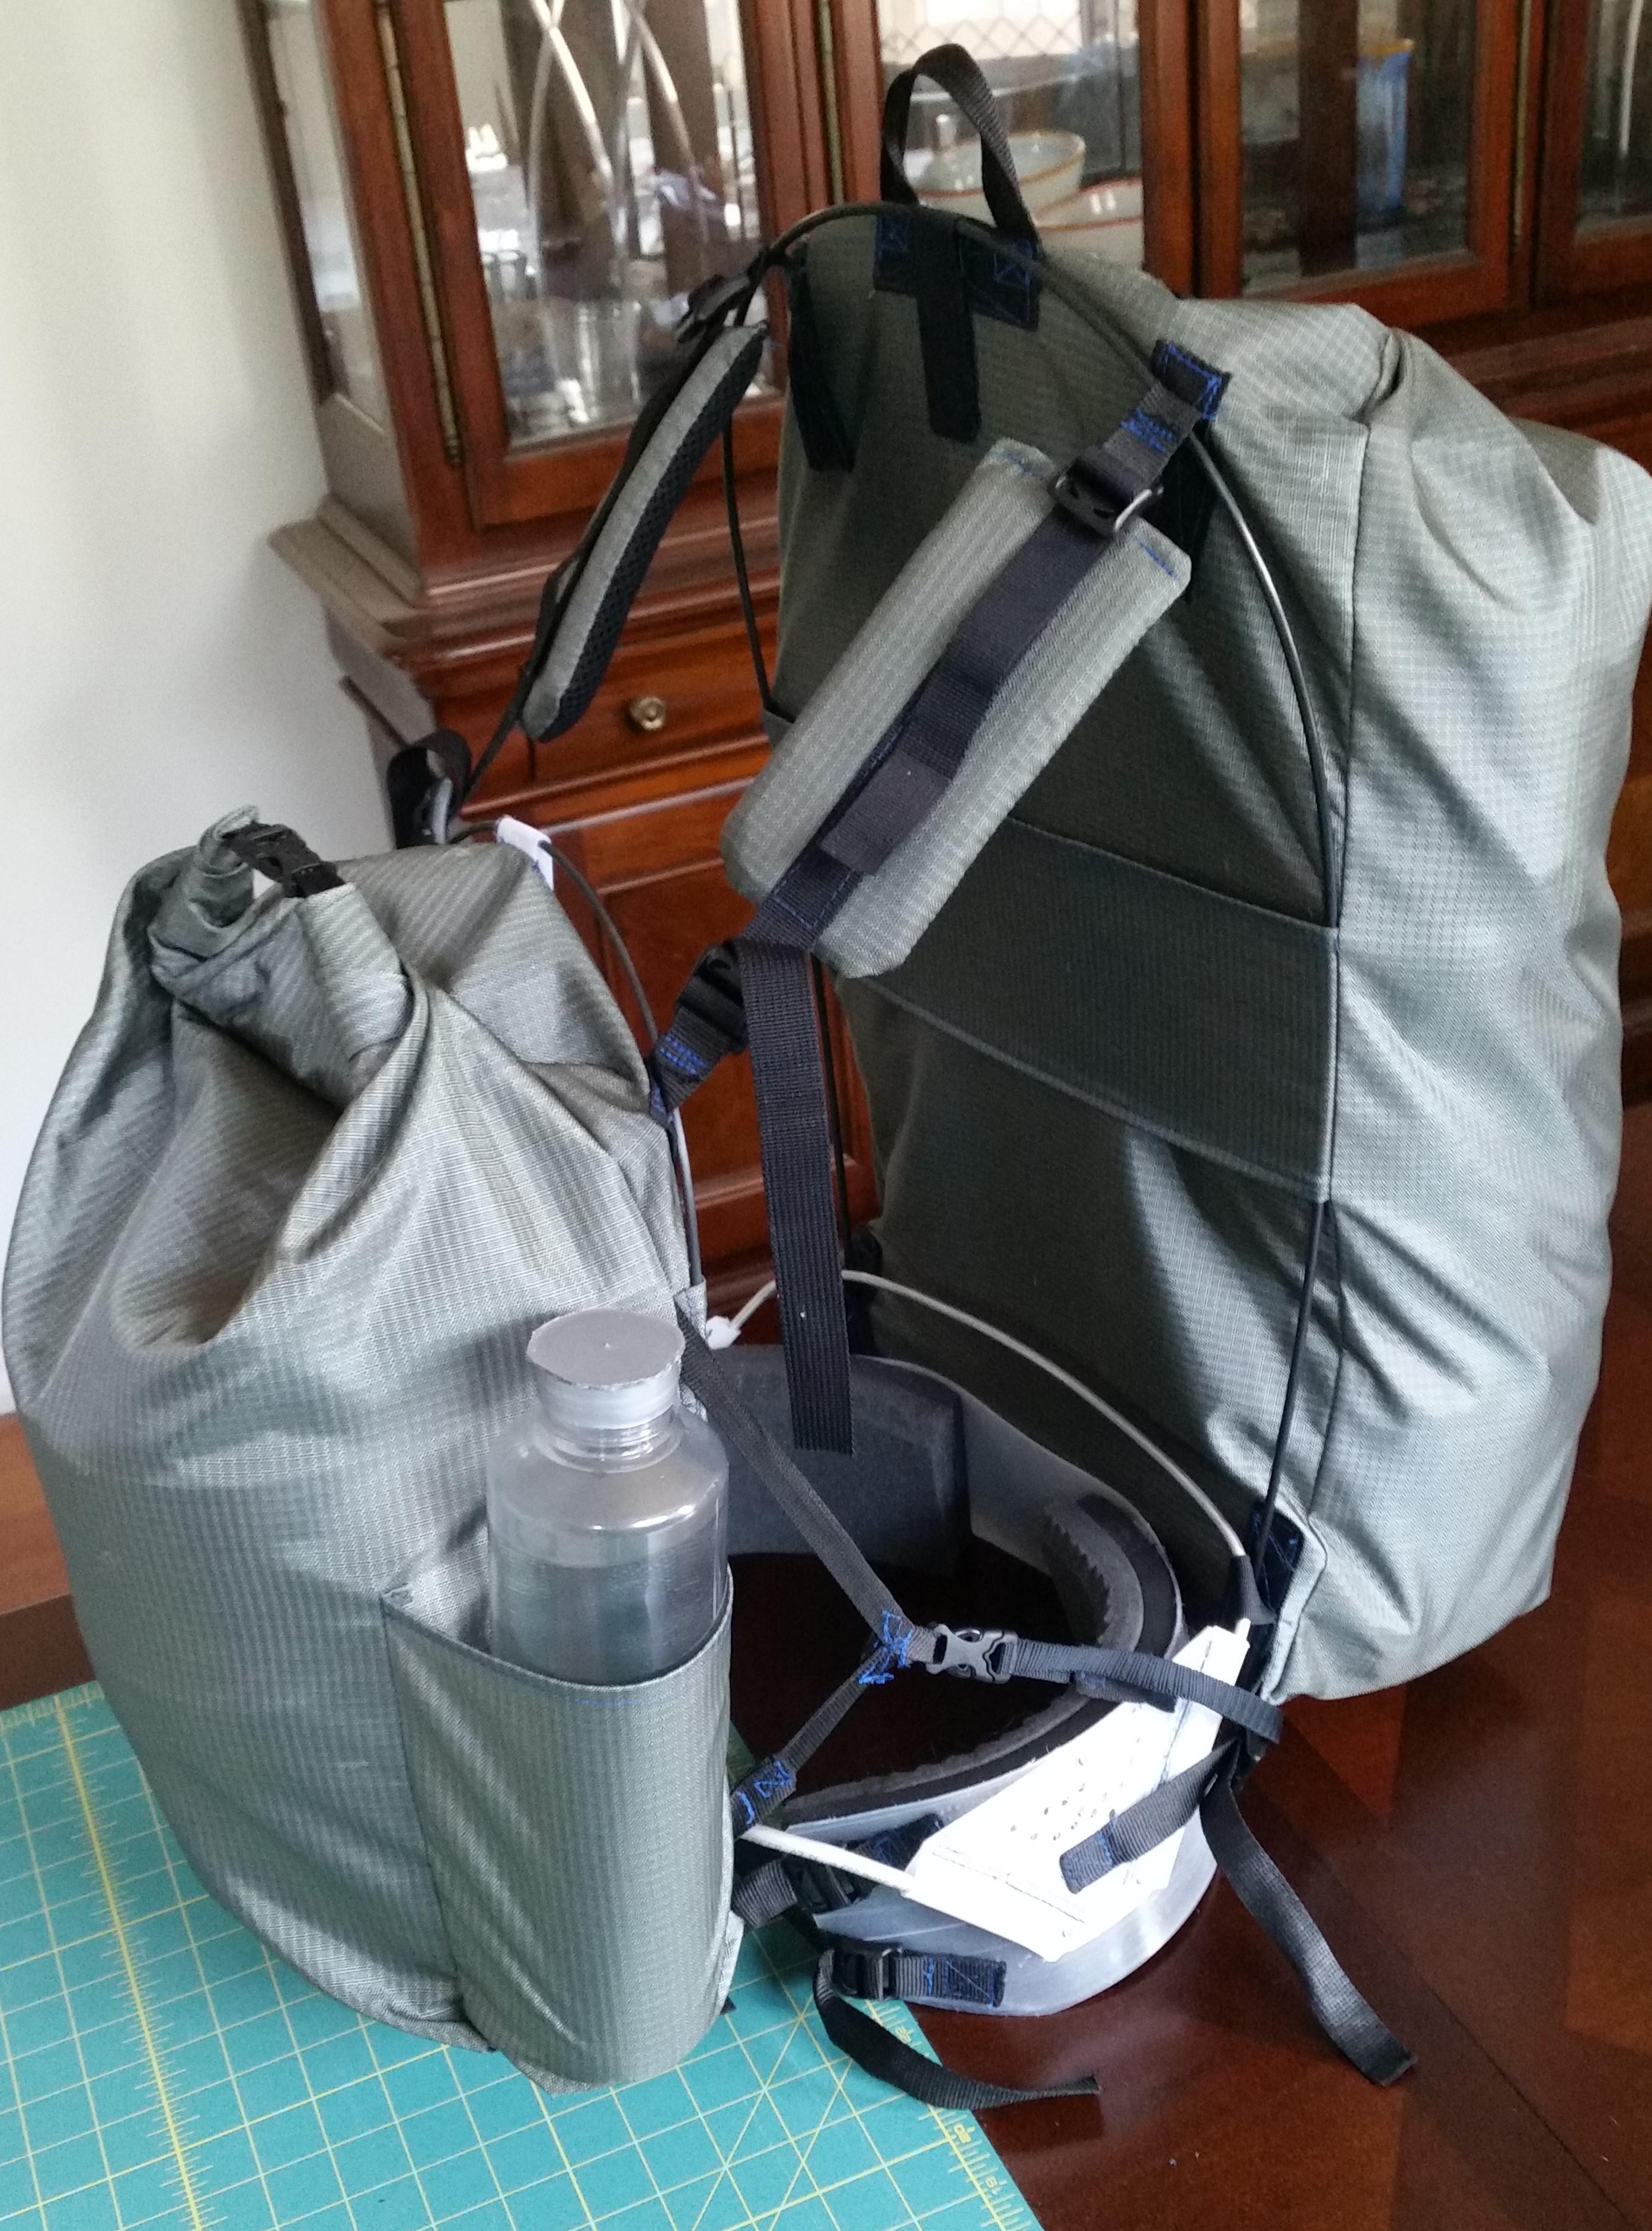
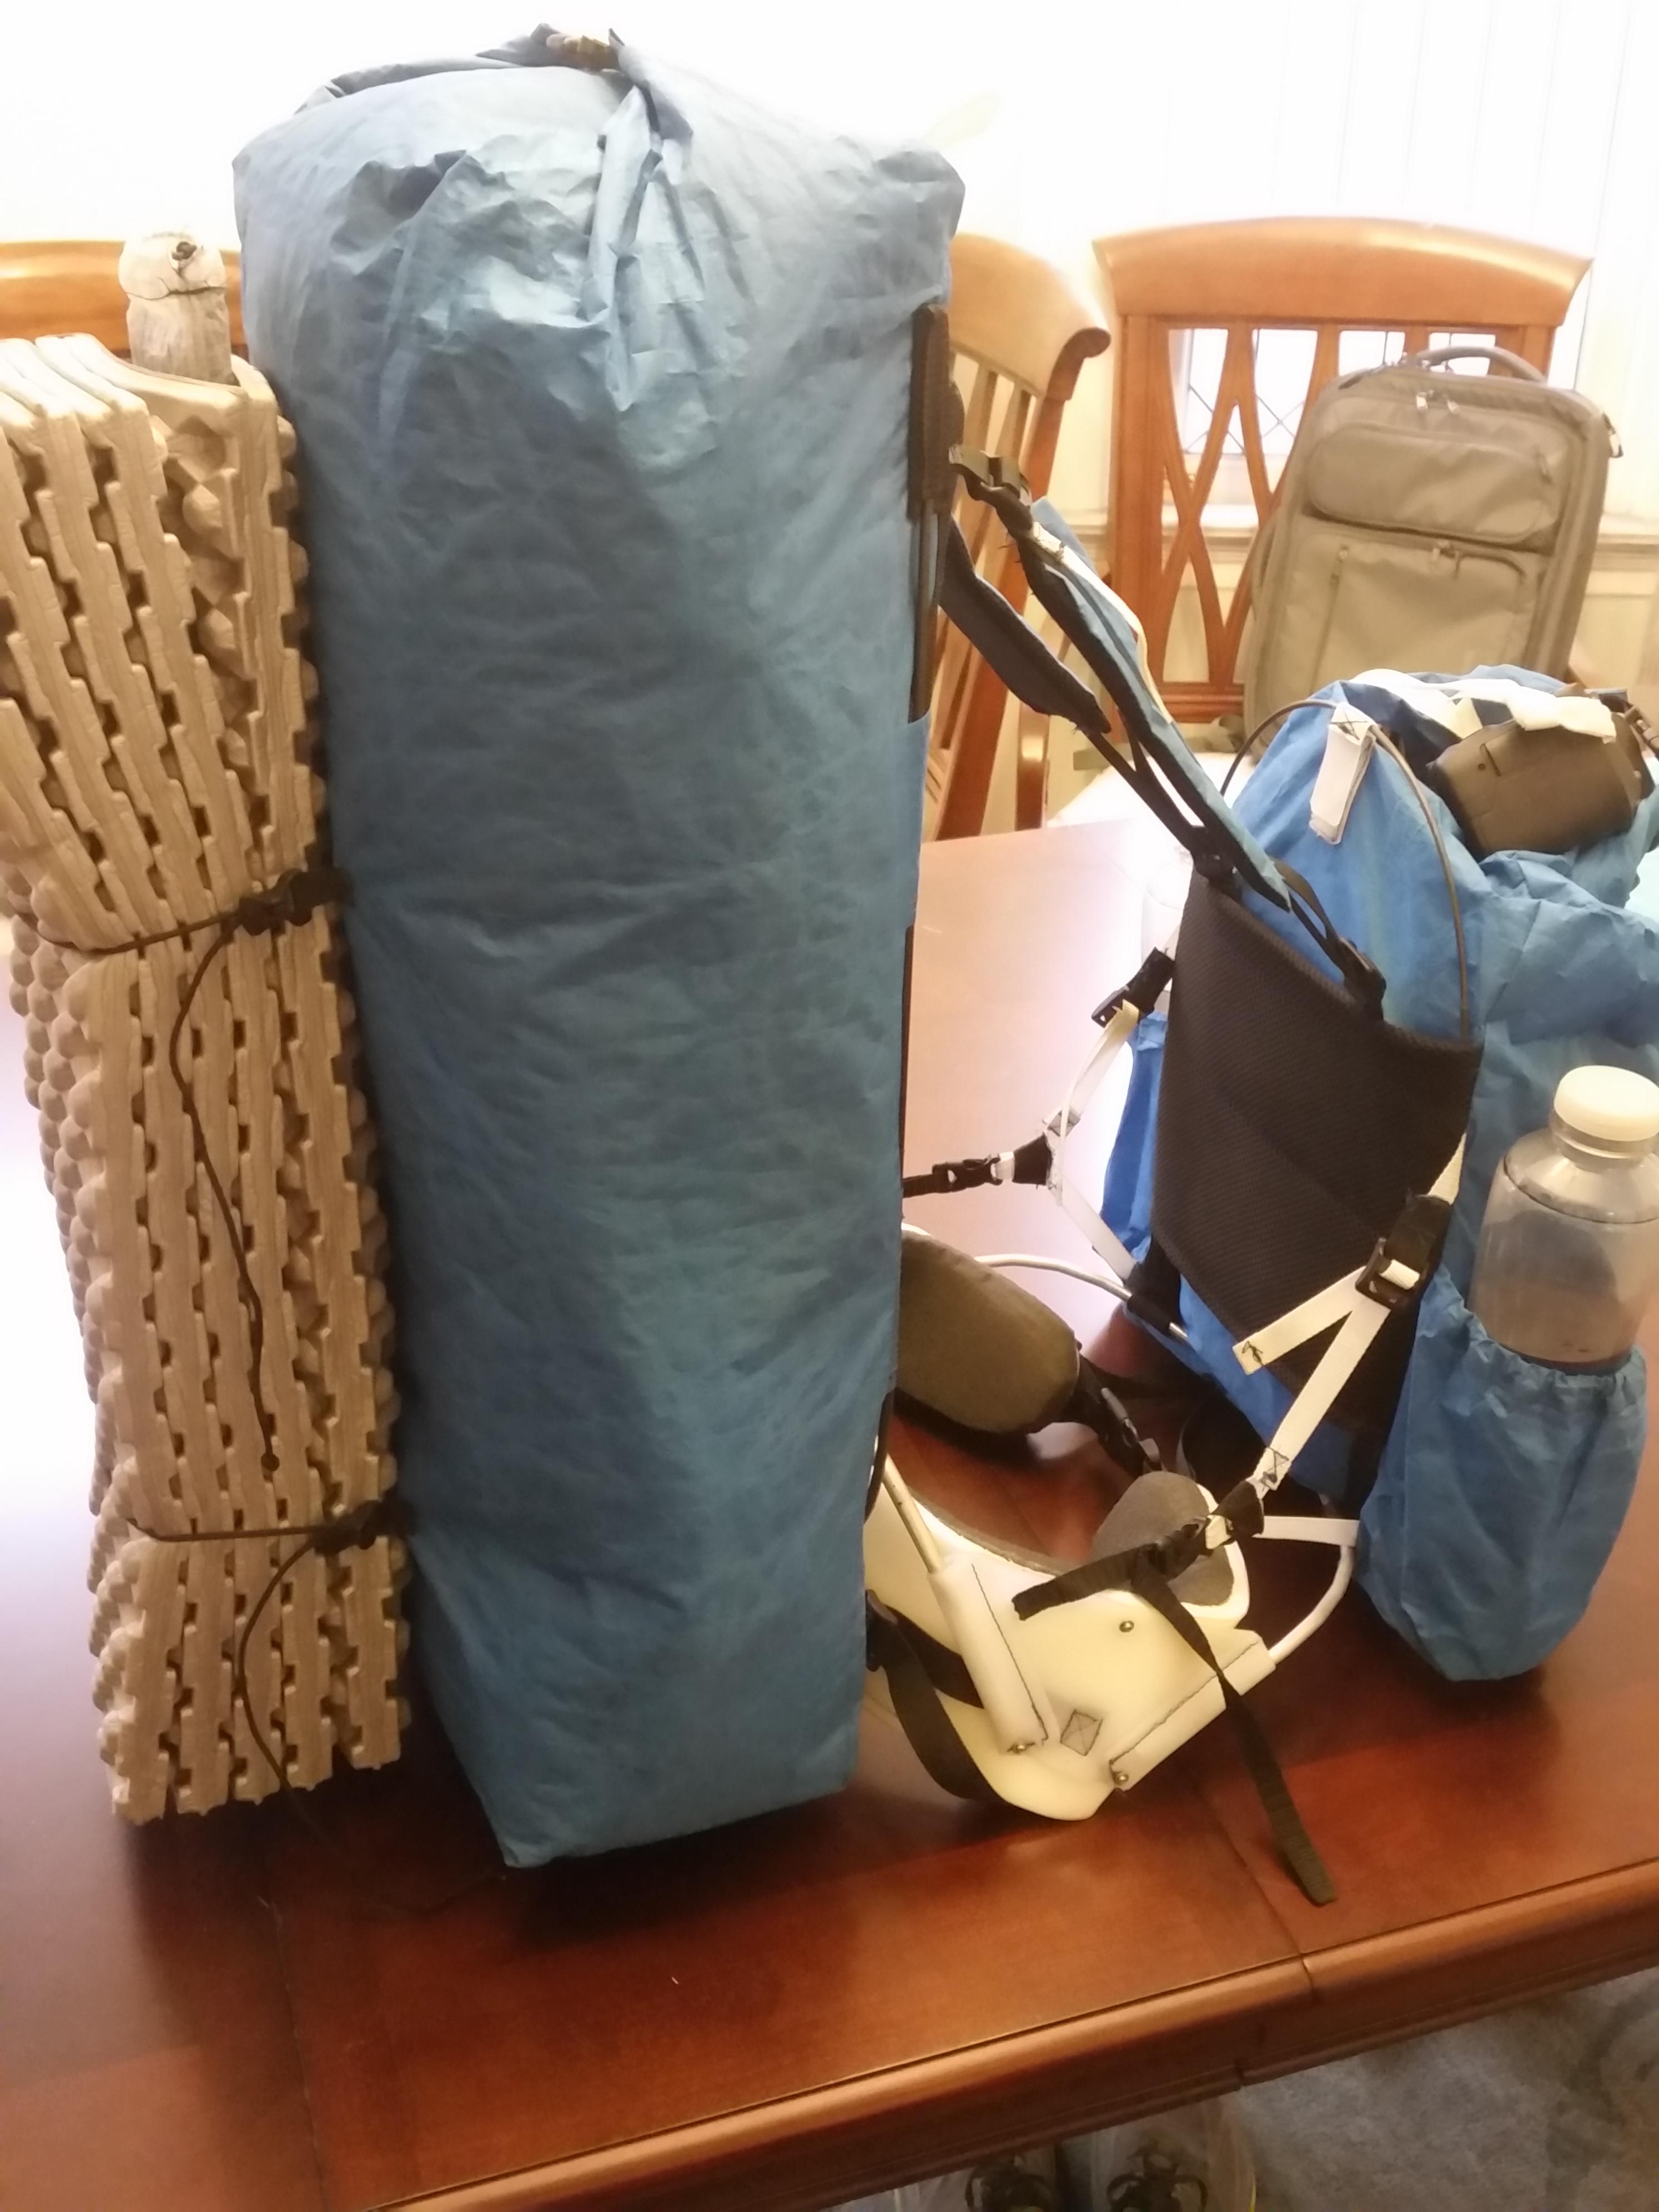
The v1.0 holsters I made were from a single sheet of 1/16” HDPE. While somewhat flexible, it was very difficult to fold over the edges to make the channels for the arches. For the second iteration, I also built them up from 3 separate sheets of 0.02” HDPE which was much easier to fold over to make the channels. While easier to fold, it was fairly difficult sticking the various pieces of the belt and holsters together without trapping bubbles between the pieces. If I ever do another refinement of the belt and holsters, I will likely make them out of a single ply of 1/16” material again, but have them laser cut with holes along the bend lines and for lightening purposes in some areas. Here’s v2.0 of the pack:


V2.1
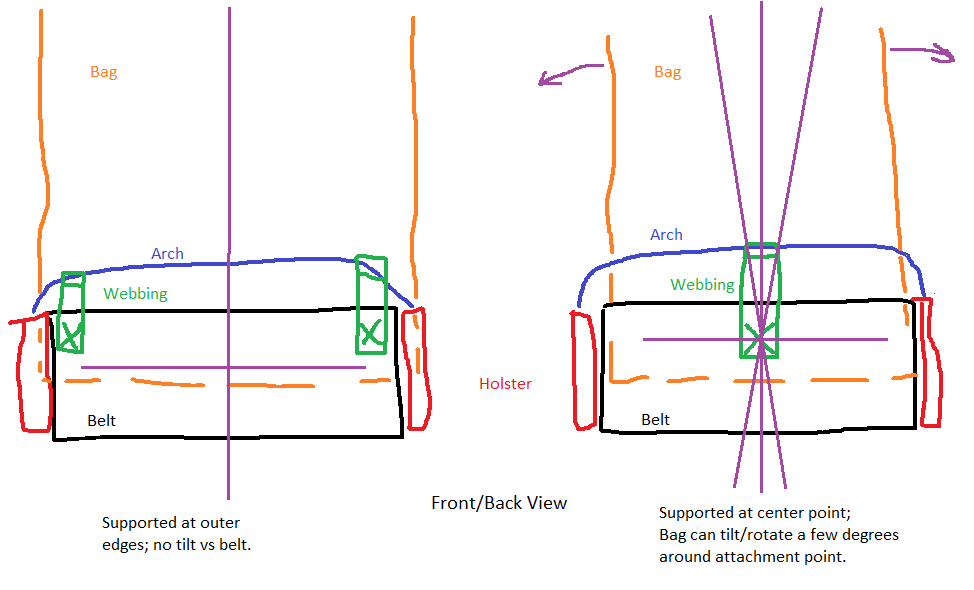
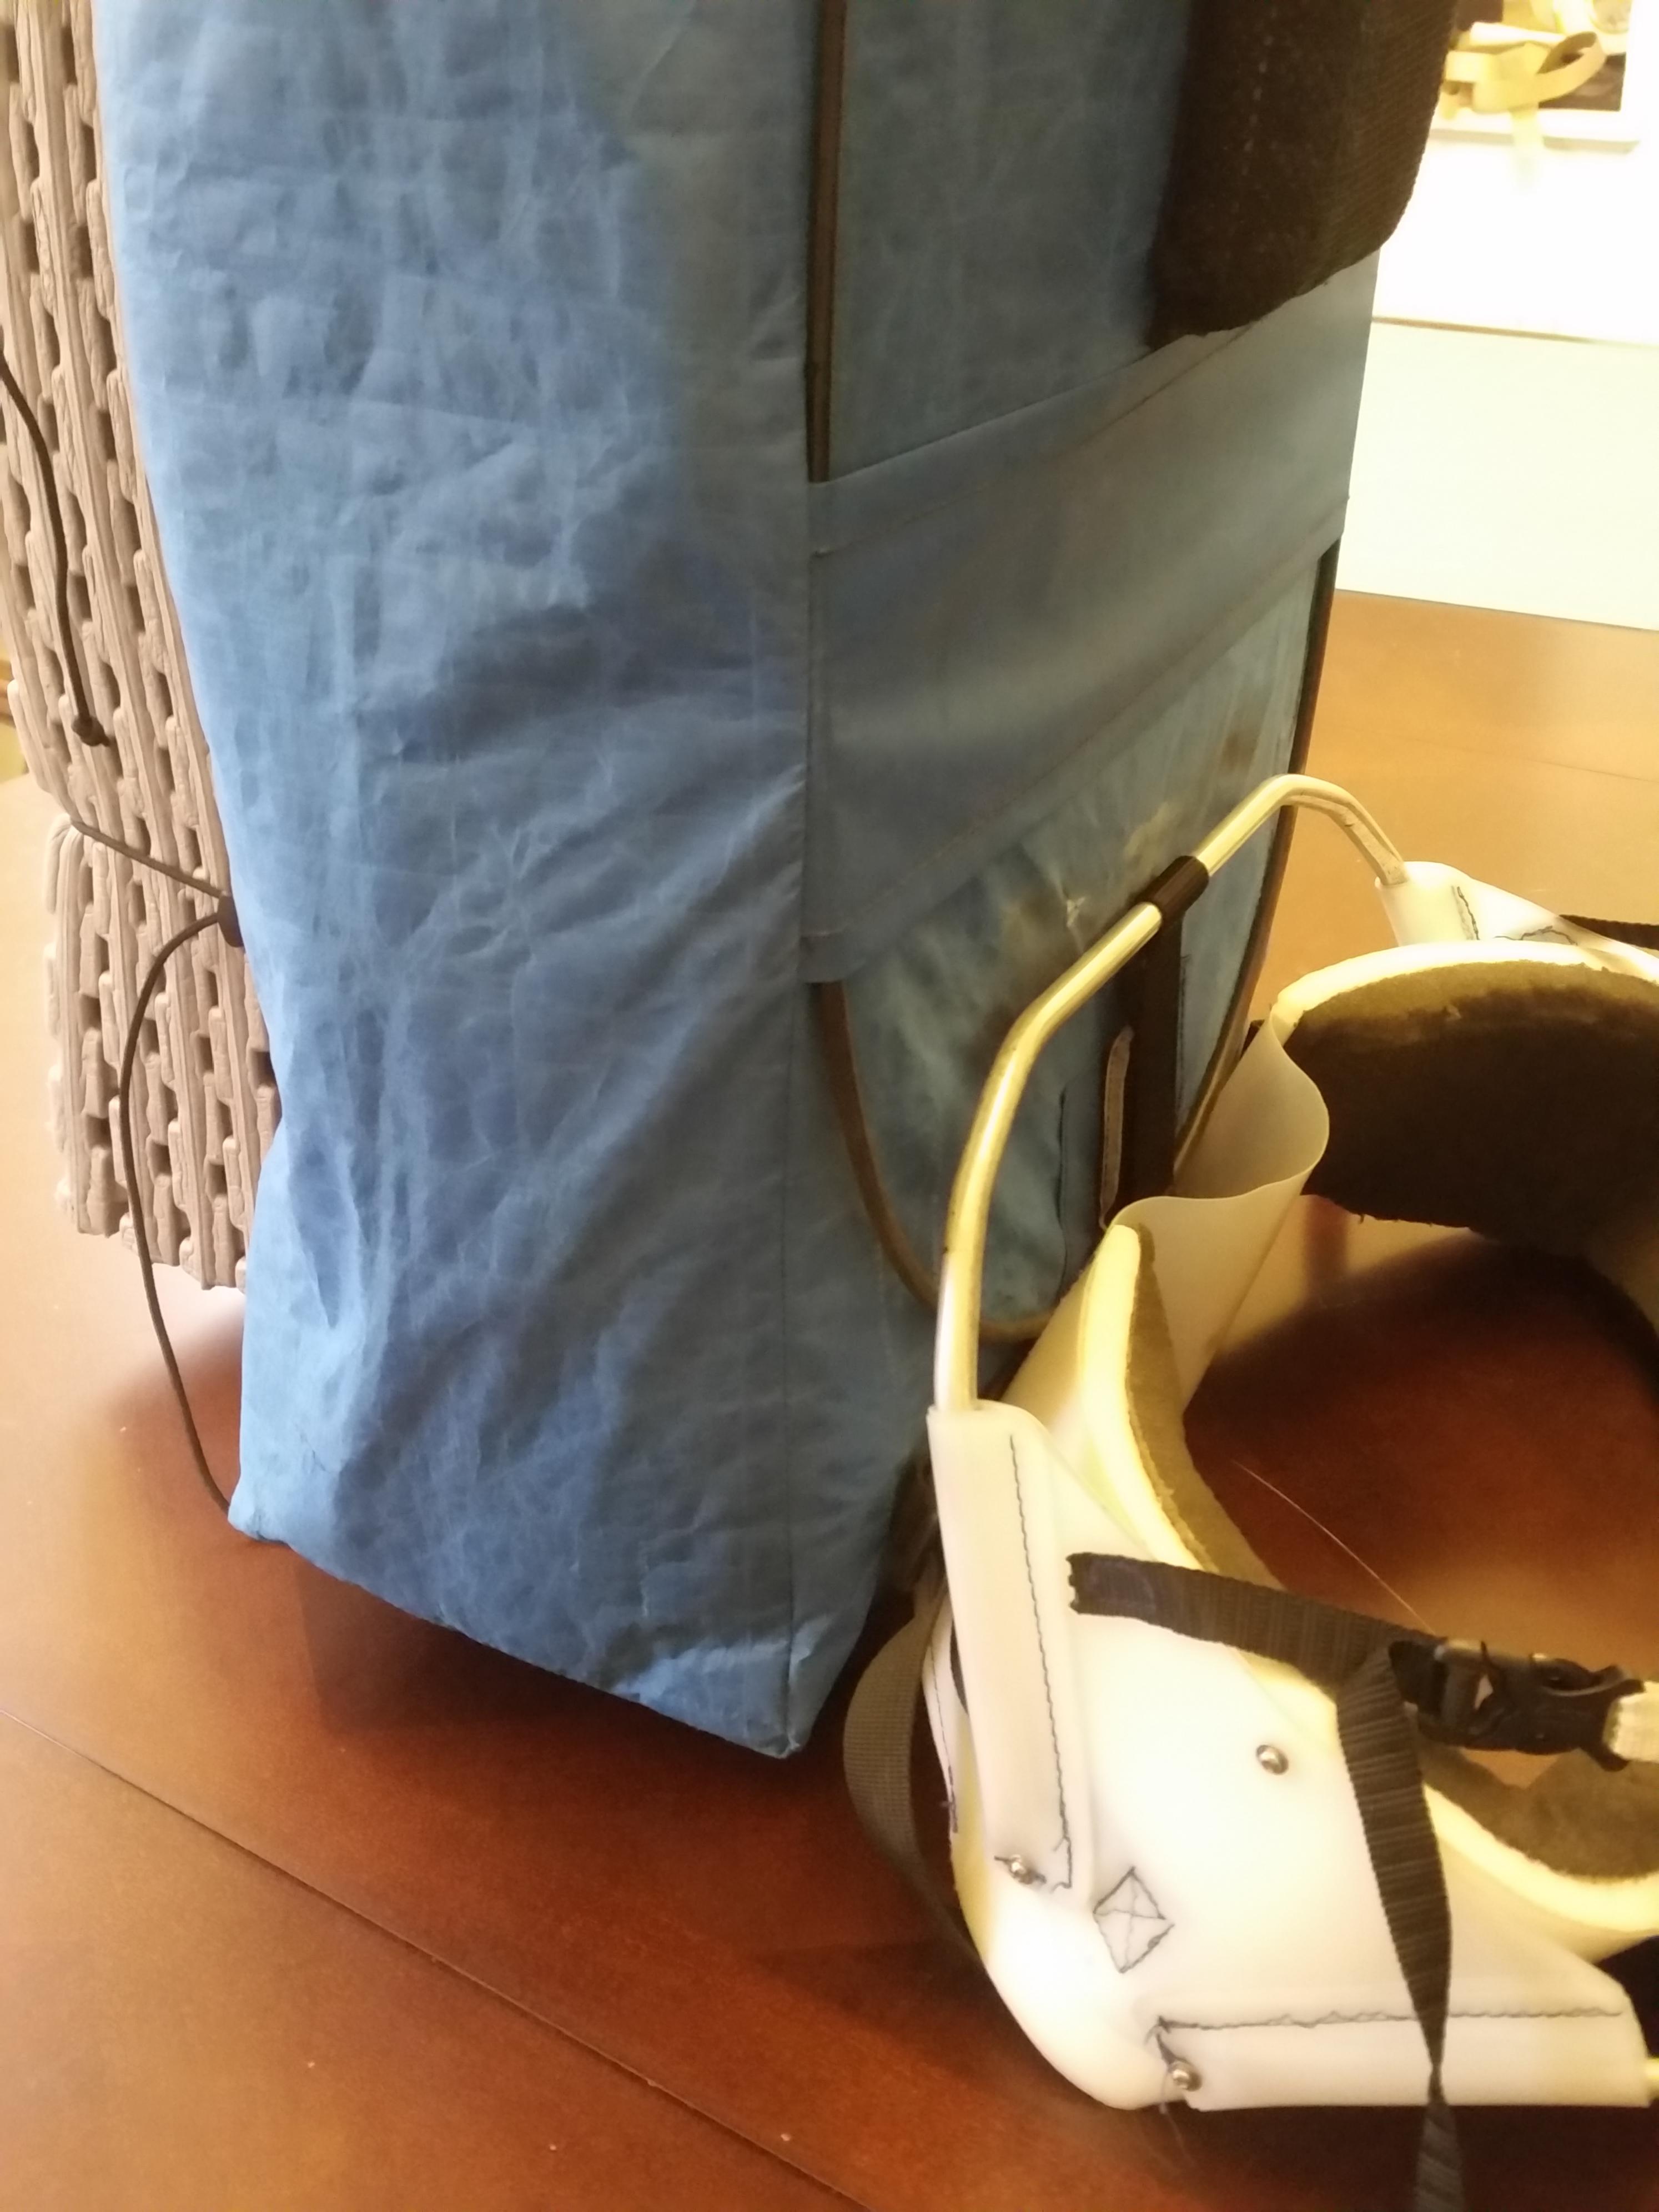
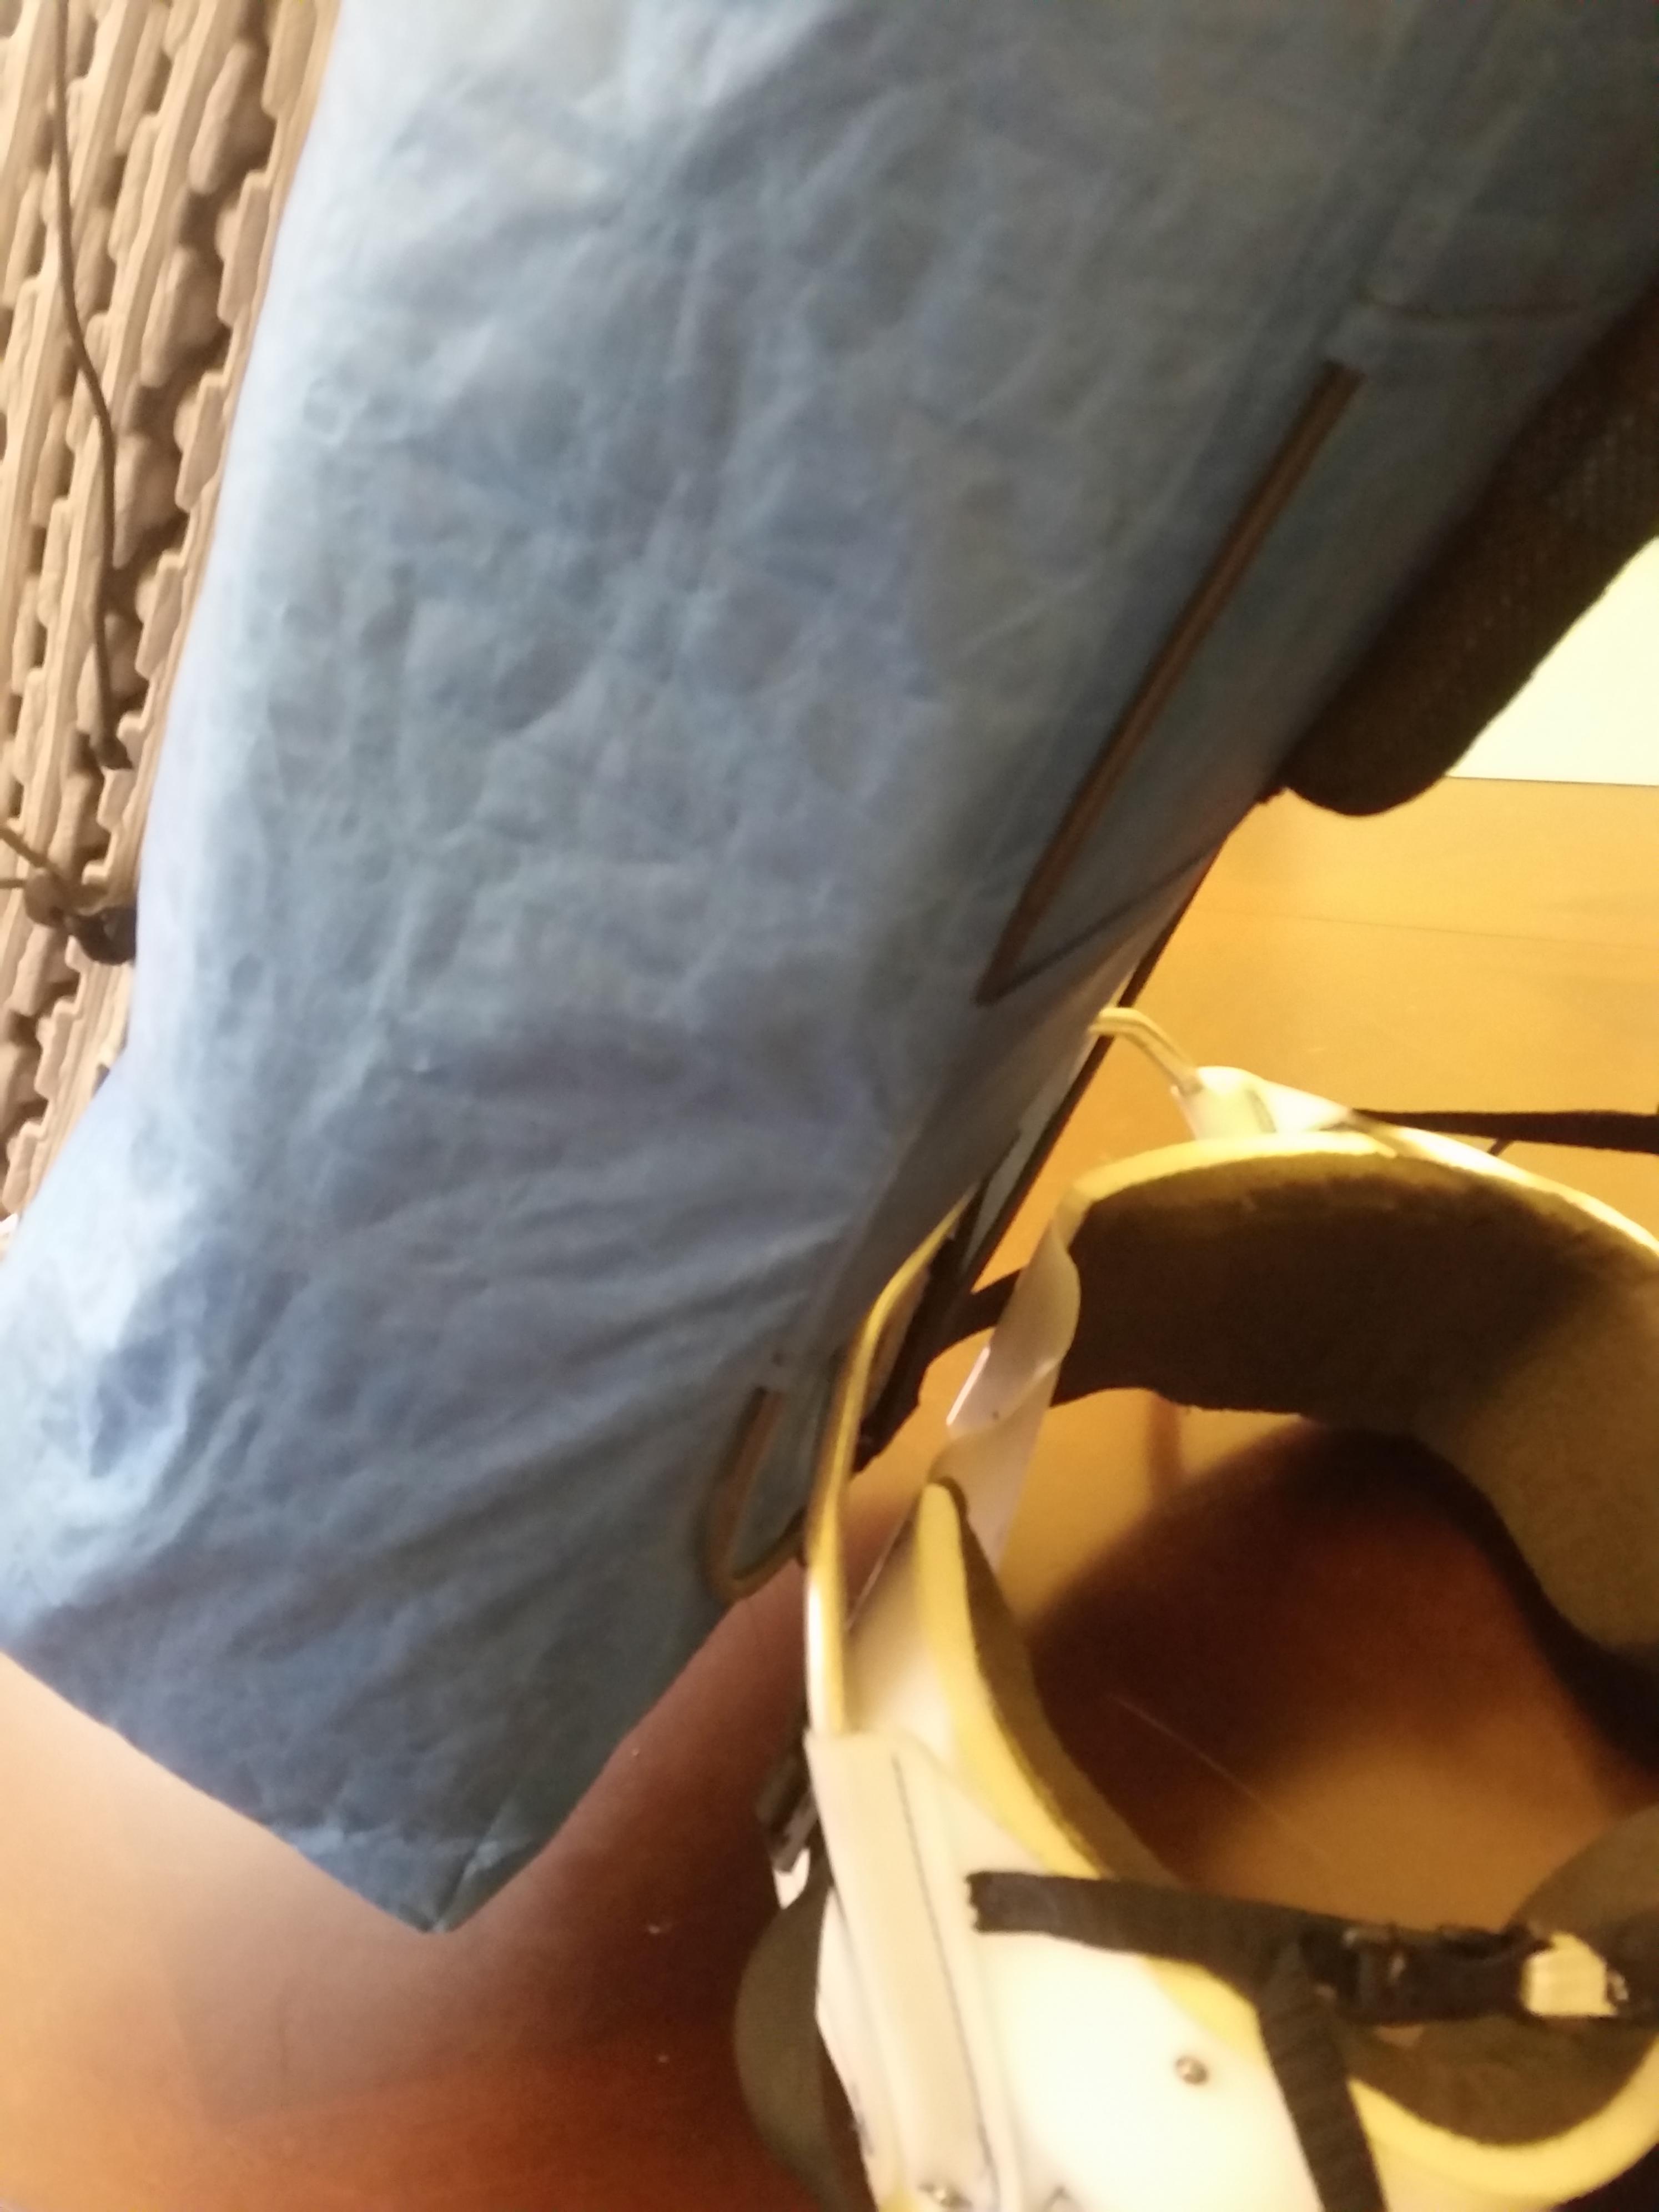
After playing with this version for a little while, something occurred to me about how the back bag was suspended off the arch; I could hold it up the same way (with webbing looped over the arch) but from a single point in the center of the bag/arch. This would allow tilting of the hip belt with respect to the bag by a few degrees in either direction because the webbing is soft and flexible:

This essentially creates a roll bearing at the hips which allows for a much more natural stride. You notice this the most when you try to take long steps; the farther you try to step, the more your hips want to roll like this. The generally tolerated compensation scheme people adopt while wearing a standard backpack is to just take shorter steps, then you don’t really notice the restriction. This is fine with a heavy pack going uphill, but when going downhill or with a light pack on flat ground, it feels really good to be able to stretch your legs and walk with long strides.
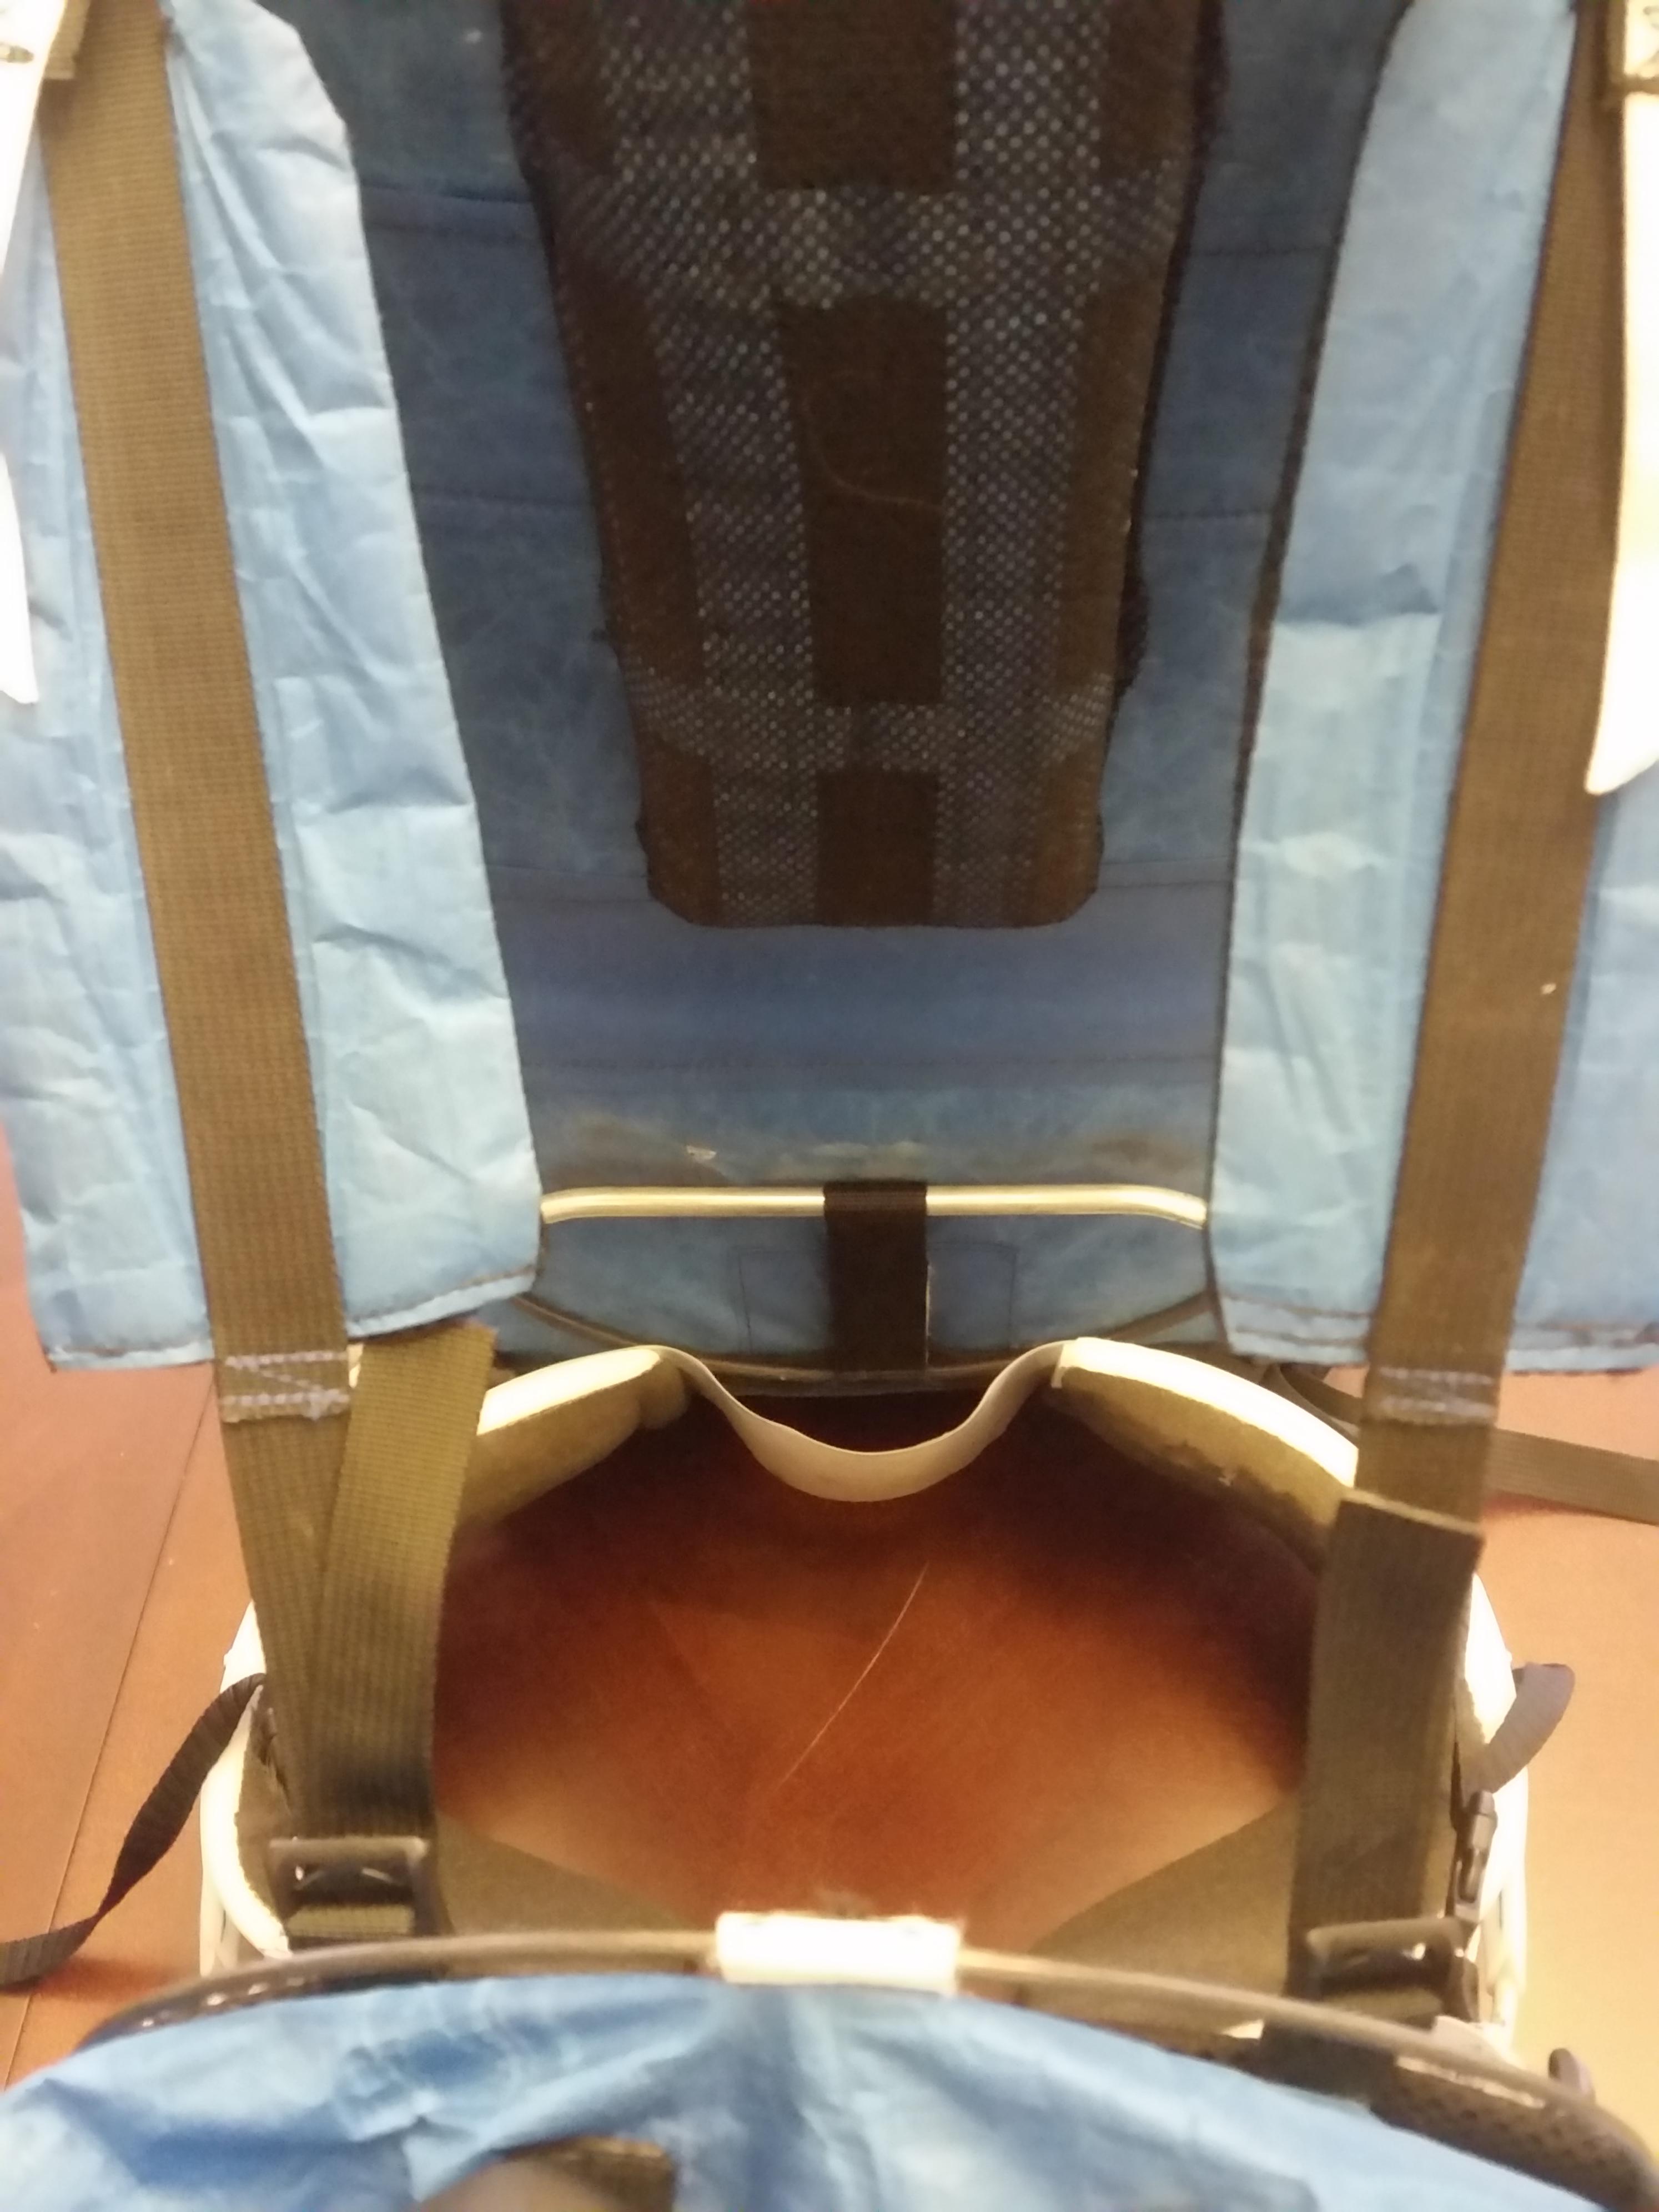
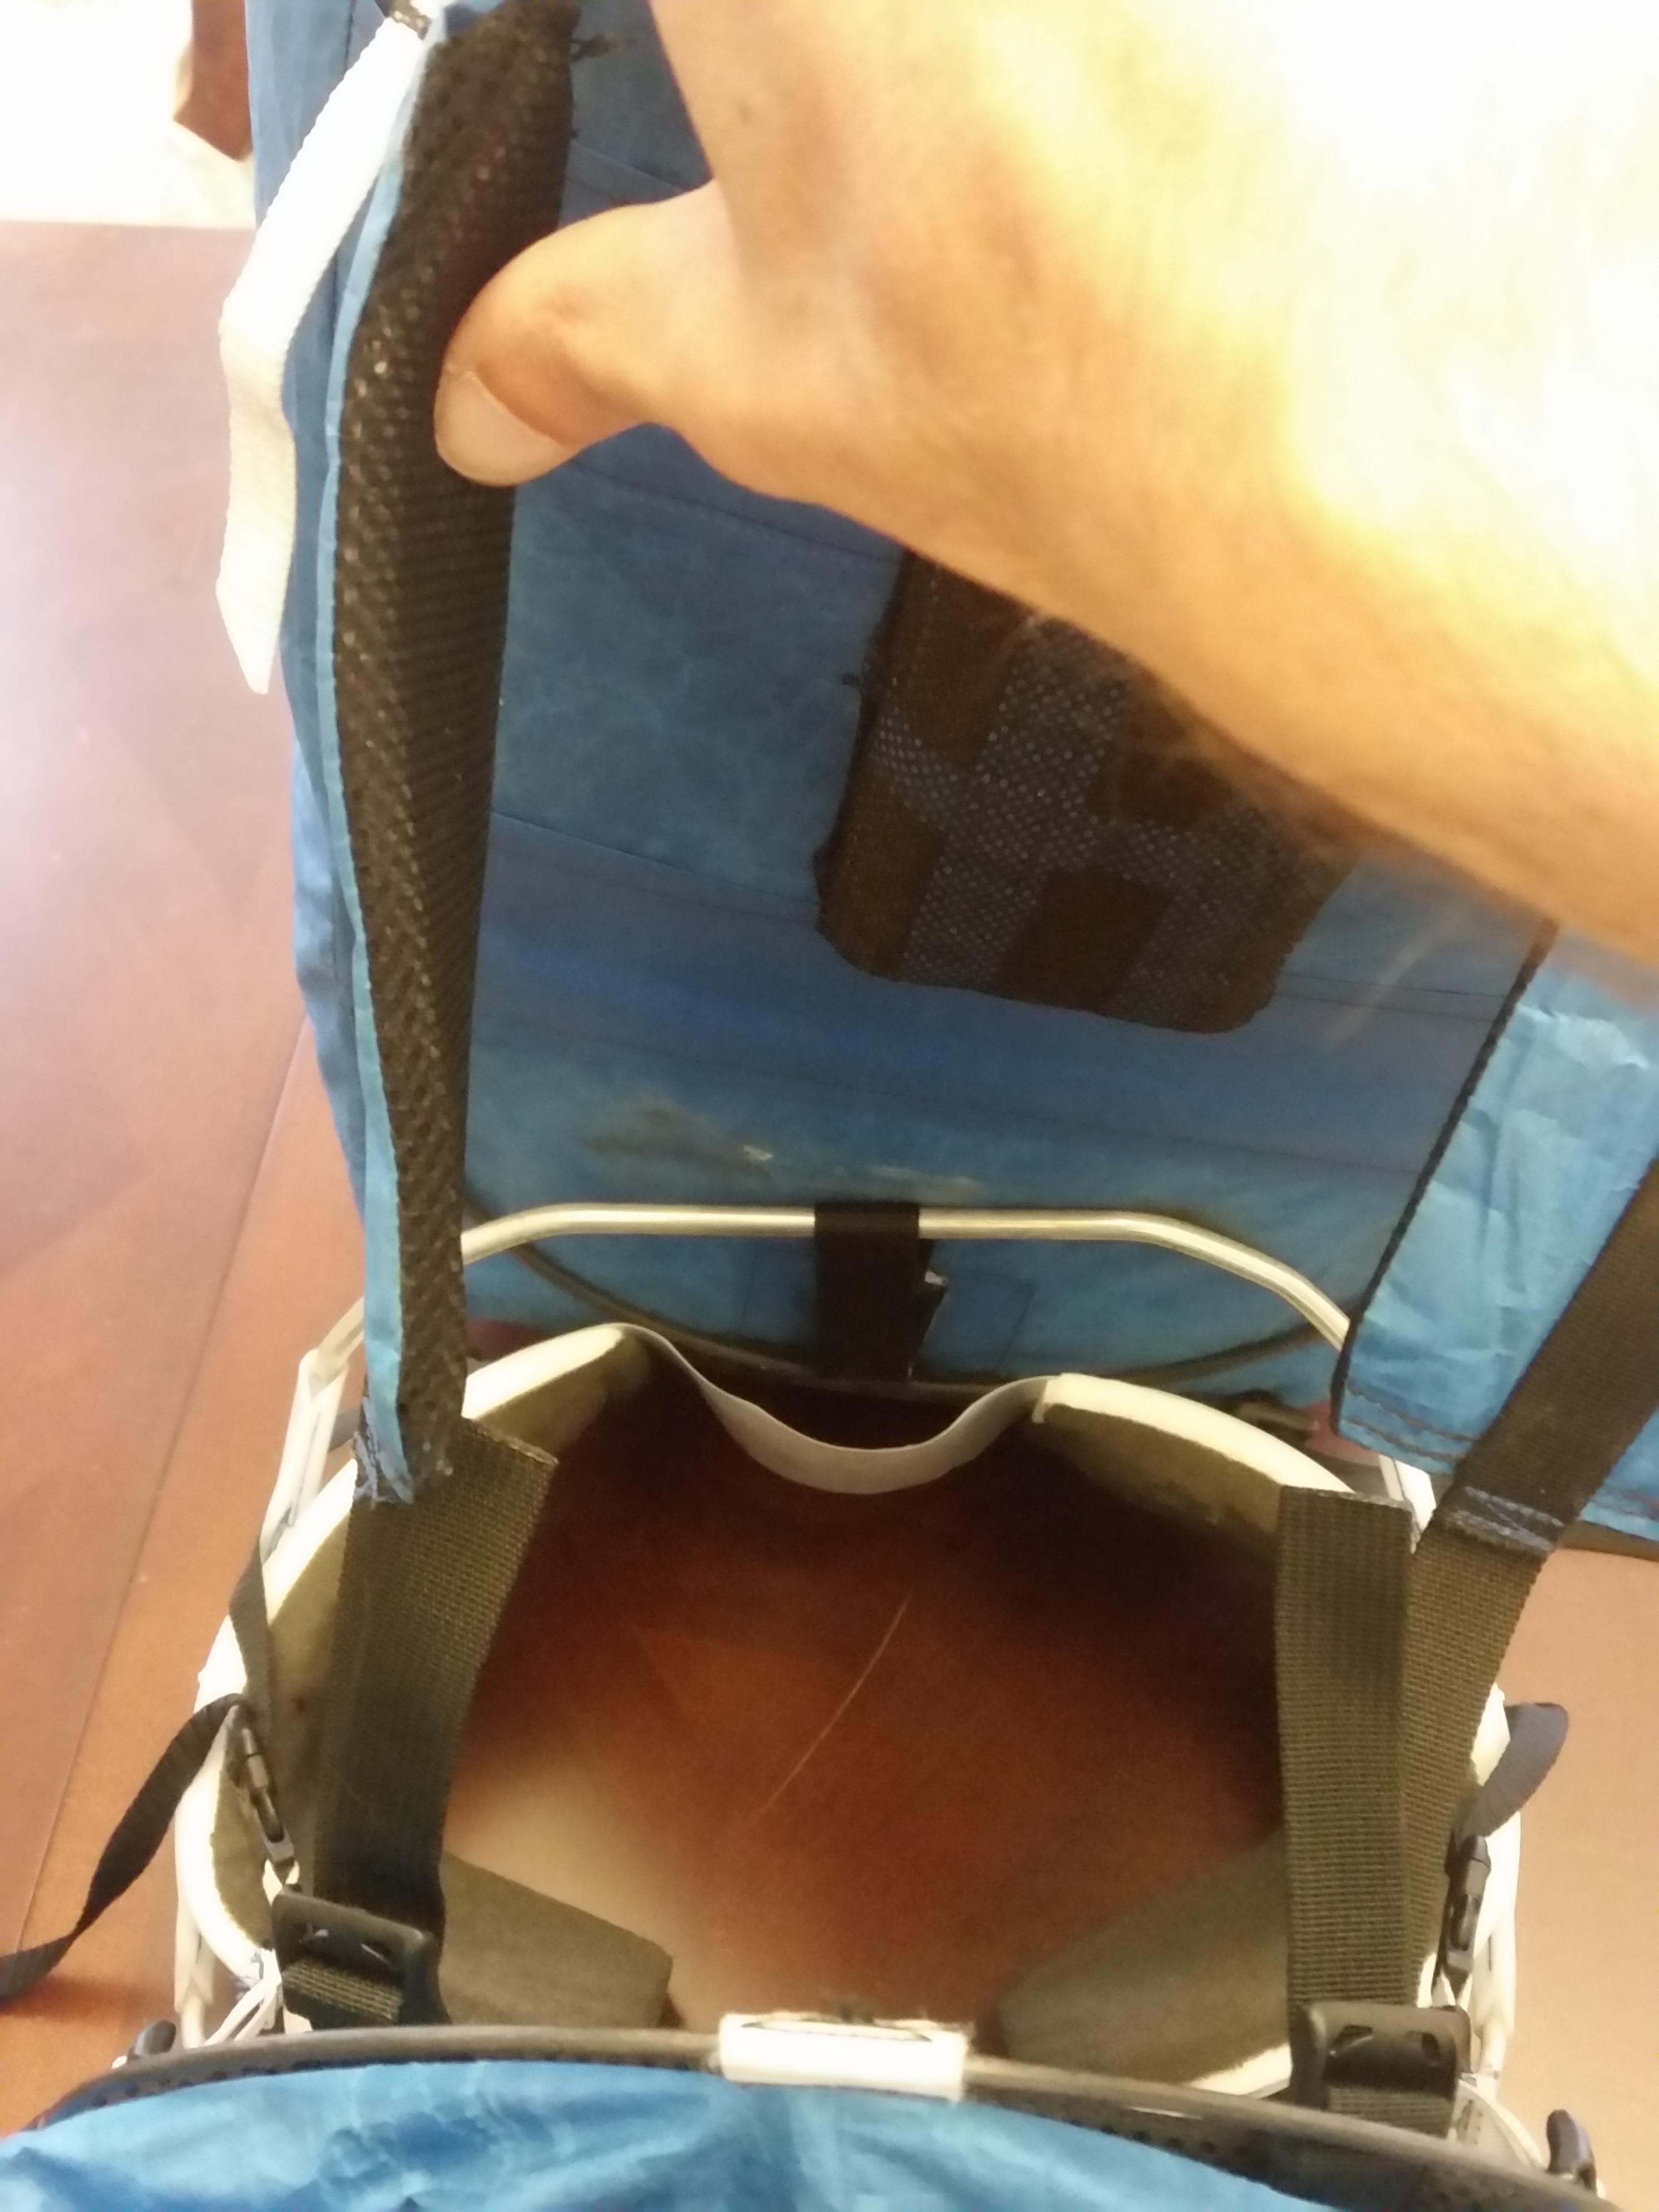
In order to support the back bag at a single point like this, a couple of changes needed to be made. First the fiberglass rod frame needs to be inverted into a U, then get supported by the suspension webbing at the center of that U. Second, the arch needs to be stiffened a fair amount since you are moving the suspension point much further from the holsters. I ended up moving from ¼” tubing to 5/16” x 0.049” wall tubing which was a bit heavier. Here are a couple pictures of the single point attachment setup:


Another thing I felt was needed was an adjustment to the vertical angle the front bag makes with the hip belt. For this I just needed to put another ladder loc in one of the legs of the front bag teathers:

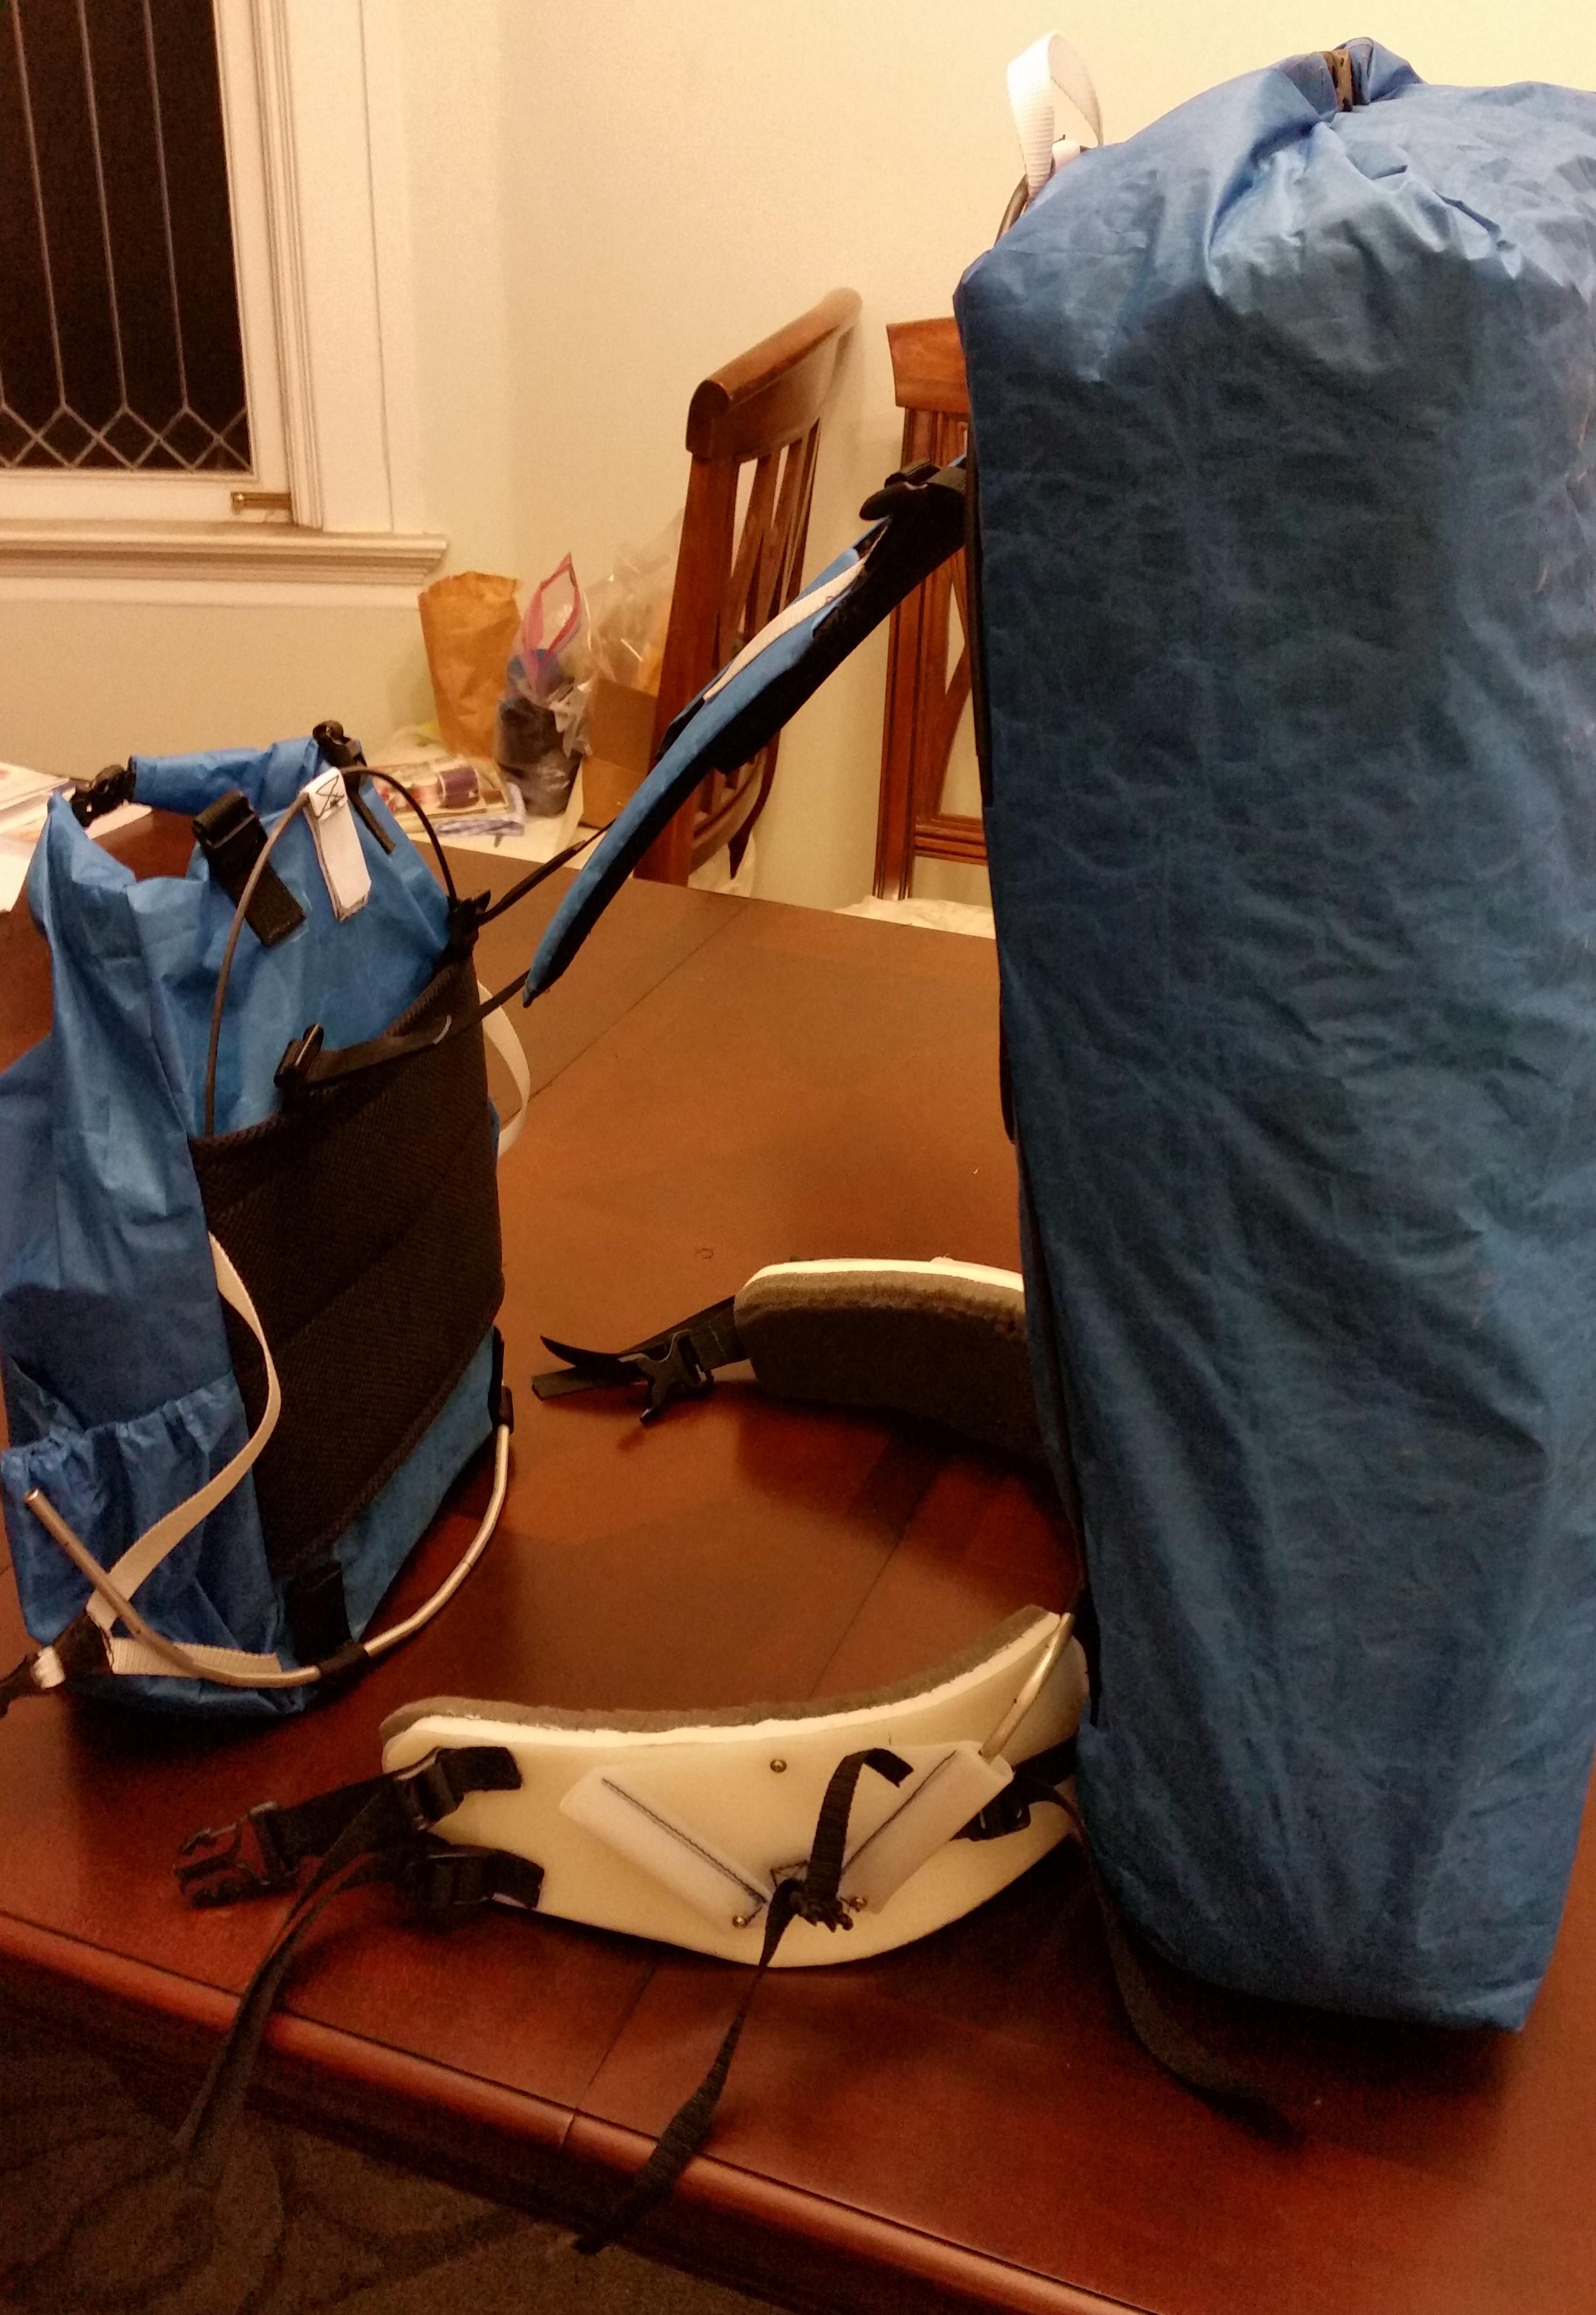
So here’s v2.1 still loaded with about 18 lbs after coming home two days early from a planned 4-night trip (we were smoked out of Inyo National Forest due to the Creek Fire in CA):


Putting It On
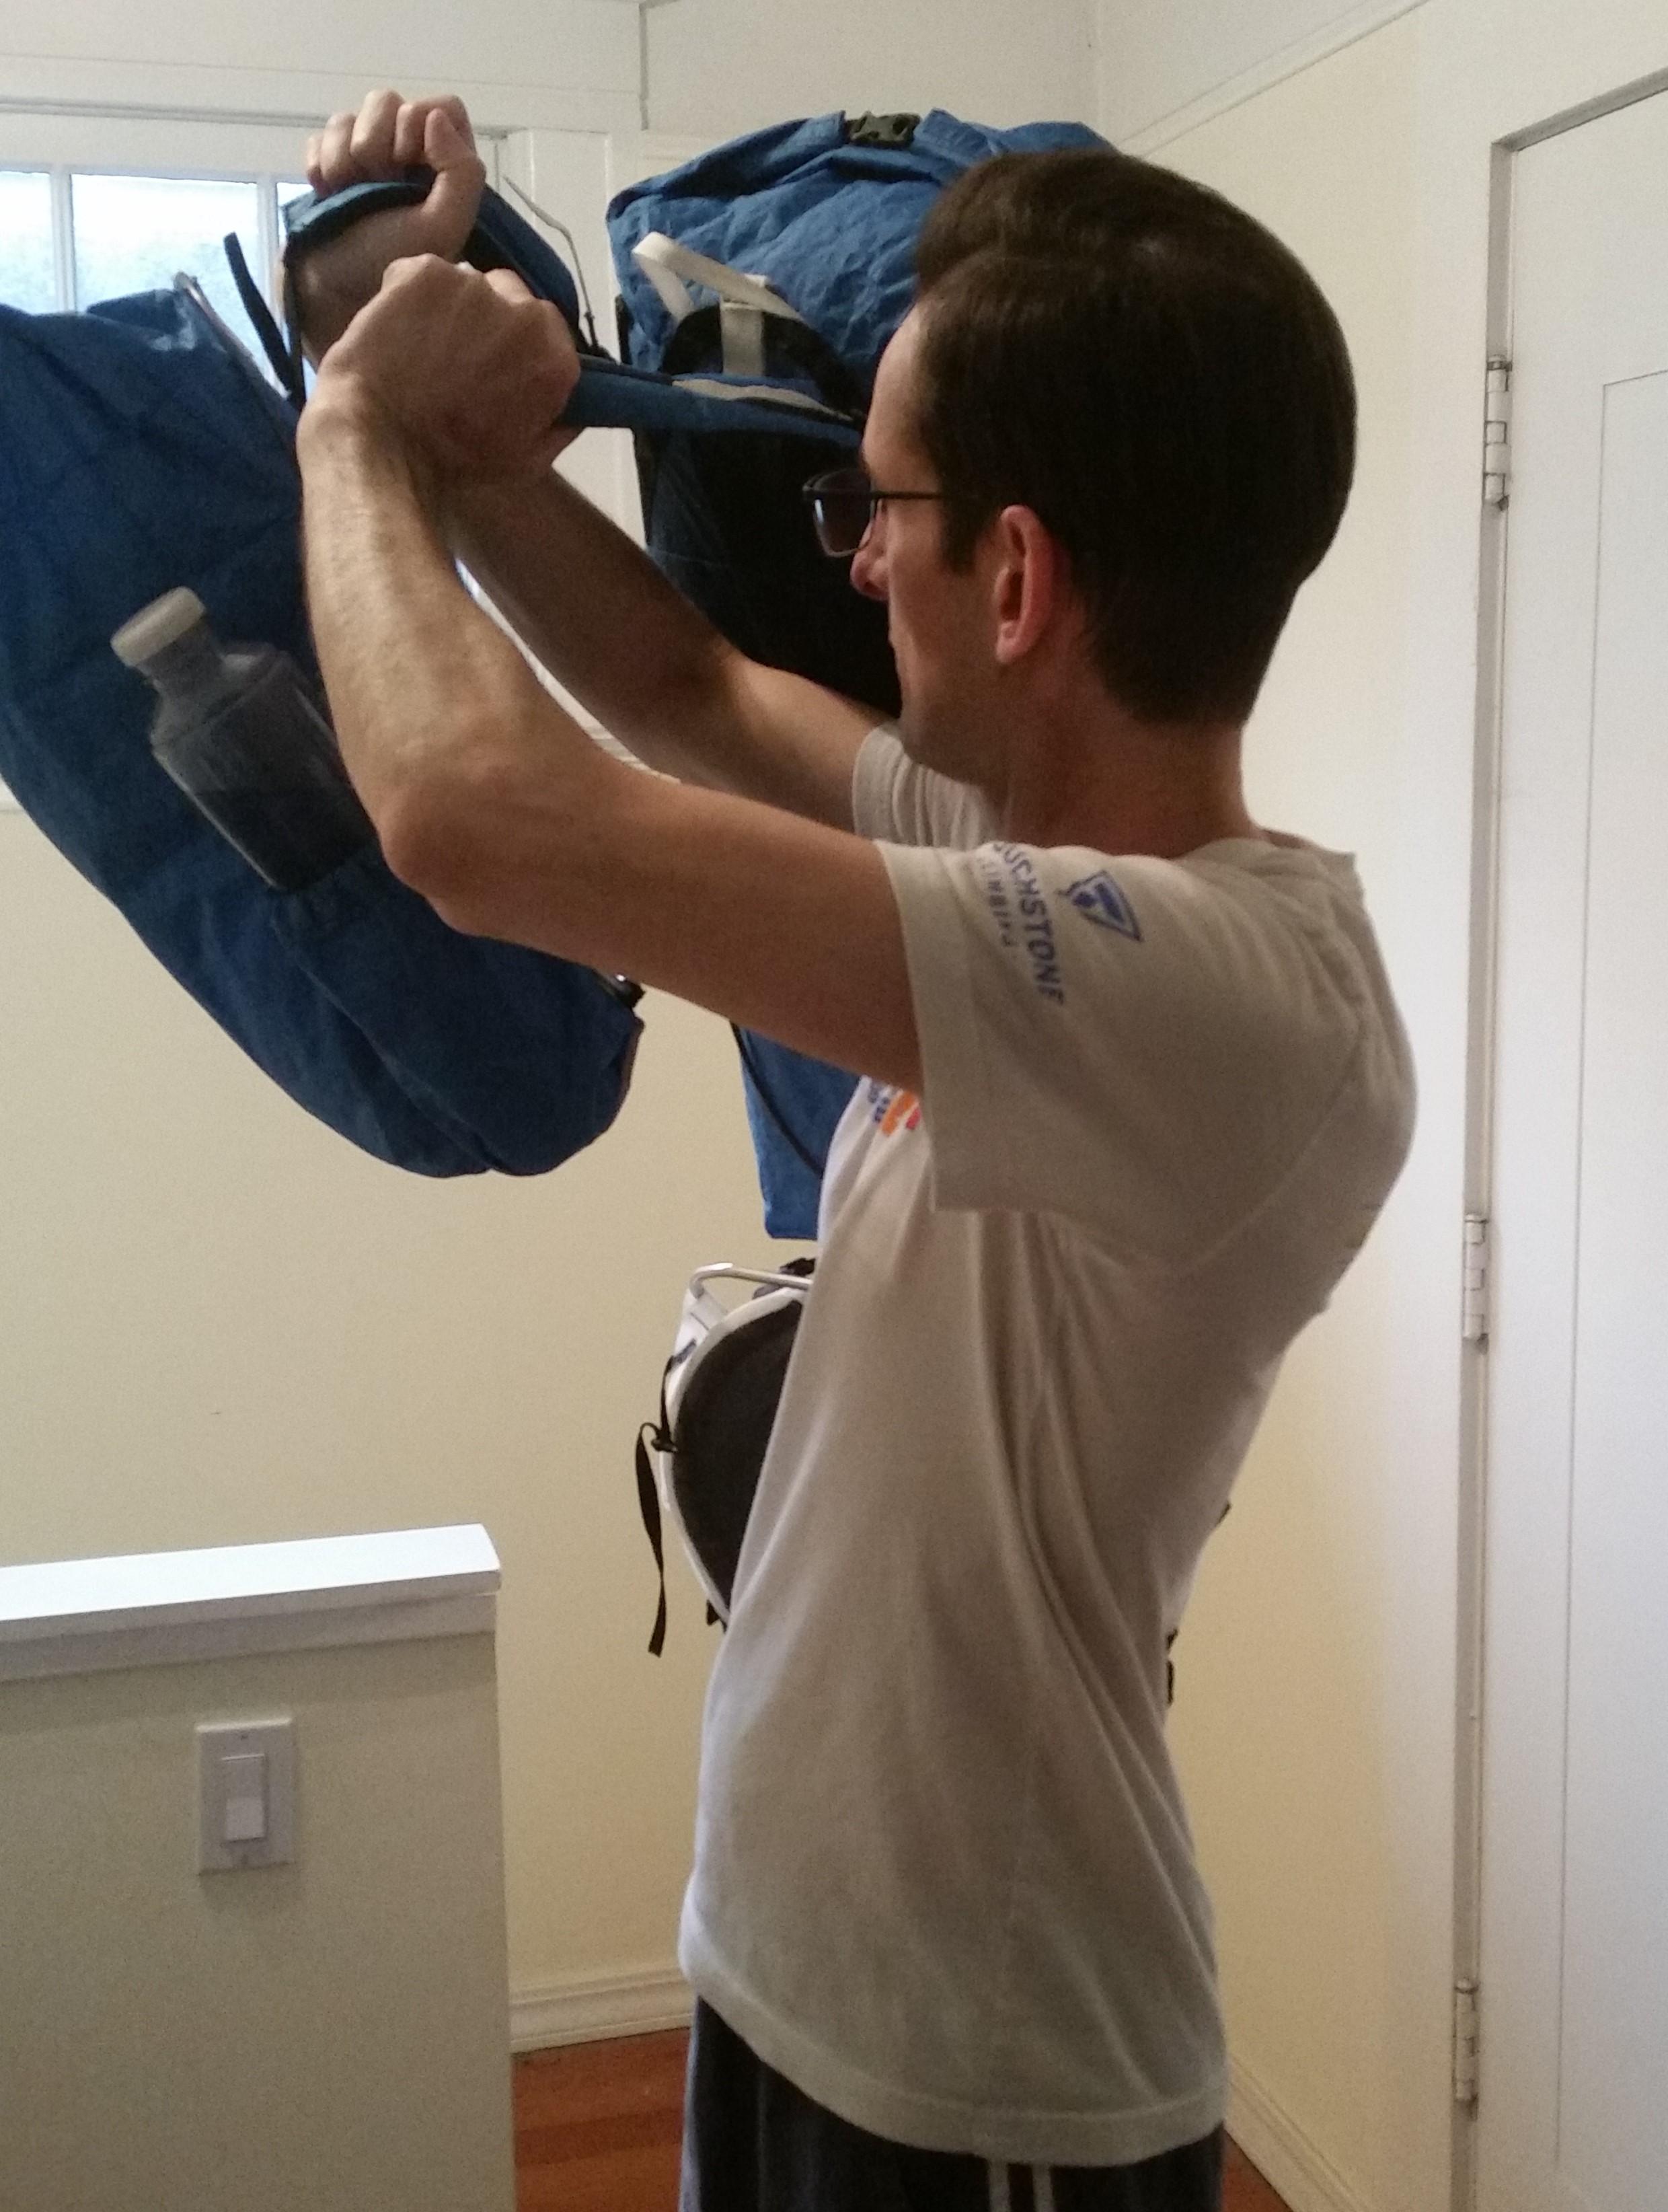
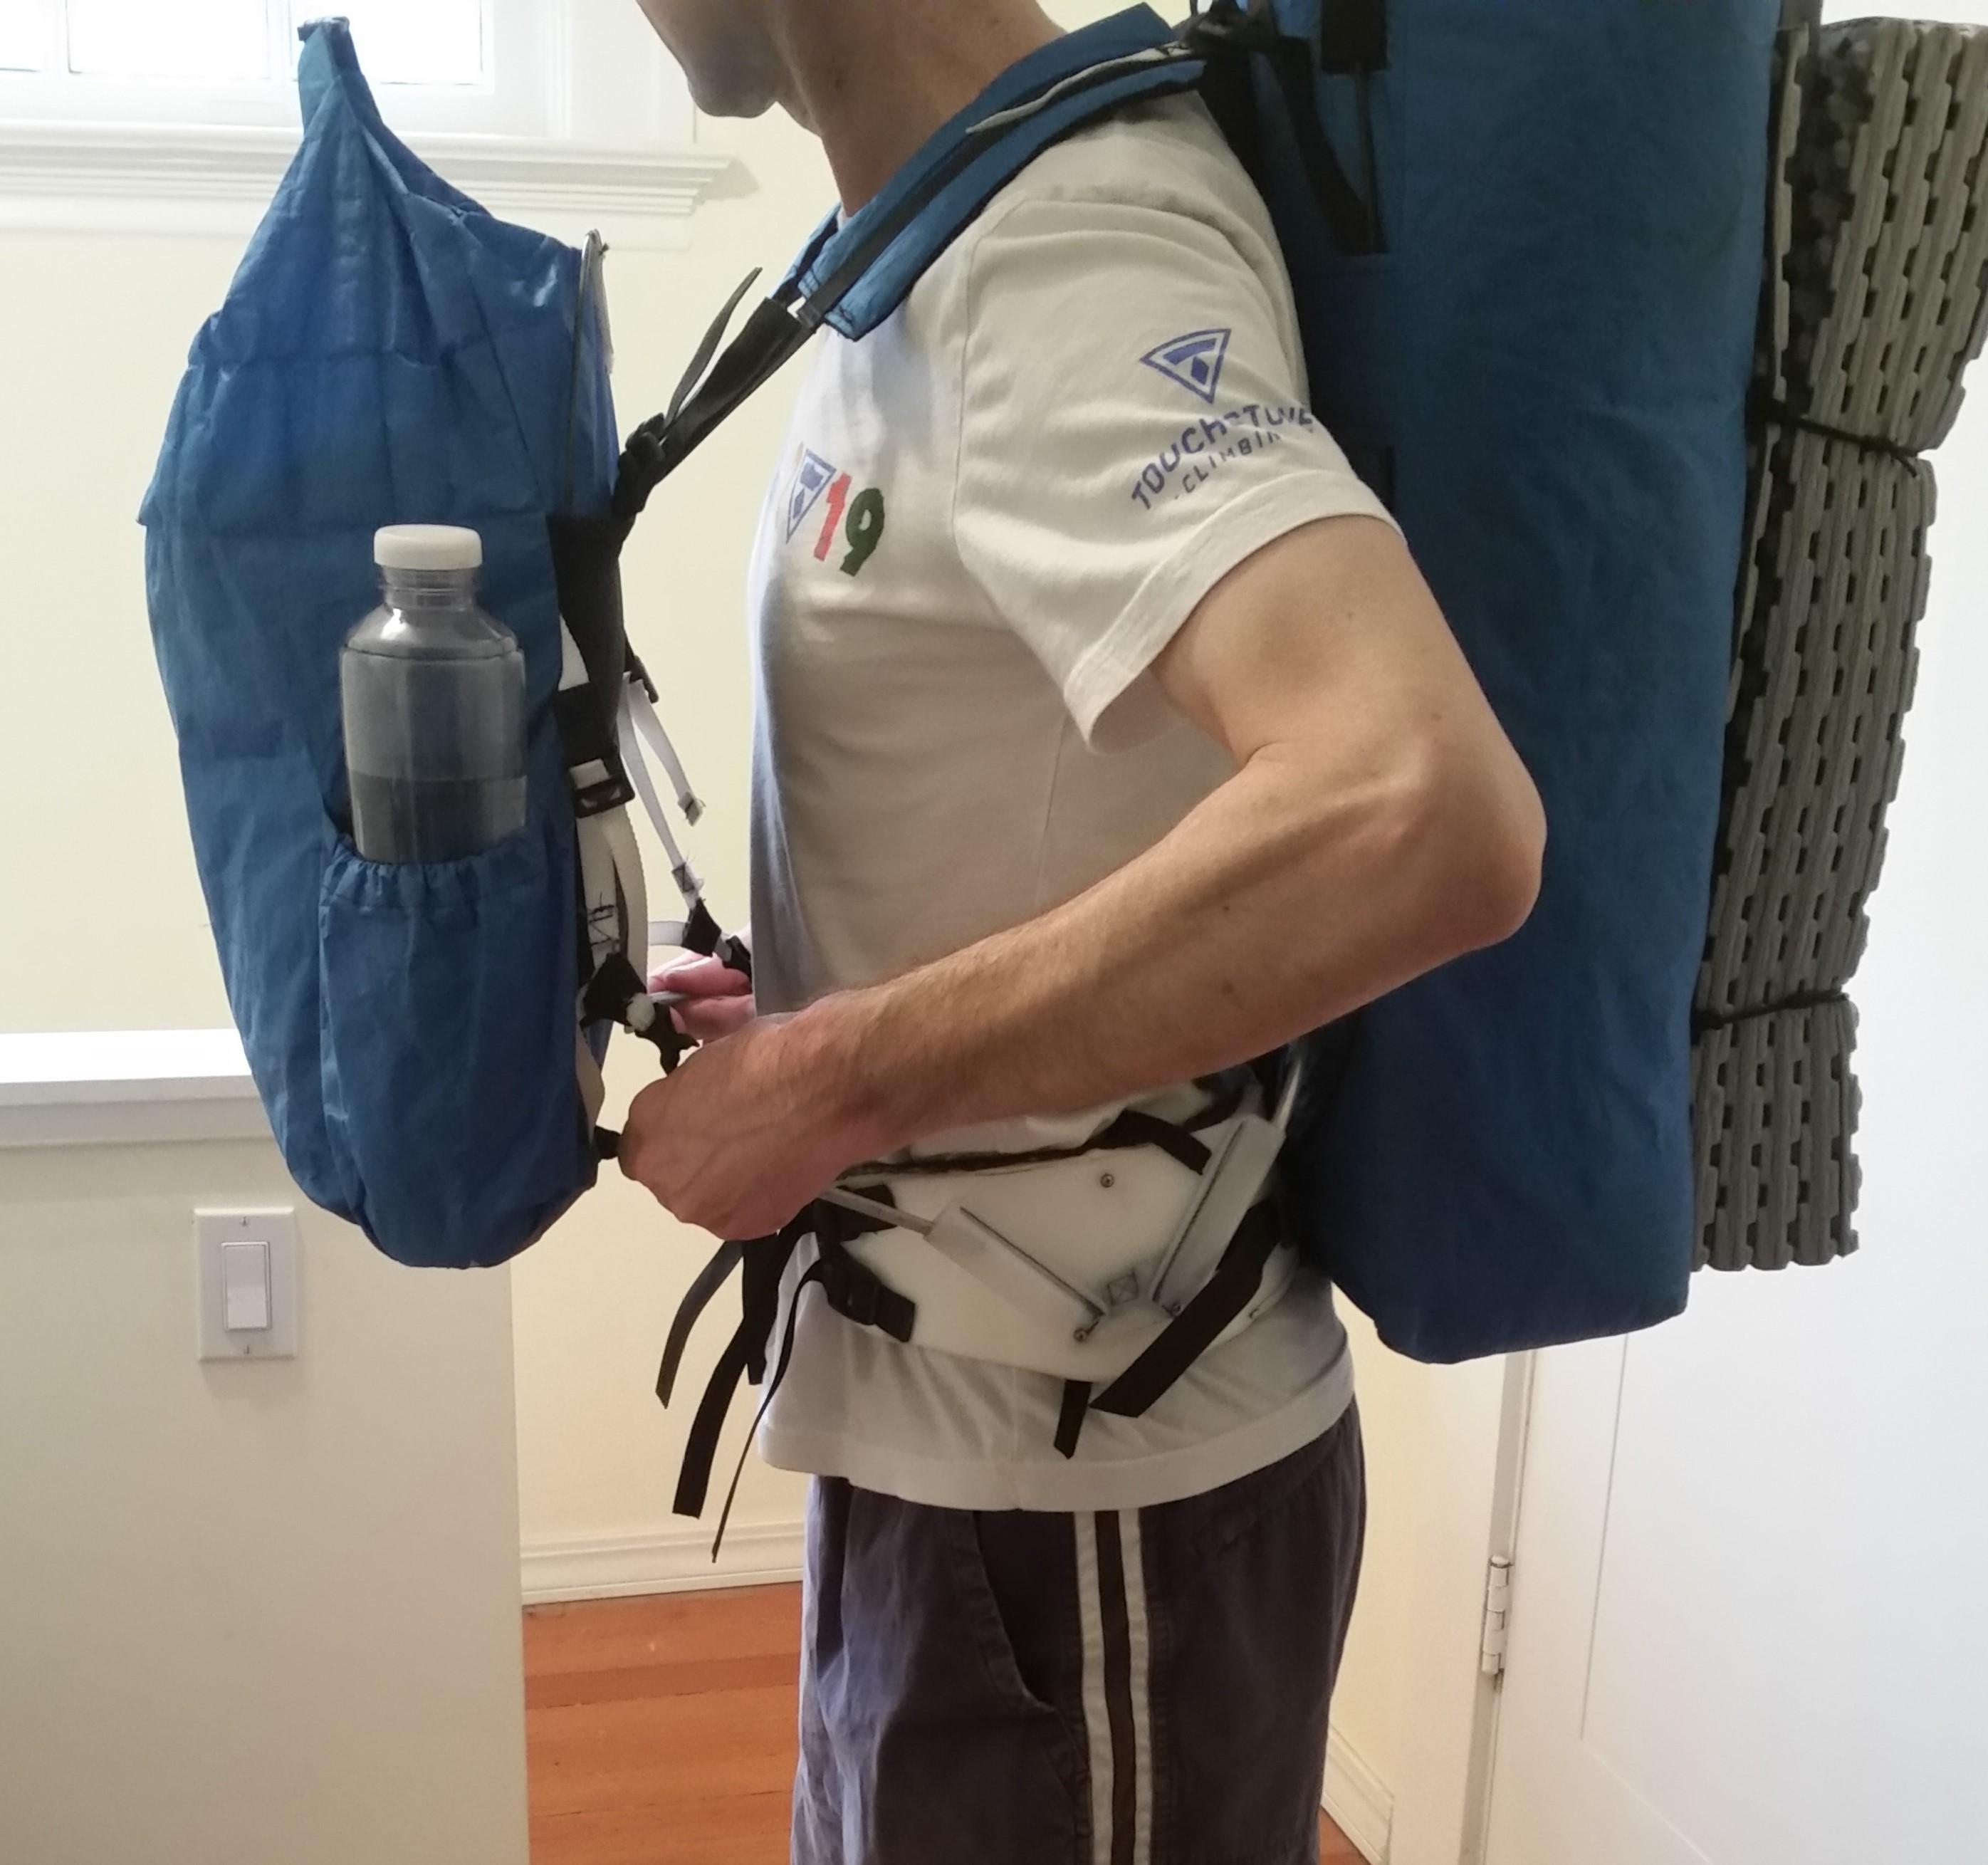
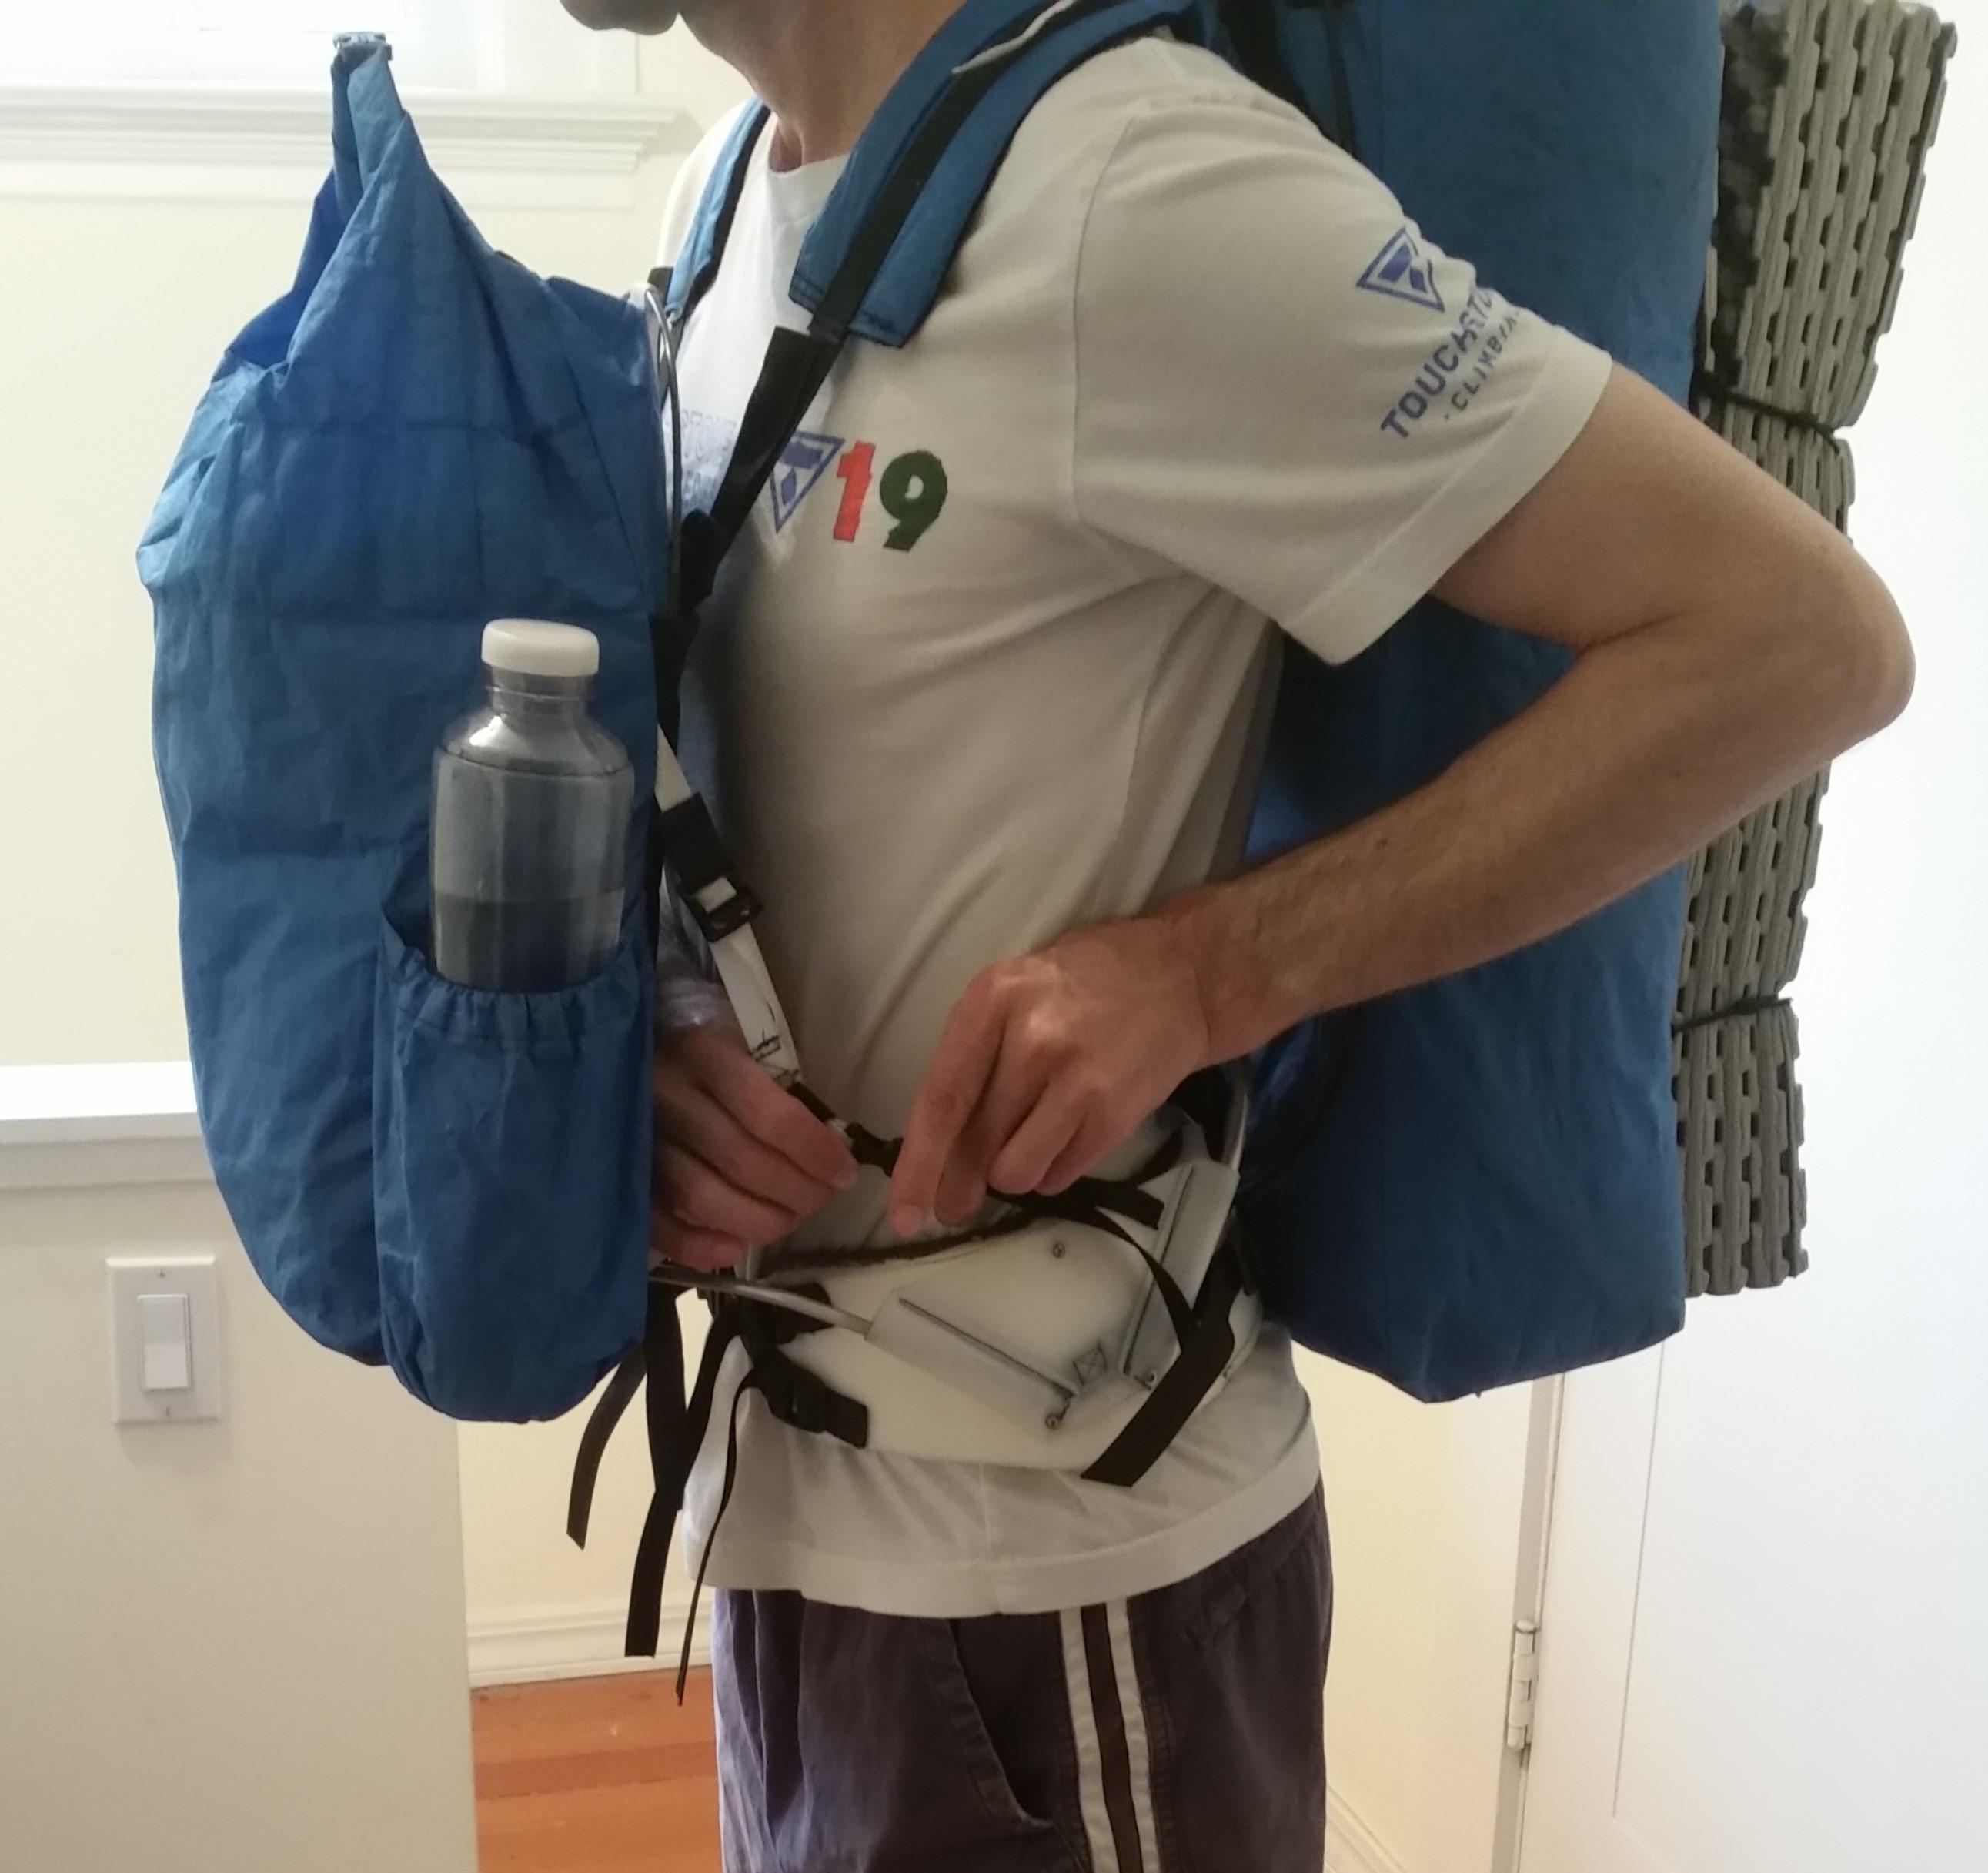
Here’s the procedure for putting the pack on. Lift over your head with the two shoulder straps and rest the straps on your shoulders:


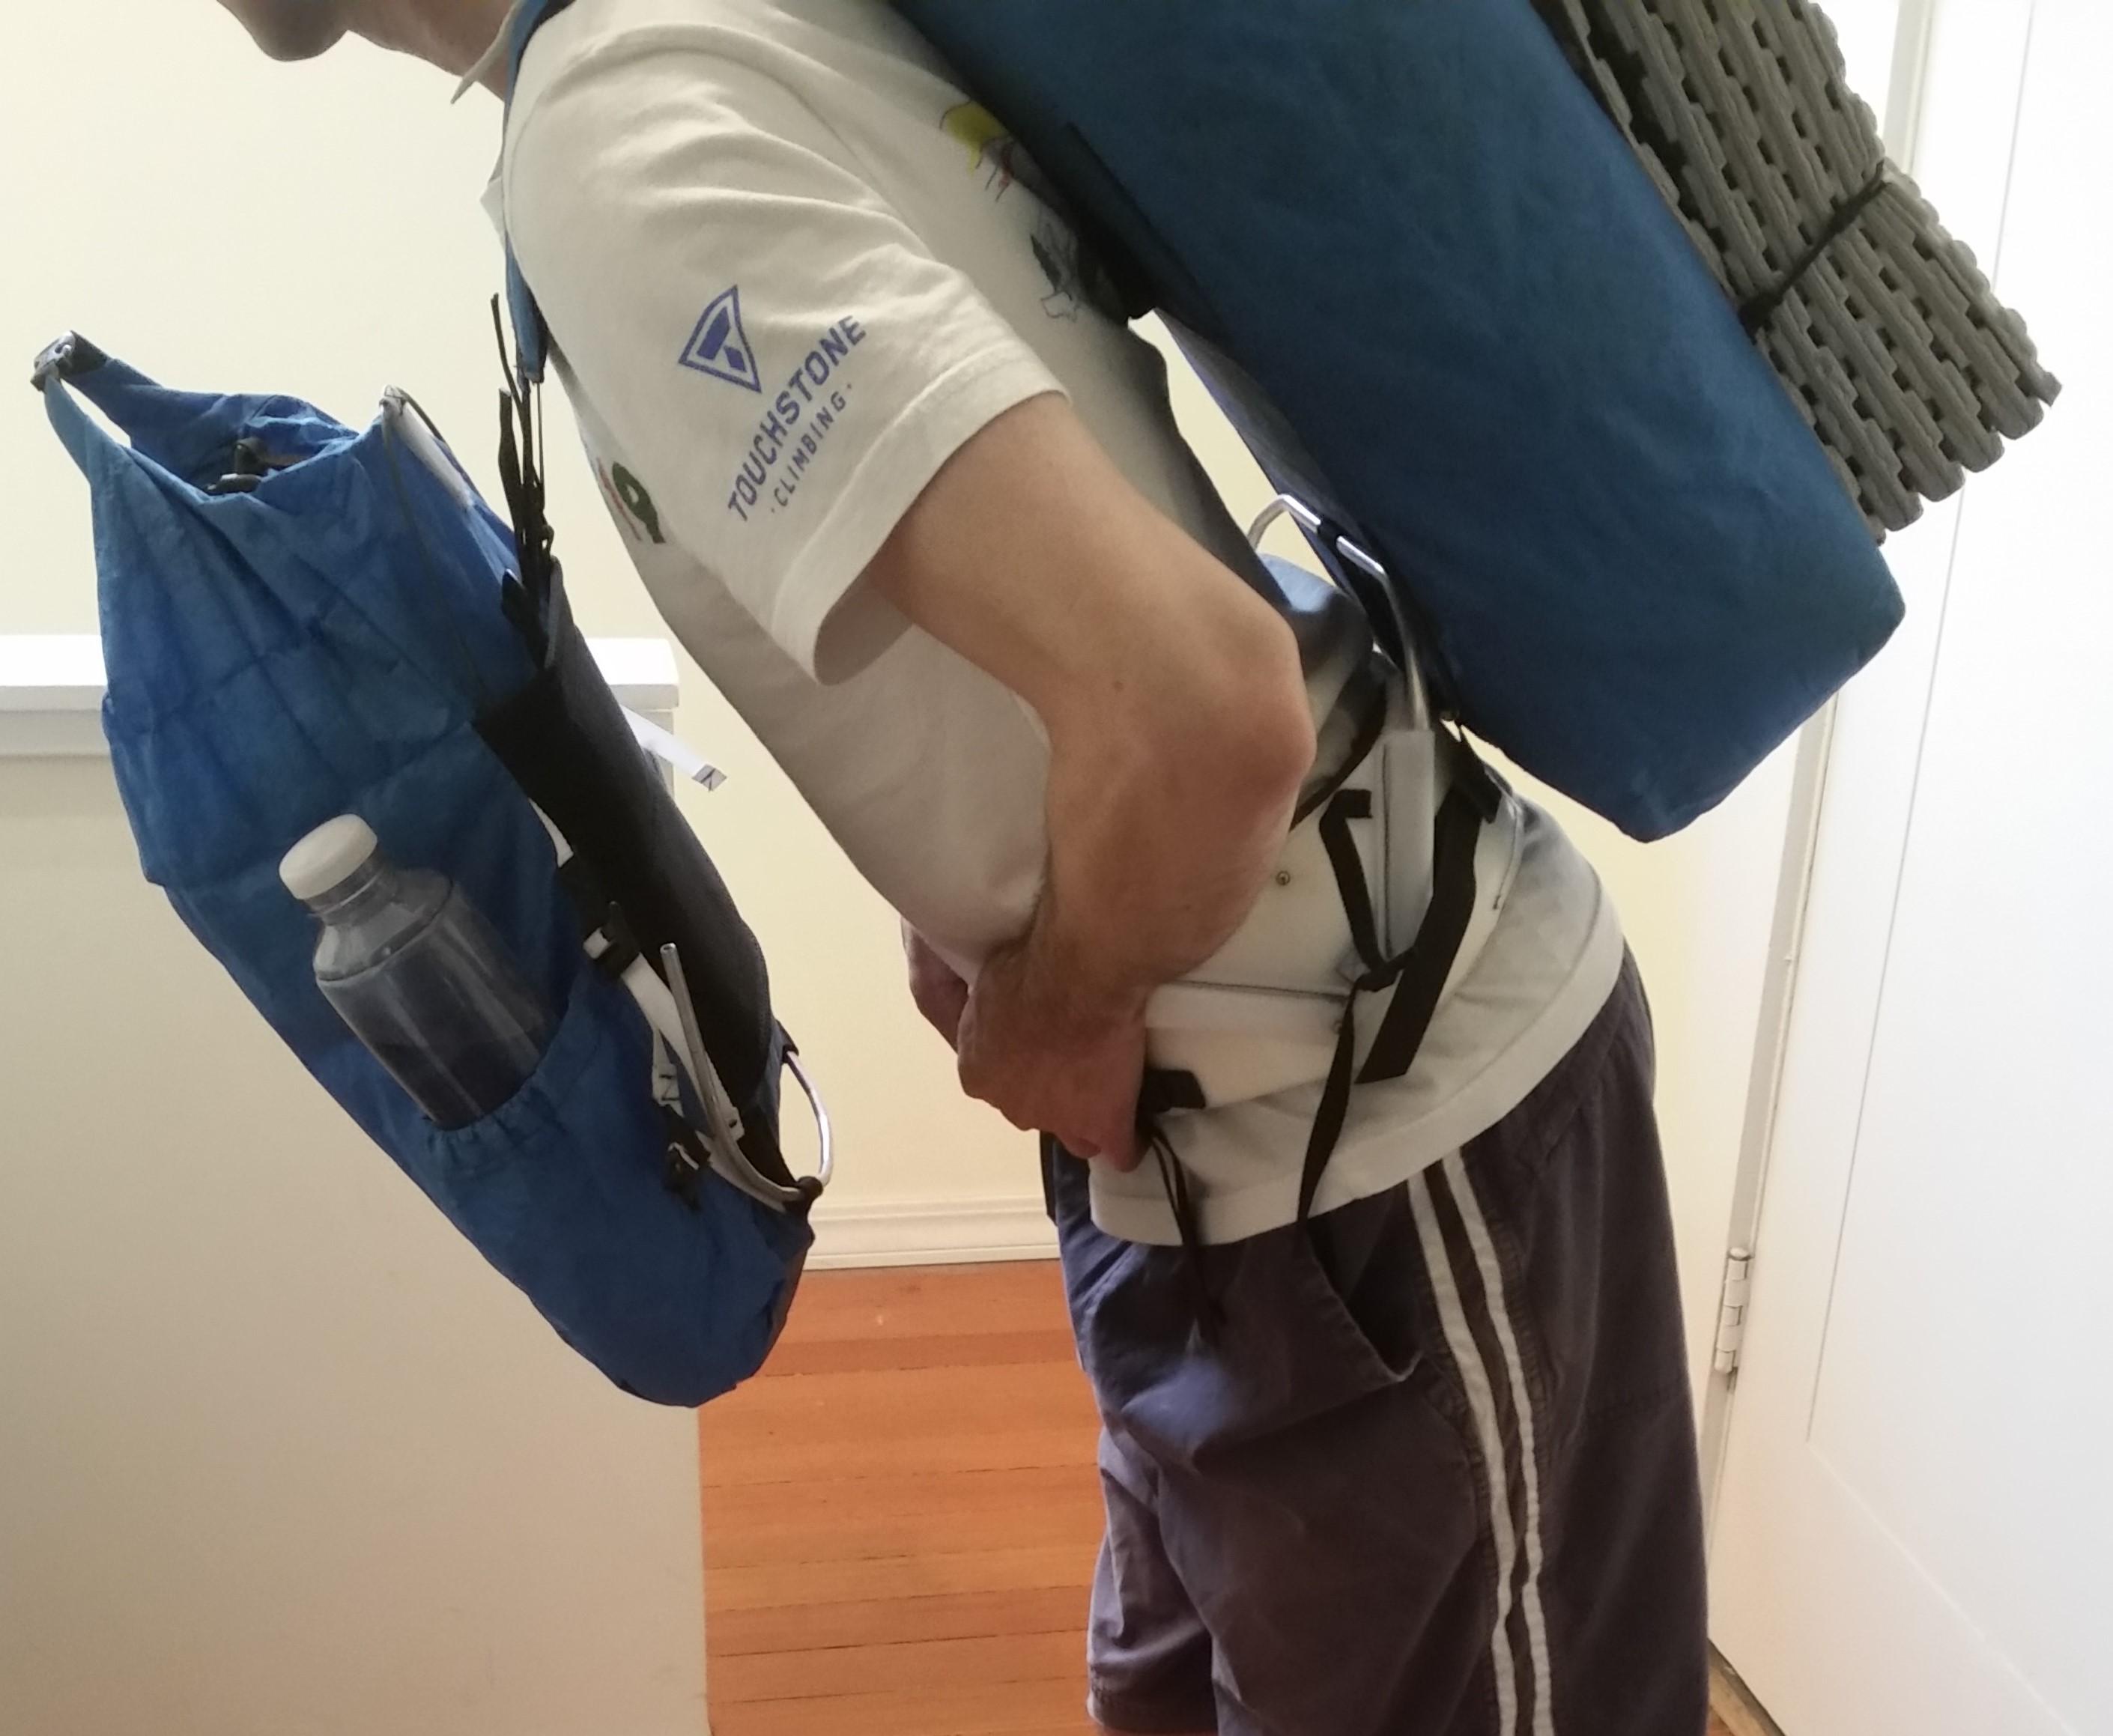
Lean forward so the front bag hangs away from your body and buckle the hip belt. Grab the ends of the front bag arch and seat it into the holster sockets:


Reach across behind the front bag and buckle the support straps for the front bag, first on one side, then the other. Make adjustments as needed to center the bags and remove play.


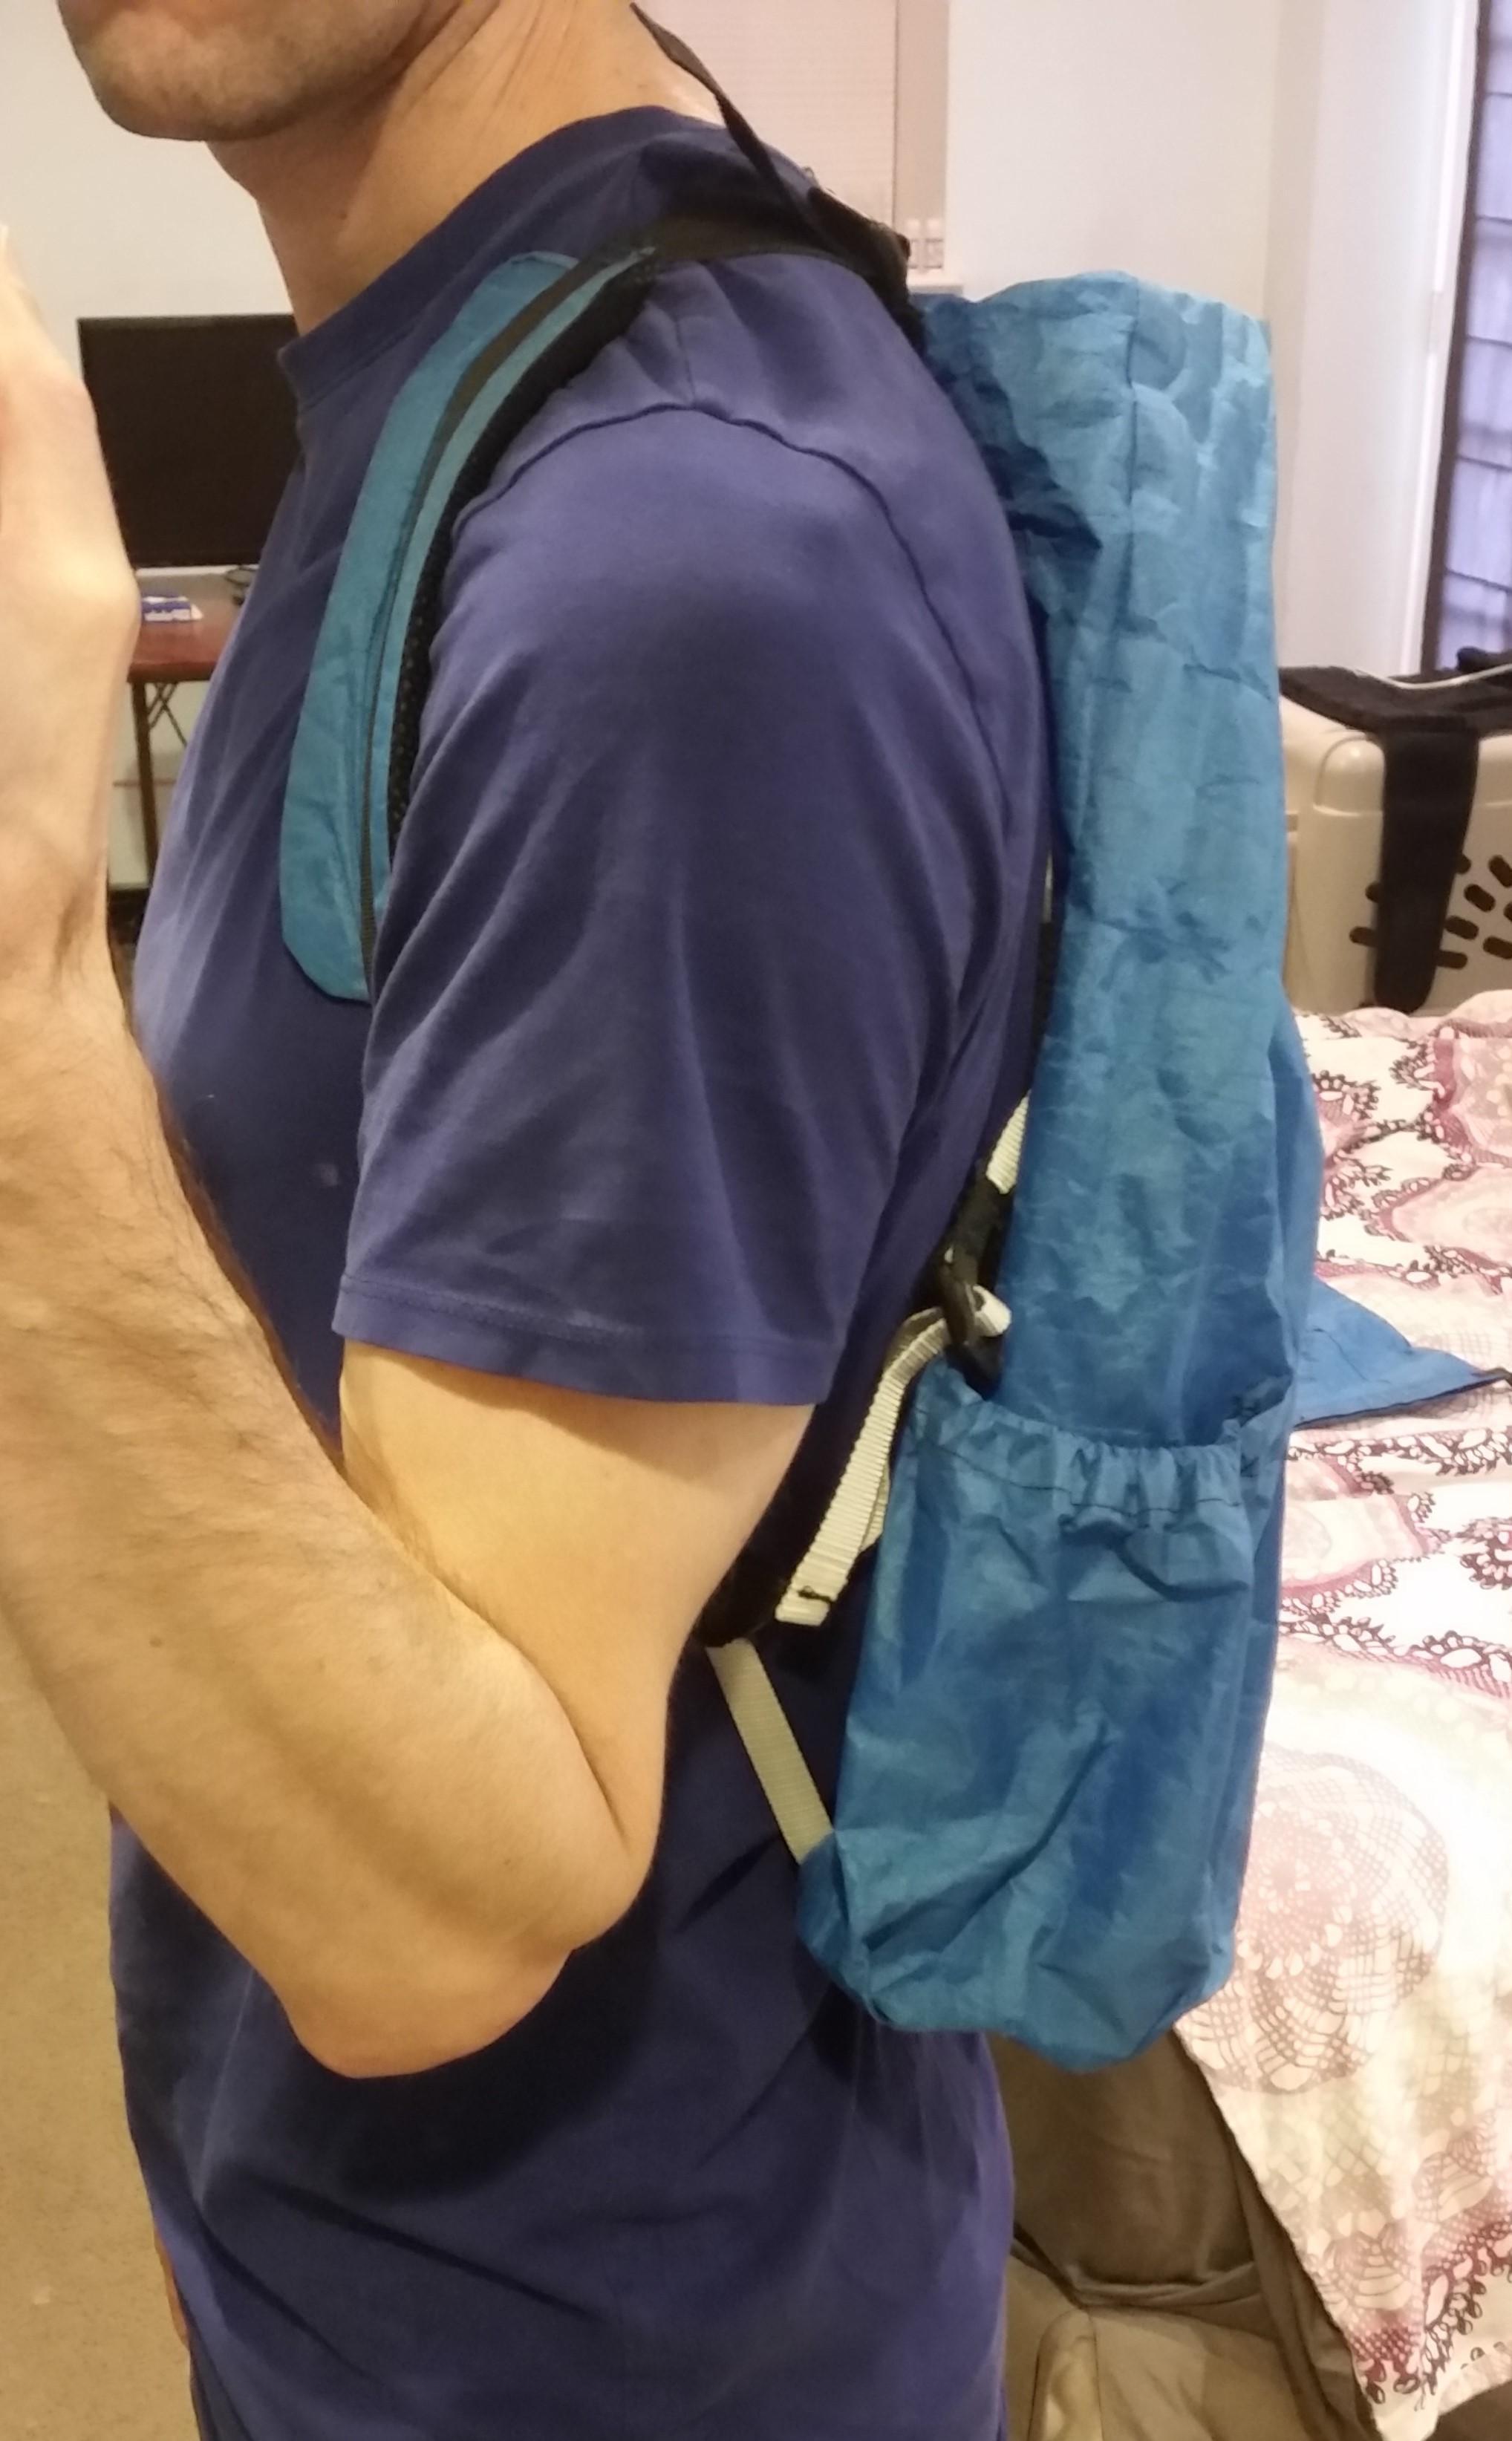
To take it off, reverse the procedure. The front bag can be used as a day pack, but it is not the most comfortable. Here’s a picture of it set up that way:

Results and Discussion
Overall, I feel like I hit the design goals pretty well.
- All the weight is definitely being applied to the outsides of the hip belt.
- It’s possible to load the front and back bags so that there is no ‘rotation’ of the hip belt. This is a bit challenging with ultralight stuff since it is so light, and the front pack is fairly small. This means the bear can or bag has to go in the back, and the next most dense things need to go in the front, which is water and miscellaneous stuff like electronics, stoves, or toiletries.
- During training, I load it up with about 25 Lbs and it feels pretty good. It could probably go up to about 30 Lbs, but I’m not sure I’ll ever have occasion to do that. When loaded up with my light but bulky ultralight gear and 4 days of food at a bit under 20 Lbs, it feels really light compared to my training weights.
- The final weight of v2.0 was about 23.5 Oz, a hair over my Arc-Blast. After I made the few extra tweaks to v2.1, the whole thing comes in at 24.6 Oz (696.2g). 1.6 Oz/7% more than my Arc-Blast setup.
- The front bag can be configured as a day pack.
- It’s definitely not as easy to put on/take off as a traditional backpack. However, once I learned the method, I don’t feel like I hold my companions up very much while donning the pack after a rest break on the trail. It is difficult to put on while wearing stuff on your head, like a hat, so there are just more steps in the procedure of gearing up after a rest stop; Take hat/glasses off, put pack on and arrange it, put hat/glasses back on. Additionally, I’ve started carrying a DSLR again which I hang over my neck and rest on the front bag which also needs to be dealt with when donning or removing the pack. Although you would have to do the same thing with a camera if wearing a conventional backpack as well, so that’s not really fair to include in this comparison.
I like this design much better than any of the traditional backpacks I’ve had. It’s super comfortable to wear and does not produce hot spots anywhere. The sweaty patches it creates where it contacts you are pretty small compared to a big external frame backpack that touches the whole surface of your back. I notice being most sweaty on the sides of my hips from the hip belt, and in the center of my back where the narrow cushion is. The front bag doesn’t alway sit touching your chest so it doesn’t make you very sweaty there.
The front bag setup is quite convenient to use organizationally. Anything that I might need during the day goes in there and is accessible without taking the pack off. I can stuff my phone in one of the side pockets next to a water bottle so it’s easily accessible to check navigation. I can also rest my camera on the front bag nestled under the loop that the roll-top closure makes, and then can instantly grab it for pictures while walking.
OK, so here are the annoying things about using a pack like this.
- The whole setup feels a bit clunky and unwieldy until you get it on since there are multiple parts.
- Once it’s on, it does not feel like it’s really strapped down and secure to your body like a traditional backpack. This is only noticeable when moving suddenly like running or if both of your feet leave the ground. Spinning in a circle feels much more natural since your center of gravity is where it normally is, not moved out toward your back.
- It’s hard to crouch or bend down with the front bag, like to tie your shoe.
The front bag is attached at two outer points to the support arch so does not rotate independently from your hips like the back bag. This means this bag is always shifting a little bit side to side in front of your chest as you walk and your hips swing. I never found this to actually be annoying, probably since the front bag is so much smaller, but thought I would mention it nonetheless. - You cannot see your feet while standing, and therefore the terrain right in front of you while walking. I don’t find this to be an issue, since I usually don’t look directly down anyway while negotiating rocky trails and such. I generally see where I want to put one foot then the other a few feet in front of me then remember where those spots are as I step forward; kind of like what you need to do when negotiating talus quickly. I have really good balance and find this like second nature, but some people may feel differently.
- The height I have the shoulder straps attached to the back bag at the moment results in a slight downward pressure on my shoulders that I can notice after a long day of hiking. It makes me feel like I’ve been slightly hunched over for a while and that I need to stand up straight. When I do stand up straight or take a deep breath, I can feel a bit of downward pressure from the shoulder straps as my torso lengthens away from the hip belt. This could probably be solved by moving the attach points higher or adding load lifters.
Next Steps
There’s probably a bit more polishing to be done with this design, especially if someone were to produce it commercially. I’m pretty satisfied with it as it is though. The one thing I will probably do before my next trip is change the fiberglass rod that goes in the back bag. When loaded up with my training weights, I notice the fiberglass rod bending and behaving like a spring as I walk, and I’d like to have the support a little more solid. Since I finished v2.1, I made a tent that uses aluminum tent poles, and I think I can use two of those pole sections as stays in the back bag. I would also need another aluminum u-shaped piece to join them, but I think it would shave a bit of weight off total vs the fiberglass.
 Sep 9, 2020 at 5:38 pm #3675446
Craig, thank you very much! Applause!!
Sep 9, 2020 at 6:40 pm #3675465Craig
Many thanks for responding to our hectoring with such a brilliant post.
It’s great to see truly original thinking and I’m glad it worked out for you – this is a big project!
For my own uses I’m not sure it will tempt me away from a more Aarn inspired design, but I will give myself some time to cogitate and experiment before I give a reaction – there’s a lot to absorb and I’m hoping to glean a few ideas for my own build.
Sep 9, 2020 at 7:45 pm #3675478Craig—Wow, I’m impressed with your original ideas and all the effort to work with various materials and novel shapes. Great work!
This is a super example of using the myog approach to solve a personal goal in a way that works well for you. Who cares if it’s not for everyone, you got a great pack out of it that you couldn’t have bought anywhere.
Sep 9, 2020 at 10:30 pm #3675493Yeah, great idea, good thinking, good write-up.
Sep 9, 2020 at 11:27 pm #3675500Great explanation of your engineering process. Thanks for sharing!
Sep 10, 2020 at 10:42 am #3675546Craig @kurogane — Why did you put a center pad on the back bag? I’d have thought padding the shoulder blade area would be more comfortable.
Sep 10, 2020 at 11:38 am #3675548Fabulous write-up Craig. Thanks for doing this. I’m on my 2nd reading and have gotten some ideas for a winter myog project. Thanks again.
Sep 10, 2020 at 1:18 pm #3675559Thanks all!
Here’s the story behind the narrow back pad:
The other area I typically had hot spots with conventional packs is on my shoulder blades. I’m not sure why this is the case for me and seemingly not others, but I DO have pretty bony shoulder blades. I found the Z-Packs Arc-Blast to be especially uncomfortable in this area, maybe even more so than the hip belt. I tried making tall narrow pad like this for my Arc-Blast so that my shoulder blades would not be in close contact with the back of the pack, and it worked quite well. The pack was comfortably held off the surface of my back and my shoulder blades didn’t rub on anything. To me this seems like just as good a way to hold a pack off your back compared to any of the tensioned mesh panel methods. It’s small, so material weight should be comparable, and there’s not a huge amount of contact so it should not be super hot. You might think that it would allow the pack to tilt or wag back and forth, but I never felt that from any of the packs I’ve done this on. It’s made out of 1″ thick open cell foam that’s 3.5″ wide by 10.5″ tall, and enclosed in mesh. I also added some extra strips of the DCF that the pack is made out of for fear the mesh wouldn’t hold up that well in that area. I’m not sure that was totally necessary though.
I didn’t just try to pad the shoulder blades themselves for a couple of reasons. First, I’d probably have used more material to make sure they were both cushioned well and I didn’t know exactly where my shoulder blades would fall every time I wore it. Second, if the foam compresses fully on the point of a shoulder blade, your back to the same situation of it possibly rubbing on something hard. Over time, your shoulder blades could wear out the foam there too. With a flat contact patch with the tall narrow pad between the shoulder blades, the foam should have less overall compression on it.
Sep 10, 2020 at 3:08 pm #3675571Craig, how does your backpack carry without the front pack?
Sep 10, 2020 at 3:16 pm #3675576Here’s the story behind the narrow back pad:
Thanks for the story. Another example of how what works for one person doesn’t work for another. Let a thousand packs bloom!
Sep 12, 2020 at 10:57 am #3675823how does your backpack carry without the front pack?
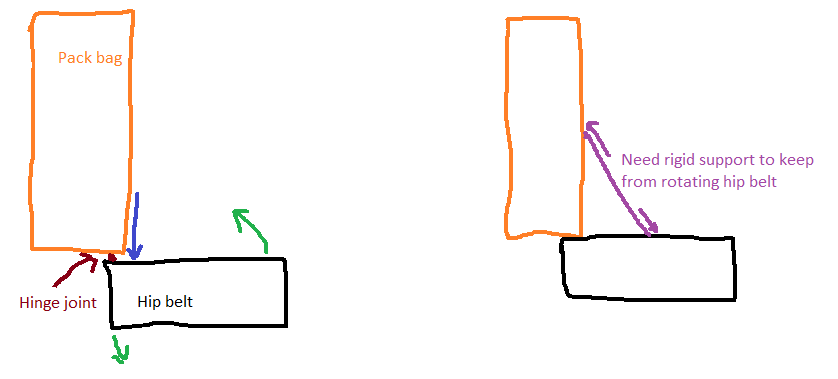
It doesn’t. I never envisioned a time when I would want to use it that way, so I didn’t try make it do so, and it’s not really feasible with this design. Right now the shoulder straps attach to the top of the front bag, so without it the shoulder straps wouldn’t anchor onto anything. More importantly though, the ‘rotation’ effect on the hip belt would be at the maximum possible because the pack bag is essentially hinged at the arch attachment point. In order to stop that, you’d need to add some sort of reinforcement or structure to keep the pack bag in an L-shape with the hip belt.

Once you put a rigid support on either side, you loose the two degrees of freedom that were there in the first place, and it’s essentially back to being a conventional pack. Although there would probably be some merit to all the weight being applied to the outside of the hips if you wanted to add the support arch feature to a conventional backpack design.
Sep 13, 2020 at 7:51 pm #3675993Thanks for sharing a creative solution.
Cheers
Sep 14, 2020 at 9:14 am #3676028Super impressive, especially to hit that weight with so much going on.
-
AuthorPosts
- You must be logged in to reply to this topic.
Forum Posting
A Membership is required to post in the forums. Login or become a member to post in the member forums!
HAPPENING RIGHT NOW (February 11-21, 2025) - Shop Hyperlite Mountain Gear's Biggest Sale of the Year:
Our Community Posts are Moderated
Backpacking Light community posts are moderated and here to foster helpful and positive discussions about lightweight backpacking. Please be mindful of our values and boundaries and review our Community Guidelines prior to posting.
Get the Newsletter
Gear Research & Discovery Tools
- Browse our curated Gear Shop
- See the latest Gear Deals and Sales
- Our Recommendations
- Search for Gear on Sale with the Gear Finder
- Used Gear Swap
- Member Gear Reviews and BPL Gear Review Articles
- Browse by Gear Type or Brand.

 There’s no foam in the center back of the hip belt because all the weight is supported by the outside of the hips, so I saved a bit of material there. Initially I tried having the hip belt be essentially two halves, joined at the back center with just 2 straps of webbing, but it did not work very well. Having it be a single piece was important, but on the second iteration I tried lightening up that area a little more, which I’ll get to later.