Topic
Tarp perimeter sewing advice… please!
Forum Posting
A Membership is required to post in the forums. Login or become a member to post in the member forums!
Home › Forums › Gear Forums › Make Your Own Gear › Tarp perimeter sewing advice… please!
- This topic has 13 replies, 8 voices, and was last updated 7 years, 1 month ago by
 Roger Caffin.
-
AuthorPosts
-
Dec 28, 2017 at 3:07 pm #3509697
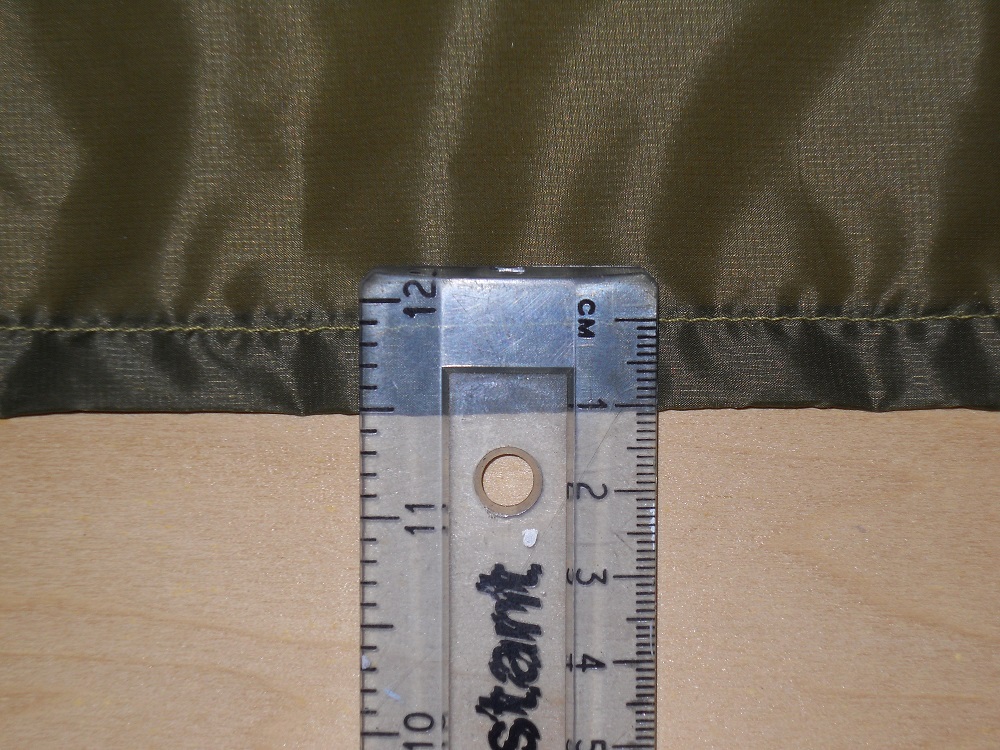
This time I’m doing a tarp with 20d sil/pu nylon and I’m finding it a little tricky do deal with. Problem is that after sewing 2 perimeter lines the fabric wants to scrunch up a bit much. In other words, the outer edged shortens about an inch over 9 feet and it produces small waves when the tarp is laid out flat. The perimeter has somewhat of a rubber band effect when you pull on it and let go.

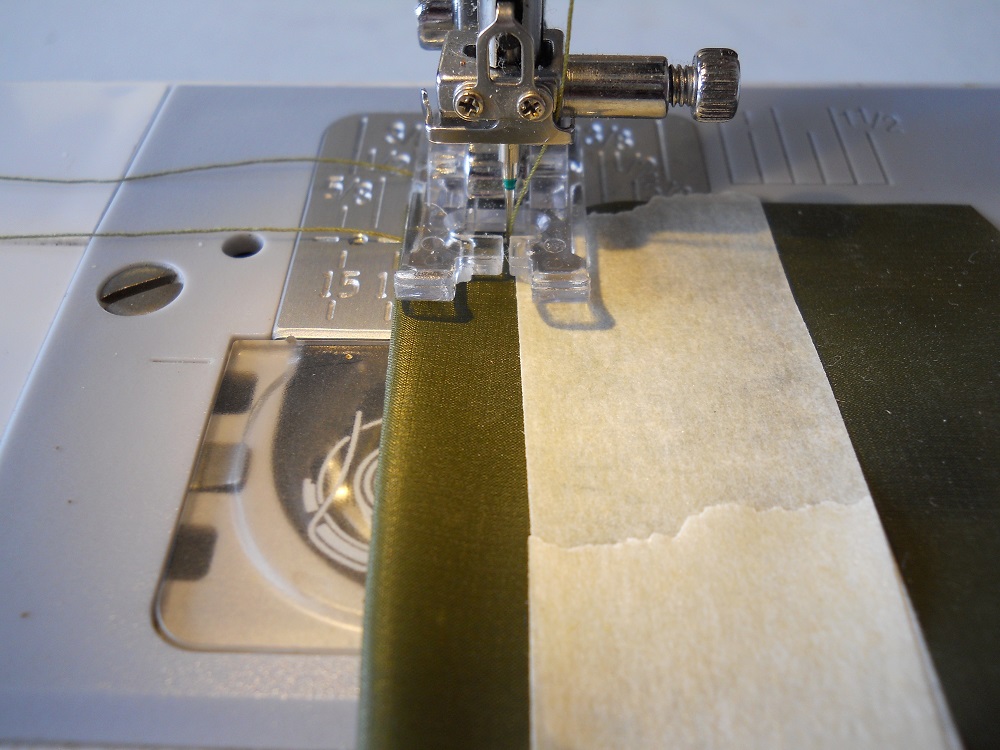
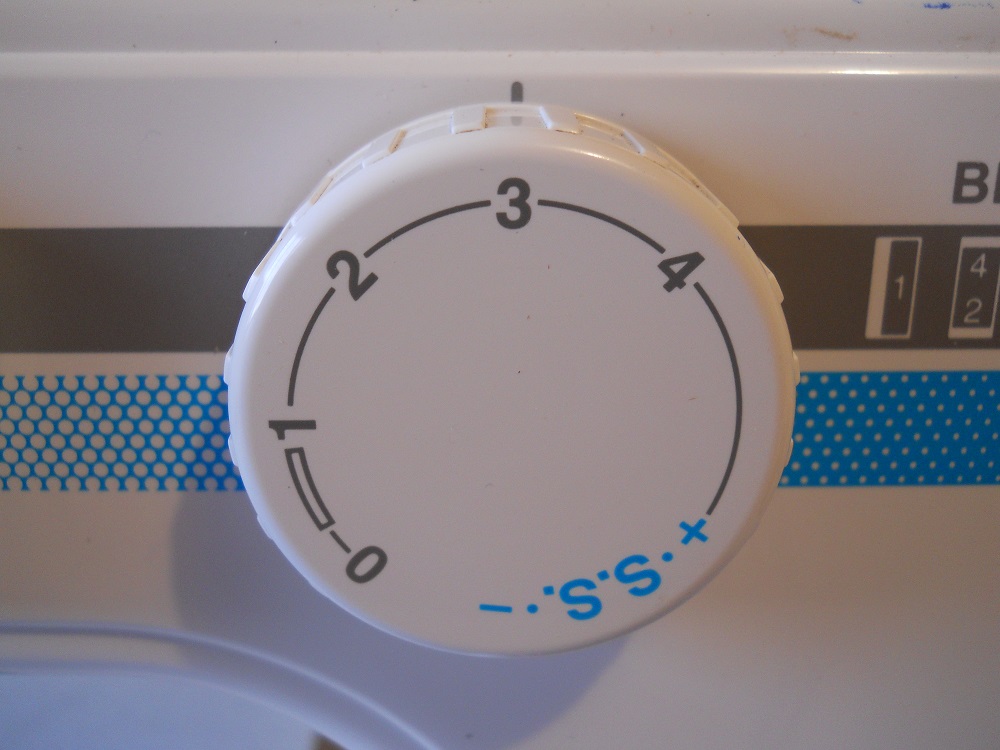
I start by sewing the first line with the tension set at 2 out of 9. Any lower and the stitches get too loose. Also using Mara 70 thread and a new 70/10 needle. Janome My Style 100 machine. I first tape the seams after using a small number of pins, but removing the pins before applying the tape.
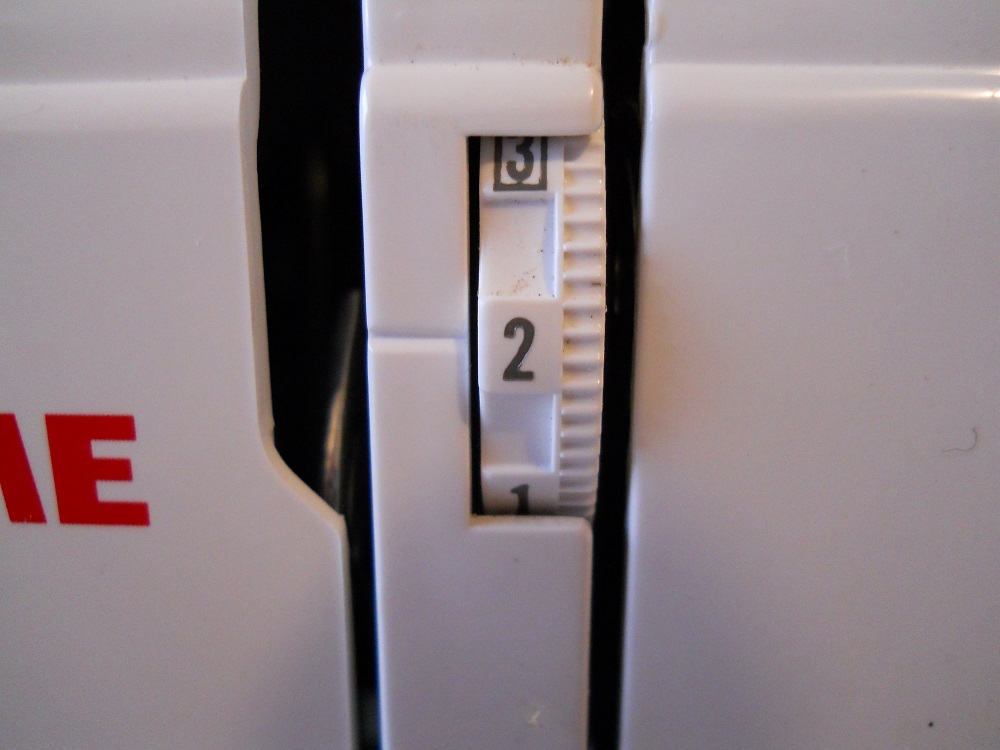
I set the stitch length at a 3, which is about 4 stitches per centimeter. Then I sew another line after I’ve folded the perimeter a second time, all the while trying to pull the material somewhat tight as I’m feeding the machine.Looks a little rugged on the edges. Do any of you guys iron your seams with a VERY low setting before sewing? Thanks. Insights would be appreciated.
Dec 28, 2017 at 3:35 pm #3509699I don’t pin or tape or anything, just fold over twice as I go and sew through it.
I don’t understand shortening 1 inch in 9 feet, do you have any pictures that show that?
When you pitch the tarp is it all flat and taut or are there wrinkles?
I just do one row of stitches, that seam doesn’t take a lot of tension across it so it’s not critical.
Dec 28, 2017 at 4:21 pm #3509701I’ve never worried about puckering, as long as under tension the thread stretches. Perhaps your thread tension is too high, try some practice seams on a scrap to see if it evens out. Also, maybe try tensioning the fabric before and after the needle while sewing.
As noted, this is not a critical seam.
Dec 28, 2017 at 4:59 pm #3509713I just tried sewing a piece without the tape and I had less shortening occur. I think the tape was inhibiting the ability of the material to stretch as it needs to (as I’m pulling it taught and sewing).
I don’t think tension was the problem. Set any lower and the stitches are too loose.
I’m going to take a pic of the tarp spread out on the floor and a pic of it staked out flat on 4 corners.
So Jerry, I take it you don’t use an warm iron on the seams? Sounds like a stupid question, but I saw some guy doing it on YouTube, before he sewed flat felled seams.
Be back soon with photos.
Dec 28, 2017 at 5:23 pm #3509717I don’t use tape, pins, or an iron. However, when I was getting started, I would make a chalk mark every ~12″ to give me a guide. If you’re doing a 1/2″ rolled hem, them the chalk marks are made 1.5″ from the raw edge. One rolling, try to ensure that the interior of the hem meets up with the marks. Wipe the chalk off when complete. It never failed me and I still use this method when sewing the large end channels at the end of my hammocks.
Dec 28, 2017 at 5:30 pm #3509718I don’t use an iron for seams
I have watched sewing shows on PBS a little, and they use an iron on clothing seams. I think if you want professional looking clothing that might make sense. Maybe natural fabric like cotton or wool.
I’ve used an iron to flatten and smooth wrinkled fabric. Nylon will melt if you leave the iron on high just sitting on the fabric.
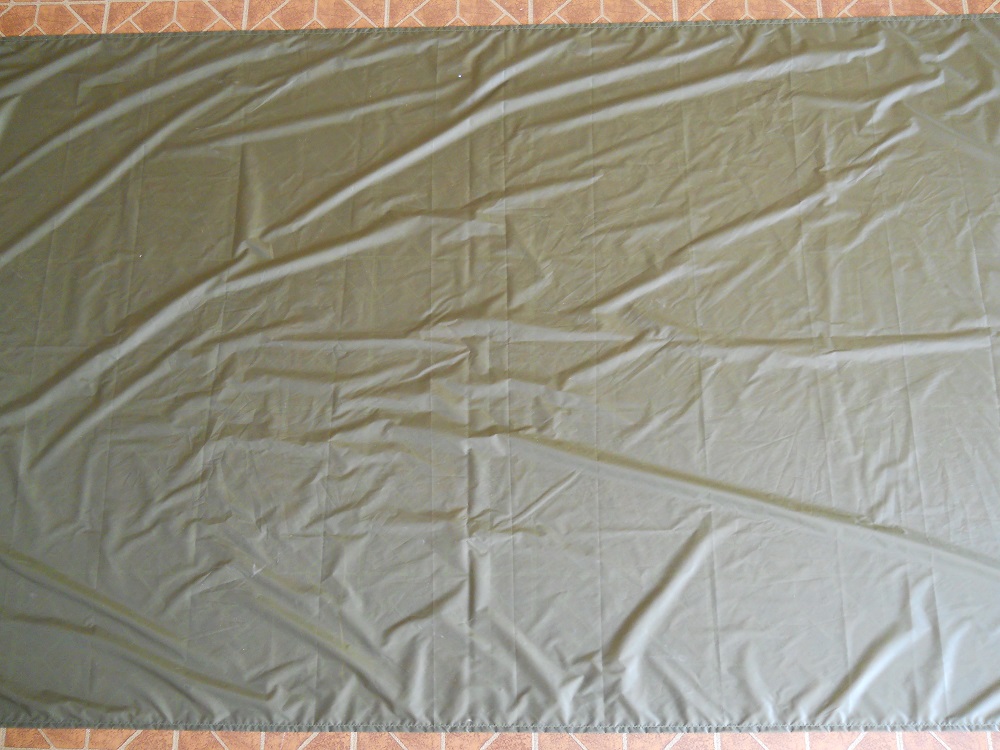
Dec 28, 2017 at 5:52 pm #3509720I wasn’t able to encompass the whole tarp in the pic, but it shows about 80% of it. I have 1 lb weights placed on each corner to try and pull the tarp taught….it still looks horrendous though. You can see what I’m talking about.
I think the tape was the main thing messing me up…big time. It’s funny that the 0.7 Rockywoods wasn’t really effected much by the tape. It’s a very much different material though. Also the 2 rows of stitching instead of one made the seams draw up more.
Back when I was obsessed with making bug nets, I found masking tape to be my best friend. Obviously silnylon is not the same story.
Dec 28, 2017 at 6:31 pm #3509728Off-topic question: how does the Rockywoods 0.7 handle moisture in the way of sag? Do you have to re-tension in the evening as dew settles, or is the silicone coating so good this isn’t a problem?
Dec 28, 2017 at 7:12 pm #3509736Rene, I’ve only had the 0.7 Rockywoods exposed to heavy dew, not rain, but it doesn’t change as much with moisture as much as the 30d silnylon I got from Dutchware. It does stretch though. I’m not a materials expert by any means, however the 0.7 has a total feel of quality about it. Richard’s tests bear that out. The weave is supreme and it seems very strong for a 7 denier.
When I spoke to Rockywoods on the phone awhile back, they said they haven’t sold as much of the material as they thought they would. I told them one of the reasons is probably because people aren’t aware of it, and that Gossamer Gear (The One & The Two), the latest MSR Carbon Reflex, and some UL Nemo tents are now using 7 denier.
At $14 the 0.7 Rockywoods is pricey, yet it’s still less than half that of cuben fiber. I swear I think I like it better than cuben, though not quite as strong as cuben per weight. I don’t like the glossy sheen of cuben nor do I like the fact that it has no stretch. Not as easy to set up as quality silnylon.
I will be buying more 0.7 Rockywoods soon and I would highly recommend it. I can’t believe it’s not caught on more than it has.
EDIT TO ADD: The 0.7 is sil coated on one side and PU on the other.
Dec 28, 2017 at 8:15 pm #3509745On long seams I’ll start in the middle and sew to the end and then return to the middle and sew to the other end. This helps to distribute any stretching/distortion
Dec 28, 2017 at 8:32 pm #3509747That doesn’t look so bad Monte, maybe just try it out and see how it works. When it’s staked out it will be more taut.
Dec 29, 2017 at 3:25 am #3509799Thanks, Monte. I thought I’d heard it suffers less sag, but wasn’t sure. Part of their sales problem w/ the stuff is their strength figures are wildly incorrect. 1 – 2 pounds sounds like tissue paper. I tested a sample around 15 lb/in. Also, their site overhaul is all but unusable.
Dec 29, 2017 at 4:33 am #3509804Monte, interesting your technique of using tape rather than pins. I’m not a big fan of pins either, I normally hand baste my seams to keep things in place for the actual sewing. It’s more / slower work that way, but I’m not a pro in a production line so I’m not in any rush.
Looking at some of your pictures, looks like part of the foot is on the masking tape and part on the fabric. I wonder if this has any impact on how things run under the foot as I would imagine the masking tape is more coarse than the fabric. Perhaps try to run the foot 100% on the fabric, and once you have that stitch on and the seam secured, do the second line closer to the edge after removing the masking tape?.
I’ve seen some folks using tissue paper between the fabric and the “feed dogs” when working with thin / slippery fabrics. I have try that and seems to work well.
Edit: Other options to avoid having part of the feet on fabric and part on the coarse masking tape is to use a zipper foot or have the masking tape at intervals not a continuous run. This assuming that this was creating the problem, which might not be the case. Only testing on scraps will tell.
Dec 29, 2017 at 8:28 pm #3509879A caution about using adhesive tape to hold things together for sewing if you sew through the tape. The needle picks up the adhesive and gums up the thread. Disaster follows quite quickly. Yeah, been there.
Cheers
-
AuthorPosts
 I set the stitch length at a 3, which is about 4 stitches per centimeter. Then I sew another line after I’ve folded the perimeter a second time, all the while trying to pull the material somewhat tight as I’m feeding the machine.
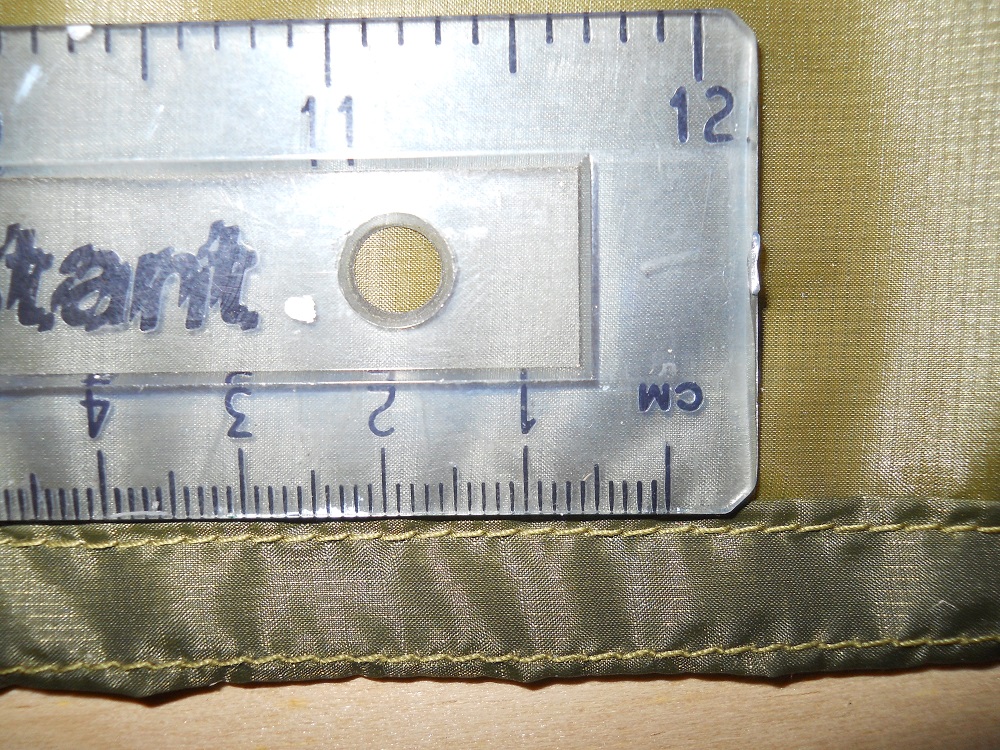
- You must be logged in to reply to this topic.
Forum Posting
A Membership is required to post in the forums. Login or become a member to post in the member forums!

Our Community Posts are Moderated
Backpacking Light community posts are moderated and here to foster helpful and positive discussions about lightweight backpacking. Please be mindful of our values and boundaries and review our Community Guidelines prior to posting.
Get the Newsletter
Gear Research & Discovery Tools
- Browse our curated Gear Shop
- See the latest Gear Deals and Sales
- Our Recommendations
- Search for Gear on Sale with the Gear Finder
- Used Gear Swap
- Member Gear Reviews and BPL Gear Review Articles
- Browse by Gear Type or Brand.
