Topic
T shaped seams?
Forum Posting
A Membership is required to post in the forums. Login or become a member to post in the member forums!
Home › Forums › Gear Forums › Make Your Own Gear › T shaped seams?
- This topic has 9 replies, 5 voices, and was last updated 8 years, 5 months ago by
 Roger Caffin.
-
AuthorPosts
-
Sep 20, 2016 at 7:21 am #3427110
Hi Friends,
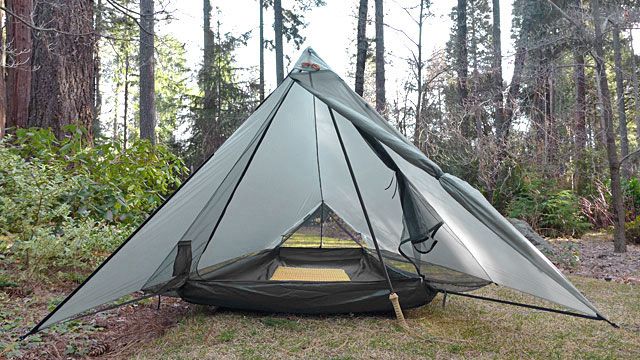
Thanks for all the amazing posts and articles, BPL has been a huge (passive) help so far. I’m building my first tent, but struggling with one detail – how to join the lightweight fabrics into a strong seam where one layer pulls perpendicular. E.g. below where the front door mesh joins the side wall on the protrail.

So far the best I’ve been able to come up with is basically a flat felled french seam with the fold on the inside and the mesh joined in the middle of the fell. Surely there’s a better way though? I’m also wondering how you’d do it joining into the middle of an existing panel (rather than on a seam). In either situation, I get a lot of hole expansion.
Thanks for any help!
Sep 20, 2016 at 8:38 am #3427127A flat felled seam is probably your strongest seam, though typically it doesn’t involve starting with a French seam. The standard technique of making flat felled seams encase the raw edges–I think the only issue of including a French seam is that it would add bulk. I just don’t think it’s necessary to make French seams first–that’s mostly done in sewing to hide the raw edges of seams bearing low stress.
Here’s a diagram of standard flat felled seam:
 Sep 20, 2016 at 8:56 am #3427132
Hi Mary,
Thanks for the reply. My issue is not in joining two pieces, but rather three – like where the mesh in the photo above joins to the side wall of the tent. The seam is in tension rather than shear, and I’m having a tough time making it strong.
Sep 20, 2016 at 10:14 am #3427151For 3 pieces, simply make a regular flat seam with all three edges alligned, give or take. Then roll once sewing through all the fabrics, simultaneously covering the edges. Then sew again along the other edge of the rolled seam. IFF you are really good with sewing (or have a special foot on a serger,) you can roll this without first stitching and simply stitch with two rows. The extra cushioning usually lets you use a closer stitch, increasing the strength and decreasing hole elongation.
If the holes are elongating under stress, you need to close up the stitching, distributing any load over more stitches through the fabric. That is actually a separate item. For example: If you use a 3/16″ stitch, turn the stitch length down to 1/8″. This will make the stress loading some 1/3 less on each stitch. Turning down to 3/32″ will decrease stress loading 50% on each stitch. But, there is a limit. Too close together for the material you are working with will create a weakened joint. A balance between stitch length and seam strength needs to be reached, ideally.
Sep 20, 2016 at 5:52 pm #3427225Image D shows one line of stitching right through. Make it two lines. Yes, shortish stitch length too.
Cheers
Sep 21, 2016 at 3:05 pm #3427356first sew main fabric – flat felled seam is best
then sew the mesh to it – it can be on the flat felled seam or just anywhere – fold over and sew through it to main fabric. So, the seam will be through two mesh layers and one main fabric layer. Do a second row of stitches for strength if needed.
There isn’t a lot of tension on the mesh so it doesn’t have to be any stronger.
Seal the seam from the outside to strengthen the main fabric after you weakened it with a row of needle holes.
Sep 23, 2016 at 9:07 am #3427682Thanks heaps for all the advice. It turns out shortening the stitch length (which seems obvious in hindsight) is the bit I was missing.
For the benefit of future browsers, I went from 4mm, Mara 70, sz 80 universal, to 2mm, Rasant 120 (tex 30), sz 60 microtex – thanks for the tips Roger :). Night and day, seams look great and load test very well. This is in rsbtr 1.1oz silpoly.
Sep 23, 2016 at 2:08 pm #3427737So where did you get the Rasant thread? It’s hard to buy in America.
Cheers
Sep 24, 2016 at 5:03 am #3427819Wm C Jackson in Richmond, $7/1000m. Pretty much the only thing that’s easier to find in Australia since I started this MYOG thing. Moved back last year from the US
Sep 24, 2016 at 5:26 am #3427820HA
I did not realise you are in Oz! Yes, good distribution here. Even my local sewing machine shop now carries Rasant 120, in many colours. The owner told me that she kept getting more and more requests for the stuff after starting to sell just the black. Apparently people know about it.Cheers
-
AuthorPosts
- You must be logged in to reply to this topic.
Forum Posting
A Membership is required to post in the forums. Login or become a member to post in the member forums!
Trail Days Online! 2025 is this week:

Thursday, February 27 through Saturday, March 1 - Registration is Free.
Our Community Posts are Moderated
Backpacking Light community posts are moderated and here to foster helpful and positive discussions about lightweight backpacking. Please be mindful of our values and boundaries and review our Community Guidelines prior to posting.
Get the Newsletter
Gear Research & Discovery Tools
- Browse our curated Gear Shop
- See the latest Gear Deals and Sales
- Our Recommendations
- Search for Gear on Sale with the Gear Finder
- Used Gear Swap
- Member Gear Reviews and BPL Gear Review Articles
- Browse by Gear Type or Brand.
