Topic
Sewing zipper on slippery silnylon–how keep it straight and flat?
Forum Posting
A Membership is required to post in the forums. Login or become a member to post in the member forums!
Home › Forums › Gear Forums › Make Your Own Gear › Sewing zipper on slippery silnylon–how keep it straight and flat?
- This topic has 18 replies, 7 voices, and was last updated 2 years, 4 months ago by
 Geoff Caplan.
-
AuthorPosts
-
Jul 13, 2022 at 5:20 pm #3755048
For the first seams on my new tent project I need to sew zippers on the face of the tent (then slit between the seams over top of zipper to open). My first zipper is a disaster–the seam curls the zipper tape, and when I sew both seams the whole zipper becomes very wavy up and down, which will create uneven stresses.
My Warmlite has this done perfectly, making it look so easy–how do I get mine to work? Is it a lousy machine not putting enough pressure on the foot on the slippery fabric, so the zipper and fabric are slipping/feeding at different rates?
I’ve tried various widths, stitch lengths, and tensions, and inserting crepe paper etc. Roller foot helps, but still somewhat wavy; pins don’t help. The only thing that approaches acceptable is to place the foot directly on top of the zipper, offset the needle and sew tightly up to the zipper, reverse and do the other side, then sew again wider on both sides of the zipper in the “normal” fashion, then rip out the first (tight) stitch lines. What a pain!
Any ideas? Thanks.
Jul 13, 2022 at 11:31 pm #3755060Could not get a flat seam without a large ping-pong size table on which to assemble the work and do the measuring and cutting. .
Are you using a zipper foot? I like them so much, often use them for non-zipper sewing. But if you are, not sure why you are having difficulty. Also am not sure why you are having issues with pins. They must be fine pins, and short ones.
Trust you know how a zipper seam is constructed: First a stitch line is made with the marked seam line (or edge if there is no marked line) right over the outside edge of the zipper tape. Then the bulk of the fabric piece is folded back over the tape and away from the teeth and top stitched. This will conceal the inner stitch line underneath the seam and help prevent snags . The pins are added before sewing, in order to stabilize the fabric flat on the tape on the big table.
Then the second line of stitching, the top stitching, is done over the fabric with the line closer to the edge of the zipper tape and further from the teeth. Used to stitch right over the pins, but now pull each pin out shortly before the work goes under the pressure foot to get sewn. When doing this, it is helpful to hold the work with one hand (am a lefty) after it goes through the foot, with the other hand holding the work at a point just before the work goes under the foot. This makes doubly sure that the work is sewn flat without wrinkles. It is also helpful to have a machine with variable speed, controlled by the floor pedal. Like the tortoise, success comes at slower speeds.
Some use basting tape and find it easier. Since I learned the old way, stuck with that. And would recommend taking a few classes to get a visual idea of how it’s done. Also, starting with a kit, such as one for gaiters, helps because all the cutting and measuring has been done.
Sometimes I separate the two sides of the zipper and stitch them separately. Then thread the zipper through the pulls afterward.
Sometimes I pretend that I’m working in an Asian sweat shop, just to remind myself of all the folks who survive by doing this stuff. Thank goodness I was trained in something else, and this is just a hobby, not a livelihood.
Jul 14, 2022 at 7:53 am #3755065yeah, sewing would be an unpleasant career but a good hobby : )
I just sew both sides separately. Fold over once. Use the zipper foot to sew it so the edge of the fold is close to the zipper teeth. Then, I usually sew another row of stitches close to the edge of the zipper tape.
The trick is to hold the fabric to the zipper about 6 inches ahead of the sewing needle. Stretch both fabric and zipper a tiny bit. Then hold them tightly together as you sew that 6 inches.
The waviness is because either the zipper or the fabric stretches more than the other.
This is experience from a hobbiest sewer. Probably a professional sewer has better technique and equipment.
Jul 14, 2022 at 11:16 am #3755090I’m guessing the problem, is, as you say, Jerry, that either the zipper or the fabric stretches more than the other. So how can I compensate for that or stop that?
Jul 14, 2022 at 2:13 pm #3755100you align the zipper and fabric and pinch them together with one hand about 6 inches ahead of the needle. Slightly pull against the feed of the sewing machine. That will keep that 6 inches aligned.
Repeat for the rest of the seam.
Like I said, this might be slower than something a professional would do with professional equipment.
Jul 14, 2022 at 10:53 pm #3755121Thanks, Jerry. Your posts are much clearer and succinct than my attempt.
Maybe I also was not clear about taking the portion of the work to be sewn, and holding it flat by using both hands; one hand in front of the presser foot, and one hand behind it for the whole time during the stitching. This has also been recommended a number of times by Roger Caffin, who moderates this forum ([email protected]). That’s one of the reasons I use the pins. Figure if the zipper and fabric are flat and unwrinkled when pinned together on the cutting table, they will remain so when sewn together. Will also sometimes tack components to the cutting table to assist with the pinning. Seems to work fine.
Jul 15, 2022 at 7:42 am #3755129if someone had made a picture it would have been clearer :)
yeah, everything has been discussed previously
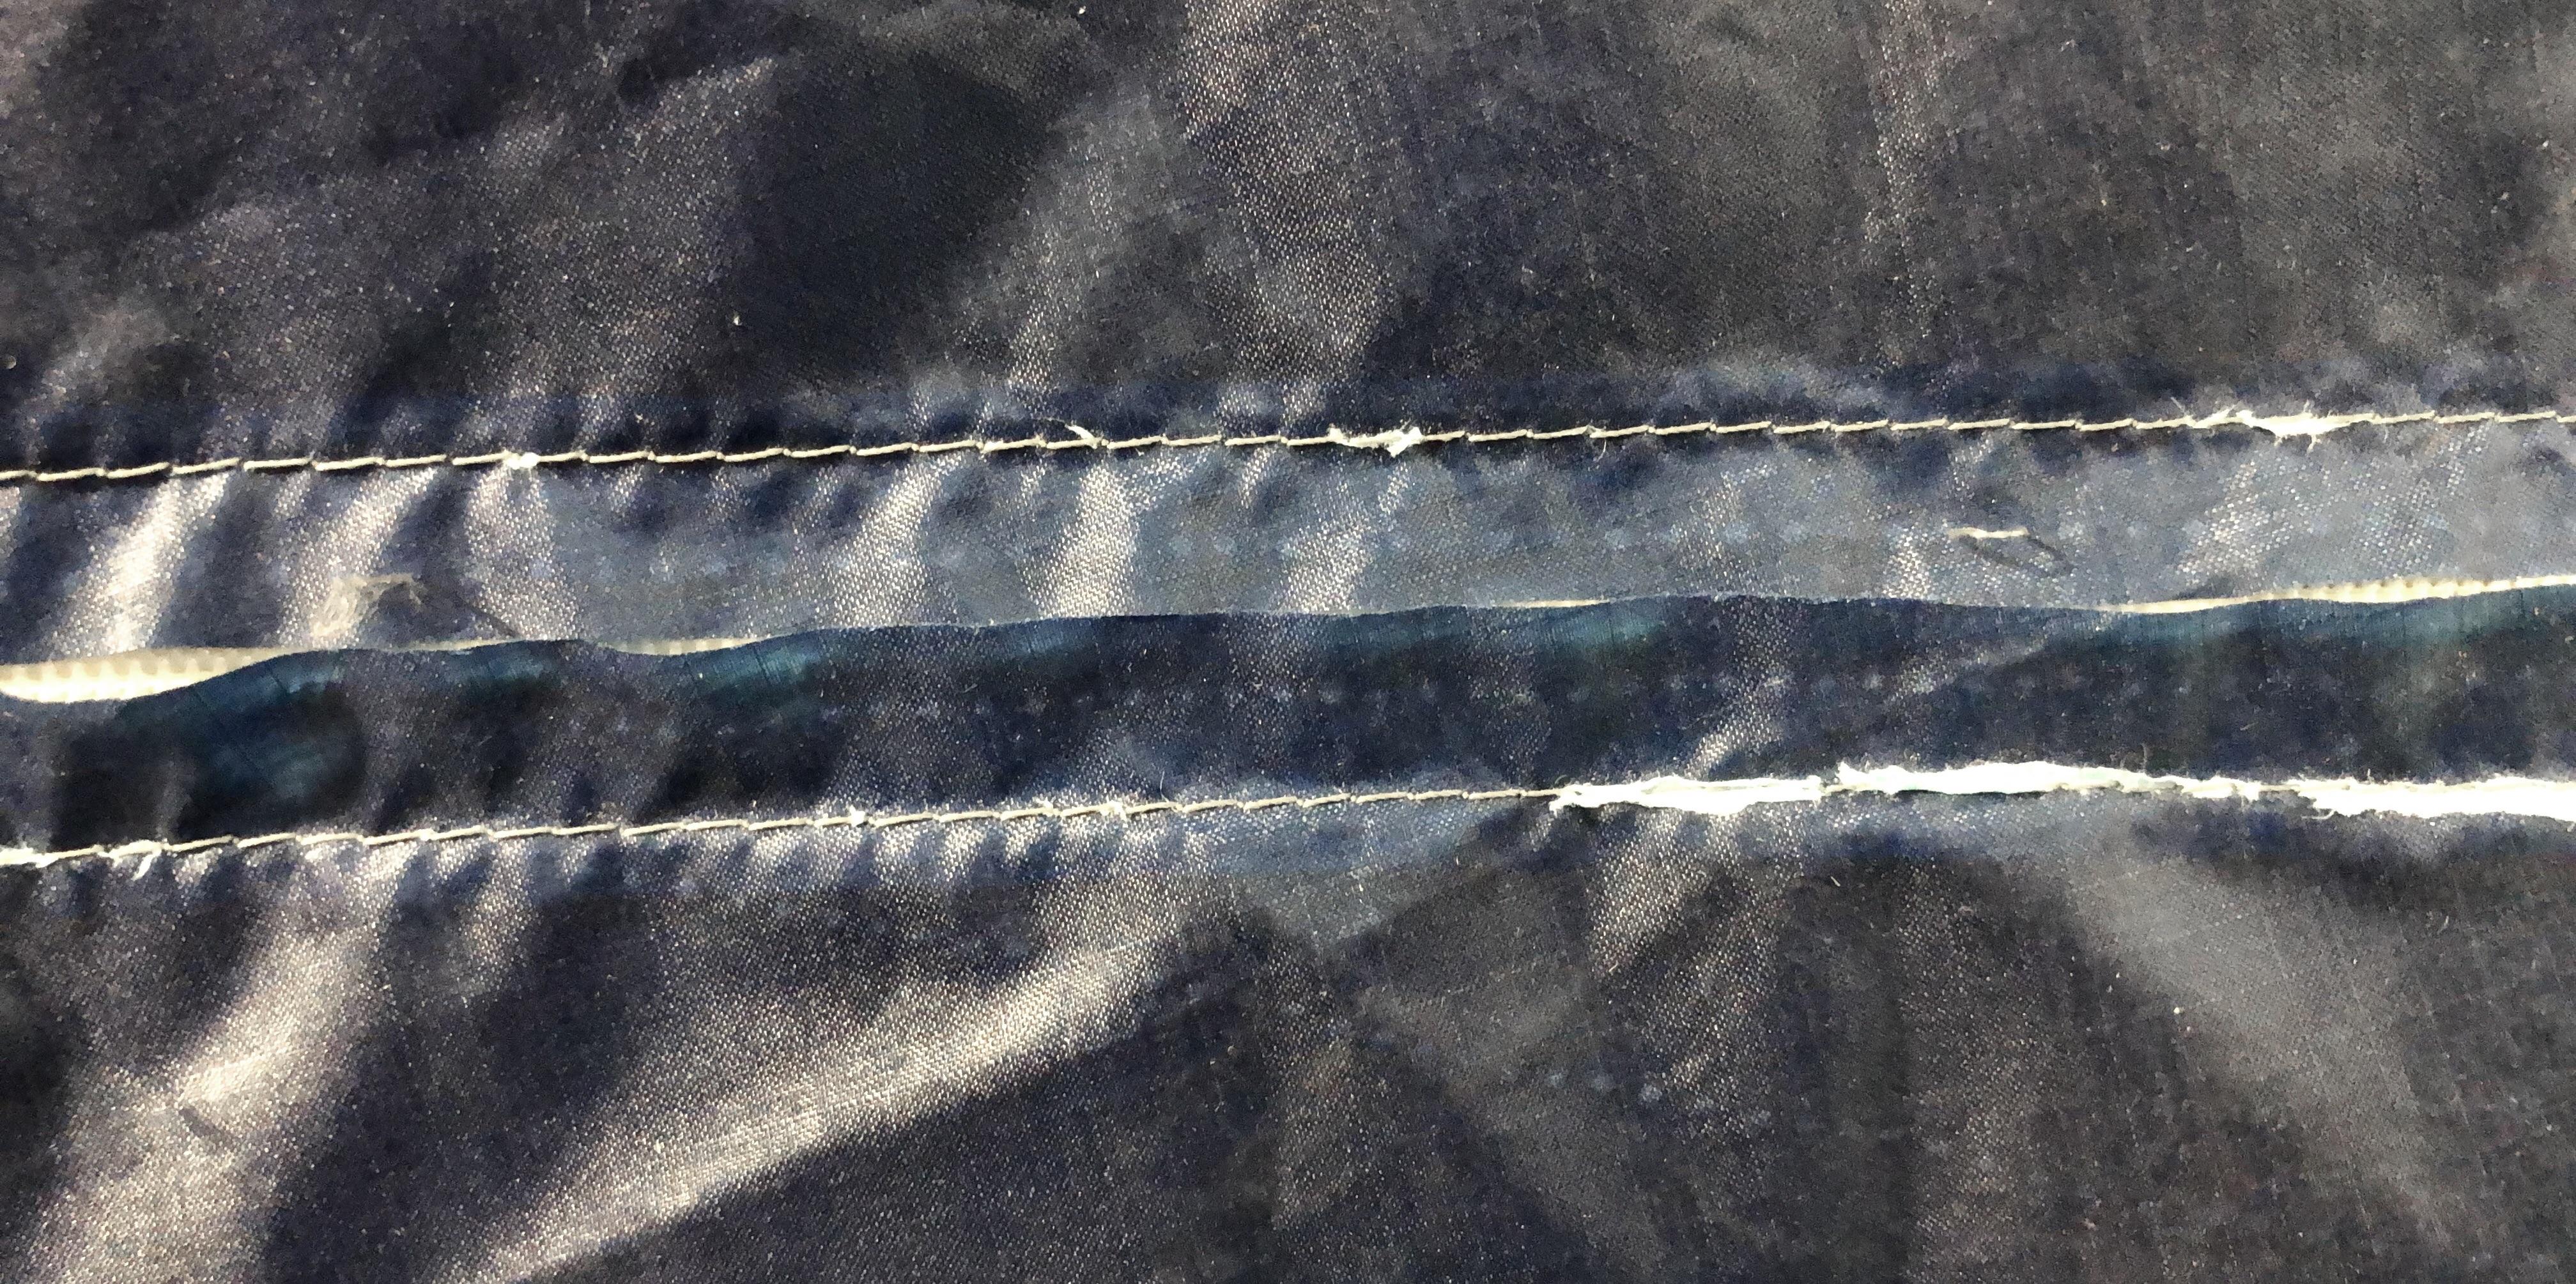
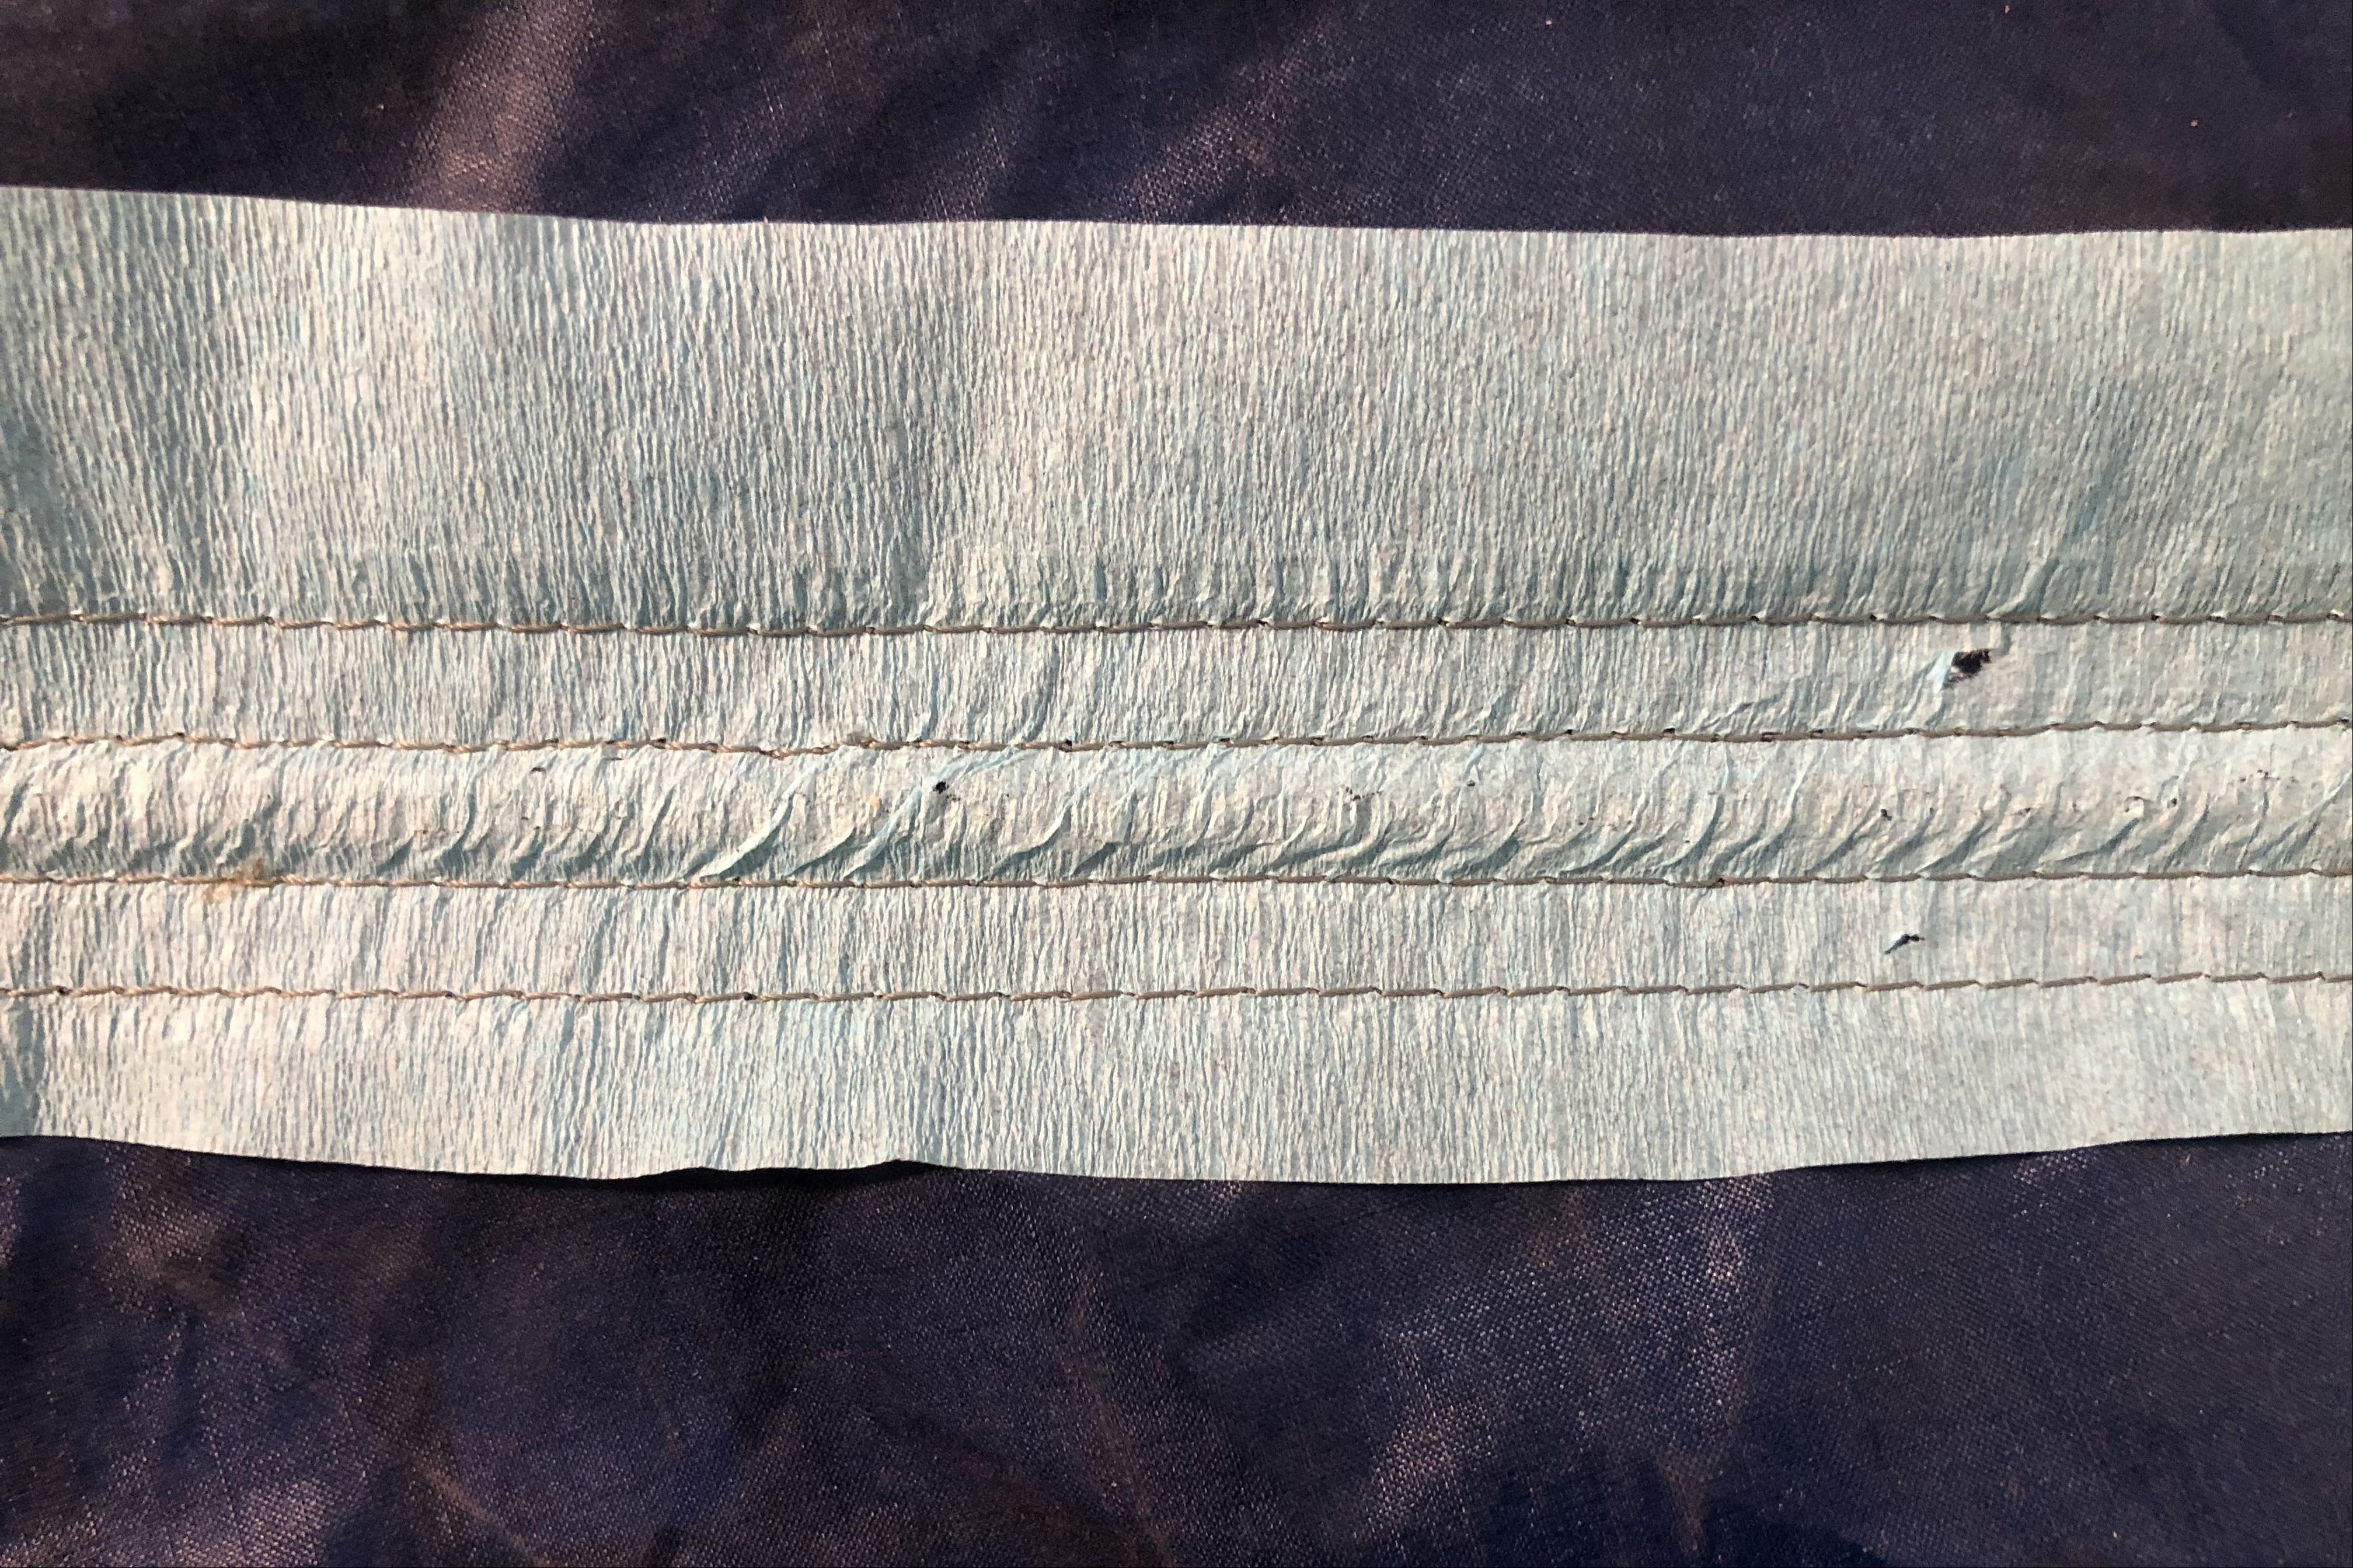
Jul 15, 2022 at 8:58 am #3755134Solution found. See “Before” and “After” photos:

It wasn’t a matter of alignment, and pins were useless. The zipper and the fabric were slipping or feeding at different rates. The solution: party streamers. Strips of crepe paper placed on the silnylon. I sewed from the back side, from the back of the zipper tape. Then stripped off the crepe paper and slitted the fabric.
Note that I am not installing these zippers in the way you have described. I am not joining two separate pieces of fabric with a zipper; I am sewing the zipper flat on the backside of the tent panel, then slitting to make the opening. Works great, no hemming etc., and decades of using my Warmlite built this way shows the little flaps don’t clog the zipper.
Jul 15, 2022 at 9:58 am #3755147That’s a good technique because there is very little gap between the fabric so any water or air won’t leak through the zipper
Jul 16, 2022 at 10:00 pm #3755258OK, should have noted that with two-hand sewing, the thumb and forefinger of each hand hold the zipper tape and fabric flat against each other. Congrats on finding a solution that works.
Aug 25, 2022 at 11:55 am #3758457This is a great idea — and one I haven’t seen before!
Aug 25, 2022 at 6:56 pm #3758583Jerry, isn’t that the same technique you used in your diy pyramid article?
Aug 25, 2022 at 8:12 pm #3758588Imho, the secret is LOTS of fine pins, plus two-handed sewing.
Yes, it does take some work to put in all the pins. But it works.Cheers
Aug 29, 2022 at 9:51 pm #3758909“Imho, the secret is LOTS of fine pins, plus two-handed sewing.
Yes, it does take some work to put in all the pins. But it works.”Works for me! Especially because the pins are initially placed with the fabric and zipper on a free standing framework identical to the desired dimensions. Cat cut lines have already been marked, but may be changed to make the canopy taut. Then the portions of the work that have been pinned together, in this case the zipper tape and the fabric folded underneath, are placed on the large work table, and each pin is removed separately and reoriented, and the work refolded into a zipper seam (or lap felled seam is no zip) with the fold s close to the zip teeth or coils leaving just enough tape showing so the zipper pull will slide smoothly. I call this process “tailoring” for short. Then the work is often replaced on the framework to double check for tautness. Finally, the seam is run through the machine using two hands; one on my side of the presser foot, and the other on the other side of the foot to be sure the seam is held flat and taut before sewing. Often, I also pull out each pin one at a time just before the seam goes through the machine. Once one line of sewing is done, correctly it is much easier to add a 2nd line for strength. This might sound intense; but it beats having to cut the seam open and resew it all over again, which looks sloppy and may weaken the seam.
If you are sure that the sewing lines are accurate, especially if no cat cuts are to be done at the zipper, the fabric to be folded at the zipper can be sewn to the zipper tape close to the line of teeth or coils, the fabric then folded away from the zip, leaving just enough tape showing for the zipper pill to slide smoothly, and the work fully over, repinned and top stitched to the tape with a second line of parallel stitching that is further away from the first line.
While the procedure must be done meticulously, it becomes easier after a while, and has yielded good results. For professional sewers it is done much more quickly, however.
Aug 30, 2022 at 6:10 pm #3758960I also pull out each pin one at a time just before the seam goes through the machine.
+1When you are sitting inside the tent in a 50+ mph storm, you tend to not regret the care taken with the sewing. If, indeed, you even remember the time taken.
Cheers
Oct 2, 2022 at 5:19 pm #3761182I’m a great believer in double-sided basting tape for holding things in place while I sew tricky fabrics.
It also helps seal the needle holes and improve waterproofing.
For slick fabrics, you need to find a brand with a strong adhesive. Luckily the standard stock in my local craft shop seems to do the trick, but you may need to experiment.
Oct 2, 2022 at 8:58 pm #3761199Geoff, I would love to use double-sided basting tape but I have tried two kinds and nothing sticks at all to the silnylon. What do you use??
Oct 2, 2022 at 9:21 pm #3761201Moab
When you buy adhesive foam it has a backing tape which you can peel off – right?
The peel-off works because the tape surface has been coated with silicone polymer.
So, basically little sticks to silnylon.Ah – except for silicone adhesives and silicone tapes. These are very hard to find because they are more expensive than conventional acrylic adhesives. However, they exist, and I use them when sewing silnylon, especially on tents. You will have to Search for local suppliers – who may not be very ‘local’.
Beware of vendors who assure you their products are better than others. I have met a few.
Cheers
Oct 3, 2022 at 4:16 pm #3761230Moab
My tape is unbranded, I’m afraid – and anyway I’m in the UK.
But it works. I don’t want to mislead you so I just tried it on some Kerlon offcuts I recently snagged from Hilleberg. The quality of the silicone coating on their tent fabric is legendary, so it’s probably the ultimate test.
The adhesion wasn’t as good as I was getting on more standard fabrics, but it’s just good enough to hold things in place with careful handling and a few clips as backup.
Before I peel the backing, I rub the tape onto the fabric with the back of a spoon. This seems to help.
You might have a chat with Sailrite (https://www.sailrite.com/). They are sailmakers who are great enthusiasts for sewing with basting tape and stock a good range.
This guy had good luck with the Sailrite Seamstick product on both silnylon and silpoly.
-
AuthorPosts


- You must be logged in to reply to this topic.
Forum Posting
A Membership is required to post in the forums. Login or become a member to post in the member forums!

Our Community Posts are Moderated
Backpacking Light community posts are moderated and here to foster helpful and positive discussions about lightweight backpacking. Please be mindful of our values and boundaries and review our Community Guidelines prior to posting.
Get the Newsletter
Gear Research & Discovery Tools
- Browse our curated Gear Shop
- See the latest Gear Deals and Sales
- Our Recommendations
- Search for Gear on Sale with the Gear Finder
- Used Gear Swap
- Member Gear Reviews and BPL Gear Review Articles
- Browse by Gear Type or Brand.
