Topic
Myog hexpeak tie out locations
Forum Posting
A Membership is required to post in the forums. Login or become a member to post in the member forums!
Home › Forums › Gear Forums › Make Your Own Gear › Myog hexpeak tie out locations
- This topic has 20 replies, 4 voices, and was last updated 5 years ago by
 R.
R.
-
AuthorPosts
-
Feb 6, 2020 at 2:34 am #3630076
Hi All,
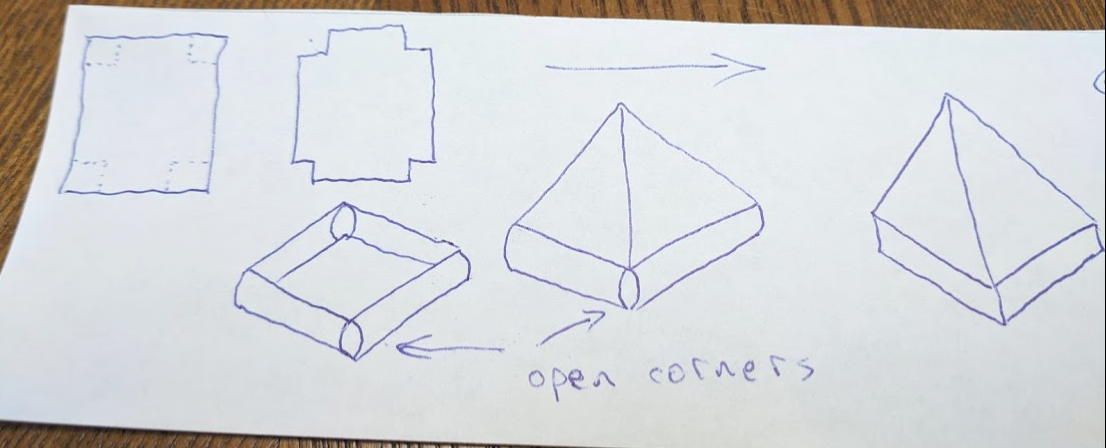
I’m planning a 6 sided pyramid like the luxe outdoor hexpeak.
The base will be 175cm. I’m planning on tie outs in every corner and one in the middle.
To get the tent more storm proof I’m planning on mid panel tie outs around the back and one in the seam of the back 3 panels.
My question where do I positions those? The mid panel should I place them exactly in the middle or in the bottom third, and the question for the ones in the seam?
Thanks in advance!
Regards Joost
Feb 6, 2020 at 2:54 am #3630079Image search is your friend.
Most appear to be a bit below half way up, same for mid-panel or seam.
Since you can add these after it’s complete, you might want to pitch it and then see where you want them.
Feb 6, 2020 at 8:29 am #3630091I have one tieout about 1/3 of the way down from the top. To pull the side out so I don’t touch it on the inside when I get up and get condensation on my head.
I think that’s optimum for that purpose, but not for storm worthiness.
Feb 6, 2020 at 8:35 am #3630093And mid panel tie out on the back would that help with high winds?
Feb 6, 2020 at 9:24 am #3630102In my experience, which is just one experience and subject to change, it’s better to have the tie outs on the ground. For a hexamid, have one stake at each corner, and one in between, so 12 total. Only use 6 stakes unless it gets really windy.
If you have mid panel tie-outs, they distort the shape of the panels. Better to support the panels at the edges.
But, I think if you did a survey, more people would favor mid panel tie-outs.
Easy enough to experiment. A little below half way down sounds good. Putting on grosgrain loops doesn’t add much weight.
I saw some pictures of an antarctic tent. They had poles on all (6) ridges. Looking at my mid, flap around in the wind, it seems like that might help. Or another possibility would be to have some cord or something that doesn’t stretch on each ridge. I was thinking about taking a strip of fabric maybe 3 or 6 inches wide, folding over a bunch of times to make it 1/2 inch wide, and sewing that on the ridge. So many experiments to try…
Feb 6, 2020 at 9:51 am #3630106I was thinking about the cord as well. Maybe some dyneema cord in the seam to make it more rigid.
Tramplite has a connection for a trekking pole in the middle of the rear panel.
I think I’ll just add the gross grain loops. It doesn’t weigh that much and I have lying around anyway. Mid panel tie outs I could add later.
I making it from 40d silnylon. Do I need reinforcement patches for the tiebout points on the base? Or can I sew it on the seam and hem?
Feb 6, 2020 at 10:43 am #3630118In my experience, 40 D needs no reinforcement
My last tent is 15 D membrane polyester 0.93 oz/yd2. Much weaker fabric. I made reinforcements at the corners but in between I just sewed to the hem.
If you sew to the hem, outside of the row of stitches that makes the hem, then you will have two layers of fabric to carry the load.
For the corners, if you sew to the flat felled seam, that’s 5 layers of fabric. There’s a lot of tension going up that ridge seam. Very little tension going sideways. Do several rows of stitches through the tent stake loop and the 5 layers of fabric, maybe a zigzag stitch.
Feb 6, 2020 at 10:45 am #3630119After you’ve used your tent and learned everything you can from it, if you’ve become a MYOG addict, for your next iteration, consider that polyester fabric. Strong enough. Almost as light as Cuben.
Feb 6, 2020 at 11:00 am #3630123Too late I’m addicted 😊ast month I made an xpac backpack for my wife. A zpack arc clone of sorts.
I’m in the Netherlands and there aren’t many fabric suppliers here.
None have membrane silpoly or silpoly xl. I guess I’ll have to start ordering from the US 😁
Feb 6, 2020 at 11:23 am #3630128ahhh… that explains the cm measurement, someday we in the U.S. will finally go fully metric : )
I assume ripstopbytheroll.com ships internationally, they seem to have a pretty good selection of state of the art fabrics
Feb 6, 2020 at 11:36 am #3630132They ship to the Netherlands no problem. But to be a economical I’ll have to order some more then just a few yards. But then vat and taxes will be added.
Feb 7, 2020 at 12:01 am #36302101 more question… Sorry 😉
I’m planning on making a inner tent with this 170*250cm. Do you have any tips to do that? Like what’s the best order to work with? Make the walls and zipper first and attach it to the bathtub floor. If so how do you attach it to it?
Feb 7, 2020 at 3:36 am #3630218Joost,
AdventurExpert in Slovenia has some of RSBTR’s silpoly for a good price
Feb 7, 2020 at 4:58 am #3630221Thanks for the tip!
I would love to try the 300 HyperD from RSBTR to prototype a backpack in working on.
Feb 7, 2020 at 2:35 pm #3630269I’ve often run in to trouble sewing a tube to a disc. Like the bottom of a stuff sack. In your case this would be the floor to your inner. By the time I’m back around near where I started, one side has ended up longer or shorter than the other. This could be because I’m just not quite good enough at it, or maybe it just isn’t the right way to do it. So I favor sewing around the perimeter first, and then closing up the length of the tube. By leaving a little extra on the circumference of the tube, I can adjust to where ever I end up once the end piece is sewn on.
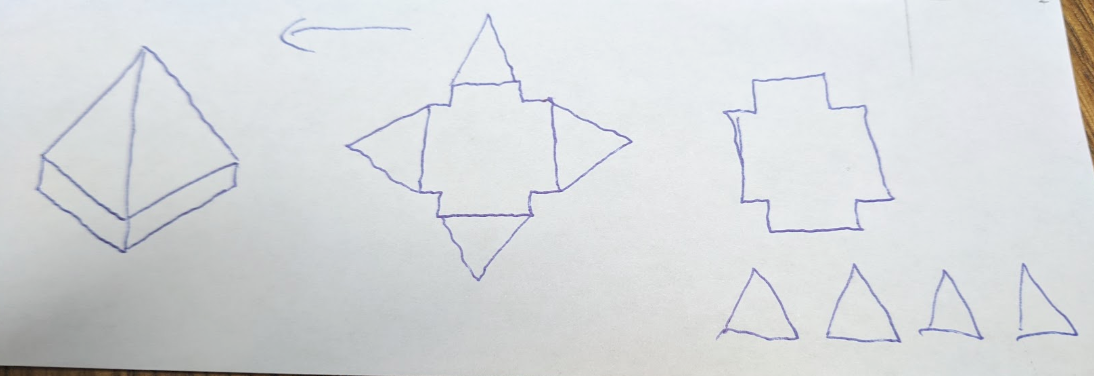
If I was attempting your inner, I’d cut out the triangular wall panels and attach them separately to each side of the floor first. Then sew up each vertical seam to complete the cone. If you’re making a bathtub floor, don’t make the vertical seams at the corners before attaching the walls. Give your self a giant star shape made of the floor and the walls, and then close up each edge.
If your door is fully contained with in one wall panel, do that first. If you want to put zips on the seams, you’re probably better off sorting that out yourself.
All this applies regardless of whether you’re doing a full inner, or half. It still amounts to a cone of sorts on a base.
Regarding re-enforcing the vertical seams in the outer fly, grosgrain ribbon may be easier to sew on than cord. With a 40d, I don’t think you’ll need it. But you might make a point of leaving the seam allowances extra wide and folding them over more times than normal. This will have a similar effect to sewing on ribbon or cord. You might also want to consider that there’s less fabric at the tip of the pyramid to carry the load. Adding a second layer of your wall fabric to a small area at the top addresses this. Take a close look at some of the photos of MLD’s mids – they use a heavier fabric re-enforcement at the tip.
Good luck!
Feb 8, 2020 at 12:49 am #3630401Thanks for the tip!
I was thinking to do the panels first. And then work from the middle to the corners in the floor. Pin or tape everything, and sew it to the floor. Then do the folded corners for the bathtub. If the the panels shift a bit I have some room to work with in the fold of the corner. If that makes sense. So the folded bathtub corners come at last. That was a tip from a Dutch myog forum.
Does that make sense?
Feb 8, 2020 at 1:59 pm #3630468Can’t say I’m following your plan – not sure what ‘do the panels first’ means. But having a plan to accommodate a little mis-alignment is the important thing.
Since netting and flooring stretch differently, be sure you maintain alignment at every pin *before* you pull it while you’re sewing. If you end up with tiny little pleats along the length of the seam, you’ll never notice it in use – much better than fixing a 2″ error in one spot.
Feb 9, 2020 at 12:35 am #3630515Sorry I wasn’t clear. Explaining something in a different language… 😉
What I meant was join all side panels first. The vertical mesh panels. (so I have a mesh pyramid) then join the complete mesh pyramid to the floor by pinning it down from the the center of each horizontal seam working my way to the corners. Sew all seams. And then create the folded corners. I was think of using gross grain to fold over the corner with a carbon rod in it.
I hope this makes sense. Maybe I worry to much and just start sewing 🤔
Feb 9, 2020 at 1:52 pm #3630566Ah – join the side panels *to each other* first!
Is this what you mean?

If you’re off when it’s time to close the corners, you have some room for correction, but it’s limited. I try to avoid leaving holes like this. Closing up the point where the two net/floor seams and the corner seam meet will be a little difficult.
This is how I would do it:
But either way will work.
If you’ve never sewn bug net to solid fabric before, you might want to try doing a long (1m?) practice seam to see how much the net stretches when you sew it.
Grosgrain sleeves sound good – close the top with a velcro flap so you can replace a broken rod.
Feb 10, 2020 at 5:04 am #3630670Yes I was thinking about the first option.
But you’re suggestion is a good one. Do you do the seam between the mesh panel and the bathtub corner all in one go? Or in two seperate seams.
Just thinking how to do a felled seam.
I’m not closing the seam in the top. But wanted to make some ribbon loops with a cordlock. So I can adjust the height to to the pitch height. So I was thinking start sewing on the bottom and work my way up. If the seams don’t not completely match I can cut off and do a rolled hem/channel on top.
Feb 10, 2020 at 12:32 pm #3630711When I attach one triangle to the floor, I would do a single seam starting at one corner of the triangle and continuing all the way to the other. Is that what you’re asking? If you stretch the netting a bit at the end, you can just trim off the excess. The type of stitch for this seam doesn’t really matter. I might do a felled french seam.
When I close the vertical seams, I would do one long single stitch from the bottom corner of the bath tub all the way to the tip of the pyramid. I would do a French seam here, with the flap sticking out. This seam won’t really care about the angle in the corner where floor turns in to mesh. Putting the flap on the outside gives you something to attach your grosgrain pole sleeve to, and a clean surface on the inside of the bathtub to seam seal. Putting the pole on the outside means it won’t wear a hole in the floor of the tub. If you want, you can fell the flap once the seam gets up in to the mesh the mesh.
I like your thinking for the tip of the mesh pyramid. You might want to run a draw cord through your hem/channel so you can cinch the mesh around the pole.
-
AuthorPosts
- You must be logged in to reply to this topic.
Forum Posting
A Membership is required to post in the forums. Login or become a member to post in the member forums!
LAST CALL (Sale Ends Feb 24) - Hyperlite Mountain Gear's Biggest Sale of the Year.

All DCF shelters, packs, premium quilts, and accessories are on sale.
Our Community Posts are Moderated
Backpacking Light community posts are moderated and here to foster helpful and positive discussions about lightweight backpacking. Please be mindful of our values and boundaries and review our Community Guidelines prior to posting.
Get the Newsletter
Gear Research & Discovery Tools
- Browse our curated Gear Shop
- See the latest Gear Deals and Sales
- Our Recommendations
- Search for Gear on Sale with the Gear Finder
- Used Gear Swap
- Member Gear Reviews and BPL Gear Review Articles
- Browse by Gear Type or Brand.
