Topic
My DIY/MYOG alpine backpack. Seemingly simple and very thoughtful design.
Forum Posting
A Membership is required to post in the forums. Login or become a member to post in the member forums!
Home › Forums › Gear Forums › Make Your Own Gear › My DIY/MYOG alpine backpack. Seemingly simple and very thoughtful design.
- This topic has 12 replies, 8 voices, and was last updated 8 years, 7 months ago by
 Daryl and Daryl.
-
AuthorPosts
-
Jul 20, 2016 at 6:10 pm #3415309
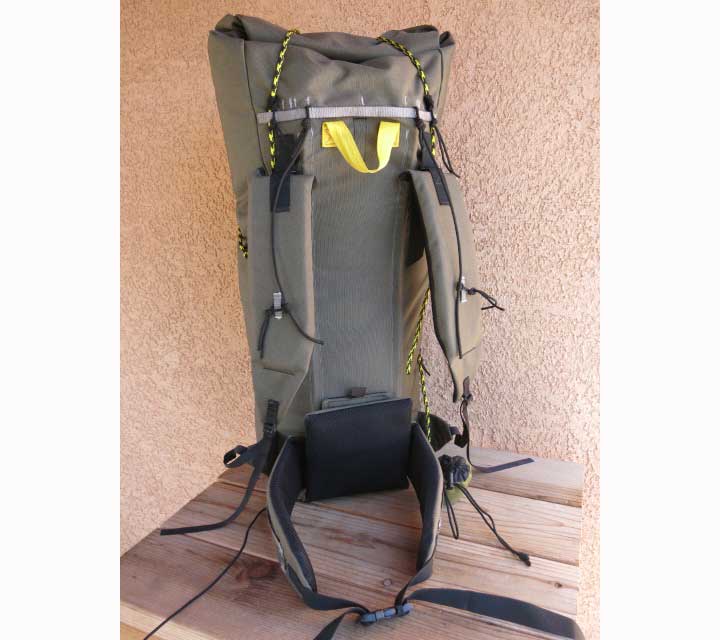
I designed this after researching historic and contemporary backpack innovations. There are other bags out there similar (which you may recognize) but not exactly like this in the details, which is why I had the impulse to make it. I designed the pattern using a plastic sheet, Tyvek and carpet tape. Sourced the appropriate materials and my sister (a pro fiber artist and metal smith) put it together with some bomb proof stitching! Instead of buying a new pack and complaining about its weaknesses as I always have, I thought it best to make this one where I could shape and re-invent all the details.
A fair amount of adjustability is built into the shoulder and hips without adding additional weight and the padding is far more substantial than anything I have ever seen on the market. I tried to limit the use of the weak plastic hardware (side release buckles, ladder locks, cord locks, etc.) that all bag manufacturers insist on sewing into their designs. That being said, if one still wants to use that stuff, it can easily be added to this bag as needed and then removed if not needed. I generally carry 18-20 lbs of gear on summer backpacking outing and 22-26 lbs in winter or 30 lbs for remote alpine rock climbs. I wanted one bag to do it all so the 4 oz removable frame has been essential. I used this pack very recently on a number of backpacking trips and a remote alpine climb (where the external gear attachment lashing worked great using a few feet of shock cord). The verdict is in now and it outperformed every pack I have had by a long-shot!
I chose Cordura 1000 for its bomber durability because I shred backpacks made of anything less durable due to my backpacking route choices (I am not a through-hiker. I don’t stay on trails all that much). A backpack manufacturer using the same material would make it weigh twice as much as mine because of all the sewn in hardware and complex seams they like to use!
Bottom line:
Weight is 32oz with full padding and the Gossamer Gear internal frame. Padding in this pack is removable, and up to two layers of 7/8″ EVA can be inserted into the padding sleeves. Using a single layer in the shoulders and lumbar and none in the hip sleeves reduces weight and is very comfortable. I have very boney shoulders and no hips so I can’t tolerate the flimsy padding on all the packs available designed to carry 40 liters or less. If I were to use XPAC fabric, more weight would be shed but I opted for the Cordura because in my personal experiences it has always been the most reliable. I could have made it out of some Dynema-type fabric but it would maybe last two years for me that way and I don’t want to ask my sister to sew me a new pack that often! I still cannot fine a pack on the market this durable that weighs less and has good padding.
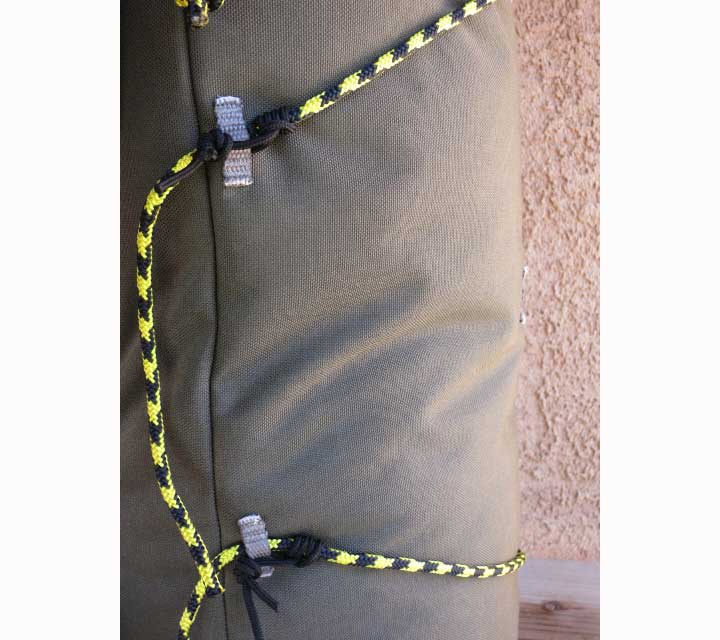
The only hardware this pack requires are two metal 1″ slide adjusters, two Z-Packs ladder lock slide adjusters, and the GG frame. The accessory cords on the pack are adjusted using 3mm paracord prusik knots. Something I thought of but have never seen before on a pack! Alternatively, one could use 550 paracord with 2mm cord prusiks to save a few ounces or shock cord. The cord is only needed if I am attaching a jacket, tent, helmet, or crampons to the outside of the pack.
I will upload more pictures of the pack if there is genuine interest here in the MYOG forum.
Lastly, thoughtful criticism and further innovation ideas are welcome so please chime in with any thoughts.
 Jul 20, 2016 at 6:38 pm #3415311
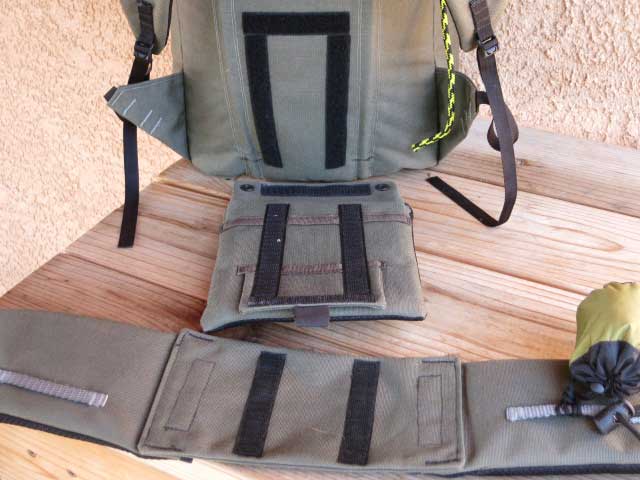
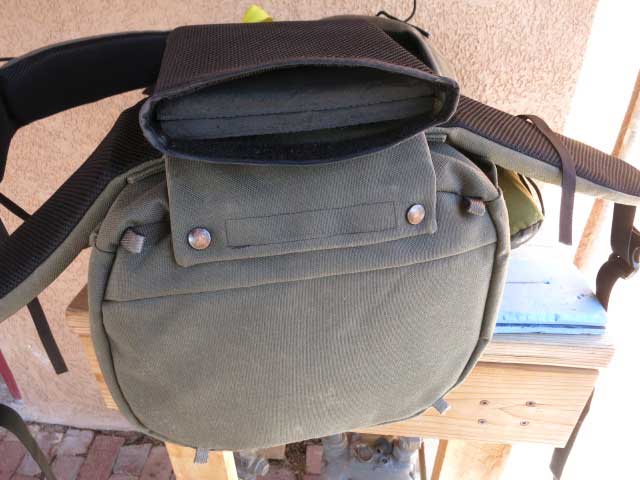
Waist belt and lumbar pad are removable for lighter loads. Waist belt has a large vertical adjustment, which can be adjusted very quickly with this velcro arrangement.
2 layers of 7/16″ EVA makes a huge difference! Sleeves that open make it easy to remove padding when smaller loads are carried. Shoulder pads are attached using a thin metal slide adjuster. Shoulder pads can be adjusted vertically up to 3 and a half inches!
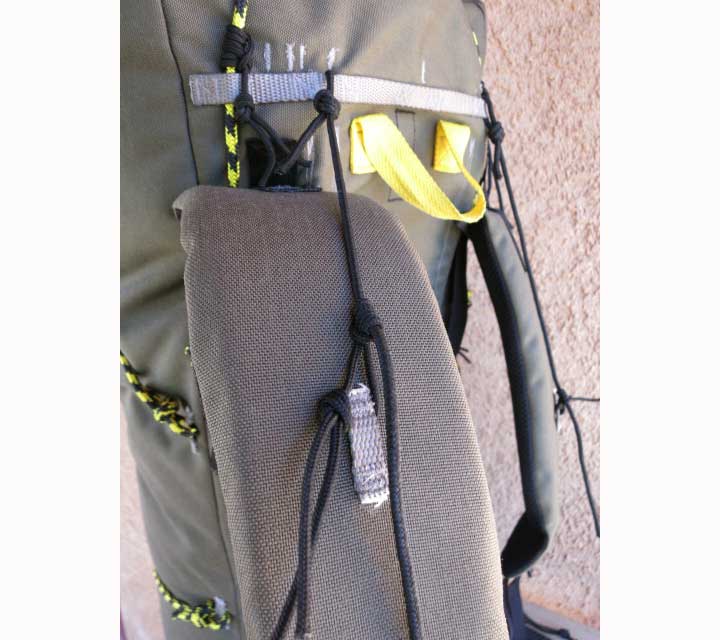
Adjustment with Prisik knots rather than plastic side release adjusters.
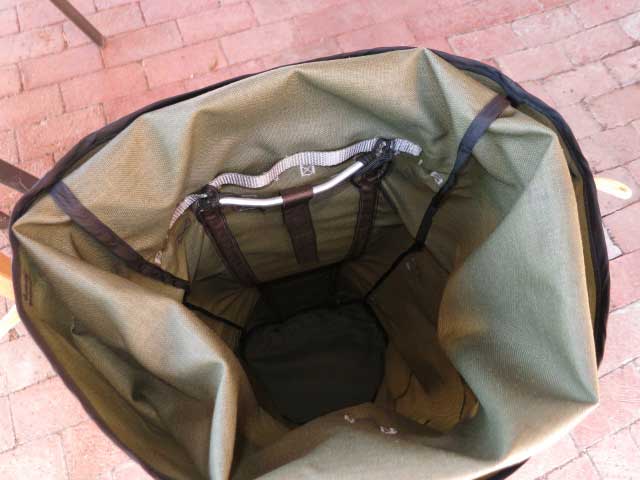
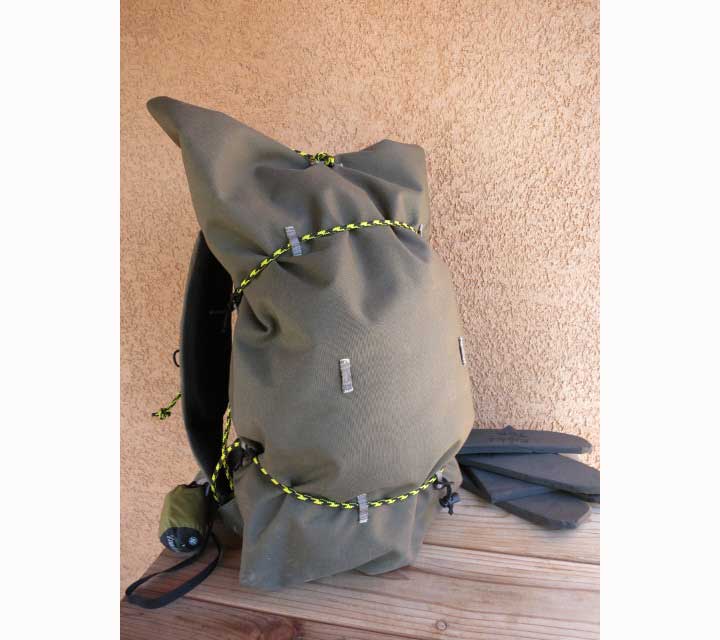
Pack compressed, frame and most padding removed for day trip/climb
Waist belt in normal position. GG internal frame modified just slightly for my back shape. Despite the appearance here; due to the thick lumbar pad, the frame actually doesn’t make contact with my back allowing my back to breath.Waist belt in climbing mode (moved substantially up to accommodate climb harness)
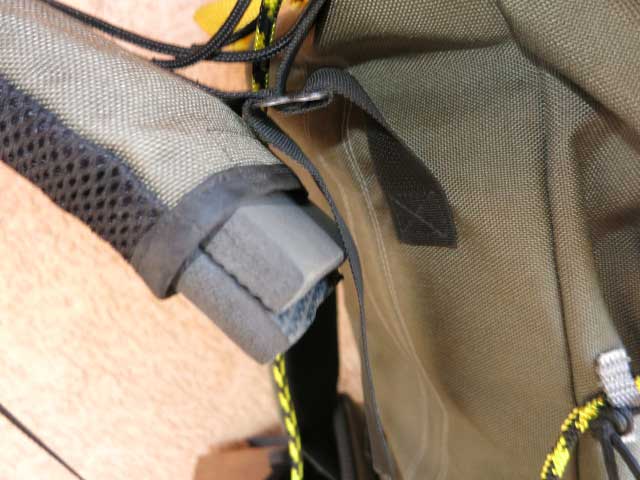
Lift-loader cord uses prusik knot on shoulder pad rather than the typical plastic ladder lock behind the shoulder.
Jul 23, 2016 at 1:55 am #3415808Wow. Surprised no comments here. Saw this the other day.
I’m impressed. Nice work
The commitment to line and prussiks is interesting.
To me, the shoulder strap attachment looks the most vulnerable part; though it’s not totally clear to me from photos what’s going on there.
My old 80s Berghaus pack failed ( after 1000smiles) where webbing went through metal buckles behind the top of the load lifters Webbing tape wore through. Took years though.
Jul 23, 2016 at 7:42 am #3415820Nicely done
Yeah, that fabric is un-necesarily heavy, but your total pack weight isn’t too bad – I guess a pack uses a small enough amount of fabric it’s not that important, and the robustness is a good thing
How are the shoulder straps attached at the top? A potential failure point.
Will a bear canister fit in there or is that even an issue for you?
Jul 23, 2016 at 7:17 pm #3415961Great job.
Jul 23, 2016 at 8:22 pm #3415984Thanks for the feedback fellas.
Bear can fits vertical with ease. Actually, that was one of items that determined the measurements of my pattern! It’s a mandatory burden in most of the places where I backpack. Diameter is approx 33″ near the top of the pack.
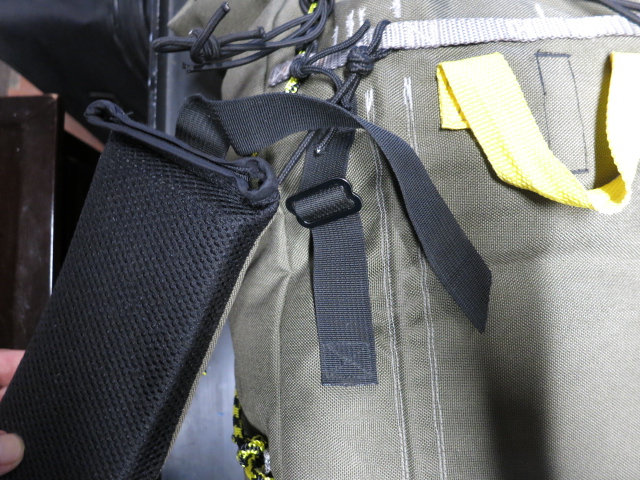
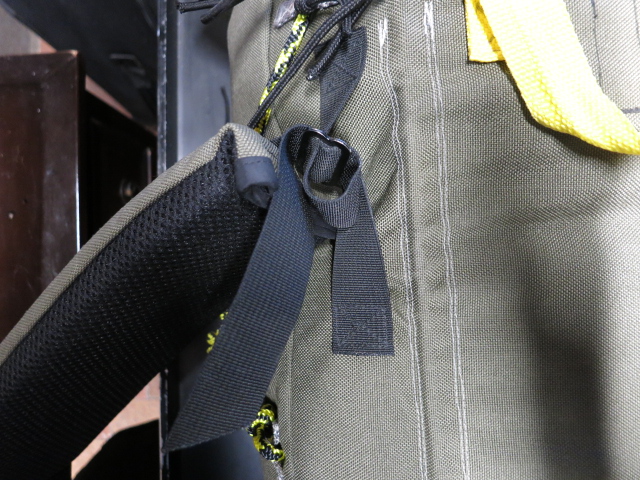
Maybe these pictures of the shoulder pad attachment point will help clarify. There is a metal slide adjuster sewn in and the shoulder strap has a length of webbing that slides through the metal slider twice to secure it. I had considered just sewing the shoulder pads directly to the back panel and this is still an easy thing to do in the future. I was apprehensive about stitching them down, which won’t allow vertical adjustment.
It’s a fair point about the webbing possibly detaching over the long run. Now that I know where I like them I could just sew the shoulder pads down permanently in the more typical way…. However, I noticed Z-Packs doing a similar thing on the Arc Blast and they use much less robust fabric. Most of the tension on my packs shoulder straps are pulled from the lower box-x stitch while wearing the pack. I should definetely add some additional zigzag stitches above the box-x stitch.
Frankly, I was more worried about the webbing sliding though the metal slider but even with 30 pounds it stayed put while backpacking.
I think I could have shaved 3 ounces at best if I used X-Pac fabric instead of Cordura 1000. Still a worthy consideration for a future prototype, you think?
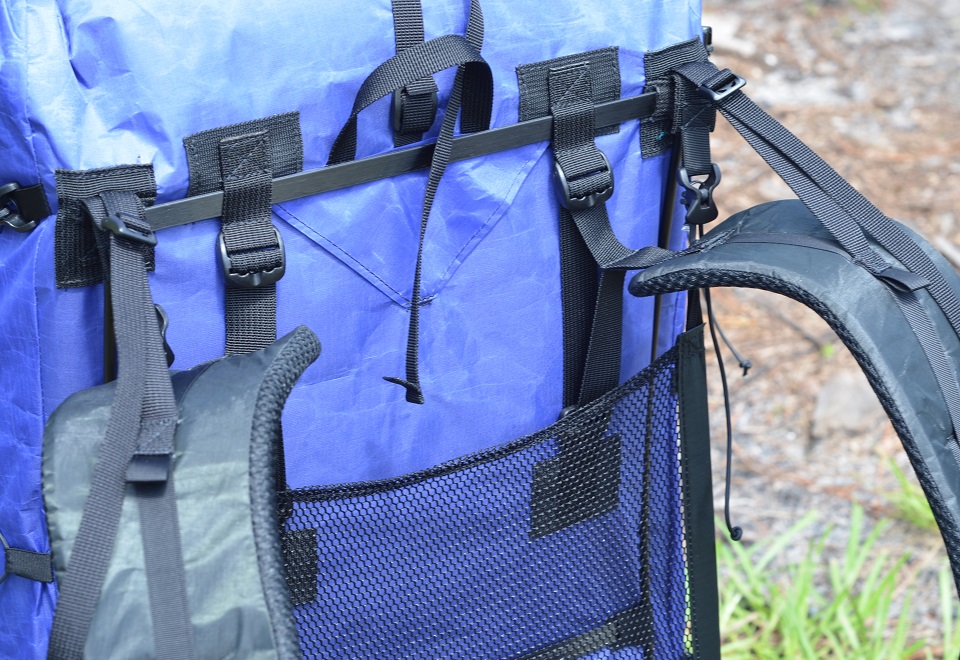
Jul 23, 2016 at 8:37 pm #3415987Z Packs Arc Blast shoulder pad attachment picture here. Are these vertically adjustable? Looks like it is but I’ve never had the pleasure of using one of these… Anyone here know?? The Arc Blast seems to be a really fantastic pack and I considered buying this instead of making one but I’m pretty sure I’d shred the bottom of this pack in a year and my shoulders would hurt if I carried anymore that 18 lbs with those thin pads… Perhaps they’d consider adding an additional abrasion resistant layer on the bottom and thicker padding. I know people who carry extra stays when they hike because those vertical tubular stays break on these packs!
Jul 25, 2016 at 10:10 am #3416284You’re correct…Zpacks calls it “adjustable torso height” and Joe demonstrates it around the 2:00 mark in this video:

By the way, it looks like you’ve got a great pack there!
Jul 25, 2016 at 10:36 am #3416294More important to have a commercial pack adjustable so it can be used by a wider range of people
But, if you’re making your own, maybe you don’t know exactly where you want it ahead of time so being adjustable is useful
Jul 27, 2016 at 6:42 am #3416726Nice pack Matthew.
If you’re chiefly mountaineering and scrambling in the Sierras I think 1000D cordura is ideal for your needs. The laminate in XPAC improves tear resistance as well as waterproofing, but wouldn’t really add too much when it comes to the kind of abrasion resistance you need for dragging something up a chimney.
Jul 27, 2016 at 6:55 am #3416729I disagree. Perhaps the OP could have gone with 500D Cordura, or even 420D Robic, but the part in the OP about shredding packs left and right and not wanting to build another within two years is the indicator that 1000D Cordura was the right choice for him. I love Cordura, use it in my builds, and was also considering going with 100%, although likely with a combination of 330D and 500D.
You are correct; the weight gained by going with an 11oz yard/squared fabric is not too much but what ever weight gained could also be removed from the kit. For example, I am not an ultralighter, but a lightweight backpacker instead. I’ll carry a 3# pack, a 3# sleeping bag, and a 3# pound tent–all traditional and conventional gear–and still fall into “ultralight” range because being a minimalist hiker I don’t carry much more gear than that. So, my pack-out weight is at 12# give or take.
Jul 27, 2016 at 7:57 am #3416735If you really want to cut weight, then yeah, lighter fabric would save a few ounces. Those dynema fabrics like XPAC are probably the best.
I’ve used 30d silnylon which worked, but after a few years started shredding. Currently I have 200d oxford 4oz. That’s been fine for several years. I can’t imagine needing anything heavier for a user that is careful. For rock climber or Boy Scouts then maybe heavier fabric.
Also, you could lose all those nylon straps and save an ounce or two.
I like that there are no pockets. People here are into pockets though for some reason : )
Jul 27, 2016 at 8:29 am #3416740Fabric-another option
I use 1.9 ounce per square yard uncoated fabric for the diy packs my wife and I use. Has never failed (i.e. ripped) but does get pin holes over time. I rely on an internal trash compactor bag for waterproofing so pin holes in the fabric are not a problem.
Takes about 1.5 yards of fabric to make the bag so the added weight of heavier fabric is easy to calculate.
Have tried lighter fabrics down to less than 1 ounce per square yard. Finally got a bag to actually rip with some sub 1 ounce fabric. The 1.9 ounce stuff seems to be the sweet spot for me. Going heavier would add durability that my wife and I don’t need for our mostly on-trail trips..
I like using uncoated fabric because I can wash the pack between trips. I sweat a lot and the pack can get pretty stinky and covered with salt after using it.
-
AuthorPosts

 Waist belt in normal position. GG internal frame modified just slightly for my back shape. Despite the appearance here; due to the thick lumbar pad, the frame actually doesn’t make contact with my back allowing my back to breath.
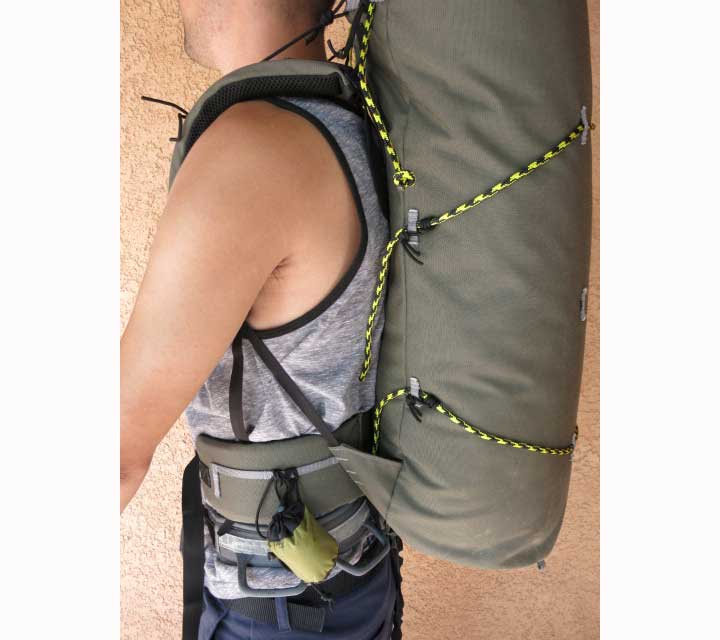

- You must be logged in to reply to this topic.
Forum Posting
A Membership is required to post in the forums. Login or become a member to post in the member forums!
Trail Days Online! 2025 is this week:

Thursday, February 27 through Saturday, March 1 - Registration is Free.
Our Community Posts are Moderated
Backpacking Light community posts are moderated and here to foster helpful and positive discussions about lightweight backpacking. Please be mindful of our values and boundaries and review our Community Guidelines prior to posting.
Get the Newsletter
Gear Research & Discovery Tools
- Browse our curated Gear Shop
- See the latest Gear Deals and Sales
- Our Recommendations
- Search for Gear on Sale with the Gear Finder
- Used Gear Swap
- Member Gear Reviews and BPL Gear Review Articles
- Browse by Gear Type or Brand.
