Topic
Moulder Strip put to the test. Butane canister use at -21F/-29C
Forum Posting
A Membership is required to post in the forums. Login or become a member to post in the member forums!
Home › Forums › Gear Forums › Make Your Own Gear › Moulder Strip put to the test. Butane canister use at -21F/-29C
- This topic has 71 replies, 22 voices, and was last updated 7 years, 4 months ago by
 David Thomas.
-
AuthorPosts
-
Jan 18, 2017 at 3:09 pm #3445868
BobM, of the eponymous “Moulder Strip” fame asked me to test one when I went to Fairbanks last month when temps were forecast to be -25F. Thankfully (because I was working outside all day drilling wells and collecting soil samples), the cold front didn’t arrive that day, although we could see it off the SE all day long.
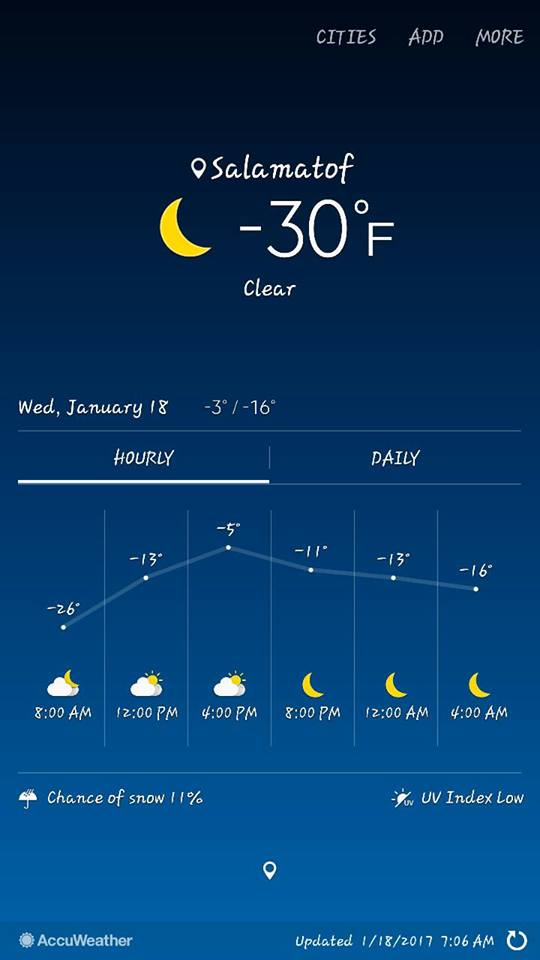
I woke to FB posts from locals like these:


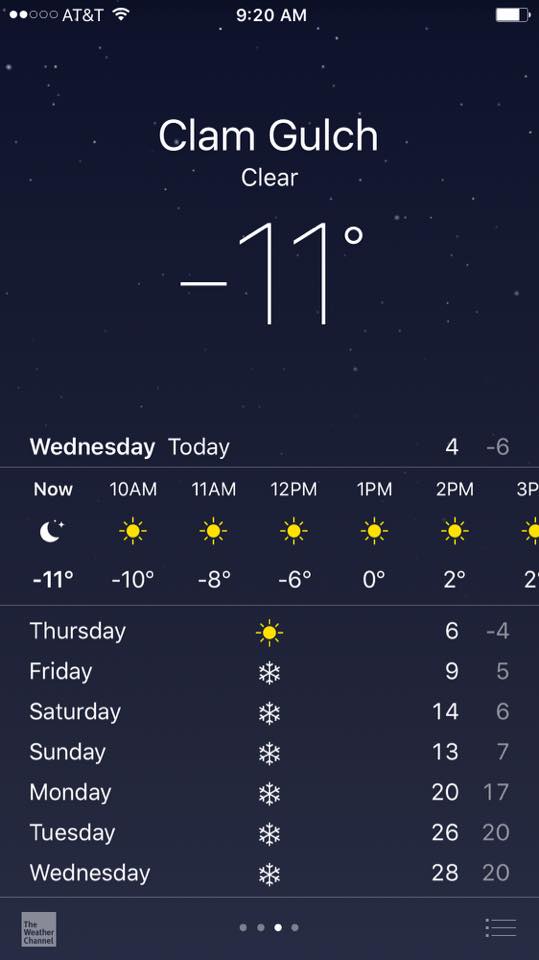
And thought, Hey, I can do this from my own garage. Kenai was showing air temps of -21F and my IR thermometer indicated objects in the shade had cooled down to -28F-ish.
Anyway, more details in post#2 because I’ll be able to edit it.
Short story: My beefed-up version of a Moulder-Strip (TM) worked fine at air temps of -21F. Got a rolling boil. Dumped in snow until there was excessive snow. Got another rolling boil. Repeated. And again. Flame looked and sounded like normal throughout.
Jan 18, 2017 at 3:10 pm #3445869Making the Moulder Strip:
My theory on Moulder Strips has long been that yes, it should be a strip around the canister, but it should be a cylinder above the strap/insulation. So I got some #4 bare copper wire at Home Depot. $1.39/foot. 56 grams/foot. 0.123 pounds/foot.
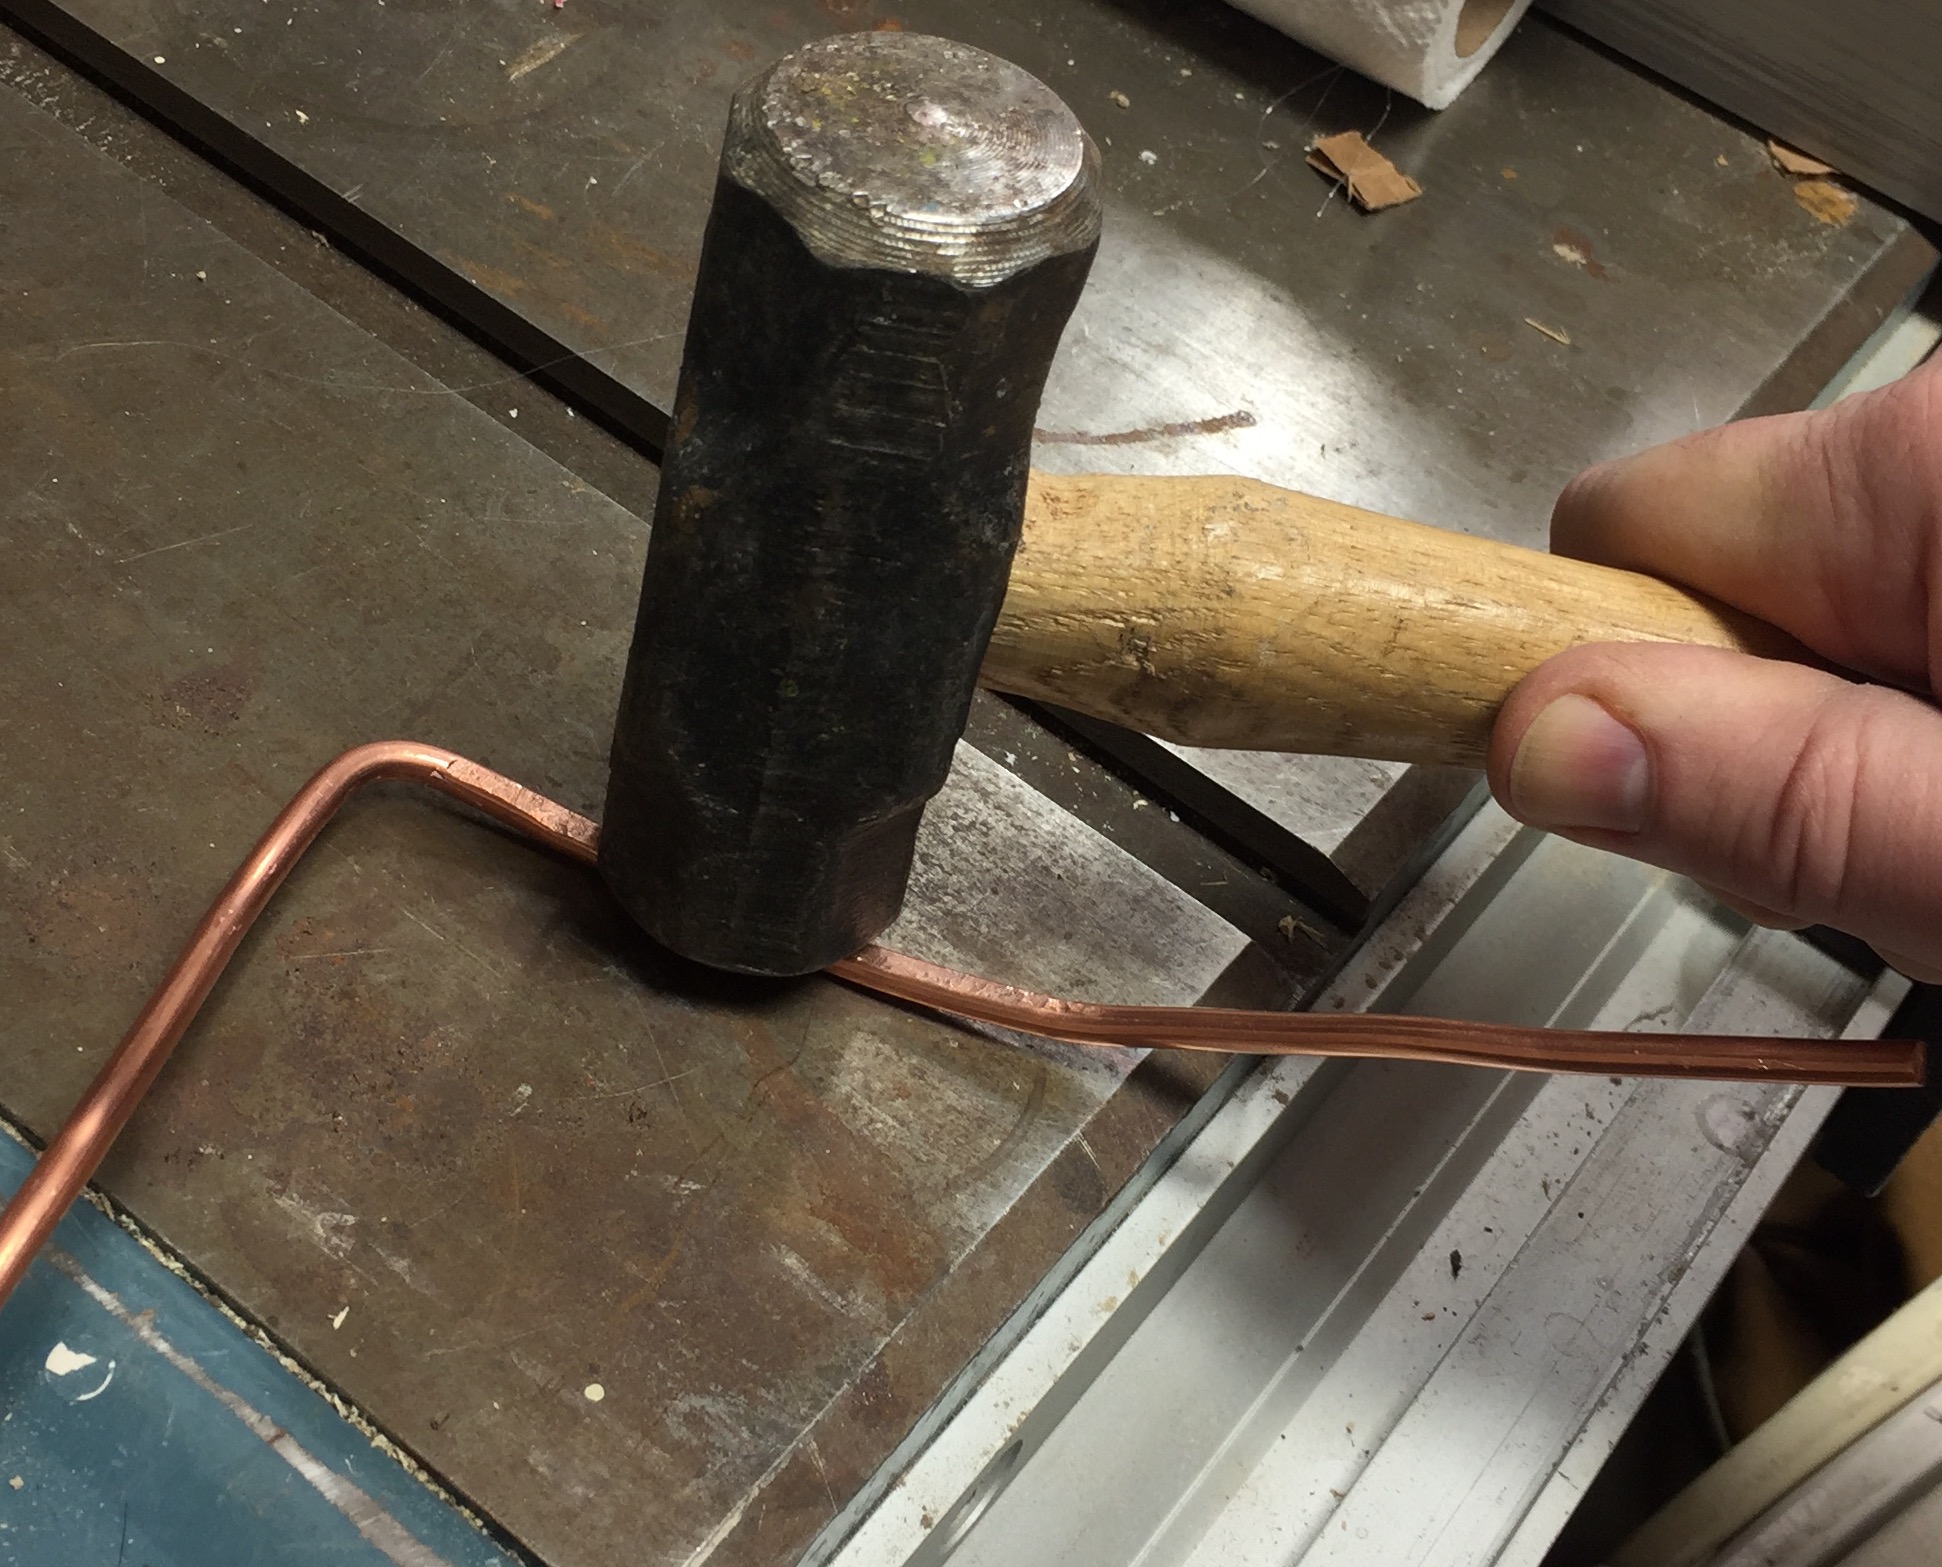
I used 7 inches = 33 grams for a 110-gram canister to reach 4 inches up to a BRS-3000T upright stove and to reach 3 inches (curved) around the base of the canister. To do it again, I’d use #6 or maybe #8. First I flattened the 3 inches that were to go against the canister. I suspect I was work-hardening the copper because it got increasingly hard to flatten it more.

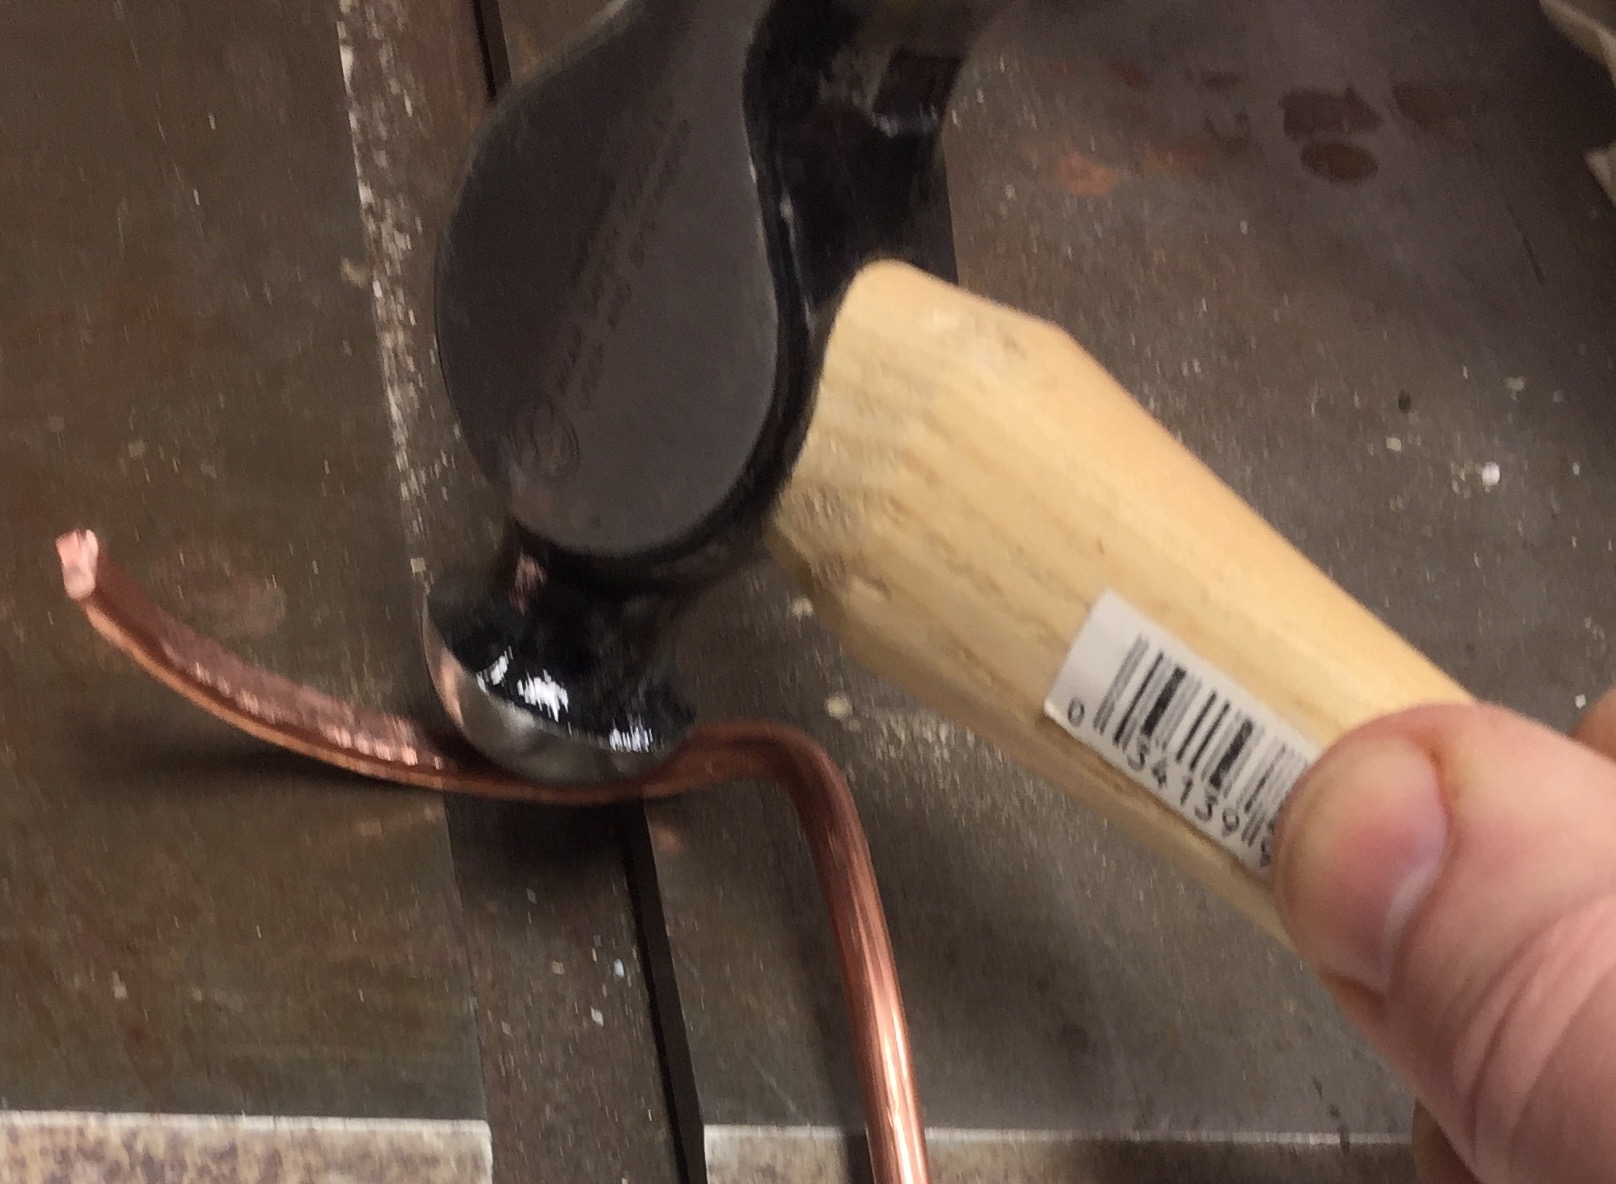
Then I used a ball peen hammer and tapped on the flattened portion in this gap of my table saw table. Each tap curved it a little more. When I’d over-shot, I set it on a 1-pound propane cylinder (a wider diameter) and give a few taps to reduce the curvature.
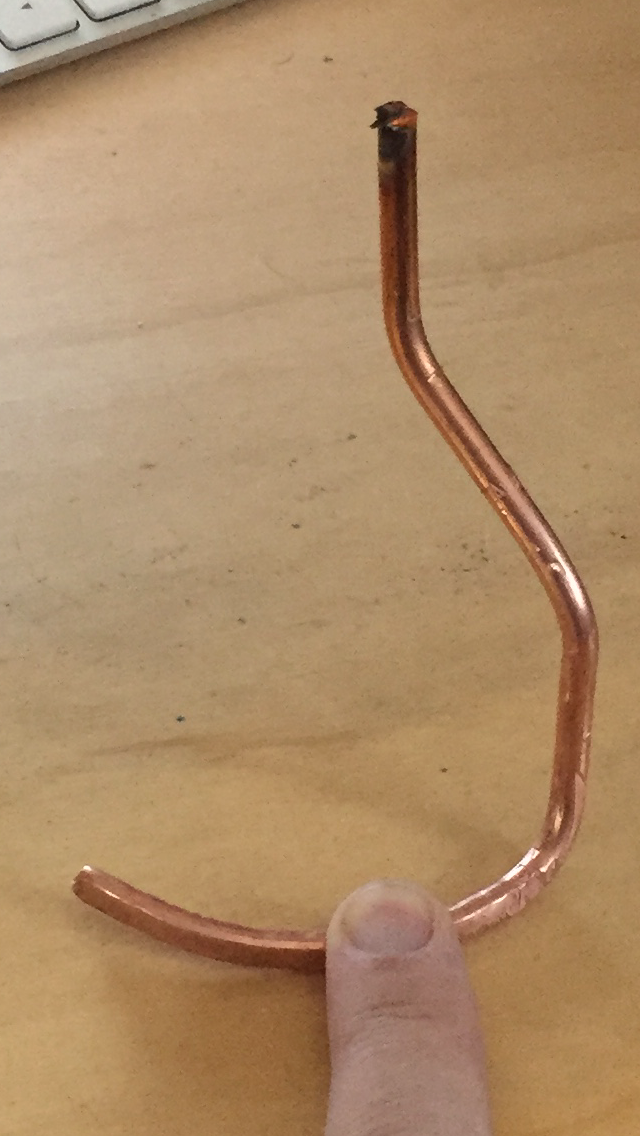
 Here’s the 3-D end product:
 Jan 18, 2017 at 3:34 pm #3445872
I used my favorite stove base (because it’s a great fire starter, too) – 6″ x 6″ of waxed corrugated cardboard from behind the grocery store (used to ship some produce). The cardboard sat on snow.
A 16-inch length of 1.5-inch-width 2-sided Velcro strap (hook on one side, loop on the other) served to secure the Moulder Strip. 16 inches is long enough to work on 110-gram and on 220-gram canisters. 9 grams.
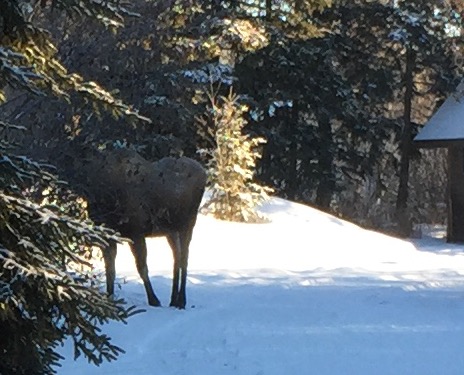
 During testing, a moose wandered by, so here’s your obligatory moose photo:
Results: Air temps were -21F, although the many objects were showing -28F on the IR thermometer (because solid objects can radiant away enough heat to get below air temperature). No wind. Starting with a 60F canister, the flame never slowed down. I tried a pot of 60F water, and many pots of ice-cold snow-water mixes. They kept coming to a boil, maybe a touch slower than I’m used to in more modest temps, but the lid was off the pot. Touching the wire just before it went under the Velcro indicated it was about 170-180F (you can’t IR off of shiny metal). Certainly it was well over 150F and nowhere near 212F.
Analysis: In most ways, I threw everything at it: thick copper wire and minimum surface area to conduct heat to under the Velcro. The Velcro made for a reasonable cozy. The cardboard was good insulation underneath. The HX Primus Eta pot is dark grey (good radiator) although often at 32F but those heat fins would have been most of the radiant effect because they were in hot exhaust gas. The tip of the wire was against the flame.
How could it be better? Soldering the upright portion of #4 wire onto a thinner strip of copper with more surface area would have been even more effective (and maybe easier to make and lighter). Or if I’d flattened the curved portion more (maybe in a roller press?).
Optimizing it for weight, and I’d use #8 bare copper wire (40% of the weight/length) and maybe make two. One for use in mild conditions (0 to -10F) and both when below 20F. And thinner wire would have been easier to work with – a short length of #4 is pretty stiff.
I’ve thought of soldering the upright wire onto a 95% copper (pre-1983) US penny (post 1983 is 97.5% zinc). And it just dawned on me: you know those souvenir penny machines that take 3 quarters and a penny, you turn the crank and it returns one flattened penny with the Statue of Liberty pressed into it? That would give more surface area and about the right curvature.
Jan 18, 2017 at 6:20 pm #3445914Neat, very neat.
And the Velcro will melt and release the copper wire if it gets too hot … although being nylon the canister might have exploded by then …
Cheers
Jan 18, 2017 at 6:50 pm #3445924Oh, I forgot to mention, all testing was done with ONLY the Moulder Strip. No windscreen, no aluminum foil IR reflector. At -21F. Admittedly a pretty meaty Moulder Strip, but nothing else. So any manner of windscreen and the resulting IR reflection would let you operate in lower temperatures. And I don’t know that I was even at the limits of this set-up.
Jan 18, 2017 at 7:22 pm #3445934cross sectional area is important
I believe Bob’s strip was 1 ” wide x 0.03 ” thick = 0.03 in2
#4 wire is 0.2 inch diameter = 0.03 in2 also
So, your #4 wire should do the same as Bob’s (just considering cross section)
If you use smaller wire it won’t work so good
Jan 18, 2017 at 7:52 pm #3445945Jerry: A good metric to keep in mind. I think I get a little more out of my cross sectional area, because I have less surface area losing heat to the environment. But, yeah, I went with a thick wire because it is the “pipe” that carries the heat down to the canister.
I’d be curious what the temp of Bob’s strip was at the shoulder of the canister.
I was originally thinking of a loop going up and single horizontal legs going each way partway around the base of the canister. Represented in text: ___II___
But the #4 was so stiff, I would have been hard to work into a tight loop.
The weakness of my #4 wire is the minimal surface area on the canister.
Jan 18, 2017 at 8:04 pm #3445948Thanks for the tests David. Great to know how well it works, even if I never experience such bone-chilling temperatures.
I know aluminum doesn’t conduct heat as well, but it’s so much lighter and can be easier to work with. Any chance of interesting you in more tests?
Jan 18, 2017 at 8:06 pm #3445949Hi David
Ah, just keep hammering. When the copper work-hardens to much, bring it up to ‘pretty hot’ and start hammering again.
‘Pretty hot’ is about cherry red. If you get to much scale while heating, dunk the hot copper in water. That won’t affect the annealing, but it should blow any black oxide layers off.Cheers
Jan 18, 2017 at 8:38 pm #3445962Silver has better heat transfer capacity than copper, so I’m wondering how a silver spoon work out, especially if the spoon portion was flattened out and positioned on the bottom. Silver wire is possible, but it’s a little more expensive.
Umm, I wonder if my wife would notice if one of the silver spoons went missing. : )
Jan 18, 2017 at 9:22 pm #3445974Roger wrote:
And the Velcro will melt and release the copper wire if it gets too hot…
What material could be used as a safety strip (instead of Velcro) that would melt and let the copper wire fall away before the canister explodes?
Idiot-proof is good for me, because sometimes my IQ drops precipitously when wet-cold-tired-hungry.
— Rex
Jan 18, 2017 at 9:48 pm #3445982Aluminum – 205 W/mK, 2.7 g/m3 – ratio = 76
Copper – 385 W/mK, 8.96 g/m3 – ratio = 43
so aluminum would weigh 43 / 76 = 60% less weight for the same conductivity
Jan 18, 2017 at 10:03 pm #3445985I’d done this check before and I just made a spreadsheet with the thermal conductivities and densities of Aluminum, Copper, Brass, Silver, Gold, Iron, and Titanium and their common alloys.
The heat transfer per weight (in units I’m not going to bother to figure out) are best for
Aluminum: 88
Copper: 44
Silver: 40
Gold: 16
Brass: 15
Iron: 9
Titanium: 5
So, if you were born with a silver spoon in your mouth, you, Mr. Trump, might want to go ahead and use it. But if you have to buy the silver spoon, or steal it from your wife, copper is better per weight and a LOT better per cost.
Aluminum seems to be better per weight by a factor of 2, and it is, until you make aluminum oxide. Aluminum oxide is crap at conducting heat. And eventually, you’ll erode all the aluminum away as the aluminum oxide erodes away.
I don’t have to solve the differential equations to know that if I can take my conductor higher in temperature at the hot end, that everything is better. With aluminum, I must keep the tip out the direct flame or accept a high erosion/corrosion rate. With copper, I can take the tip to a much higher temperature – potentially twice as much – and a correspondingly higher rate of heat transfer.
Conclusion: in ambient temperature applications, the higher conductivity, low weight, and lower cost of aluminum make it preferable. You see it used on computer chips (100-300F), heat fins in a hydronic baseboard (160-200F), and, increasingly, in car radiators (180-240F). You don’t see it used in flames. Copper, although 2nd place in conductivity per weight, lets you go to a higher temperature. Also, it’s trivial to solder copper bits together (I’ve literally done it with a camp stove) but a lot harder to MIG or TIG weld aluminum.
Jan 18, 2017 at 10:15 pm #3445989Aluminum melts at about 1220F Butane flame can reach 2600F You need to be careful where you place the strip in the flame.
Jan 18, 2017 at 10:17 pm #3445992Oh well David posted as I was writing. So the above was repeat.
Jan 18, 2017 at 10:36 pm #3445995I’ll try TIG welding some AL bits I have in the shop and see how it goes.
Jan 18, 2017 at 10:41 pm #3445996Aluminum seems to be better per weight by a factor of 2, and it is, until you make aluminum oxide.
True, but ….
I use a 1.6 mm thick aluminium heat shunt on my V1 stoves, with the tip going INTO the flame. I have not seen any problems. And there are a lot of those stoves out there in the field.Explanation:
* First of all, the blue flame is a reducing environment. There is not enough oxygen for the aluminium to be oxidised.
* Second: the thick aluminium strip sucks the heat away from the tip very fast. There is no sign of melting.
Part 5 of the series of articles on the stove at https://backpackinglight.com/caffin-evolution-of-winter-stove-part-5/ is all about some IR camera measurements of the temperature of the strip, made by John Linn. The actual temperature recorded at the tip does depend a bit on the emissivity assumed for the aluminium, but even under some tight conditions the tip did not exceed 200 C.
If you were to use a 0.5 mm thick strip it might melt as it could not do this. Aluminium is a very good conductor of heat AWAY from the flame.Cheers
Jan 18, 2017 at 10:45 pm #3445997I’ll try TIG welding some AL bits I have in the shop and see how it goes.
Remarkable stuff, TIG welding. I recently saw a photo on the web of two Coke cans TIG-welded together at the bases. Very nice looking weld too.
(OK, not actually COKE, another brand. No matter.)
Cheers
Jan 18, 2017 at 11:50 pm #3446004“. . . aluminium heat shunt on my V1 stoves, with the tip going INTO the flame. I have not seen any problems.”
One good empirical data point always blows all good theories out of the water.
Maybe I need to try an aluminum version next. Cheaper, lighter, and down at the base of canister, I can probably just J-B Weld the thick, vertical aluminum to the thin strip in contact with the canister.
Jan 19, 2017 at 12:09 am #3446005Hi David
One good empirical data point
I must confess that it was with some hesitation that I first did the experiment. I too thought the Al strip would melt, at least at the tip. When it did not, I had to work out why not. John Linn verified my guess.Cheers
Jan 19, 2017 at 5:12 am #3446012Dave, I have V1 of Roger’s stove and there is no problems with the Al at the tip. In fact, I don’t even see any extreme oxidation, though it could be flaking off and not be seen.
I would suggest getting some #4 Al wire and simply flattening both ends, ie, at the flame and canister, rather than fiddling with soldering/welding. I believe you will find that the decreased surface area of a round wire will radiate less heat than a bar:
1) improving overall heat conductivity, efficiency at cold temps
2) decelerating oxidation at the tip by better cooling it by conduction
It “might” melt at the flame, but once it “burns back” you can clean it with a knife and maybe rub it with some pencil lead. (That will slow oxidation.) It should stay good for a LONG time, say 300-400 burns, minimally.While not actually true, you can think of cold as conducting back up a conductor as well as heat flowing down a conductor. (Mathematically, it works out by simply inverting polarity of Hot->Cold. Cold->Hot works as well within normal limits.)
Personally, the stove plus the weight of the heat shunt, plus the weight of the cozy/velcro, likely adds up to close to the same as one of Roger’s remote stoves, though. With the Aluminum shunt, it might actually be lighter.
Jan 19, 2017 at 6:40 am #3446018David,
Thanks very much for testing this in respectably cold temperatures and for continuing the experiment with your configuration. Great to see that it operates unaffected in what I think we can all agree is extreme cold.
Regards to material choice, it will be interesting to see what folks do with aluminum or other materials, but I think that in the long run copper will be hard to beat for this application. I am guessing that Al works well for the heat shunt Roger’s stove because it is comparatively small and operates in an environment purged of oxygen. I have observed that with the copper strips the side sticking into the flame does not oxidize but the side away from the flame does. However, it oxidizes at a rate that is slow enough to get many dozens of burns without affecting the function of the strip. I have not tested or even kept notes while doing other tests (bad science!) to see exactly — or even roughly — how many hours of operation can be expected, so let’s just say it’s a bunch.
Although I don’t know the origin of the “Alpine Bomb” myth, at this point I can say with great confidence that any any incidents or accidents that gave rise to the myth involved factors beyond the use of the copper conductor (wire or strip), with the most likely culprit being a tightly wrapped windscreen that overheated the whole system. The simple copper strip alone is not going to overheat the canister, and a too-tight windscreen can lead to an explosion with or without the copper strip.
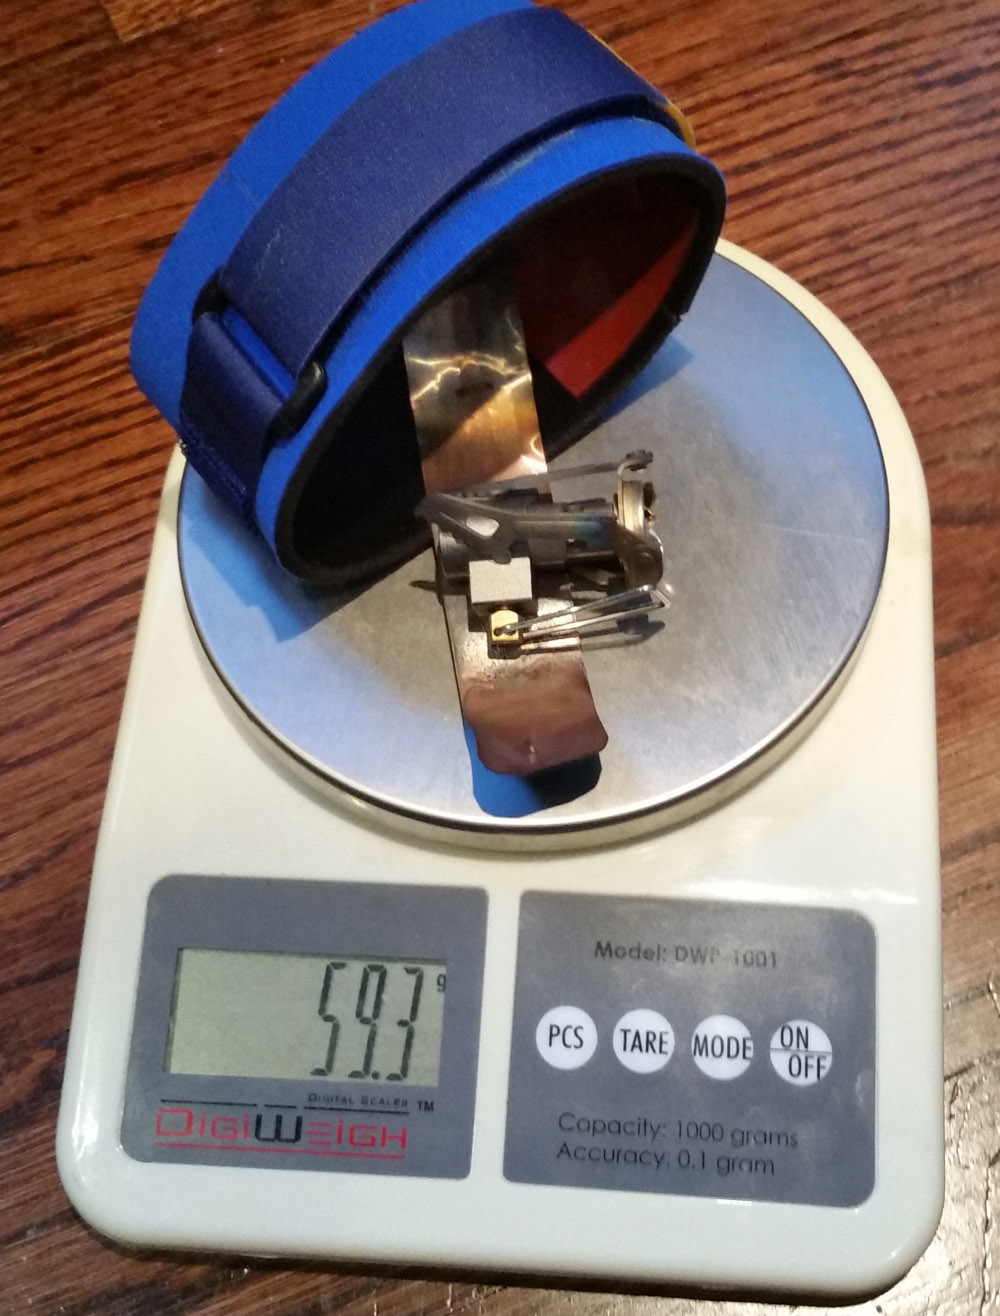
I don’t know the weight of other stove setups, but for a combo that operates on butane well below zero F, the BRS + strip + Velcro + cozy + silicone insulator that together weigh 59.3g (2.1 oz) for the 110g canister size, is going to be hard to beat. Admittedly, although a topper setup with the BRS is almost like cheating and it isn’t good for any pot larger than about 750ml, it remains a very viable option. However, I would not enjoy being assigned snow-melting duties with this combo. :^)
 Jan 19, 2017 at 9:50 am #3446052
“Admittedly, although a topper setup with the BRS is almost like cheating and it isn’t good for any pot larger than about 750ml, it remains a very viable option. “
Yes and no. If you balance the canister on a rock, yeah, you don’t want a big heavy pot on it. But if you use a decent base like a 5″ x 5″ or 6″ x 6″ piece of waxed cardboard or 1/8″ 3-ply plywood (snag an old closet door or hollow-core interior door at the dump for a nice source of 3 to 4 mm plywood). The 1.8-liter Primus Eta HX pot fits nicely on the BRS-3000T pot supports. I was shoveling snow in and scooping water out of that set-up yesterday morning. That particular combo works well because the BRS pot support fit fully inside the ring of HX fins. And that was with a 110-gram canister. A 220-gram canister is a bit wider.
In summer, maybe the stove base is “extra weight” you could avoid with a remote stove. In winter, I’m bringing a stove base for an upright or a remote stove.
Jan 19, 2017 at 9:57 am #3446054“You show me yours, and I’ll show you mine.”
Here’s the set-up I tested yesterday at -21F:
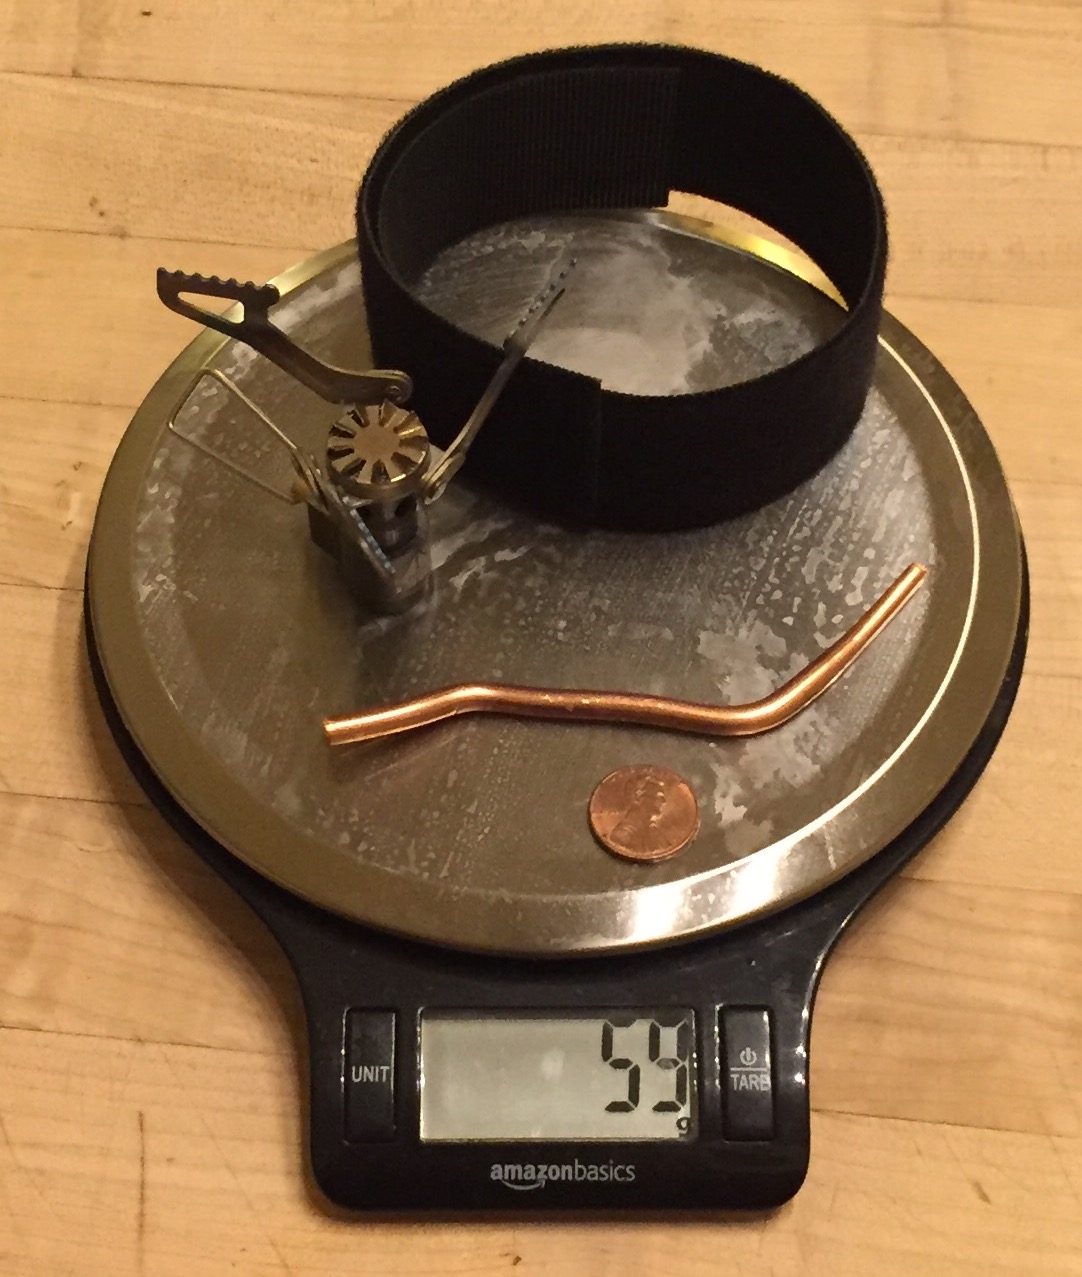
And here are the components that I plan to solder together soon:

So the copper strip beats the 7″, 33-gram, #4 bare copper wire in weight. It probably works to as low a temperature, but we haven’t confirmed that.
The strip weighs the same as the #4 wire + penny, neither of which have been tested at -20F. The strip is certainly far easy to fabricate.
But, yeah, what remote canister stove works at -20F and weighs less than 60/70 grams?
Jan 19, 2017 at 11:31 am #3446071OK, Brothers of the Exalted BRS, I’ll play too:

The thing about my 70.0 gm is that includes the 7.0 gm plastic lid with 1/8″ evo foam. Real men include their base thingy. I know that my neoprene cozy is a bit heavier than Bob’s, and also that my Velcro strip and carbon felt piece are lighter than his silicone strip and that easy-to-place burly Velcro strip. But no matter, as you are spot on, David–a fully functional frigid weather stove setup that weighs less than 2.5 oz. is nothing to scoff at.
I need to dispel a myth–for some reason the hot copper doesn’t seem to melt the Velcro when they are in direct contact. I suspect that Velcro is made by the same people that make Twinkies. Nobody quite knows what they are actually made of, or just what their chemical and physical properties are.
-
AuthorPosts
- You must be logged in to reply to this topic.
Forum Posting
A Membership is required to post in the forums. Login or become a member to post in the member forums!
Trail Days Online! 2025 is this week:
Thursday, February 27 through Saturday, March 1 - Registration is Free.
Our Community Posts are Moderated
Backpacking Light community posts are moderated and here to foster helpful and positive discussions about lightweight backpacking. Please be mindful of our values and boundaries and review our Community Guidelines prior to posting.
Get the Newsletter
Gear Research & Discovery Tools
- Browse our curated Gear Shop
- See the latest Gear Deals and Sales
- Our Recommendations
- Search for Gear on Sale with the Gear Finder
- Used Gear Swap
- Member Gear Reviews and BPL Gear Review Articles
- Browse by Gear Type or Brand.

 Here’s the 3-D end product:
 During testing, a moose wandered by, so here’s your obligatory moose photo: