Topic
Melting water in sunlight – what's the most efficient way?
Forum Posting
A Membership is required to post in the forums. Login or become a member to post in the member forums!
Home › Forums › General Forums › General Lightweight Backpacking Discussion › Melting water in sunlight – what's the most efficient way?
- This topic has 8 replies, 7 voices, and was last updated 5 years, 5 months ago by
 Steve M.
-
AuthorPosts
-
Aug 27, 2019 at 6:31 pm #3607807
Hi there,
Every year in October I spend a week in the Swiss Alps, rather stationary, for photography.
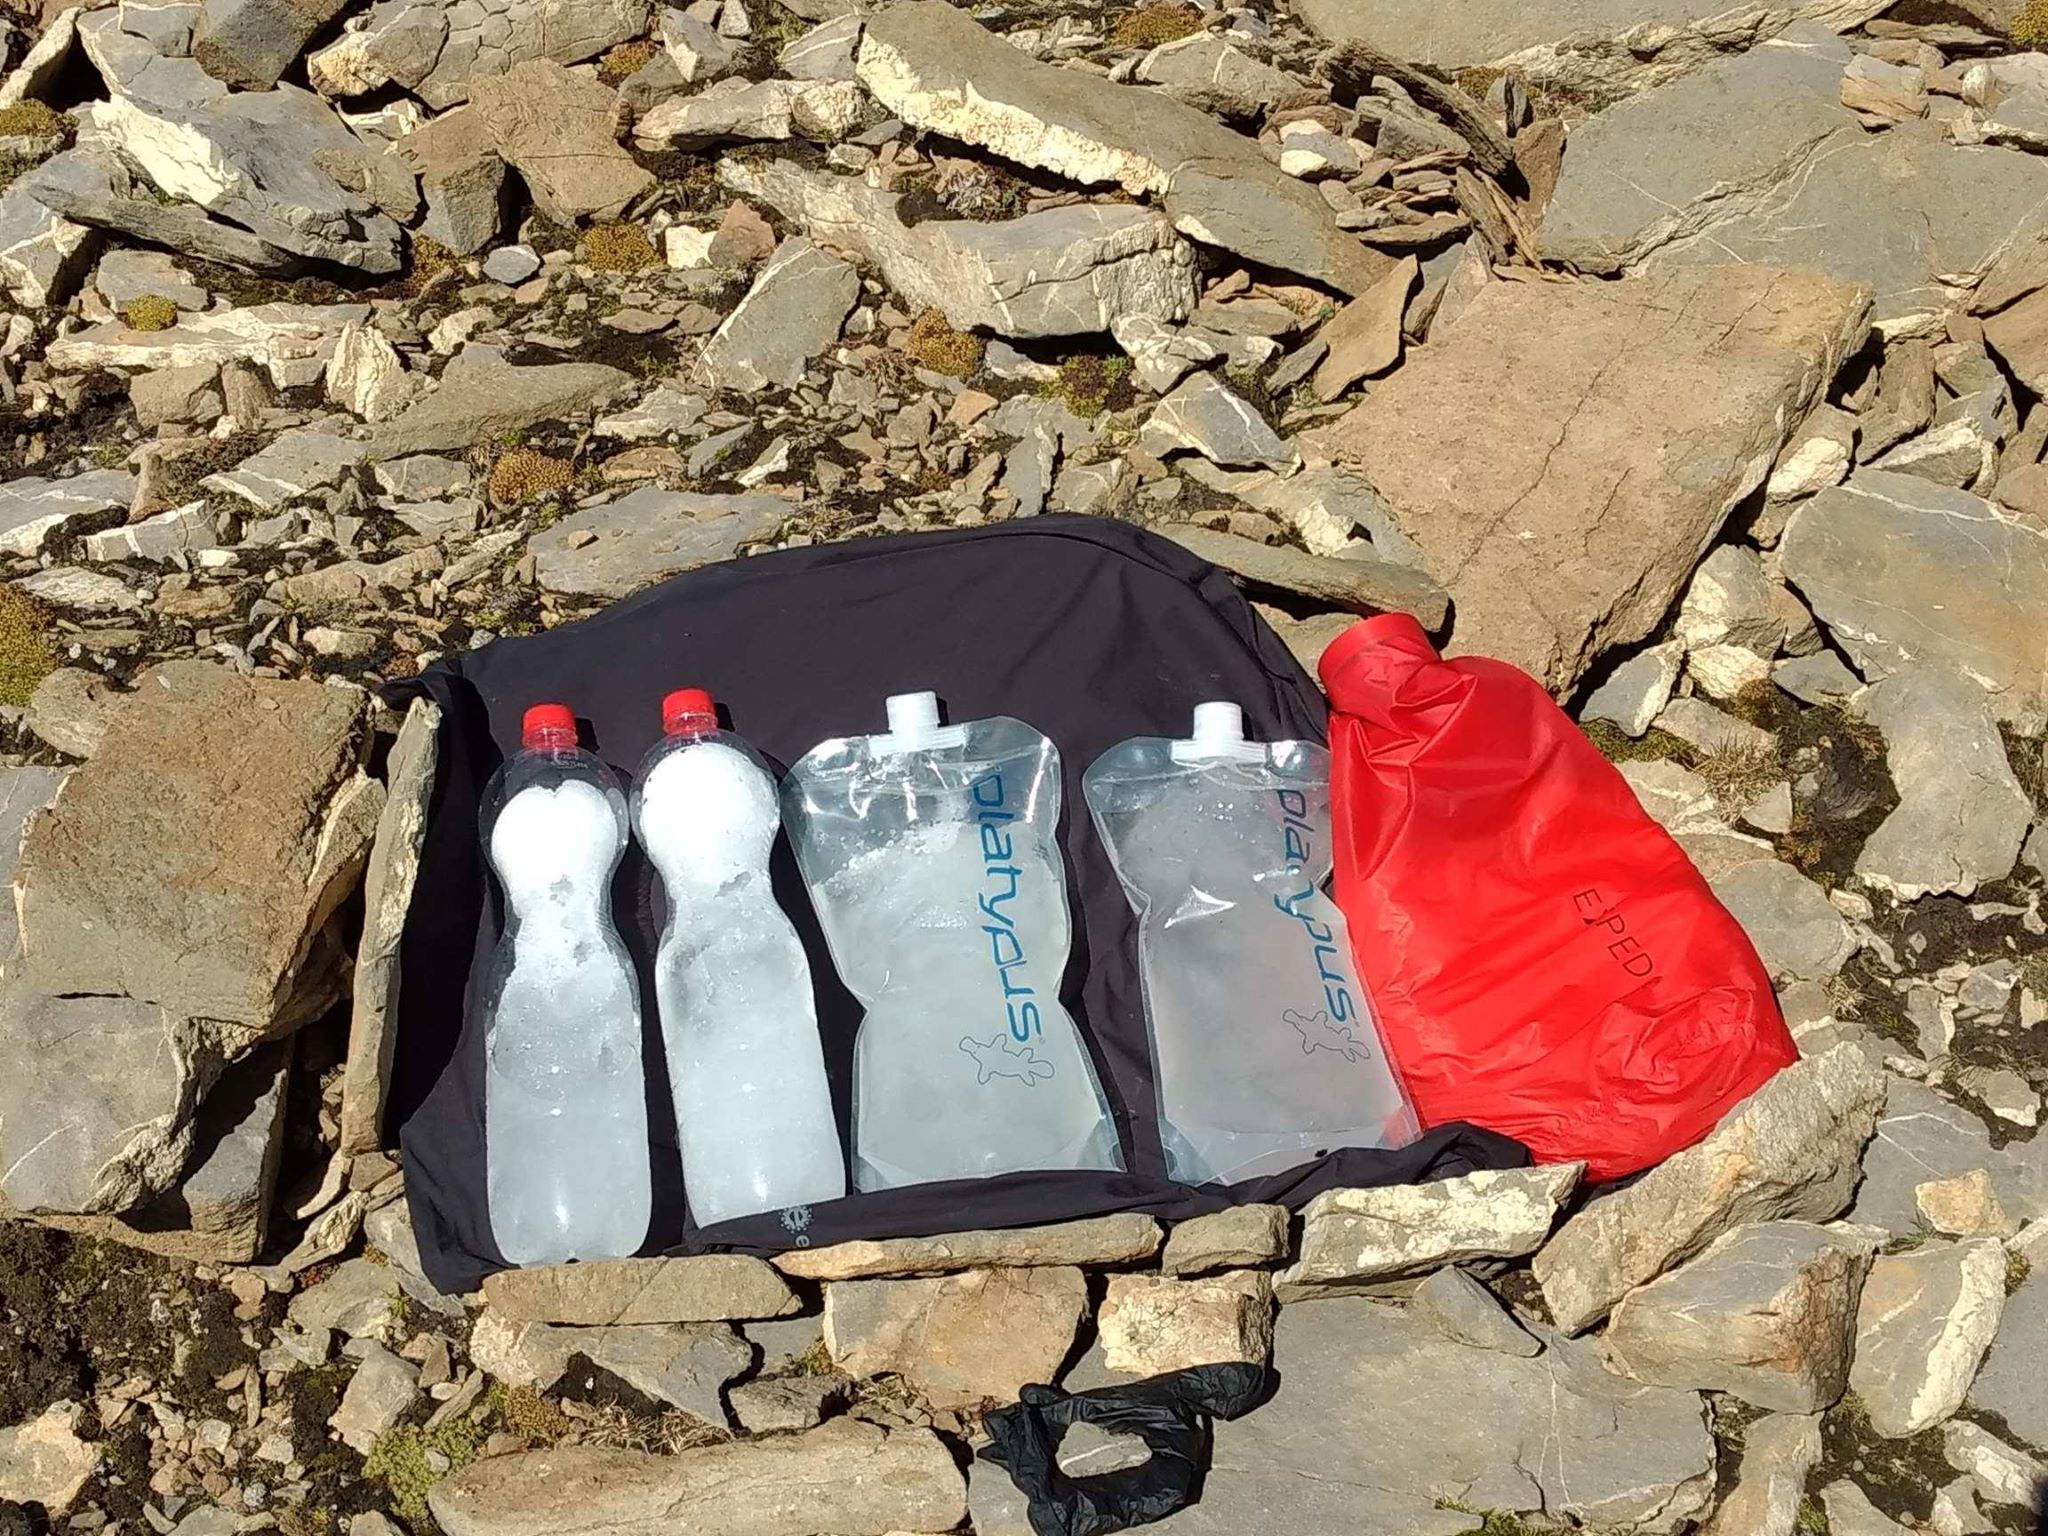
The camp is usually at around 3000m and there is no water or it’s frozen.We usually melt snow and it works quite good, I usually fill Platypus bottles with snow and put them on a black surface (wind jacket) such as here:

While this works well, I wondered what the most efficient way to do this is and I thought of the following experiments:
- wrapping bottles with black foil – this is what people recommended, however, I’m not sure if it makes sense as the outer layer would absorb the energy and not the inside?
- transparent bottles on black surface like in the image above – works reasonably well
- creating a parabolic mirror around a water bottle so sunlight is reflected into the bottle? solar cooking works like this, but I guess it’s not possible with the platypus bottles
- putting the bottles into a black box with transparent cover – like a greenhouse – however, the second option would probably similar as the bottle itself acts like a greenhouse?
Did anyone test this? I’m curious to find out how to do this in the most efficient way – just out of interest :)
–
Aug 28, 2019 at 6:30 am #3607895CCF as a base to stop conductive heat loss. Black plastic bag to absorb maximum solar radiation All inside a clear plastic bag to minimise heat losses through wind, It’s actually a pretty standard mountaineers technique. If the plastic bags are ultra light and fragile use the CCF under the bags. Simpler sometimes to use a huge ziplock as the container to hold the snow, easier to stuff snow in. On a bright sunny day the water can get warm enough to enjoy a hot shower
Aug 28, 2019 at 6:43 am #3607896Thank you very much!
I also discovered http://solarcooking.org which has a lot of resources, even very lightweight ones such as the Windshield Solar Cooking Funnel.
Aug 28, 2019 at 2:14 pm #3607910We’ve had very good luck with a black nylon bag wrapped around the pot full of snow. Melts in no time. And in a water bottle, we’ve had the water get hot enough to be too warm to touch…
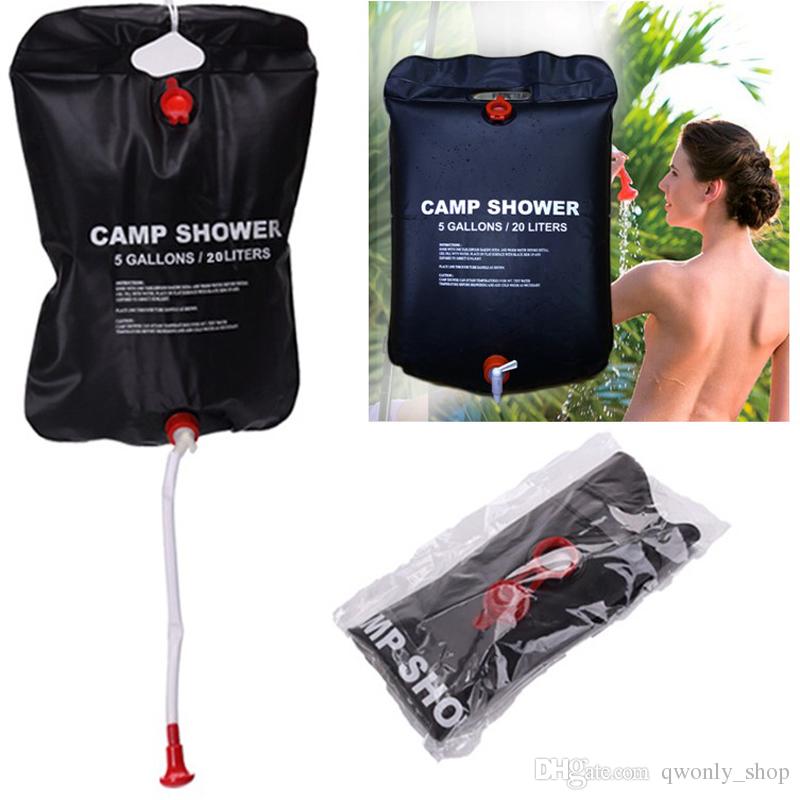
Aug 28, 2019 at 8:07 pm #3607989In the 1980s, I used a “Solar Shower” quite a bit on group trips and while car camping. Left out all afternoon (or on the flat spot under the rear winder of a car), it would get too hot to use as a shower without being diluted with cold water. It’s clear plastic on one side and black plastic on the other side. So I know that configuration works well.
The packaging on all of them is deceptive, because they never include the naked model in the photo.
I concur with Edward that insulation from the cold ground below is helpful, but while that can be CFF, it could also be any other bit of gear you’ve got along – an inflatable sleeping pad, your pack, a sweater, or just some branches.All the versions I’ve seen are a bit heavy since they’re made from vinyl and not, say, sil-nylon.
Used for snow-melting, just like snow-melting in a pot, warm water is your friend – a slushy mix of snow and water is vastly more dense than dry snow (up to 10x denser), so saving some liquid water from your last batch to treat your next pile of snow speeds it up a lot.
If you’re inclined to DIY / MYOG, I’d start with a wine-in-a-box liner and paint the back of it black. It’s a pretty sturdy bag and gives about one square foot of area (10″ x 14″) per 3-liter bag (Black Box brand, some Gallo products come in larger sizes). Carrying 3 or 4 of those would offer more surface area, faster melt times, lighter total weight, and better redundancy than the “Solar Showers” from the camping aisle at Walmart / Cabela’s.
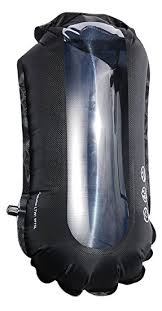
Or, to repurpose a cheap off-the-shelf item, there are black dry bags with clear windows. Here’s a PVC one that’s not very light (10-liter $14 12.5 ounces 350 grams; 20-liter $18 16.4 ounces 460 grams):
Far lighter would be one sold as backpacking gear. I sent one of my Hyalite Equipment 25-liter “Pneumo LTW Window” dry bags (15″x27″ 130 grams) to Antarctica with my wife in January, mostly for its window giving better visibility of what’s inside and it has a burp valve to make everything small. But all my web searches for that make and model now say “no longer available”.
The more I think about it, the more strongly I’d suggest you go with some kind of dry bag. You could literally SHOVEL the snow (pond ice, icicles, etc) into the bag through that full-width opening, unlike anything with a 1″-2″ opening. The window probably helps, but just a black sil-nylon dry bag will work well.
Also, I’d REALLY lean towards, say, three 10-liter bags rather than one 25-liter bag. More surface area, more redundancy, and lower stresses on the seams of the smaller bags holding less water weight.
It wouldn’t be wrong to lay such bags on top of aluminum foil. How much that helps depends on how much you can focus the sun using that reflector and my experience building “Solar Death Rays” is that aluminum foil, once crinkled just a little bit, is both a reflector but also a diffuser – it sends the light in many different direction even when it seems flat to you.
Aug 28, 2019 at 8:40 pm #3607994Here’s a very efficient option…but heavy.
http://contemporaryenergy.co.uk/solar-kettle/
Regardless of the Solar Kettle, I’d think one would melt their snow faster faster if the bottles were spray painted black? (Or the top side perhaps?)
Aug 29, 2019 at 4:08 am #3608058Just a late thought.
If this is for a fixed base camp it might be worth while not going ultra light with your set-up.
If you can find a small poly drum in black plastic with a screw top lid and a tap on the bottom you might save a lot of time.
You still need to use the clear plastic bag over the whole unit to keep the wind off and the solar radiation trapped and you do still need to insulate the base but it is easier and faster to unscrew the lid and add snow and ice on a continual basis as you tap off the water from the bottom. As snow often contains bits of organic matter blown in by the wind you can also line the whole drum with a fine filter [ which is held in place by some LW shock cord and the lid] Calamata olives come in such small drums, and it is a simple matter to drill a hole and add a small tap and to paint the drum black with a matt paint
Aug 29, 2019 at 9:32 am #3608070I think David’s post describes the optimal setup for a simple container of liquid water – a transparent top and black bottom, perhaps insulated from cold ground by setting it on a pad. It’s somewhat similar to a greenhouse. The transparent side allows solar radiation to enter, where it’s absorbed either directly by the water or (probably more) by the black backing. In a real greenhouse, the transparent top prevents convective heat loss since there’s air on both sides. Here, the transparent top prevents the evaporative heat loss from the liquid surface that would occur with an open-topped container.
Cristoph’s photo in the OP shows essentially the same thing, except the black backing is not integrated with the container; and it’s ice rather than liquid water, which might be important. If there were transparent liquid water in the bottle, I can’t see the benefit of wrapping it in black foil, I’d think it better to have it pass through the water to be absorbed by the black backing, as in David’s solar shower. But I’m not sure how much of the solar radiation is absorbed vs reflected when it hits ice. Not much of the light is reaching the black backing, and maybe a lot more is being reflected, so perhaps wrapping it in black foil would be better.
Somebody should do some experiments…
Aug 29, 2019 at 4:07 pm #3608116A few years ago I did a non-scientific ‘test’ of various ways to pre-heat a bottle of water…in hopes of using less fuel for boiling. I tried clear bottles in clear bags, a black bottle in a clear bag, a clear bottle in a black bag and then inside a clear bag, a bottle with one side painted black and the other left clear, etc etc. I expected the best heat gain would be with the sunlight passing through a clear bag and then through the clear side (of the half painted bottle), through the water and then hitting the backside (black) surface. This proved not to be the case—the highest heat gain was having the flat black surface facing the sun with the bottle inclosed in a clear bag. YMMV
-
AuthorPosts
- You must be logged in to reply to this topic.
Forum Posting
A Membership is required to post in the forums. Login or become a member to post in the member forums!

Our Community Posts are Moderated
Backpacking Light community posts are moderated and here to foster helpful and positive discussions about lightweight backpacking. Please be mindful of our values and boundaries and review our Community Guidelines prior to posting.
Get the Newsletter
Gear Research & Discovery Tools
- Browse our curated Gear Shop
- See the latest Gear Deals and Sales
- Our Recommendations
- Search for Gear on Sale with the Gear Finder
- Used Gear Swap
- Member Gear Reviews and BPL Gear Review Articles
- Browse by Gear Type or Brand.
