Topic
Lets Get Technical (MYOG tents)
Forum Posting
A Membership is required to post in the forums. Login or become a member to post in the member forums!
Home › Forums › Gear Forums › Make Your Own Gear › Lets Get Technical (MYOG tents)
- This topic has 19 replies, 6 voices, and was last updated 6 years, 1 month ago by
 R.
R.
-
AuthorPosts
-
Jan 2, 2019 at 3:46 pm #3571084
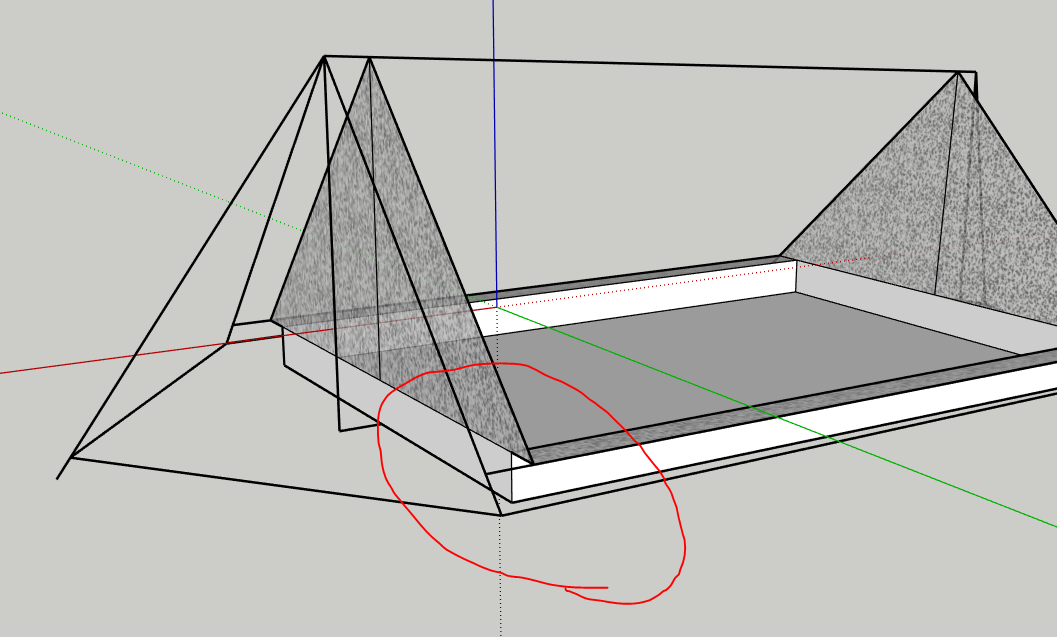
I thought I’d throw out a question for you all. I’m moving on to an A frame style tent with trekking poles supporting it. It will be somewhat similar to the Echo II except it will be a single wall tent.
I’m trying to decide whether to add 6in to either end or have the seam (fly & vestibule) end right at the bathtub floor. The extra space would make the vestibule a little larger, which would be nice. However I’m not sure if this would mess with the tention

Or
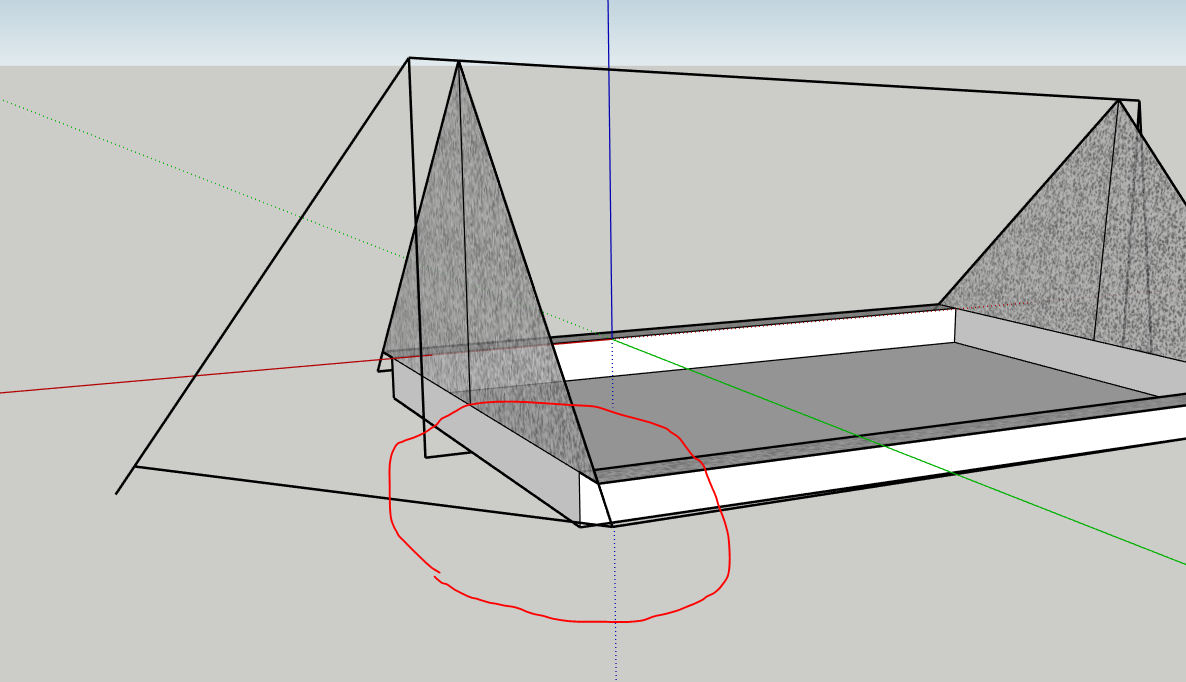
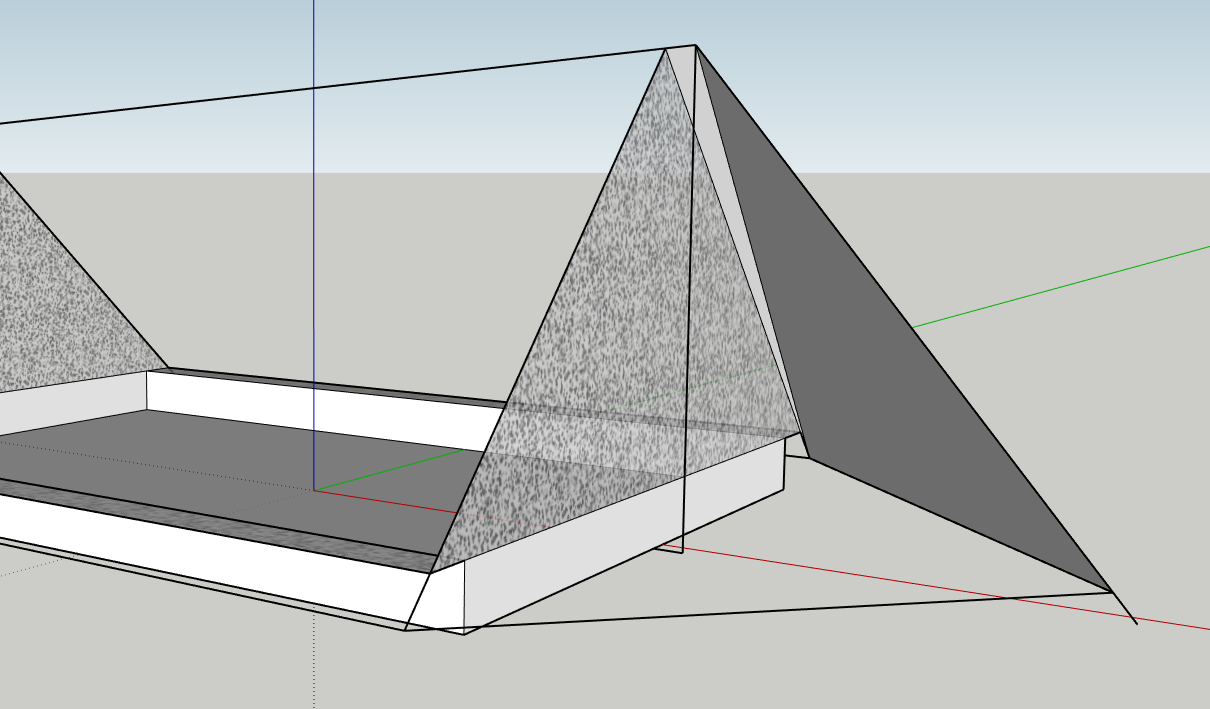
Here is another view of what the back would look like.
Or
Jan 2, 2019 at 11:33 pm #3571121Depends on how you look at it and what you expect in terms of the inner mesh. To my mind, the only thing you need tension for in terms of the inner is keeping that bathtub a bathtub. For that to happen, with your design as it is you have to have some tension and that will tend to distort your pitch if your inner attaches to the outer at a point other than at the natural lines of tension, which are along the vertices where one plane meets another. In addition, you are introducing another seam which you will need to seal. and you are enlarging the side panels, which reduces your wind-worthiness, since you always want the smallest unsupported panel size you can achieve. This is why you see so many versions of the 2-pole A-frame that have the ridge running side to side rather than lengthwise; it gives you smaller unsupported panel sizes and a shorter ridgeline.
It would be simpler to just extend the nose of the vestibule forward to enlarge the vestibule. This does not yield as much added volume, but by lowering the angle of the line from peak to ground, it gives you a more solid pitch, as that stake can then handle more tension.
Jan 3, 2019 at 2:46 pm #3571186Wow thank you for that Paul. The way you explained that was very helpful.
Jan 3, 2019 at 10:36 pm #3571323More Questions….
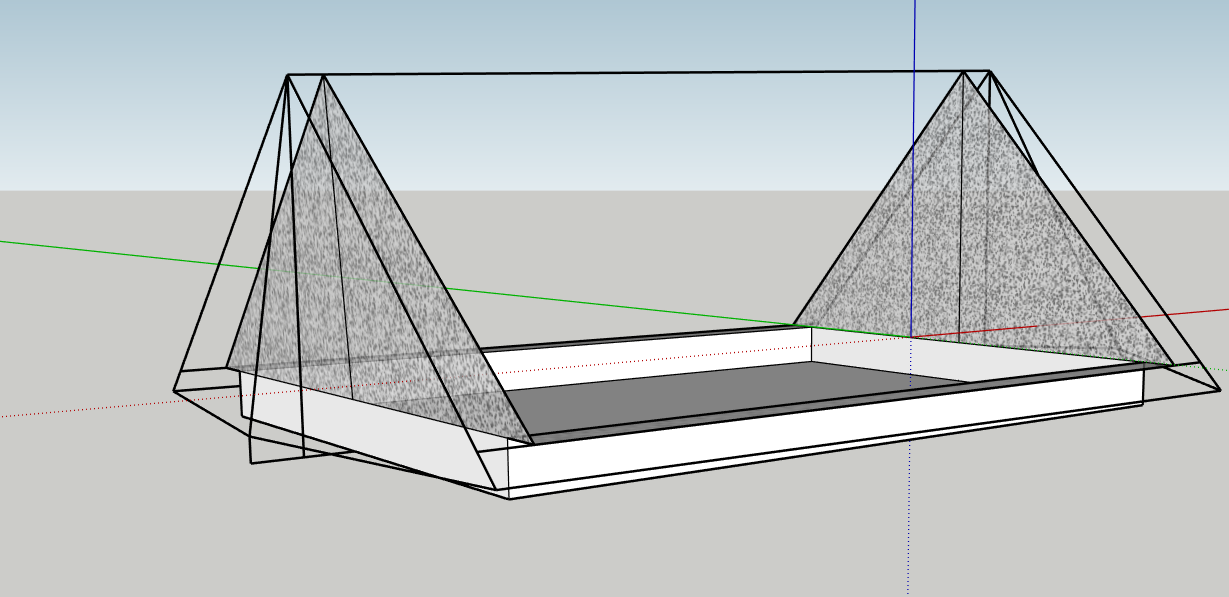
Can’t figure out the dimensions of the vestibule doors. This is going off of my initial question and I’ve decided to combine the inner mesh to the fly/vestibule seam. This would be the second picture that I posted above. I’m not sure if sketchup is making me overthink this, but these would not be typical triangle-shaped pieces, since I would need the upper part of the door to come up above the trekking pole and connect to the seam approximately 3 inches behind it. Doing triangles would require me to include an extra piece like this one in the photo.
Would I simply need to make a shape similar to this one with flat top or would that still not reach.
Thanks ahead of time for the help. I’m having trouble taking a 2D shape and envisioning a 3D shape.
Jan 3, 2019 at 10:55 pm #3571328<p style=”text-align: left;”>Why are you leaving that space between the pole and the door? If you get rid of it your design problems will go away.</p>
Also, there’s a Sketch Up feature called ‘flatten’ that may help you out. May be a 3rd party plug-in.(Edit: attn. admins: the above markup was generated by typing in your editor in Chrome on Android – no copy/paste involved. Never seen this before.)
Jan 3, 2019 at 10:57 pm #3571331yeah, make the side panel 3 inch wider so the vestibule is a triangle
Jan 3, 2019 at 10:58 pm #3571332I think you are on the right track. Essentially, the way to think about it is that you have one triangle that is from lower corner of tent to outer end point to vestibule to top of pole, and one that is top of pole to lower end corner of pole to point 3″ inboard of top of pole (I’m assuming you have the 3″ so that you have room for the pole handle ,or basket depending on which way up you intend the poles to be, outside of the netting end wall) The first is the big piece, the second is a very pointy triangle. And those two are joined into one piece – but not with a seam, just draw them both but connected at the common edge. That gets you the shape you have drawn – though of course I have no idea if your numbers are correct. If you make a paper mockup of the thing this sort of stuff will become clearer
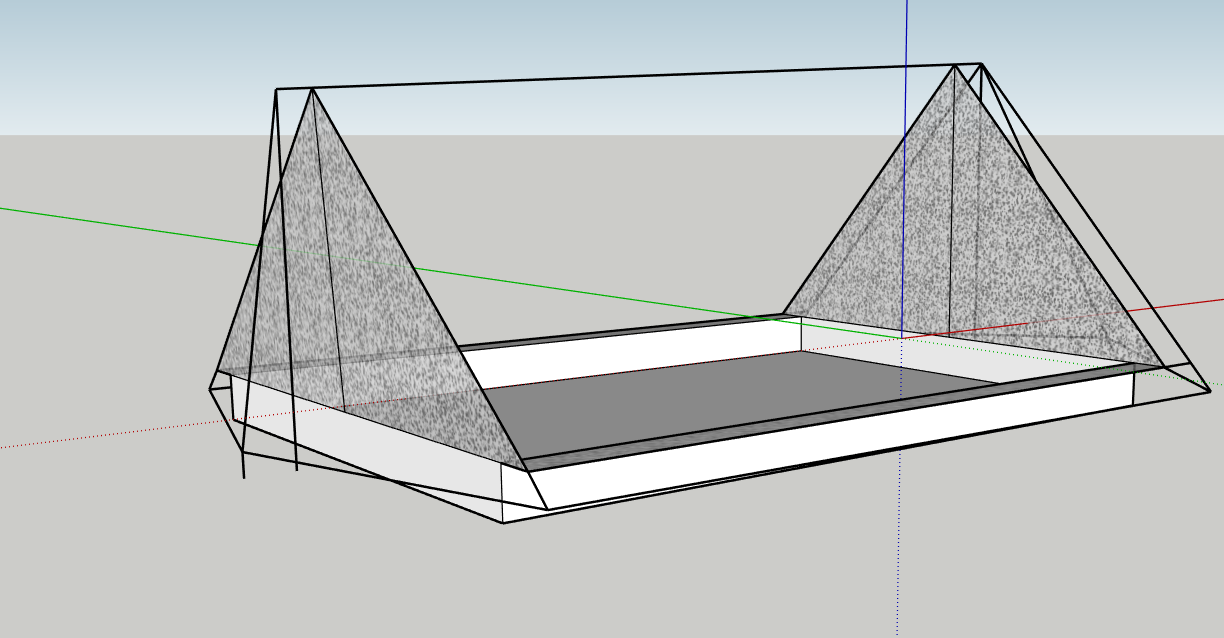
Jan 3, 2019 at 10:59 pm #3571333I fooled around with several A frame designs, then moved to a pyramid design
Jan 4, 2019 at 4:17 pm #3571451Thanks for the advice. I had kept a 3″ gap from the door to the pole to allow a space for the handle to sit in a “basket” area. This would also ideally keep the trekking pole off the mesh, since pushing on it would eventually lead to a break.
I guess I don’t really know how other tents like Zpacks achieves this, but I would assume there is a small gap.
Jan 4, 2019 at 4:49 pm #3571454Have the outside waterproof fabric go all the way to the end (making the vestibule piece a triangle)
Attach the mesh to the outside fabric 3 inches from the end leaving room for the trekking pole handle
Jan 4, 2019 at 8:55 pm #3571498Keep in mind the handle will want to slide away from the vestibule. Your pole pocket needs an adequate back wall – something stronger than bug mesh. A webbing loop attached to the forward seam might work.
Jan 10, 2019 at 10:14 pm #3572597If I was making a single wall A frame I’d take a close look at how the Yama Cirriform is put together:
https://www.yamamountaingear.com/cuben-sil-cirriform-sw-1p/
OK, it’s a Dyneema design, but there are some nice details that might work in Sil.
For attaching the inner to the fly, some people here have had good luck with bonding rather than sewing which would save complexity and perhaps a couple of seams as well. The forces are fairly modest, and it should be pretty easy to test with some offcut fabric.
But are you really sure you want a single skin? I’m also working on an A frame, but am going for a tarp as I can then combine it with a groundsheet, bivy or inner as conditions dictate, And it’s a far simpler build. You probably have your reasons, but I thought I’d mention it as an option just in case…
Jan 11, 2019 at 4:58 pm #3572696Geoff,
Thanks for the input. I thought about making it a double wall by using a bug net, however I wanted to make things a little bit simpler (and lighter). I’m sure there will be some condensation issues, but for my first attempt at a tent it seemed to make the most sense. I plan on adding 2 guy out points to either side to expand the inner area.
I’m curious on the bonding of the tent mesh to the tent fly. How would you go about doing that? Looking it up, I don’t see any specific instructions for those two materials.
Jan 11, 2019 at 7:23 pm #3572715Lance
On the single skin issue, my own take is that it’s going to be much harder to pull off than the tarp and inner approach. As you’re finding, getting the geometry right, working out how to assemble it, and ensuring that the netting will hang right in sub-optimal pitches is quite challenging. With a tarp + groundsheet/inner design those problems go away. If you use the well reviewed RSBTR 0.5 oz Noseeum mesh any weight difference should be minimal. Yama have a tutorial which would give you a good starting point for sewing an inner or bivy: https://www.yamamountaingear.com/diy/net-tent/.
I don’t know how experienced you are, so forgive me if this is stuff you’ve already considered. But many people prefer the tarp/inner for its flexibility. In summer with no bugs you can just use an ultra-light ground sheet. In winter you can use a solid inner. When it’s wet, you can pack your inner separately and protect it from the sodden outer. If you want the option of cowboy camping, you can set up the inner on its own to keep off bugs and critters and shelter you from the breeze. When it’s ghastly outside, you can push back the inner and create a large safe space for cooking under the tarp. If you design the tarp right, in bad weather you can pitch it lower to shed the wind. Yama have a smart design that allows you to do that with their Cirriform single skin, but it would be non-trivial to implement, I think. Lots of advantages to the tarp approach – I personally much prefer it.
On the bonding, someone posted about a MYOG tent where they did this, and they said it lasted well. But I can’t find the thread – I’ll post again if I do.
I’m far from a expert on bonding, but my guess would be that you’d sew a strip of whatever you’re using for the fly to the edge of the net, to give it some additional strength. Then you’d clean both surfaces with care and roughen them a little, spread the hem of the inner with a thin layer of silicon sealant (or Seam Grip if you’re using silpoly), press the seam carefully against the outer, put some weight along the join and leave it to cure for a day or two. There’s quite a lot of info on bonding if you search the forums. Personally I’d set up some test pieces and leave them outside under some stress for a few weeks to see how they stood up.
Anyway, hope there’s something here that’s helpful.
Jan 12, 2019 at 5:53 pm #3572870Here’s the guy who bonded his mesh inner to the fly:
https://backpackinglight.com/forums/topic/46644/#comments
You could ping him and ask how it stood up over time.
Jan 12, 2019 at 7:02 pm #3572883One key to bonding in your case is that you don’t want to load the bond in ‘peel’.
If you sew a thin strip of solid fabric to the edge of you netting, so that strip extends the netting, and then you bond the strip to they fly, you’re loading it in peel. Tugging on the netting will peel of the bond, just like peeling off a band-aid.
You want to use a slightly wider strip of solid fabric and sew the edge of the mesh to the middle of the strip, so the solid fabric has two free edges, and the cross section of the arrangement forms a T. Then you bond the top of the T to the fly. This way, when you tug on the bug mess, it’s tugging on the middle of the bonded strip, rather than the edge of a bond, and it won’t peel off.
Jan 12, 2019 at 8:03 pm #3572892Useful tip Rene – I’ll file that away for the future…
Jan 14, 2019 at 6:31 pm #3573114Thanks Renee,
I’ll give that a try and let you know how it works out.
Jan 14, 2019 at 7:40 pm #3573119One key to bonding in your case is that you don’t want to load the bond in ‘peel’.
Thanks for the useful tip, good to know :-)
Jan 15, 2019 at 6:29 am #3573188There is an abundance of seam bonding info floating around the forums:
site://backpackinglight.com bond
(Also – I’ve found that to be my preferred way to search this site: ask Google. If you replace ‘http’ w/ ‘site’, followed by a url, and then start adding keywords, google will search that site for those key words for you.)
-
AuthorPosts


- You must be logged in to reply to this topic.
Forum Posting
A Membership is required to post in the forums. Login or become a member to post in the member forums!
LAST CALL (Sale Ends Feb 24) - Hyperlite Mountain Gear's Biggest Sale of the Year.

All DCF shelters, packs, premium quilts, and accessories are on sale.
Our Community Posts are Moderated
Backpacking Light community posts are moderated and here to foster helpful and positive discussions about lightweight backpacking. Please be mindful of our values and boundaries and review our Community Guidelines prior to posting.
Get the Newsletter
Gear Research & Discovery Tools
- Browse our curated Gear Shop
- See the latest Gear Deals and Sales
- Our Recommendations
- Search for Gear on Sale with the Gear Finder
- Used Gear Swap
- Member Gear Reviews and BPL Gear Review Articles
- Browse by Gear Type or Brand.
