I actually did this a few years ago, but I thought it might be useful to someone. Unfortunately I don’t seem to have any pictures of the work in progress, only of the finished result.
I needed a lanyard for my Garmin Geko 201 GPS receiver. I wanted to use the GPS to document some abandoned trails using National Geographic’s Topo software, so I needed a way to carry the GPS so that it could see the sky without occupying my hands. Garmin sold a neck lanyard at the time, but it was pretty expensive. It also obstructed the battery door, and I wondered if I could make one that allowed the batteries to be changed without removing the lanyard.
The back of the Geko has a tapped hole for a machine screw, and comes with the matching screw, so I decided to see what could be done to attach a simple neck cord using that screw. My first attempt was simply a small bit of plastic with a hole for the screw, and one for the cord ends. Unfortunately this allowed the receiver to spin around so that the screen was against my chest, blocking the antenna’s view of the sky, and causing the receiver to lose lock on the satellites.
A bit of experimentation with cord and duct tape demonstrated that separating the ends of the cord and attaching them near the bottom of the receiver would curtail the spinning. I did some thinking about how to attach the cord in a way that allowed access to the battery compartment, and made some cardstock mockups to work out the dimensions.
For the bracket I chose 1/16″ aluminum sheet from the hobby shop. I inked up the area I was working on with metalworker’s layout dye (a Sharpie would also work fine), and scribed the layout of the part by tracing the cardstock pattern with a scriber.
I first cut out the outer dimensions, then drilled the holes. The hole for the screw, and two holes for the lanyard ends are required, the other holes are simply for weight reduction since the metal is far stronger than necessary. I laid out the location of each hole with the scribe, punched the center point of each hole with a center punch, then drilled the holes in a drill press.
To cut out the inside of the U I drilled a series of closely-spaced holes across the bottom of the U, then used a hacksaw to meet cut the sides legs. I was then able to bend the waste material down, cut it free from the U, and file the edges smooth.
I also filed the other edges smooth, and rounded the corners so they wouldn’t catch. I then used some emery paper to take off any lingering burrs from the edges of the holes.
I made the bends in the metal by padding the jaws of a vise, gripping the bracket, and tapping it with a rubber mallet until it was the correct angle. This took a few test fits but went pretty quickly. Once I was satisfied with the fit, I finished the metal with several coats of Birchwood-Casey Aluminum Black.
For a lanyard I used some 1/16″ nylon cord I happened to have around. I threaded a bead onto it first, then threaded the ends through a cordlock to make the lanyard adjustable. Finally I threaded the cord through the topmost holes on the legs of the U and tied figure-8 knots as stoppers. The bead prevents the cord from slipping completely through the cordlock.
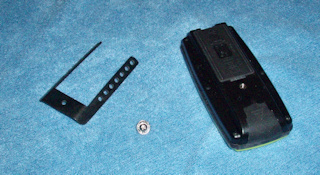
Here are a couple pictures of the results. I’ve been using this lanyard happily for some years now. The Geko is a pretty Spartan GPS, but for recording tracks and occasionally giving me my coordinates I find it quite useful, and as far as I know it’s still the lightest dedicated GPS receiver around.
Here you can see the bracket.
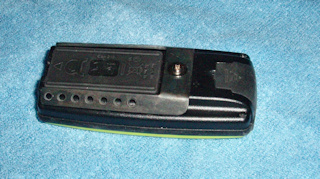
And here it is installed on the receiver.
I hope this inspires you to try a little metal working. This was a pretty easy project, it can be done with hand tools. Let me know if you have questions!
Walt
Author
Posts
Viewing 2 posts - 1 through 2 (of 2 total)
You must be logged in to reply to this topic.
Forum Posting
A Membership is required to post in the forums. Login or become a member to post in the member forums!
Backpacking Light community posts are moderated and here to foster helpful and positive discussions about lightweight backpacking. Please be mindful of our values and boundaries and review our Community Guidelines prior to posting.
This feature requires an active Backpacking Light Membership.
Premium Articles
You're currently viewing a free preview of a member exclusive premium article. Our premium articles include in depth journalism and insights from the Backpacking Light editorial team.
Get full article access by subscribing to a Premium or Unlimited Backpacking Light membership!
 .
.