Topic
Ideas for hands-free wash water dispensing
Forum Posting
A Membership is required to post in the forums. Login or become a member to post in the member forums!
Home › Forums › Gear Forums › Make Your Own Gear › Ideas for hands-free wash water dispensing
- This topic has 0 replies, 1 voice, and was last updated 7 hours, 53 minutes ago by
 Greg Deitrick.
-
AuthorPosts
-
Feb 22, 2025 at 8:44 pm #3829079
It might be comforting, for those of us that use an elbow to turn on the bathroom faucet, to have a means to turn on a small flow of water for a robust washing and rinsing of contaminated hands without touching any gear while those hands are contaminated. Washing with soap in a water source is damaging to the environment and inconsiderate to other hikers. Having a hiking partner is one solution. But I would like to suggest the following ideas for solo hikers.
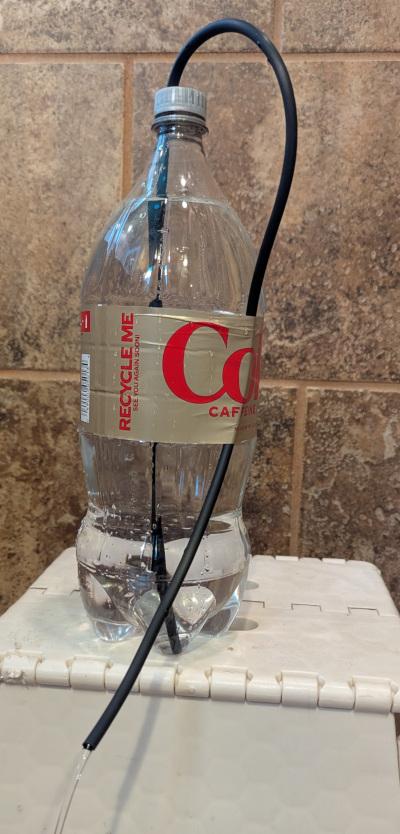
One method is a small siphon. In this case I’m using the rigid but squeezable “dirty” water bottle for my drinking water filter. The additional gear is a spare cap, drilled to snugly hold a length of small diameter thin walled plastic tubing. In this case the total weight of the cap and tube is 18 grams. The tubing in this case is ¼ inch drip irrigation tube which I think is PVC. In order to have the entire capacity of the bottle available for dispensing, the tube reaches to the bottom of the bottle on the inside, and a bit below the bottom of the bottle on the outside. This bottle is not collapsible, so a small air passage is needed at the cap. In this case there is a pin hole in the cap which cannot be seen in the photo. It may be adequate to simply install the cap loosely on the bottle instead of adding the pin hole.

To use the dispenser, fill the bottle to the top with water and either hang it or stand it at the edge of an elevated surface (log or rock, for example). In either case have the bottle upright. Now install the tube and cap on the bottle, keeping the outflow end of the tube above the top of the bottle. Then position the outflow end of the tube to be below the bottom of the bottle. Get your hands dirty. To then start the water flow use both forearms to gently squeeze the bottle just until water starts flowing out the tube, then slowly “unsqueeze” the bottle while making sure the water remains flowing at least a bit. If the “unsqueezing” is too fast the water in the outflow portion of the tube will get sucked back into the bottle, breaking the siphon and stopping water flow. It is possible but a bit more difficult to start the flow with the bottle only partially full.
There are 2 alternative methods to start the flow. In both cases the dispenser is set up and water flow is started.
In alternative 1, a tapered dowel such as a golf tee is gently inserted into the outflow end of the tubing just snug enough to stop the flow. Get your hands dirty. To then start the flow pull out the dowel. Wash and rinse the dowel as you wash and rinse your hands so it is clean enough for the next use.
In alternative 2, the cap must have a pin hole and must be tightly screwed onto the bottle. A small piece of lightweight paper or plastic is made wet and then used to cover the pin hole and prevent air flowing into the bottle. The water flow will gradually slow and stop although the bottle may become slightly crushed due to low internal pressure. Get your hands dirty. To then start the flow hold one end of a small twig or long pine needle and use the other end to push the paper or plastic off the pin hole. Discard the twig. The flow will increase to normal.
Another method would be to assemble the dispenser using a collapsible water bottle. I haven’t tried this myself. A siphon won’t be necessary. I suggest making the cap and tube assembly as above but do not make a pin hole in the cap. Also the tube inside the bottle can be short. I imagine that, after “priming” the tube by squeezing the bottle until water comes out the tube, flow will start or stop when moving the outflow end of the tube above or below the water level in the bottle using a forearm. It might be helpful to insert a length of stainless steel safety wire into the tubing so that the tubing will hold its new position after being bent. It may take two or three strands of wire to get the desired performance depending on the rigidity of the tubing.
-
AuthorPosts
- You must be logged in to reply to this topic.
Forum Posting
A Membership is required to post in the forums. Login or become a member to post in the member forums!
LAST CALL (Sale Ends Feb 24) - Hyperlite Mountain Gear's Biggest Sale of the Year.
All DCF shelters, packs, premium quilts, and accessories are on sale.
Our Community Posts are Moderated
Backpacking Light community posts are moderated and here to foster helpful and positive discussions about lightweight backpacking. Please be mindful of our values and boundaries and review our Community Guidelines prior to posting.
Get the Newsletter
Gear Research & Discovery Tools
- Browse our curated Gear Shop
- See the latest Gear Deals and Sales
- Our Recommendations
- Search for Gear on Sale with the Gear Finder
- Used Gear Swap
- Member Gear Reviews and BPL Gear Review Articles
- Browse by Gear Type or Brand.


