Topic
I want to sew a bug net for a pocket tarp, how do I make a pattern?
Forum Posting
A Membership is required to post in the forums. Login or become a member to post in the member forums!
Home › Forums › Gear Forums › Make Your Own Gear › I want to sew a bug net for a pocket tarp, how do I make a pattern?
- This topic has 17 replies, 5 voices, and was last updated 5 years ago by
 R.
R.
-
AuthorPosts
-
Feb 2, 2020 at 3:57 pm #3629618
My previous MYOG bug net shelter was an A-frame, so it was somewhat easy to figure out a pattern for it. But how would you figure out a pattern for something more shaped like a pocket tarp? What do you use to make the pattern? Normally I use old newspapers for patterns but a shelter is too large for newspapers and I don’t really know how I would go about this project.
Feb 4, 2020 at 12:17 am #3629772Perhaps the simplest method is to set up your pocket tarp, push stakes (or nails) all the way into the ground at each corner of your bug net footprint, and measure from stake to stake and from each stake to the central overhead attachment point. This will give you all the dimensions for the floor and for each triangle-shaped wall panel. Then transfer the measurements to kraft paper (Lowes, Home Depot, local hardware or building supply). Don’t forget to add seam allowance.
Or if you’re sort of a math geek like me, you can work out all the triangle measurements with a calculator.
I get the most satisfaction using a CAD program and printing my patterns on a wide format (36”) printer.
I’ve never used Sketchup, but it’s free and many people here seem to use it.
Let us know how your bug net turns out!Feb 4, 2020 at 7:12 am #3629790Thank you. I suppose the stretchiness of netting will be forgiving of imperfection, too. I was thinking I could maybe do this by folding the tarp so I can find each of the “sides” or triangles and just using the tarp on the floor as a pattern.
Is there any kind of tape that can stick to DCF but not permanently? Scotch wrapping paper tape? Post-its?
Feb 4, 2020 at 5:35 pm #3629895I don’t think DCF is too picky about general adhesives. Scotch take seems to stick and peel about as you’d expect – I just tried it.
You’re correct in thinking you could lay the tarp flat and measure out triangles. The only lengths that don’t actually have seams are from the peak to the rear corners. But to get the foot print, I’d recommend setting it up and measuring. With it pitched, you could also try draping the uncut fabric over the tent and marking it with chalk to trace your pattern directly on (of course, this excludes margins for seams).
Similarly, if you want to sew the net to the tarp, like the original Hexamid tent, you could attach it to the pitched tarp with a bunch of mini binder clips and adjust the size until you have what you want, then trace your pattern on to the netting with chalk.
Feb 4, 2020 at 6:12 pm #3629898Oh you are so smart with the chalk. I don’t think I want to sew it to the tarp. Also, I have the one without the doors so it will always be a minimalist shelter.
Feb 5, 2020 at 9:23 am #3629961Piper – I first tried the trace method you suggested. I think you’ll find your measurements to be short unless you over-correct for the rebound of unstretched DCF. Next, I used the method Lance suggests – PERFECT! It required a bunch of straight-line, right-angle, and arcTAN calculations, but the result was dead-on. If you hate math, forget it. If you love math, Merry Xmas.
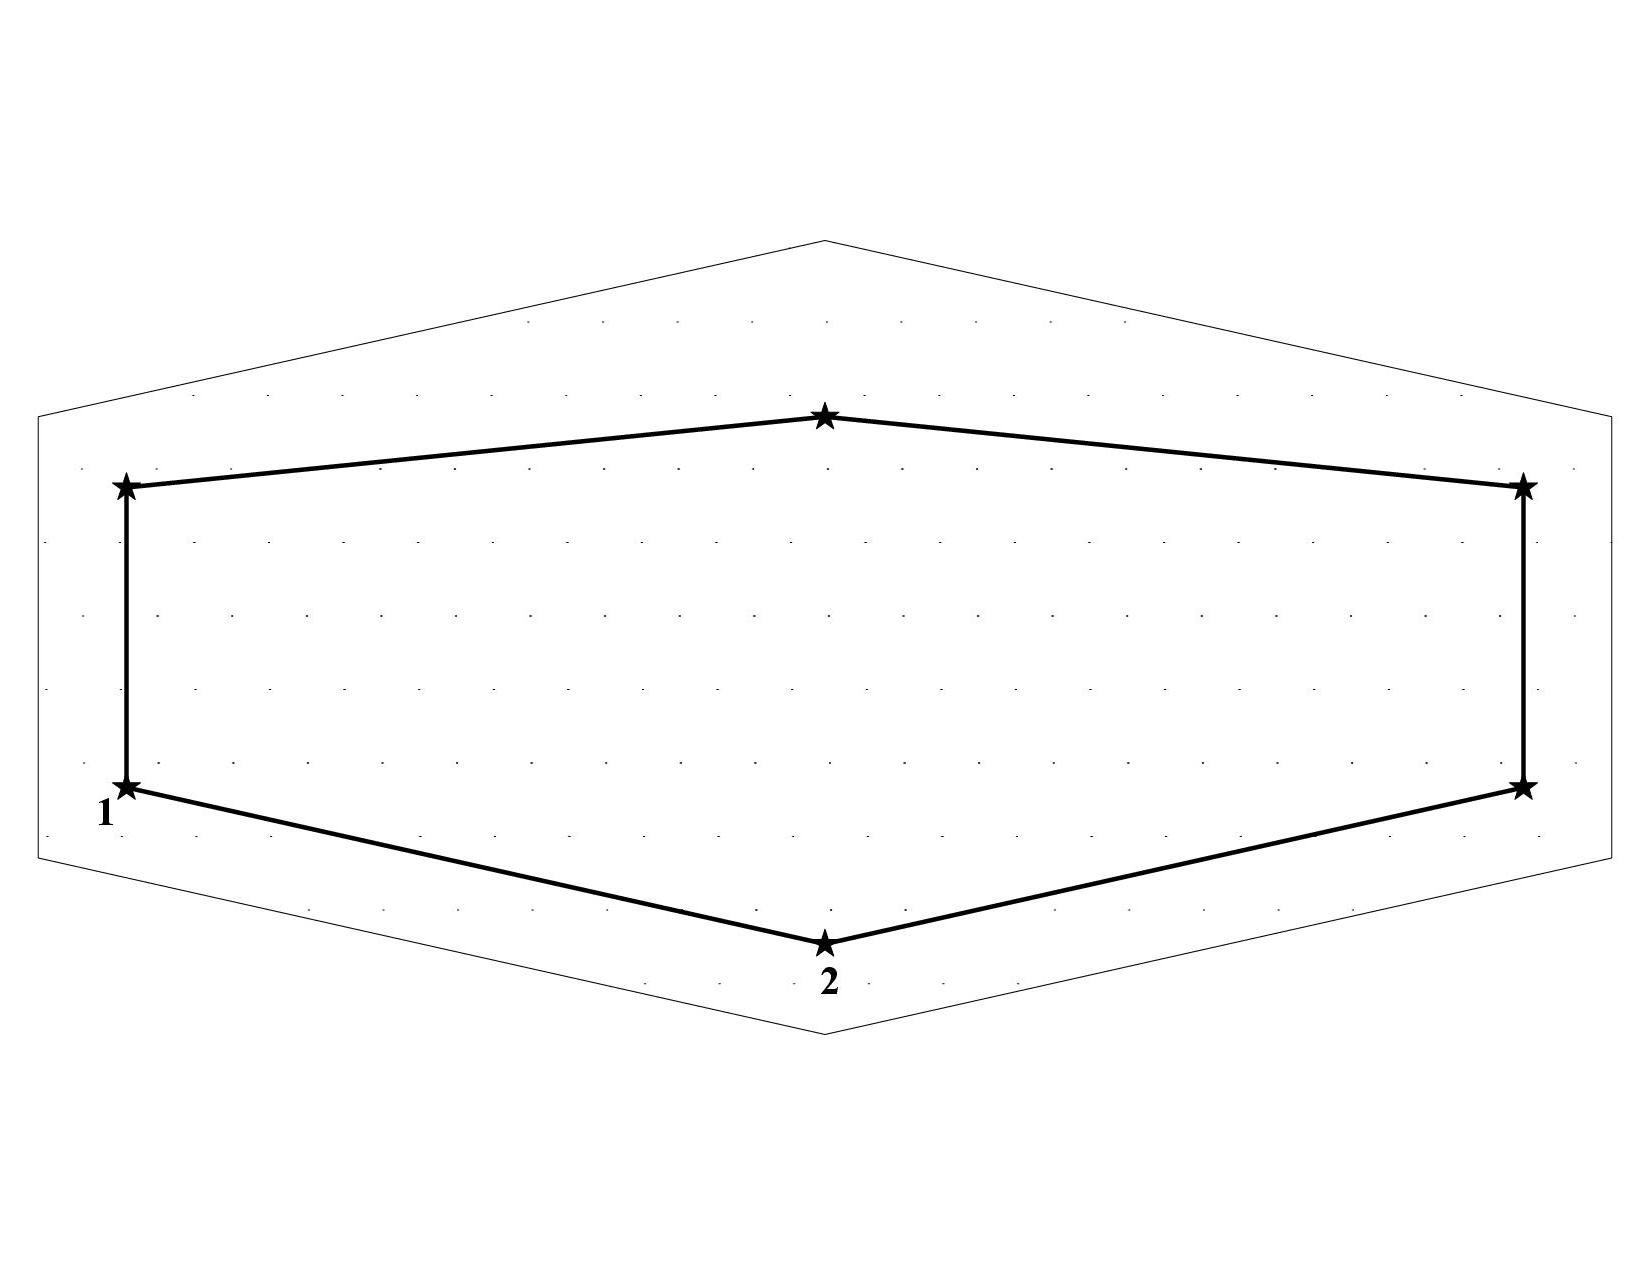
Feb 5, 2020 at 9:20 pm #3630053Here’s an example and more detailed instructions for the ‘stake and string’ method I mentioned above:
Assume the outer border is the footprint of you pocket tarp and the inner border is the footprint of your proposed inner bug net:

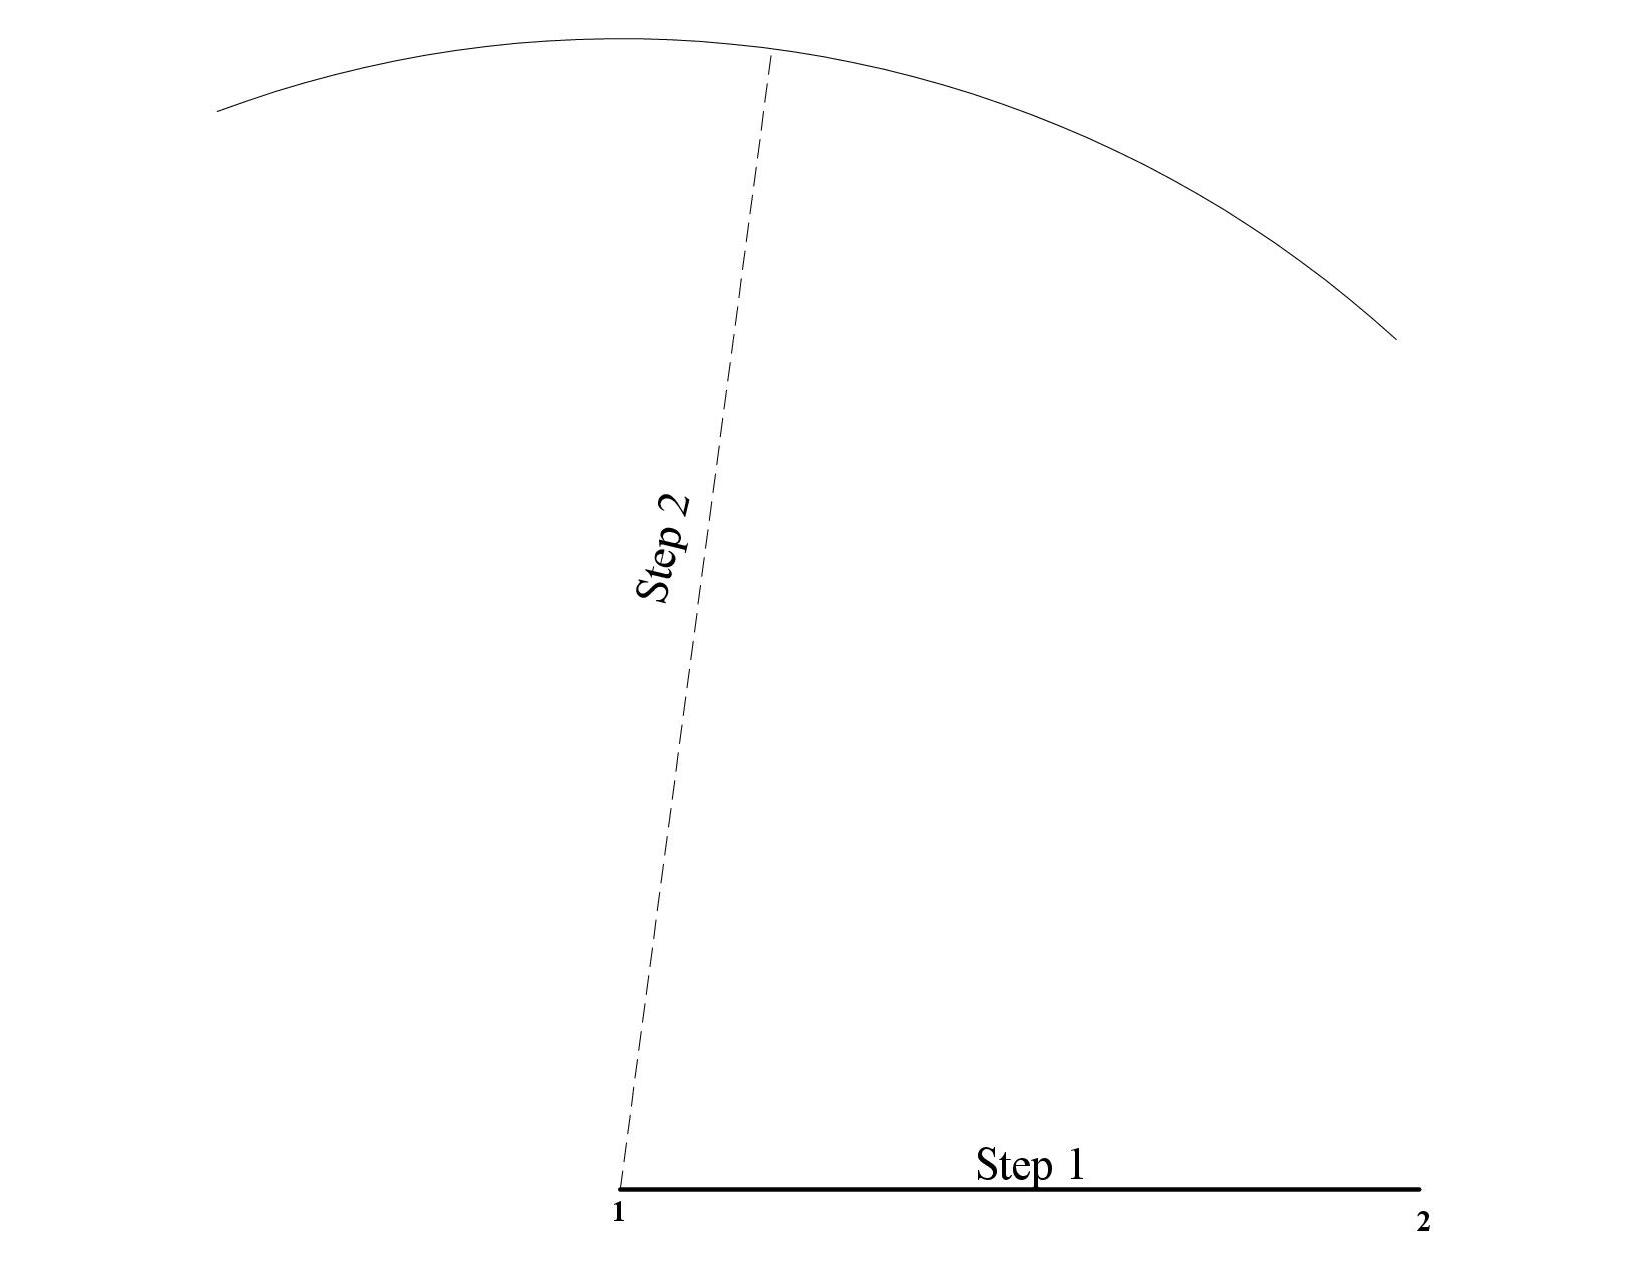
Step 1. Measure from point 1 to point 2. Transfer the measurement to pattern paper.
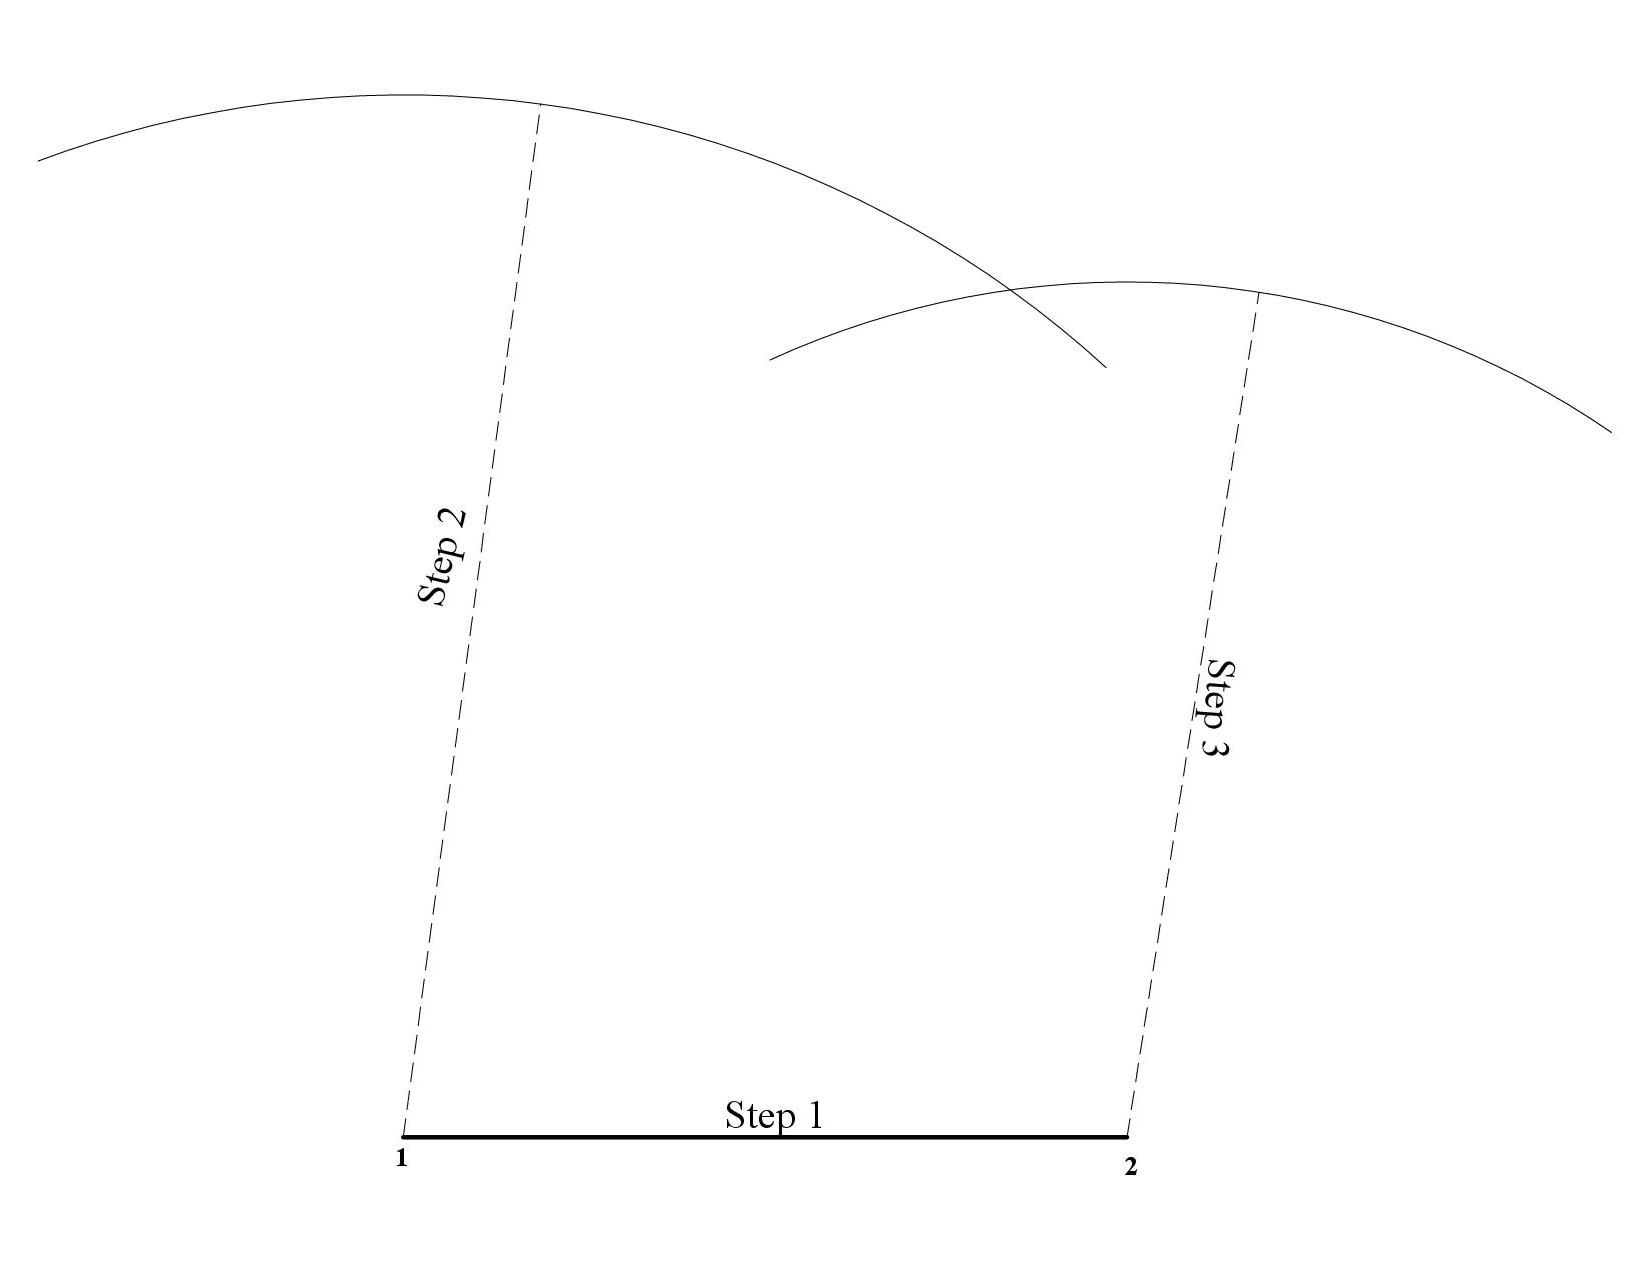
Step 2. Measure from point 1 to the central overhead peak and transfer this measurement to an arc using whatever is handy for you (string, tape measure, yard stick, etc).
Step 3. Measure from point 2 to the central overhead peak and transfer this measurement to an arc using whatever is handy for you (string, tape measure, yard stick, etc).
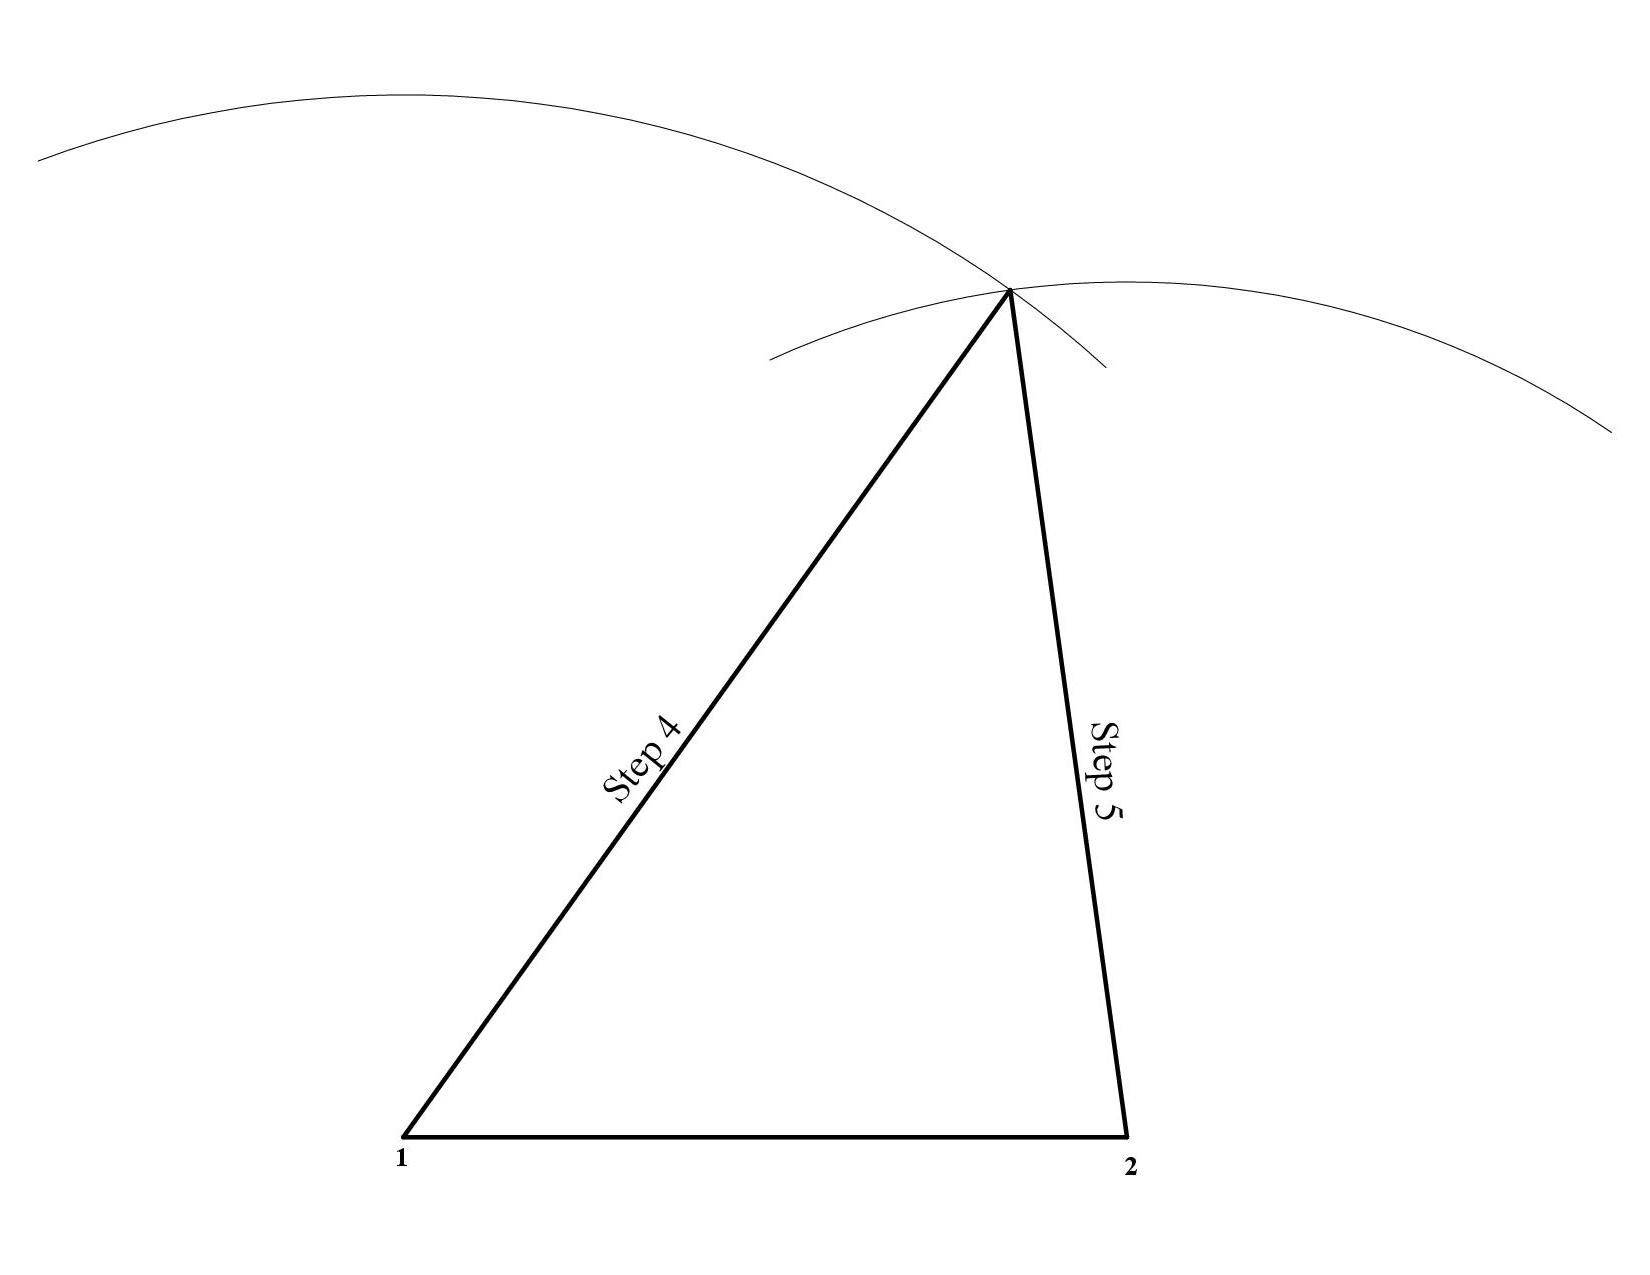
Step 4. Draw a line from point 1 to where the arcs intersect.
Step 5. Draw a line from point 2 to where the arcs intersect.
Repeat for all the panels. Add seam allowance.
The footprint can also be done with intersecting arcs. It’s just a little more complicated.
Hope this helps.
Feb 6, 2020 at 7:35 pm #3630186Thank you. The tarp has finally arrived and now I have to wait for a weekend where I have time to set it up and try to figure this out.
Feb 9, 2020 at 6:18 pm #3630604Well, my efforts were an abject failure. $40 of bug netting down the toilet. Oh well.
Feb 9, 2020 at 6:35 pm #3630607Dear Diane,
Could you elaborate on what happened? Curious,as I would like to try something similar in the future…
Feb 9, 2020 at 8:46 pm #3630632Well, I made a pattern from the tarp. If you fold it in half you see the shape of the flat piece they used. I then measured a triangle. I gave everything huge allowances. Everything seemed to be fitting together okay until I sewed on a skirt around the edge and then suddenly the triangle was not anything like the right shape. I don’t know what happened. The netting is black and it’s really hard to figure out what the hell is going on. Maybe someday I’ll take it apart and see if it can be salvaged, but what a disaster.
Feb 10, 2020 at 12:35 pm #3630713Sorry to hear that. If you’re up for it, some photos might help sort out what went wrong. Might be challenging given the black, see-through fabric.
Feb 10, 2020 at 1:48 pm #3630718I think part of the problem is that maybe a straight stitch shouldn’t be used on noseeum. Maybe I should have used a zig-zag.
Feb 10, 2020 at 3:41 pm #3630732Okay, so I had this weird idea. What if the netting just went all the way around the entire thing along the edges. No floor. Let it drag on the ground. Lift it up to get inside.
The first thing I thought was you can’t do that, it will get wet. Then I thought, so what? The tarp itself gets wet and nobody cares. If the net doesn’t enclose you because there is no floor, you yourself won’t get wet. The water on it will just percolate down into the ground.
With my poor sewing skills, I don’t think I would actually sew the netting to the tarp. Perhaps some small strips of velcro could allow netting to be inserted as needed.
Feb 10, 2020 at 8:37 pm #3630763A few posts back, I thought of suggesting sewing a bug net skirt to the bottom edge of the tarp. It’s been done to plenty of pyramids.
You could also throw a big piece of net over the top of the tarp that comes down to the ground all around the edges and secure it to the tent’s guy loops with little binder clips.
Maybe you could do that on the inside of the tarp, held up in the middle by the pole, securing to the guy points with binder clips from the inside, and put a long, thin bungee cord through the binder clips to hold all the netting out near the edge of the tarp. Maybe add a few extra binder clips to take up any slack or folds in the netting.
Feb 11, 2020 at 11:04 am #3630825I’ve already cut up the netting, so I have to make do with that. I am going to see if I can hand-sew the perimeter netting to the stitches around the edges. Not through the DCF itself, but through the thread that is already there. Then for the front, I’m hoping that the largest piece of uncut netting will fit or if not, I can creatively sew up something from the remaining large pieces that will fit. It would be nice if I could make the front piece optional, something I can just loop with shock cord to my trekking pole and the two front tie-outs. I found an old thread with interesting information about adding netting.
My intention for this pocket tarp is to use it locally. There aren’t tons of mosquitoes where I live. If anything, the flies bother me a lot more. This will be much lighter than what I have.
Feb 11, 2020 at 12:47 pm #3630831Actually, I found a pretty good video out there where the person attached a sea-to-summit nano net and it looked roomy enough for me, so maybe I will scratch this whole project and go with that. Kind of a big waste of money, oh well.
Feb 11, 2020 at 2:41 pm #3630842If you’re interested in attaching a net skirt to the perimeter, there’s really no harm in puncturing the hem if the tarp.
If you’re reluctant to touch the tarp with your machine, you could cut some long 1″ strips of waterproof fabric, sew the net skirt to that and then use double sided tape to attach it to the tarp. When you sew the strip to the net, you could include some smaller strips or cord for door ties to hold the netting up when you don’t want it.
Your idea for the door sounds like it should work.
-
AuthorPosts
- You must be logged in to reply to this topic.
Forum Posting
A Membership is required to post in the forums. Login or become a member to post in the member forums!
LAST CALL (Sale Ends Feb 24) - Hyperlite Mountain Gear's Biggest Sale of the Year.

All DCF shelters, packs, premium quilts, and accessories are on sale.
Our Community Posts are Moderated
Backpacking Light community posts are moderated and here to foster helpful and positive discussions about lightweight backpacking. Please be mindful of our values and boundaries and review our Community Guidelines prior to posting.
Get the Newsletter
Gear Research & Discovery Tools
- Browse our curated Gear Shop
- See the latest Gear Deals and Sales
- Our Recommendations
- Search for Gear on Sale with the Gear Finder
- Used Gear Swap
- Member Gear Reviews and BPL Gear Review Articles
- Browse by Gear Type or Brand.
