Topic
How to stitch a loop on a mesh inner panel?
Forum Posting
A Membership is required to post in the forums. Login or become a member to post in the member forums!
Home › Forums › Gear Forums › Make Your Own Gear › How to stitch a loop on a mesh inner panel?
- This topic has 11 replies, 6 voices, and was last updated 3 years ago by
 Niko Z..
-
AuthorPosts
-
Jan 28, 2022 at 6:03 pm #3738419
Hello,
I have an octogon mid with a mesh inner that is a tad short lengthwise for my height. I figure that I can stitch a loop on mid mesh panel next to my head and toes, to keep them off me. There is enough give in the mesh to stretch it outwards, and enough clearance from the fly. There are no seams on that part of the inner, only mesh.
I should also stich a recipient loop on the fly itself. There is a folded seam in the target location on the fly. A burly loop for the guy rope is sewn through that seam on the outside of the fly. It seems I could just stitch another loop through the fly from the inside and seal the stitch holes with silicone.
However, I am not sure how to attach a loop to the mesh itself. My skill level is non-existent, but I think I have sewn a few buttons at the age of five. Could I just stitch a piece of quarter-inch gross-grain directly to the inner mesh?
Could the experienced folks here kindly point me in the right direction?
Cheers,
Niko Z.
Jan 28, 2022 at 7:14 pm #3738423My first inclination would be to put something (another piece of grosgrain, or a woven fabric, preferably a relatively strong one that doesn’t ravel much at the edges, maybe woven nylon like Supplex) on the other side of the netting also, to take up any of the strain that would be caused to the mesh by pulling on the stitches. Then stitch through all 3 layers. The more area the stitching covers, the more the force will be spread out, theoretically at least.
Jan 29, 2022 at 1:23 am #3738439Some mesh inner manufacturers (cottage and DIY) put a patch with an eyelet on the mesh wall, and then pass a line through the eyelet. It has a cordlock on the inside so the distance between outer and inner is adjustable by pulling the cord and setting with the cordlock.
Jan 29, 2022 at 7:37 am #3738445Cut out two 3″ squares of 0.9 oz noseeum mesh and place them together with one on each side of the netting at the desired location. First pin then tape around edges with masking tape. Next sew around the perimeter about 1/4″ from the outer edge with Guterman Terra 80 thread and 70/10 needle using a longer stitch length. or you could even do it by hand if you don’t have a machine.
Now sew your grosgrain to the center of reinforcement. Go with a wider grosgrain, at least 1/2″ wide and sew on with an X patten and a square around the X so as to distribute the stress over a larger area.
Always use 3/32′ shockcord when pulling on mesh panels.
Jan 31, 2022 at 8:44 pm #3738681Thank you for the informative replies. It seems that two layers of mesh and some grossgrain are a way to go. I do not have the machine at home. Should I just stitch by thread and needle, or is there some benefit to hand held stitching device? (I am thinking of future ideas, like adding a removable mesh skirt to my tarp).
Is there an online store that specialises in the threads and fabrics mentioned above? I have tried looking on Amazon, but it seems a bit hit and miss, or perhaps the items are described diffently in product specifications, which makes me uncertain.
Cheers,
Niko Z.
Feb 1, 2022 at 3:22 am #3738693Any lightweight thread will work as long as it’s polyester. Can be bought cheap at Walmart or craft store. You’ll also need assorted hand sewing needles. PM me your address and I’ll mail you the noseeum squares and grosgrain, if you’re in the contiguous 48 states.
Feb 1, 2022 at 9:07 am #3738716Some mesh inner manufacturers (cottage and DIY) put a patch with an eyelet on the mesh wall, and then pass a line through the eyelet. It has a cordlock on the inside so the distance between outer and inner is adjustable by pulling the cord and setting with the cordlock.
Oooh I like the idea of having the cordlock inside the net tent. That seems like an ideal location.
Feb 2, 2022 at 9:36 am #3738798when putting patches on both sides of the fabric, make one larger than the other so stitch lines and fabric do not create an “edge” that is a tearing point. Not as important on stretchy stuff like netting, but can make a difference.
Stretch in a fabric is not a friend to grommets. Some small bit of inflexible patch is generally better. This could be combined with a larger patch of stretchy fabric.
Feb 2, 2022 at 5:24 pm #3738862@Monte Thank you for your kind offer, PM sent.
@Mole that is an interesting idea, it took me a while to visualise it. Do you have any link or image that showcases such a design?
@Dave Should the bigger patch go on the backside, opposite of the grosgrain loop?I am learning a lot here, I really appreciate everyone’s input!
Feb 3, 2022 at 1:26 pm #3738906Niko
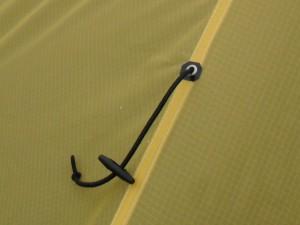
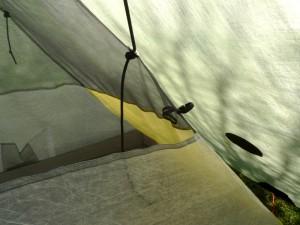
Herecare a couple of low Res photos I’ve found of Oookworks inners using the method.
They are both on seams, but I’ve also seen them on mid panels. The outer end of the shockcord can be a toggle or mitten hook. Inside there is a cordlock, so one attached the connection can be tensioned or loosened as appropriate.
 Feb 3, 2022 at 1:26 pm #3738907
another
Feb 5, 2022 at 6:23 am #3739073Thank you for sharing these photos, the concept is really cool!
I will try to do something similar on the mesh, using patches as suggested.
Cheers,
Niko
-
AuthorPosts
- You must be logged in to reply to this topic.
Forum Posting
A Membership is required to post in the forums. Login or become a member to post in the member forums!
HAPPENING RIGHT NOW (February 11-21, 2025) - Shop Hyperlite Mountain Gear's Biggest Sale of the Year:

Our Community Posts are Moderated
Backpacking Light community posts are moderated and here to foster helpful and positive discussions about lightweight backpacking. Please be mindful of our values and boundaries and review our Community Guidelines prior to posting.
Get the Newsletter
Gear Research & Discovery Tools
- Browse our curated Gear Shop
- See the latest Gear Deals and Sales
- Our Recommendations
- Search for Gear on Sale with the Gear Finder
- Used Gear Swap
- Member Gear Reviews and BPL Gear Review Articles
- Browse by Gear Type or Brand.
