Topic
How to prioritize grain direction (Silpoly X-Mid Clone)
Forum Posting
A Membership is required to post in the forums. Login or become a member to post in the member forums!
Home › Forums › Gear Forums › Make Your Own Gear › How to prioritize grain direction (Silpoly X-Mid Clone)
- This topic has 9 replies, 6 voices, and was last updated 2 years, 8 months ago by
 Bryan B.
-
AuthorPosts
-
May 26, 2022 at 9:04 am #3750357
I’m about to make my first tent. The design will be “very inspired” by the X-Mid 2…
Since the tent consists of three types of triangles, I would like some input on how to prioritize what direction to position them when cutting the fabric.
Should I try to maximize the grain direction to handle the forces along the “steepest” corners and the ridge line?Or doesn’t it matter that much?
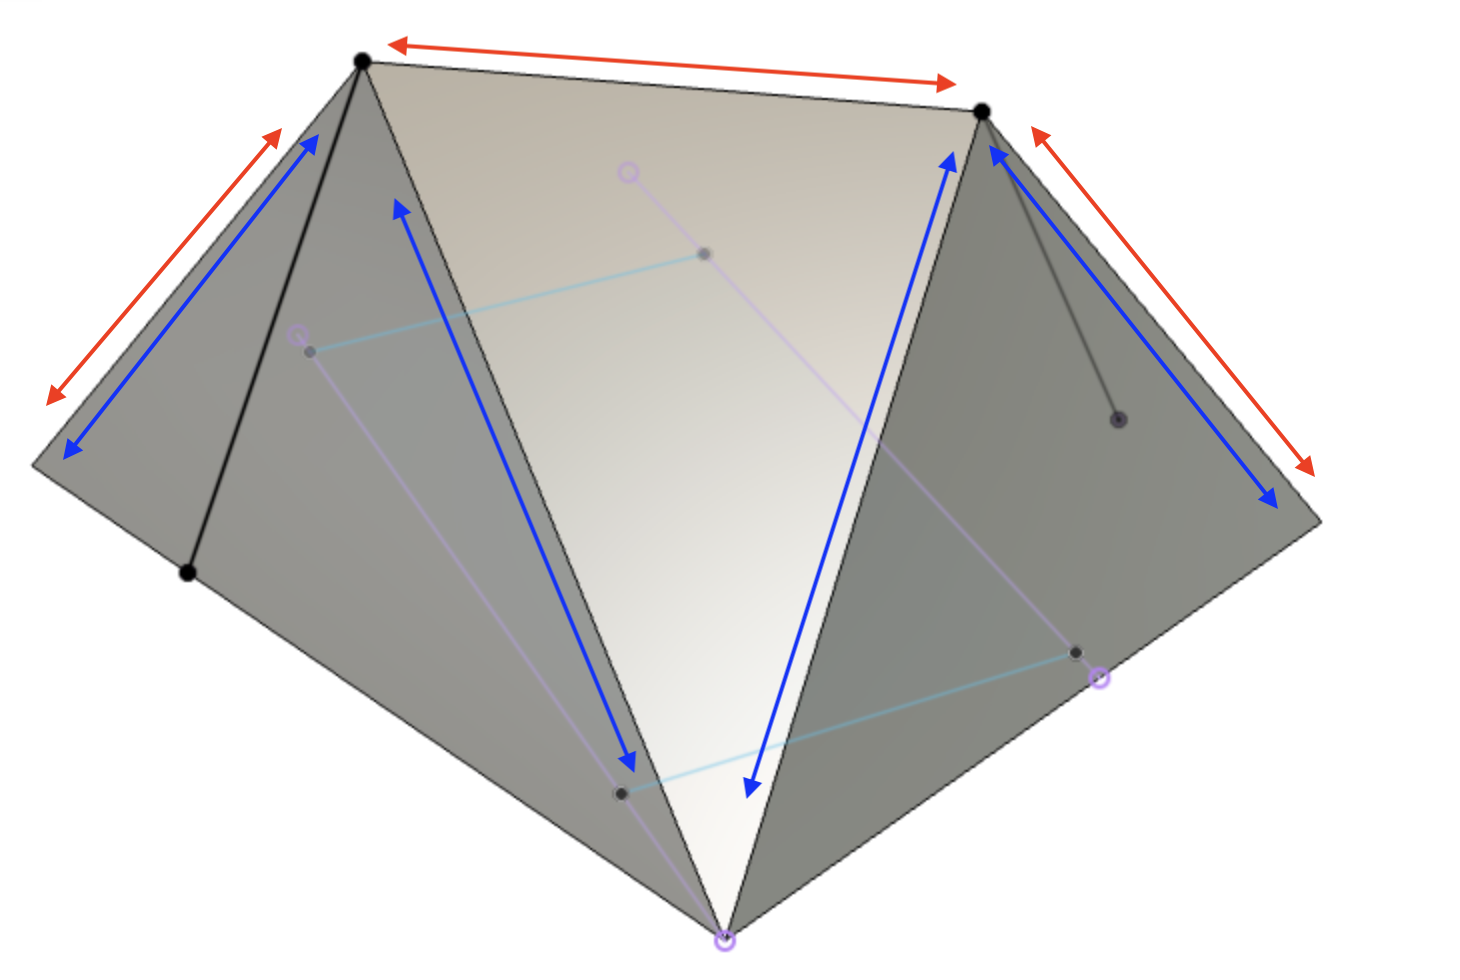
See image: The blue arrows is grain direction, ridge line is 80° from grain. The red arrows the (what I expect to be) the largest forces.
The fabric (Silpoly, 30den, #72098 at extremtextil.de) is quite stretchy at the bias, not so along the grain/weft.
And yes, I will make cat cuts, 2-3% deep, but I think they will be “deepest” closer to the corner where there’s more fabric, not in the middle of each side.
Thoughts on that?I’m grateful for all input you can bring!

#firstpost
May 26, 2022 at 11:15 pm #3750427I’ve seen many theories about this; but for your purposes, would suggest eyeballing an X-mid, and go with Dan Durston’s choices. He has put an enormous amount of time on such issues and how they apply to his design.
One niggle: By grain, we often mean the direction of the threads that parallel the sides of the roll, or the warp. But there is also the weft, with threads going across the grain, that on some weaves can be hard to distinguish without the roll in front of us. (This does not apply to DCF, which is not a true weave.)
Thanks for the OP. Look forward to posts here that can furnish more guidance.
May 27, 2022 at 7:08 am #3750434Great #firstpost!
I do not MYOG and cannot answer your question but it is interesting to see how you are orienting the grain direction so that one side of each triangle is in the strongest orientation. That makes sense on one level but I wonder if you end up with weird puckers when taking this approach because of uneven tension on adjacent panels. I will be very curious to see more responses to this thread.
May 27, 2022 at 9:49 am #3750446Be prepared for very slack seams unless you intentionally stretch them out by boosting your poles well above intended/modeled and/or intentionally shorten edges in anticipation of stretch to get to the desired dimension. It will be a compromise one way or the other given that all those triangular panels will have different stretch percentages along each edge.
-H
May 31, 2022 at 7:21 am #3750713I’m working on a similar project, and have been laboring over the same questions, so I’ll be curious to see if any additional insight gets added to this post.
Still prototyping w/ ripstop nylon before I use the silpoly, but my plan is opposite your diagram – grain along bottom edges and ridgeline – based entirely, however, on eyeballing (as suggested above) pictures of what was done w/ the x-mid 2 and then more recently w/ the x-mid 1 v2. Both seem to have the door and side panels w/ grain along bottom; the sloping roof panel seems to be oriented with grain along the long edge (where it connects to the door panel) in the x-mid 2, but with the grain along the ridgeline in the x-mid 1 v2 – since the x-mid 1 v2 is more recent, I’m going with that. I’ll be cutting/sewing in the next week or two, so I can share how well this orientation works then – or if you have done yours by then, I’d love to hear what worked (or didn’t) for yours.
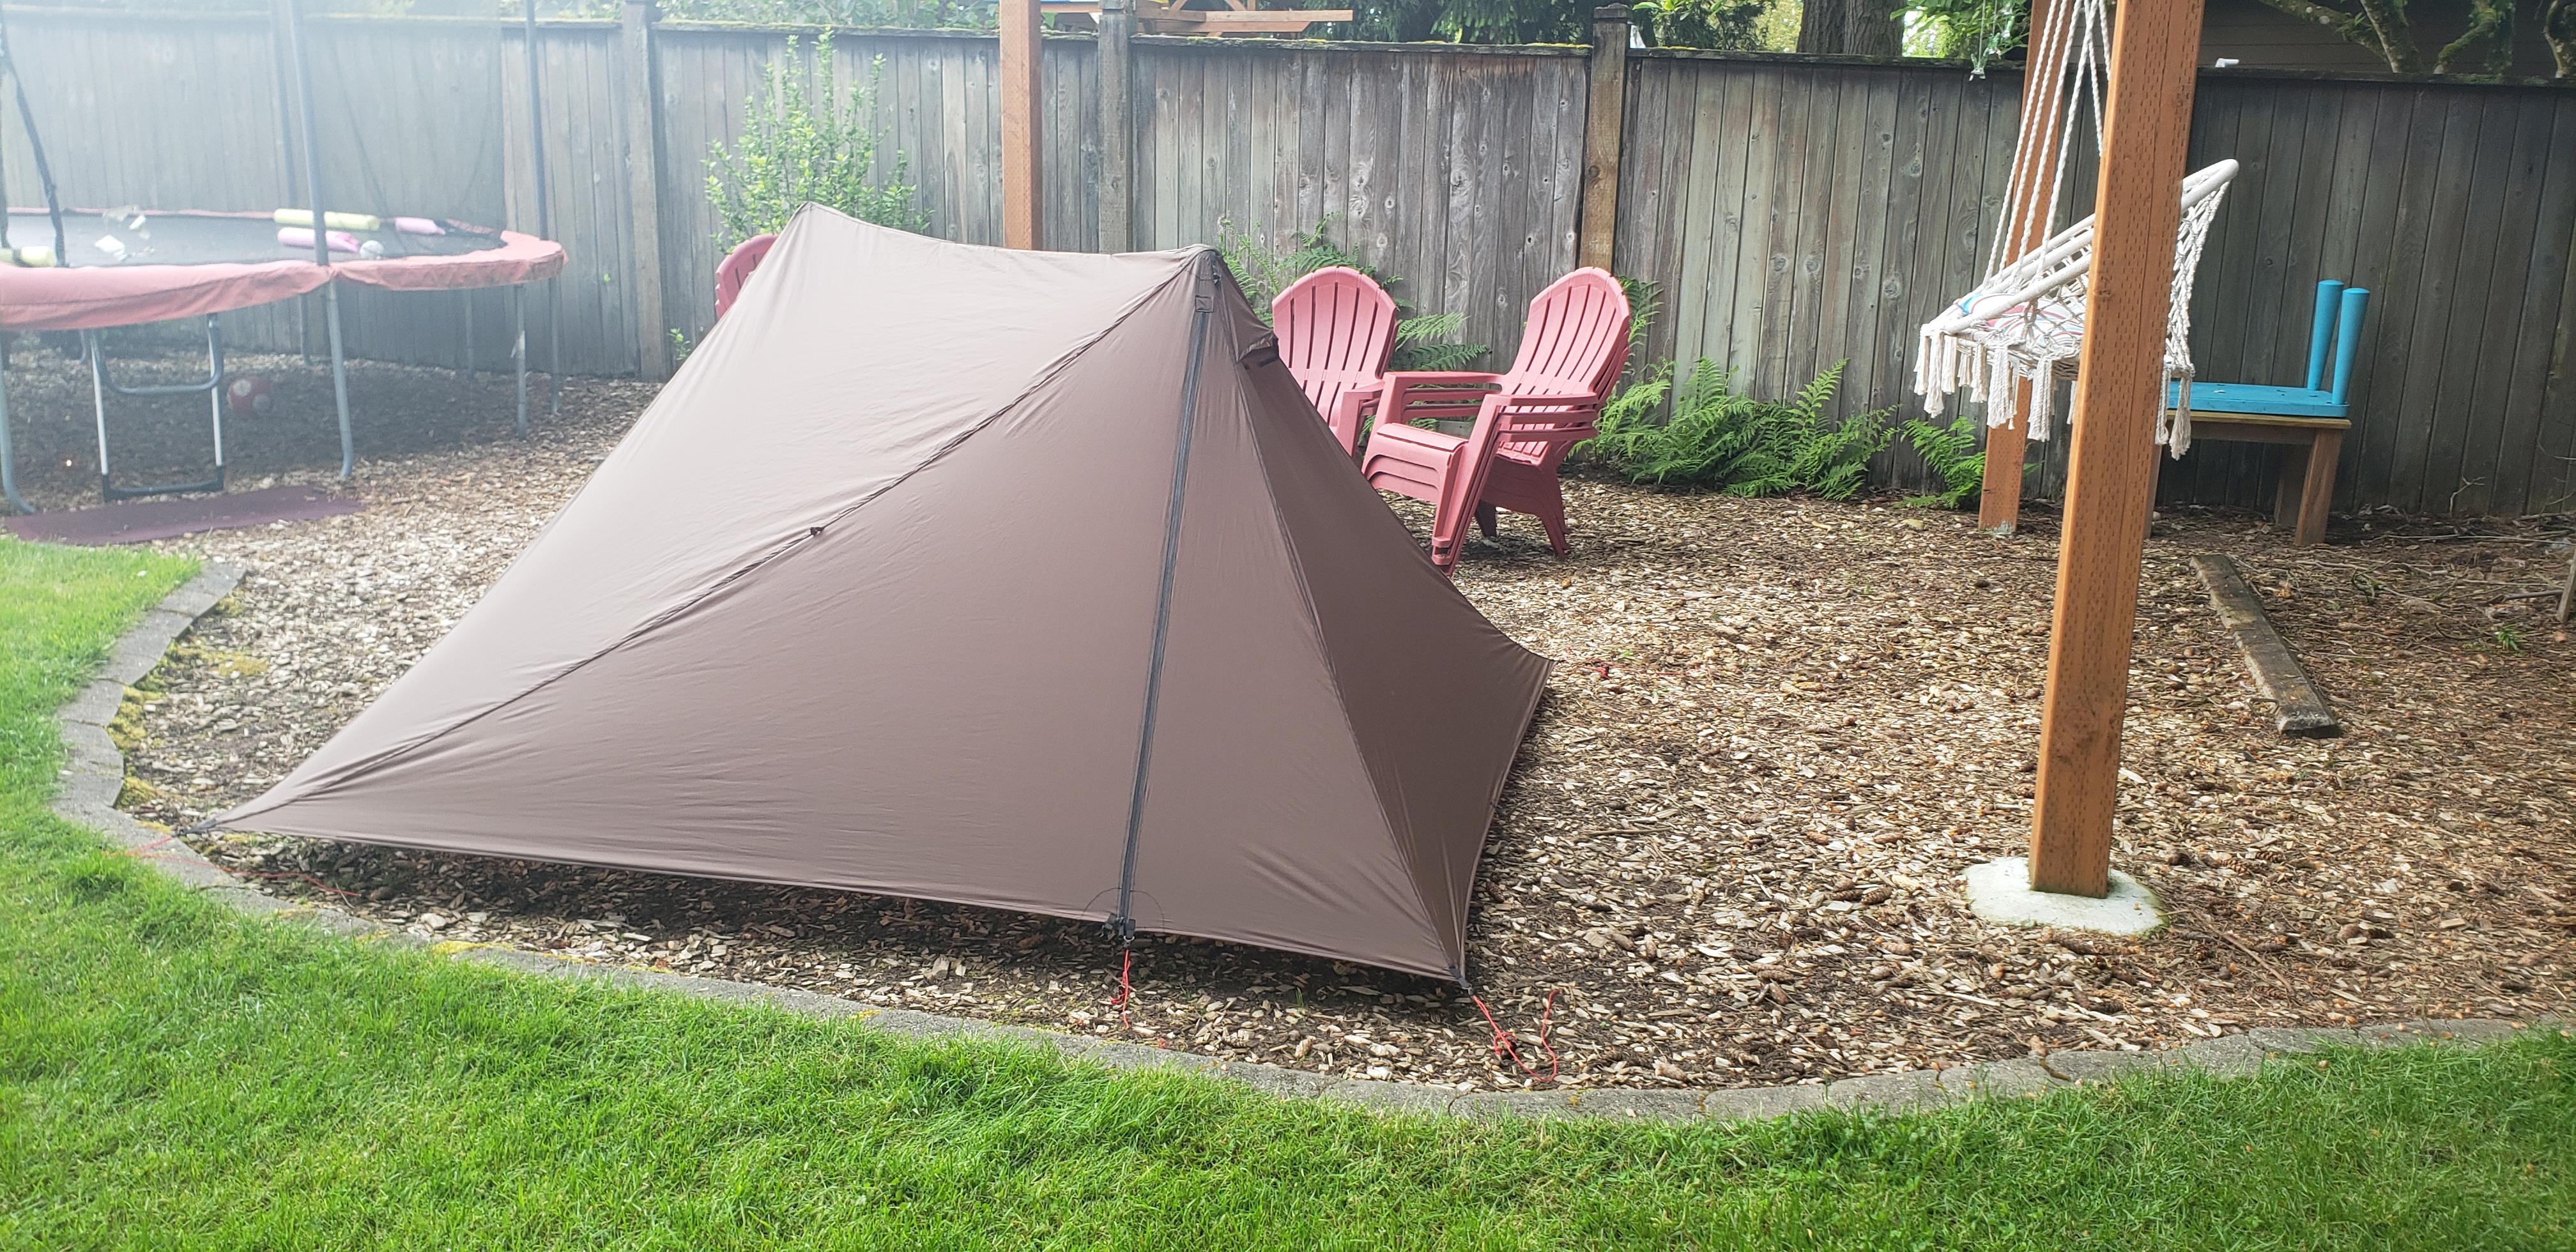
Jun 6, 2022 at 6:07 pm #3751256I just finished a similar clone project (at least the rain fly portion) and aligned my panels as described by Nathanael. I aligned the grain (warp) along the bottom edge for all the side panels. This also helped align the bias for the side seam between the door and end panels. I aligned the grain with the ridgeline on the roof panels. Doing this means the bias between roof and side panels does not perfectly align but they are all on the bias and given the imprecision in my cutting and sewing and caternary cuts I don’t think was too big of an issues. Full disclosure, I did screw up and fold and sew the flat felled seam the wrong way along the ridgeline and thus made one roof panel slightly shorter than I wanted and the other longer. Decided to leave it rather than add another set of holes across the top or buy more fabric and that probably accounts for a little bit of finicky tensioning/some wrinkles but all in all I think it turned out ok (not great). It did hold up well to some pretty good rain and wind in my backyard and that is what matters to me. I used RBTR 1.1 Silpoly XL and found it pretty nice to work with. Now planning my inner.
 Jun 6, 2022 at 9:08 pm #3751352
Did you shorten the length of the cuts along the bias to account for stretch when pitched (i.e. reduce the door/roof seam side cuts by ~ 7.5″), or did something in how you sewed it (or the slightly mismatched bias) keep that bias stretch from distorting the tent pitch?
Jun 7, 2022 at 12:20 am #3751374Thanks, Bryan. That is the info I was looking for, and appears to have produced a very taut outer. It is also consistent with orientation of grain on tents found in chain gear stores when they were more inclined to display set up tents.
With respect to Nathanael’s inquiry, I’ll note that the seams between the panels, especially if they are lap felled as they usually are, are much less elastic than the fabrics themselves, and that may have something to do with why bias orientation is not critical.
Jun 7, 2022 at 6:28 am #3751391Thanks for the input everyone!
I took your advise and went back to Plan A:
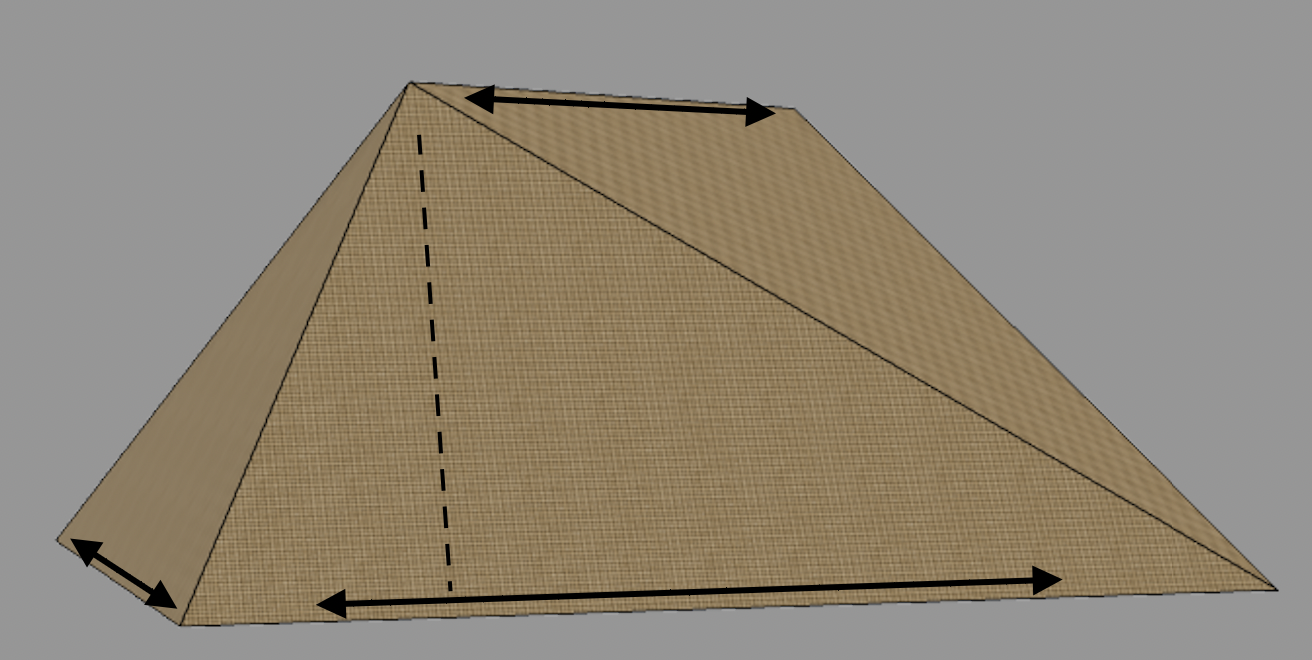
Grain (warp) aligned along the bottom edge for all the side panels and ridgeline.
Just like Brian B has done!Cat cuts: 2 % on the diagonal sides, 1.5 % along the ground and ridgeline, parallell with the grain.
First seam done (ridgeline): “True Flat Felled Seam”. Great help from this YT-video by Tac Blades to make the seam ok.
More to come!
Jun 7, 2022 at 10:53 am #3751423I would agree with Sam. In my experience, the multiple layers of the flat-felled seam seemed to compensate for any difference in bias stretch. I just used a lot of clips, took my time, used one hand to keep fabric taut (but not stretched) on backside and checked alignment every couple inches when repositioning my other hand. Keeping the backside taut also helped me keep things strait along the catenary seams. I did not do catenary cuts along the bottom and I did the bottom rolled edge last so I could make up for any stretch (or slightly longer roof panel in my case) and end up with a clean looking bottom edge all around.
-
AuthorPosts
- You must be logged in to reply to this topic.
Forum Posting
A Membership is required to post in the forums. Login or become a member to post in the member forums!
HAPPENING RIGHT NOW (February 11-21, 2025) - Shop Hyperlite Mountain Gear's Biggest Sale of the Year:

Our Community Posts are Moderated
Backpacking Light community posts are moderated and here to foster helpful and positive discussions about lightweight backpacking. Please be mindful of our values and boundaries and review our Community Guidelines prior to posting.
Get the Newsletter
Gear Research & Discovery Tools
- Browse our curated Gear Shop
- See the latest Gear Deals and Sales
- Our Recommendations
- Search for Gear on Sale with the Gear Finder
- Used Gear Swap
- Member Gear Reviews and BPL Gear Review Articles
- Browse by Gear Type or Brand.
