Topic
Anyone add pit vents? Wanting to add to a Patagonia Nano Puff Bivy Pullover.
Forum Posting
A Membership is required to post in the forums. Login or become a member to post in the member forums!
Home › Forums › Gear Forums › Make Your Own Gear › Anyone add pit vents? Wanting to add to a Patagonia Nano Puff Bivy Pullover.
- This topic has 16 replies, 6 voices, and was last updated 7 years, 1 month ago by
 Rusty Beaver.
-
AuthorPosts
-
Dec 21, 2017 at 7:59 pm #3508679
I love this jacket but it’s too hot in the pit area for me. So, I’m thinking about adding pit vents. To keep the material from unraveling, my thought was to sew what essentially would be a very long button-hole… tight zig-zag down, around, and back up…. just like when making a button hole… except it would be 4-5″ long. I’d then cut the center… just as you’d do when making a button hole.
At that point, I’d likely add some sort of mesh… primarily to reinforce the opening.
My concern is the tight zig-zag stitching creating a stiff area and discomfort. I’m guessing it would be more comfortable than a standard pit zip but maybe not. Maybe I’m worrying for nothing and should just do it.
Has anyone done anything like this… or have any ideas or insight?
Dec 21, 2017 at 10:31 pm #3508712I have one and I really do like it
I wouldn’t do it myself, I think you may not have the correct clothing article for what you are doing as it is really meant as an UL static insulation piece, hence the generous cut
Dec 21, 2017 at 11:50 pm #3508731Thanks. I don’t use it for activity but as a general use jacket around town, my yurt, car camping, etc. I may be an anomaly as the jacket is generally just right in terms of warmth with the exception of the pit region. They are almost always too warm in this jacket… and sometimes I can even wear it in temps where I’d prefer a little more insulation yet I’m still overheating in the pits.
Would hate to get rid of it as everything else about it is perfect for me. However, I don’t want to be washing it all the time just because my pits are sweating. Currently, I wipe off the inside of the pits with rubbing alcohol so bacteria doesn’t build there creating odor. I’d prefer to not have to do that each time I wear it though.
Dec 22, 2017 at 12:25 am #3508735To add to your decision, I have a Kuiu Kenai hooded jacket made of similar insulation, Toray 3DeFX+, and I love the 12″ pit-zips on it. I have a warm metabolism generally, especially in the underarm area, and usually wear this soft cushy jacket vented until I need to block wind. Great for evening hikes with no backpack because it covers the warmer temperatures when I start (vented and zipped open) and the cooler temps by the time I get home after dark( hood on).
Good luck with your project.
Dec 23, 2017 at 2:24 am #3508897May be of some help:
https://wornwear.patagonia.com/repair-and-care#/Device/Patagonia_Down_Jacket
The baffle repair article includes opening a sleeve on the main seam. Haven’t looked at the main zipper article.
There’s also this, but I don’t think it’ll be as useful:
https://wornwear.patagonia.com/repair-and-care#/Device/Patagonia_Nano_Puff_Jacket
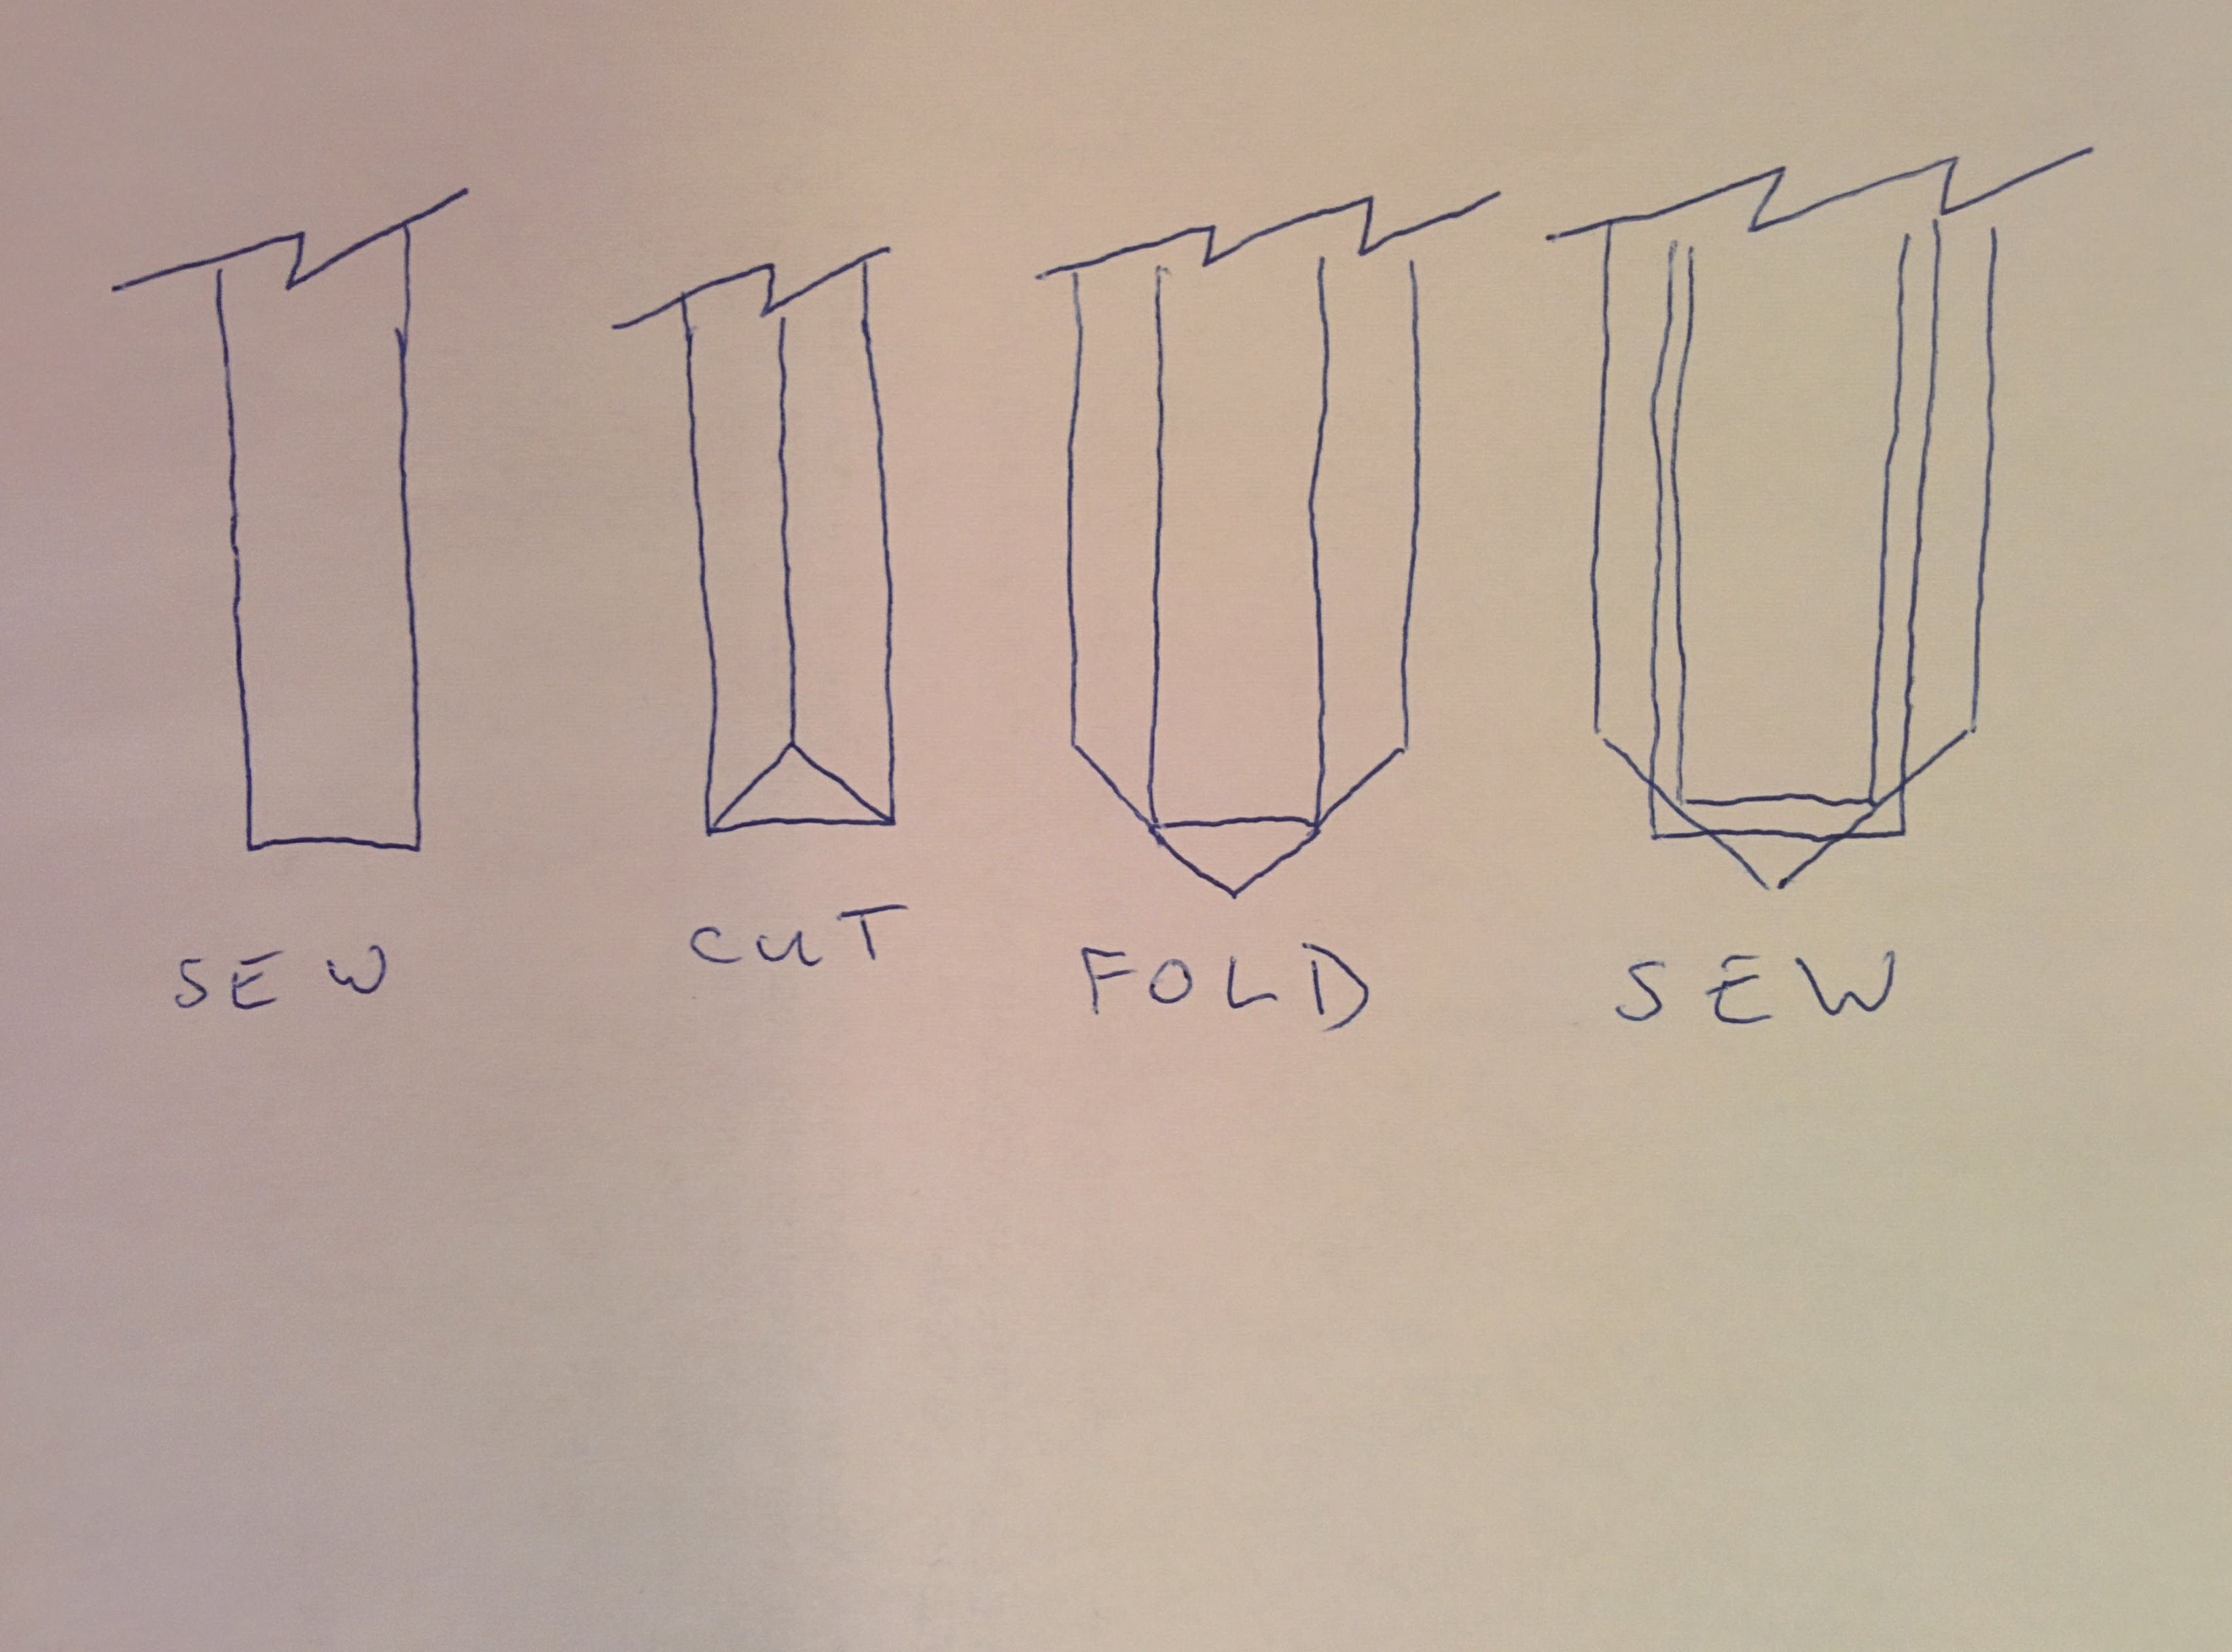
Dec 23, 2017 at 2:48 am #3508911I’ve never done this, but if I tried it, I’d do it like this. Drawing perspective from inside the garment.

This gives a neat, finished hole to place the zipper in. Align and pin the zipper on the inside, then sew from the outside so you can see how the seam lines up.
Mix and match steps and order to get the final appearance you want. Maybe sew the flaps down further from the hole and then sew the zipper very close to the hole. Or you could pin the zipper and flaps at the same time and circle the hole w/ 2 seams so you’d get the zipper double stitched. Several options.
I definitely wouldn’t take the button hole approach.
Dec 23, 2017 at 6:39 am #3508926Not a Nano Puff, but this might be helpful:
Dec 24, 2017 at 2:31 am #3509107Thanks, everyone. Very helpful! Given the nature of my armpit temp and this jackets lack of breathability, I’m not sure I’d need or want zippers. My thought was to just open it up and leave it that way. Thought it would be more comfortable that way and be less work. However, I’m certainly open to changing my mind and using zippers.
Thanks for the link, Lance! One poster there was thinking of the same buttonhole-like idea.
Rene – Thanks for the links and drawing. I’m curious though. Why wouldn’t you take the buttonhole approach?
Dec 24, 2017 at 7:09 am #3509161Cuz it’s not a button hole? :)
I actually kind of mean that – it just doesn’t seem like the right tool for the job. I guess only needing a slice and not a rectangular hole for a zipper does change things a bit, but it still doesn’t seem right to me. It’s going to eat up way more thread than you need. You’re probably not overly concerned about appearances given the location, but slicing the center of a button hole will leave you several layers of raw edge, miniscule as they may be. Buttons are generally placed through a single layer of fabric – I think you’ve got three.
I suppose there’s little harm in trying because if it doesn’t go well, you could then do a fold over as I suggested. It’s definitely simpler and more easily extended in length if you find 4″ – 5″ doesn’t provide enough ventilation.
If it seems right to you, go for it!
Dec 26, 2017 at 11:03 pm #3509512I’ve had a really good look at mine. Adding in a proper full pit zip or vent will be a real PITA but doing a short vent just on the upper arm would be very very simple.
I would just over-stitch the liner to the outer along the under arm seam about 2mm on either side then simply rip open with a good sharp seam ripper
If you do this carefully it would not look any or much different to the factory sewing. Having owned and worn jacket with exactly this type of vent tho i have to advise that at a length of 100mm they do very little and i think therefore that 150mm is the minimum and that you would need to make them 200mm and also use a short #3 coil zipper
Dec 28, 2017 at 4:12 pm #3509700Thanks, Rene and Edward.
I wouldn’t make such a big deal out of this but, being the interior of this jacket is sorta free floating from the insulation and shell (you know what I mean, Edward), I think it’ll be tricky. Regardless, I think I will a sew a rectangle with a straight stitch (like Rene suggested), using the seam as a guideline, and then decide from there how to proceed. I’m thinking the opening will be between 150mm and 200mm long.
Thanks again for the input, you two. Will post pics when done… if it turns out.
Dec 28, 2017 at 6:23 pm #3509725You’ve also got the option of installing a piece of mesh to control how far apart the edges can get. You could tune that w/ safety pins before sewing.
Good luck!
Dec 28, 2017 at 8:18 pm #3509746I would pin the lining to the outer first and stitch them as a unit, pretty easy with a free arm machine. I’m not sure I would attempt it with a flat bed sewing machine
Dec 29, 2017 at 10:07 pm #3509906Just thought I’d throw my two cents in. I work at Patagonia, in the repairs department, therefore have had my hands on/in most of the garments they make. The Nano Puff Bivy isn’t the toughest to work on, but as mentioned, the free floating liner makes it a little more difficult to accomplish what you’re looking to do, and essentially requires you to vent both the liner, and the outer insulation layer, and make sure that those vents line up. With that said, I’ve added pit zips to a Nano in the past(full zip hoody, but that didn’t affect the process). It was quite a bit of work, as with the construction of our jackets, the lining is always attached to the zipper tape first from the back side, and then eventually topstitched when closing the face fabric to the zipper tape. On top of all that, you’re working with some curves and seams up in that zone. I’m thinking your best/simplest bet would be to pick a few small quilted rectangles/baffles from the underarm area and replace them with mesh or even a light fleece fabric. I would start that process by following the stitching on top of some of the quilt lines to attach the liner in place. Then cut the portion to remove, and finish any edges you’d like to then, and then attach your replacement fabric.
Dec 29, 2017 at 10:58 pm #3509915Thanks very much for chiming in, Jesse! When you say “…vent both the liner, and the outer insulation layer, and make sure that those vents line up”…. my intention was to thoroughly pin everything then sew it all together… so it was a sandwich of sorts. Is there something I’m not seeing that would make that a bad idea?
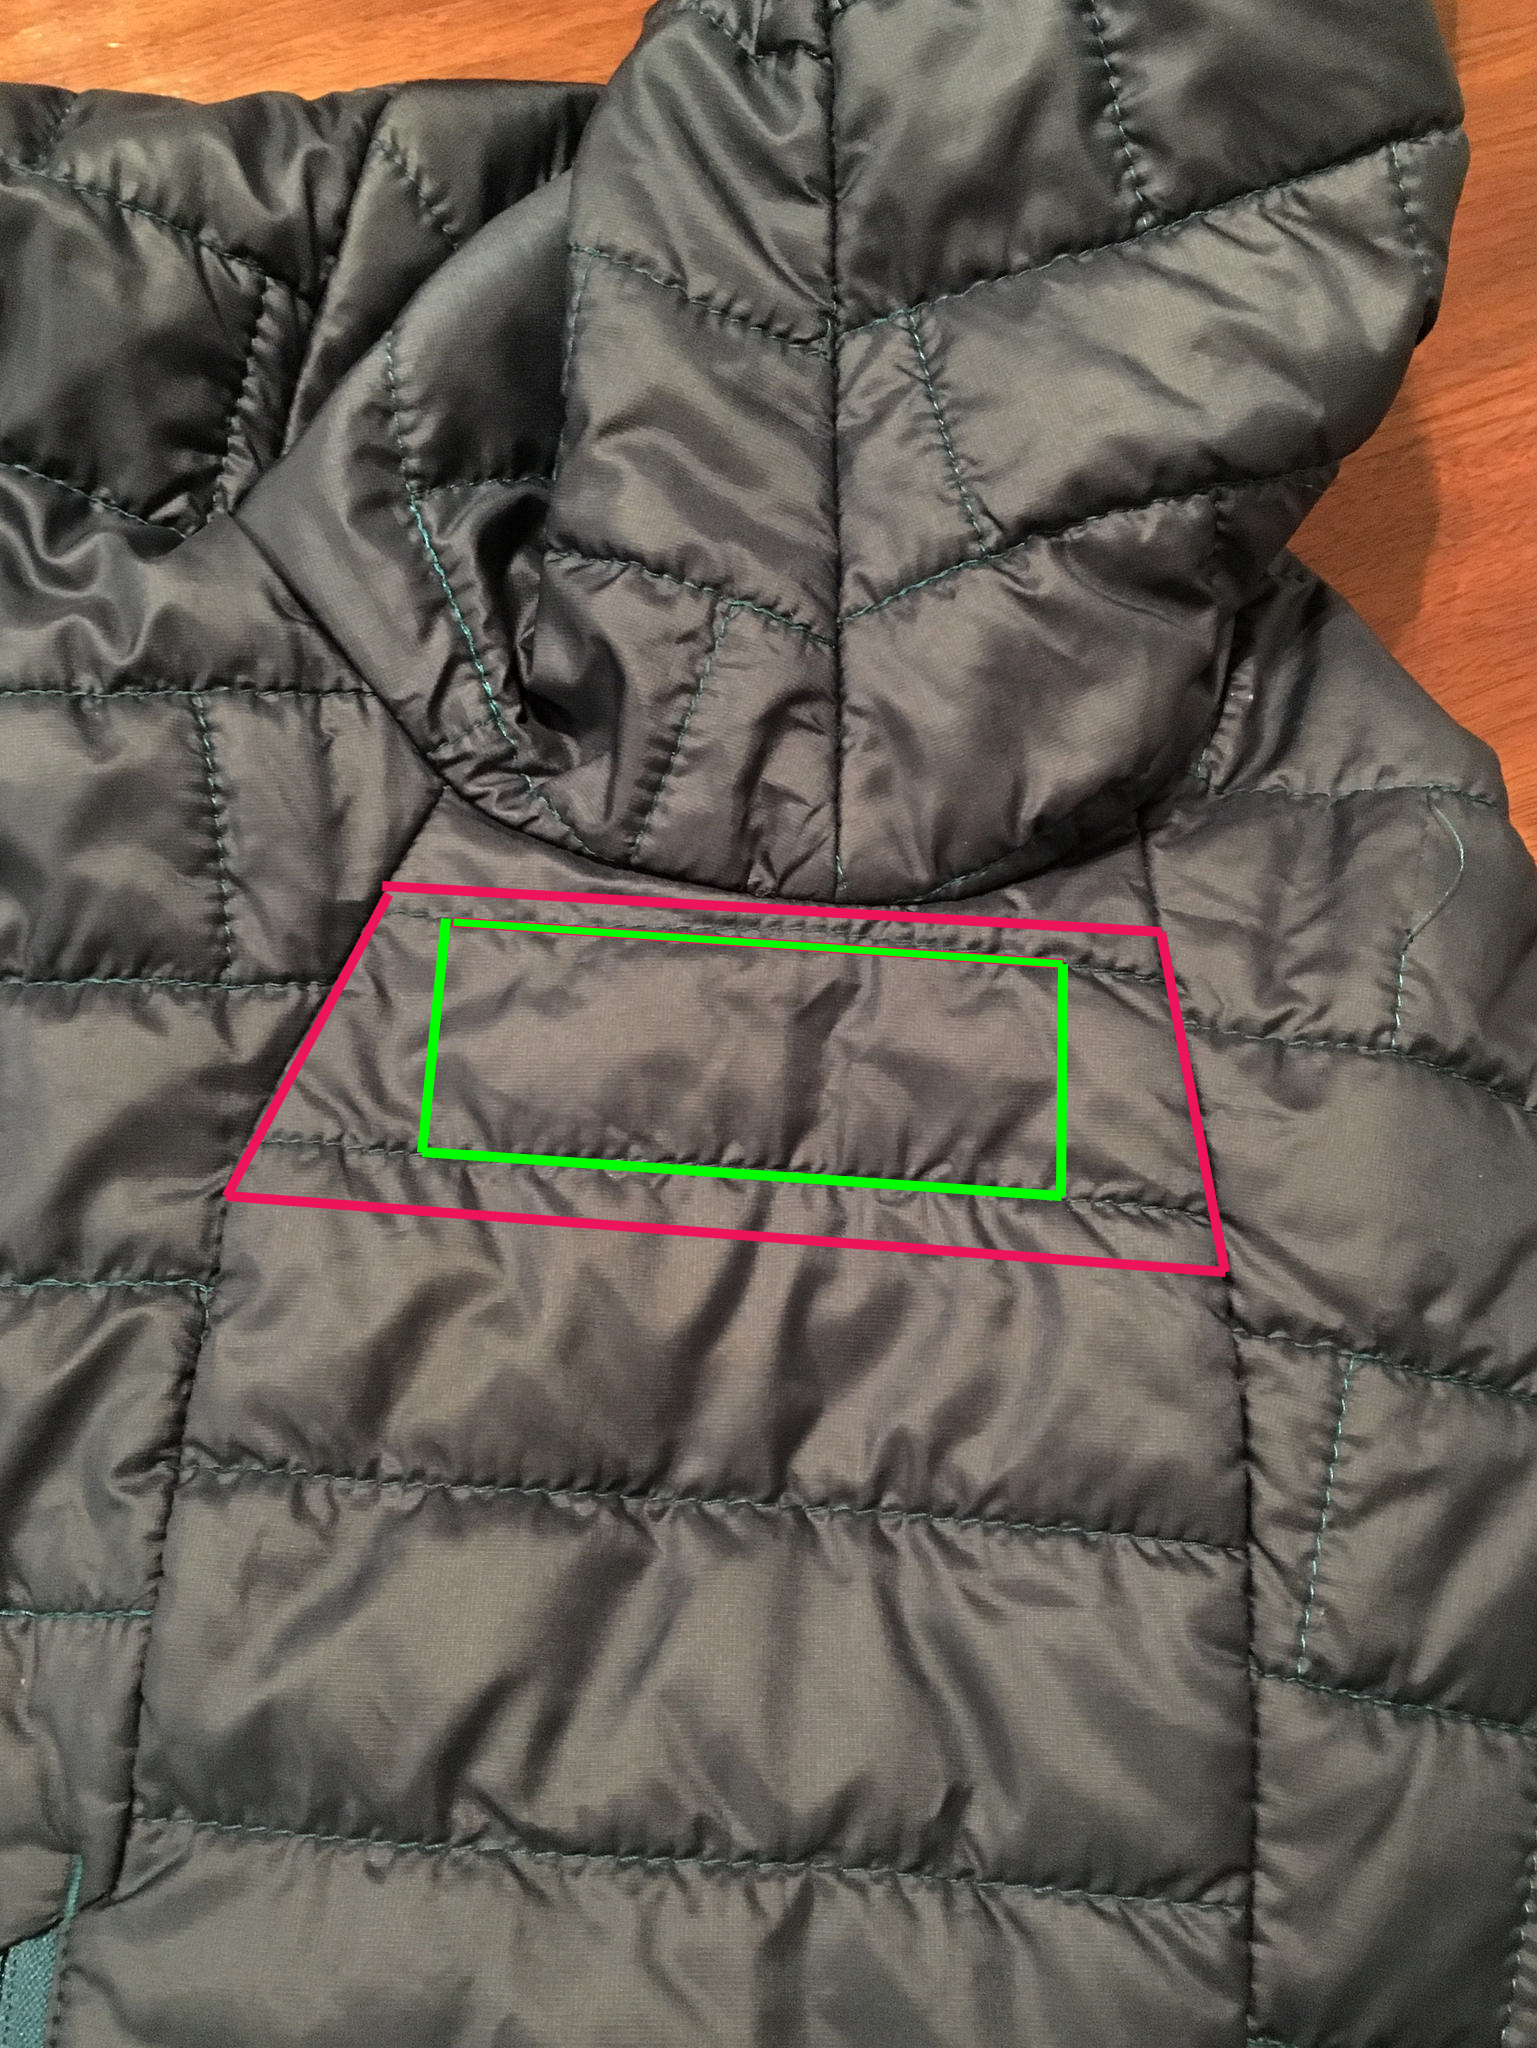
I had not thought about your other idea of cutting out fabric and replacing it with mesh or fleece. I like it! However, I’m not sure how I would follow the quilt lines as the center of the area I need to vent is at a seam intersection… and the quilt lines there are all discombobulated (see where I’m pointing in the pic below).
Would love to have more input from you if have time. Thanks!
Dec 30, 2017 at 4:45 am #3509965As mentioned, that area has a lot going on with the curve of the arm opening seam intersecting with the seam that runs the length of the arm. When I was visualizing replacing a panel, I was thinking the longer side panel baffle that your finger is resting on in that picture, or to further steer clear of that messy area, the one baffle just below that. I know that is almost bordering on venting your “side” rather than “arm pit”, but it might be easier to work in that zone for you. I’m kind of leaning towards first stitching the pink lines, then replacing the green outlined portion with mesh or something. It’s not ideal, but I think it would help get some moisture out of that zone of the jacket. The lining used on Nano Puffs really traps in heat and moisture, so I feel like it would look for an escape if you gave it one near by….
Dec 30, 2017 at 5:14 pm #3510007Thanks for the pic and diagram. That looks relatively easy. And I understand your thought on the heat looking for and finding an escape. I bet it would help. However, if I go to the trouble of anything at all, I think I’d feel better if I somehow opened up the exact area I’m overheating in. And that’s easy to locate because when I take it off and look inside, the area is clearly marked by a wet spot (sweat).
That said, there’s that messy seam intersection – ground zero. Since the baffles don’t line up there anyway, and it’s not in a highly visible spot, I’m not concerned with with following seams for reasons of esthetics. Other than being more difficult, is there a reason not to just cut out the area that gets wet with sweat (approx 3″ diameter area) and replace with mesh or fleece?
-
AuthorPosts

- You must be logged in to reply to this topic.
Forum Posting
A Membership is required to post in the forums. Login or become a member to post in the member forums!
Trail Days Online! 2025 is this week:

Thursday, February 27 through Saturday, March 1 - Registration is Free.
Our Community Posts are Moderated
Backpacking Light community posts are moderated and here to foster helpful and positive discussions about lightweight backpacking. Please be mindful of our values and boundaries and review our Community Guidelines prior to posting.
Get the Newsletter
Gear Research & Discovery Tools
- Browse our curated Gear Shop
- See the latest Gear Deals and Sales
- Our Recommendations
- Search for Gear on Sale with the Gear Finder
- Used Gear Swap
- Member Gear Reviews and BPL Gear Review Articles
- Browse by Gear Type or Brand.
