Topic
Ideas for constructing a collapsible walking -stick-?
Forum Posting
A Membership is required to post in the forums. Login or become a member to post in the member forums!
Home › Forums › Gear Forums › Make Your Own Gear › Ideas for constructing a collapsible walking -stick-?
- This topic is empty.
-
AuthorPosts
-
Mar 11, 2006 at 8:08 am #1352300
Well the hike I described is about as steep and rocky as it gets. The conduit is dirt cheap, very light and pretty strong. Actually stronger depending on the strength and seasoning of the wood than a collapsible trekking pole, at least for Perpendicular stress ( I’m no engineer so I may have the wrong terminology but if you had to hang from the thing…… On the other hand it’d be hard to put enough end to end or parallel stress on any pole to break it. The thing about the pvc is it’s cheap so you could always experiment, but I think the strength of the stick/wood is going to be your limit. After all the fitting is basically filled with the stick.
Biggest problem I had not having a shop and a spoke lathe or whatever was rounding off the ends of my sections to fit snugly inside the conduit joints. I did have a bench grinder so I used that and “eye-balled” it.
Mar 11, 2006 at 11:32 am #1352316Cola,
Did you shape one half of the stick so that it fits snugly inside the threaded portion of the PVC conduit as well, or did you just fit the ends so that they fill the inside of the conduit’s to the edge of the threads?
Thanks,
Dave:)
Mar 11, 2006 at 12:22 pm #1352319Well guys,
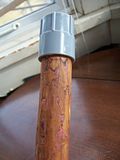
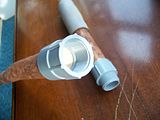
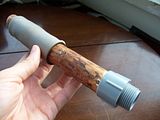
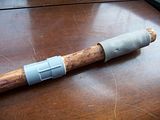
I just finished constructing the walking stick. I used two pieces of 3/4″ threaded PVC Conduit fittings for each each of the attachment points. The total stick length is aproximately 50 1/2″, and when unthreaded, I’m left with one 8″ piece, and one 42 1/2″ piece (the latter will serve as my single ‘trekking pole support’ for the Gatewood Cape. I didnt bother using glue or epoxy to attach the Conduit pieces – the Conduit pieces were just slightly undersized (they wouldnt slide over the stick ends), so a bit of minor carving at each end of the stick allowed me to partially twist on each Conduit piece, and a some steady hammering secured them the rest of the way. When threaded together, the two stick ends are essentially touching each other, and I can’t sense any weakness in the joint even when leaning on the stick with my full weight. My only concern is that water (when its raining) might leak into the joint as it runs down the stick, which may or may not loosen the Conduit pieces. However, field repair seems as if it would be easy enough, as there are more than enough solid rocks out there that could be used for pounding.
For the grip, I used some leftover 1/8″ GG thinlight pad that I had no use for, and attached it to the stick with the aid of inside out duct tape that was tightly rolled around the top edge. At first I thought the grip might slide (since its not directly attached to the stick itself), but even with all my strength, I can’t seem to get it to move. The final weight is 14.9 oz.
The one thing I have yet to do is to attach a tip to the bottom end. I intend to attach a matching 1/2″ PVC pipe tip with the aid of epoxy.
As far as aesthetics go…well, its not the most pleasing thing to look at, but I definitely think it has its own unique taste. I’m not sure what kind of wood I’m using (maple maybe?), but when I shaved off the bark today, I found some beautiful dark purple linings that I think will compliment the cheap PVC plastic well :P
If you would like, I could post some pictures on Monday for anyone who is interested in trying themself, or for anyone who is just genuinely curious. Thanks again for all of your help!
-Dave:)
Mar 11, 2006 at 12:29 pm #1352321Robert, Sure, whenever you get a chance, at your convenience, please post back and educate me on the endgrain issues — I’d appreciate it. Thanks for offering.
Mar 11, 2006 at 1:40 pm #1352327One question… why all this just for 8 inches? Is there no way to pitch the shelter will the 50 1/2″ stick?
Mar 11, 2006 at 3:13 pm #1352334David,
With the Gatewood Cape, the pole is pitched inside the shelter, and with more than 42-43″ of pole height, the bottoms of the shelter would no longer be snug with the ground (which kind of disregards the purpose of using a ‘full protection’ tarp in the first place).
Dave:)
Mar 11, 2006 at 4:45 pm #1352339Here’s a thought… I know we all hate to add weight if we don’t need to… and love the idea of dual use… but gossamer gear sells 42″ shock-corded carbon fiber tarp pole that only weighs 1.2 oz. They sell it for the SpinnShelter. It’s not cheap tho’. The aluminim pole set is half the price… but a bit heavier. Maybe it’s worth the extra 1.2 oz (and money) to have a solid walking stick that you know you can trust?
Mar 11, 2006 at 6:01 pm #1352345David,
Thanks for the reccomendation. Its odd that you mention the GG carbon fiber poles, because I do have a set of them for my Spinnshelter (which is currently up for sale….so I may in fact not have them for much longer). I had thought about just carrying along the 42″ front pole for use in the Cape….but….I really just wanted to be able to use ‘trekking pole support’ without the use of a trekking pole. Now that the construction of the stick is completed and I’ve done a bit of testing with it, I have enough confidence in its support strength to carry it without feeling I need a back-up pole in my pack. You’re probably right though….my walking stick wont be as reliable over time, and carrying the carbon fiber pole would only slightly increase my pack weight, but….if ya never try, ya never know. Plus, carrying my homemade collapsible walking stick just plain makes me feel good :)
-Dave
Mar 11, 2006 at 7:38 pm #1352350David… if you end up selling the SpinnShelter without the CF poles… would you consider selling them to me? :) I’m getting a LuxuryLite cot with sidepoles that double as hiking sticks… so now I need an ultralight pole set for my SpinnShelter. The cot with a 1/8″ nightlite pad is actually going to result in a net base weight LOSS if you can believe that! (I use a 3/4 thermarest prolite now).
Anyway… just thought I would mention the dedicated pole idea… since it’s so light. I imagine the hardware you added to your stick is not much less than 1.2 oz :) But yes… it’s much more fun to use something you made yourself… for sure. Are you going to post a pic or two?
Mar 11, 2006 at 8:00 pm #1352351David,
Surely. If it turns out that whoever buys the Spinnshelter doesnt want the CF poles, we could definitely try to work something out. How has your Spinnshelter been treating you? I havent had much of a chance to try out mine….before deciding that I wanted to switch to a ponchotarp (errggh….gear innovation!).
I’d also be more than happy to post a couple of pictures of the walking stick this next week. The wood really is beautiful…I just can’t decide whether I want to stain it or not (I’m a bit torn on whether I really want the stick to shine). Thanks David,-Dave:)
Mar 12, 2006 at 2:33 am #1352360David L., I’m curious about the warmth of the cot. Never used one, nor a hammock for camping. I’m sure both are more comfortable than sleeping on the ground.
My question to you is: since there is a constant air exchange under the cot and your body can’t slightly warm the ground underneath you, won’t you need more insulation underneath you for the same overnight temps with the cot? Not saying you still won’t get a weight loss, but other than summer, just wondering if you might need more than 1/8″ of closed cell foam underneath you? So, what do you or anyone else think about this? Faulty observation? Valid point?
Mar 12, 2006 at 4:51 am #1352365Hey Paul. Yes, I may need more than a 1/8″ pad for insultation.
Also, bear in mind that thick pads are doubling as insultation AND padding. So even tho’ we all use 3/8″ pads… because anything less is just not comfortable… much of the time we proably don’t need the amount of insulation provided by a 3/8″ pad. I know that a cot / hammock has the added issue of air circulating underneith… but anyway… we’ll see how it goes.
Mar 12, 2006 at 5:10 am #1352366Hey again.
I rechecked the calculations Paul. I actually am gaining one ounce. It had worked out to no added weight before when Bruce was talking about using carbon fiber struts… but the carbon fiber struts idea didn’t work out.
Sorry for the “thread hijack” BTW… but I guess since the stick has already been made… it’s not too bad a violation :)
One thing you will note is that I’m subtracting the weight of a ground cloth in the “After” calculation. Since most of me and my pad and bag will be completely off the ground… I figured I don’t need it. Since the cot is not full length… there will be about 1.5 to 2 feet of me and my bag / pad sticking off the end of the cot. My plan is to sew a bit of tyvek or plastic to the underside of the portion of the Nightlight pad that will be sticking off the end… just to keep out rising damp / ground water.
Before:
Thermarest Prolite 3 short: 13.44 oz
GG Polycryo Ground Cloth: 1.34 oz
Komperdell C3 poles: 10.16 ozbase: 15 oz
carried: 10 ozAfter:
44″ LL TrailStiks: 5 oz
LL ExtremeLite Cot (packed weight): 12 oz
SpinnShelter Carbon Fiber pole set: 2 oz
GG Thinlight 1/8″ pad: 2 ozbase: 16 oz
carried: 5 ozAlso note that all of the weights in the “After” calculation are as spec’d by the manufacturer… not as actually weighed by me… since I don’t actually own any of those items yet.
One final thought… to me… ultralight is not about weight… it’s about ultra-efficiency. The low weight is a side effect of being ultra-efficient. And even tho’ I could sleep on a postage stamp sized gossamer gear egg crate pad or what have you… the issue there is that I will not sleep… and a good night’s sleep is a HUGE efficiency issue. If I’m only getting a few hours of crappy sleep… it doesn’t matter how light my pack is… I’m not going to enjoy myself and the hiking will be MUCH more difficult.
Mar 12, 2006 at 7:40 am #1352369David,
I forgot to ask. Where can I contact you in the event that I will have the CF poles for sale. Thanks,
Dave:)
Mar 12, 2006 at 9:28 am #1352375David,
I just sold the Spinnshelter without the CF poles. I’ll give them to you for $35 shipped if that sounds alright. They’re basically brand new, only used 2-3 times. You can email me at [email protected] if you’d rather take care of things there. Thanks,
-Dave:)
Mar 13, 2006 at 12:06 pm #1352460Hey guys,
I was hoping to post a few pictures, but couldnt quite figure out how/couldnt find any information here on BPL. Any help would be appreciated. Thanks,
Dave:)
Mar 13, 2006 at 2:17 pm #1352466Dave,
Go to photobucket.com and make an account. Upload your pictures there. Once you have done that, select the picture you would like to post(there is a check box directly underneath the photo), then click the “Generate HTML and IMG code” button. This brings up several differnt options for the appearance of your pictures(it’s better to use the clickable thumbnail so as not to eat up bandwidth) . Choose the one you want, then copy and paste the HTML code to the forum. Your picture will the appear in your post. Try it in the User Test Forum to get a feel for it. Good luck, and I hope to see some good pics.
Roy
Mar 13, 2006 at 3:22 pm #1352470Thanks for your help Roy. Uploading those pictures really does take forever! I think I everything is in order though, so here we go:
</center>
Simple, but effective.I haven’t had the opportunity to use it as for tarp support, but I imagine it may exceed the peformance of normal, more flexible aluminum poles. I also still have to find some kind of a tip to use – I was thinking about just buying a replacement tip from GG. Thanks again for the help everyone. This was an enjoyable first project for me (I just got underway with my second today….a new PG 3D quilt :)
Mar 13, 2006 at 5:53 pm #1352483pj,
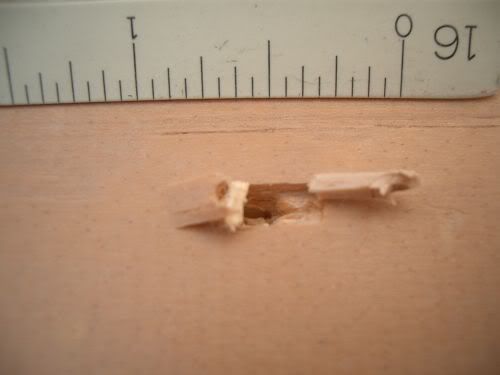
The bond between wood fibers is relatively weak. This results in negative properties such as splitting and splinters (ouch). If you crosscut a small wedge from the end of a board it is easy to break the pointy end off at a thickness of 1/8″ to 1/2″ depending on the species of wood.
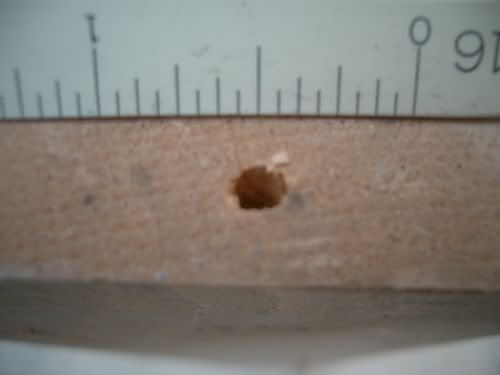
The problem with screwing into endgrain is the screw threads cut the long wood fibers into little pieces that rely on this weak bond for anchoring. Returning to the wedge example above, visualize a spiral shaped wedge around the screw in endgrain.
Destructive testing is very revealing. An endgrain screw placed in tension until failure results in a clean hole the outside diameter of the threads.

The same screw threaded in the face of the same board and tensioned to failure results in far more damage to the board because the threads have done less damage to the fibers upon its insertion. It was also much more difficult to pull out because the stress was spread into the board via the fibers.

While this the weak bond between wood fibers might be considered a negative it has been exploited by humans for a long time. The manufacture of shakes, shingles and split rail fencing come to mind. Most likely even earlier in history humans exploited this property for making kindling from bigger chunks of wood.
Regards,
RobertMar 13, 2006 at 9:46 pm #1352505Robert, Many thanks for the reply. I understand what you’ve explained, and I’ve seen similar damage to your pics. Most recently, when “xxxxx” didn’t shut my front storm door while delivering a package (yes…it was some gear) in all day heavy rains with 40mph wind gusts (the rain and wind began over 9hrs before delivery and was ongoing at the time of delivery). The return was ripped out of the door frame and the storm door banging about when I got home from work. At least no rain penetrated the edges and seals of the inner door.
My question regarding use of screw type joining hardware is that the two pole sections aren’t going to be in tension. They will be subject to bending moments and compression. Only one-half (the outer half relative to the direction of bend) of the threaded insert will be in tension. Do you feel that this will make a difference? Please advise when you get a chance. Many thanks.
Mar 14, 2006 at 8:19 am #1352521pj,
You said –
“the two pole sections aren’t going to be in tension. They will be subject to bending moments and compression”
You are correct but you’re focused on the poles and not the connector which is the weak link in this exercise.
You said –
“Only one-half (the outer half relative to the direction of bend) of the threaded insert will be in tension.”
I think you’re missing where the fulcrum is located. I believe it would be at a point on the circumference of the stick, which would place the entire insert in tension.
Robert
Mar 14, 2006 at 9:40 am #1352531Understood. Clearly this end grain threading is weaker than threading in through the grain as in your second photo (looks very similar to my door jam after the “xxxxx” delivery accident).
However, if the insert is subjected to bending forces, the inner radius will be in compression, and the outer radius in tension. This is the nature of bending. The entire insert will want to rotate about the fulcrum point you mentioned in the direction of the applied bending moment, but will be held somewhat vertical by the surrounding wood reacting to the compressive loads the threaded inserts are exerting against the wood holding them in place. Since the threaded inserts are many times longer than their diameter, I don’t think that any appreciable rotation about the fulcurm point you mentioned can occur. Perhaps I’m mistaken though? Over time, repeated loading cycles my cause the metal insert to do gradual damage to the surrounding wood in contact with the threaded insert, I would imagine.
What did you think about the dowel or hollow tubing, pinned into position? Is that superior, to your mind, to the threaded insert alternative?
Mar 14, 2006 at 11:01 am #1352538pj,
To avoid confusion leave the material (wood) out of the equation. The fulcrum is the inner radius (r=zero) and is in compression. Everything to the outside of the fulcrum is rotating on a radius and can only be in tension. Basically the joint has created a huge stress riser that has decreased the effective diameter of the tube by 50%. Correct? Or am I missing something? If one needed a joint in a steel tube a flange would most likely be best because the tension could be better spread into the OD of the tube.
I agree, gradual damage from cycling is the cause of greatest concern.
Your pinned dowel was a better solution, although your suggested length was a bit long, IMO. The pinned outside collar is an even better design because it helps prevent splitting that the inner dowel would create through bending cycles.
I gotta go. I’ll check back later.
RobertMar 14, 2006 at 11:21 am #1352540Robert, thanks for having this exchange of ideas with me. No. I don’t think that you’re missing anything. I’ll go give it some more thought until I’ve nailed everything down in my mind and then I think that I’ll see it precisely your way. The flange is definitely the way to go if a threaded insert was used. That was in my mind also, and didn’t originally suggest it since I was unfamiliar with easy to find hardware that would allow David to complete his project. Other than appearance, I agree that the outside collar is more structurally sound. Thanks again. BTW, I checked out some of your handiwork. Nice pics; nice work. You have my envy.
EDIT:
>>”I think you’re missing where the fulcrum is located. I believe it would be at a point on the circumference of the stick, which would place the entire insert in tension.”Robert, Your comment “I think you’re missing” IS EXACTLY CORRECT. Boy, did I miss that point. Your mention of “fulcrum” was the key for me – once I stopped and thought about it just a bit. It was the key point I was neglecting. When the fulcrum point is considered, it’s clear that the entire threaded insert, is all in tension. The fulcrum point being at the outer circumference of the staff will want to pull/rip the entire threaded insert out of the wood when the bending loads and the hiking staff radius act as a lever (i think m times c over i is useful here for analysis). Now, this, i.e. a catastrophic static failure, might not actually happen depending upon the loading, but that would be the what the bending loads would try to do. Good point. Thanks for taking the time to share and enlighten me as to the key concept that I was missing.
Mar 16, 2006 at 9:33 am #1352663You’ve got it Dave! Just one cautionary note. Wood moves. It expands/contracts, twists and turns. Glue the conduit joints!
-
AuthorPosts
- You must be logged in to reply to this topic.
Forum Posting
A Membership is required to post in the forums. Login or become a member to post in the member forums!
Our Community Posts are Moderated
Backpacking Light community posts are moderated and here to foster helpful and positive discussions about lightweight backpacking. Please be mindful of our values and boundaries and review our Community Guidelines prior to posting.
Get the Newsletter
Gear Research & Discovery Tools
- Browse our curated Gear Shop
- See the latest Gear Deals and Sales
- Our Recommendations
- Search for Gear on Sale with the Gear Finder
- Used Gear Swap
- Member Gear Reviews and BPL Gear Review Articles
- Browse by Gear Type or Brand.

