Topic

MYOG Bivy


Forum Posting

A Membership is required to post in the forums. Login or become a member to post in the member forums!

Home Forums Gear Forums Make Your Own Gear MYOG Bivy

Viewing 25 posts - 1 through 25 (of 80 total)
  • Author
    Posts
  • #1270785
    Chris M
    BPL Member

    @kringle

    Locale: California

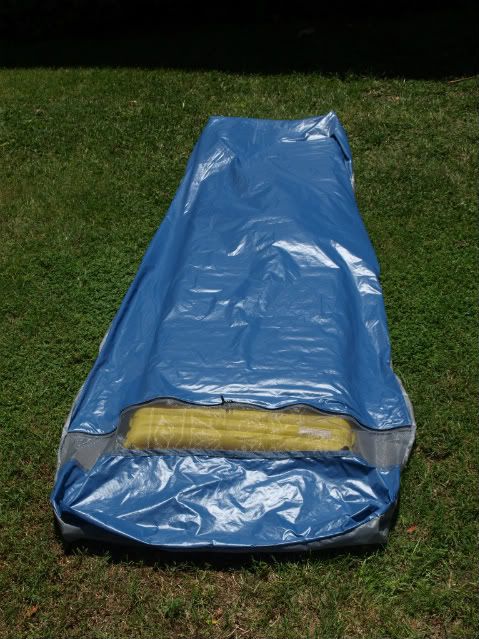
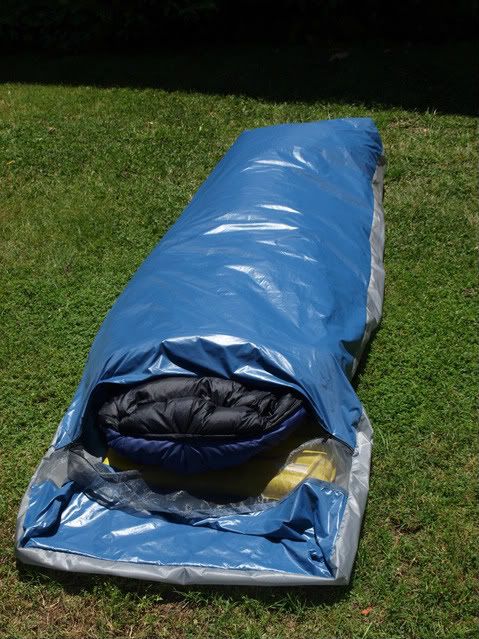
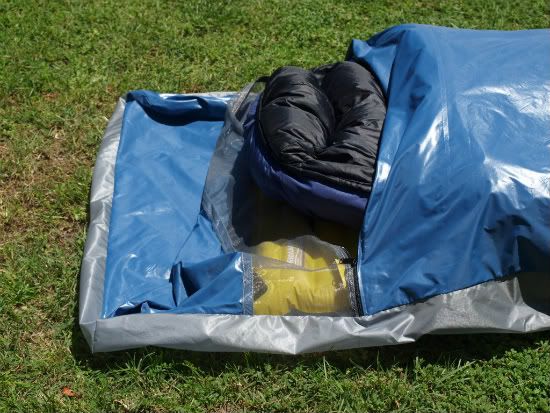
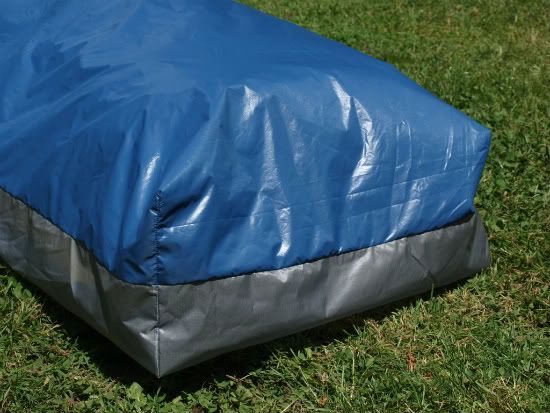
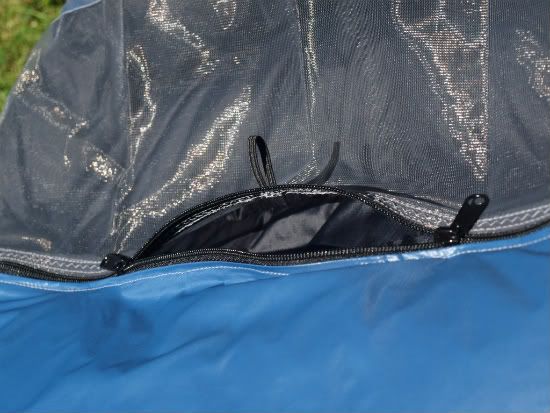
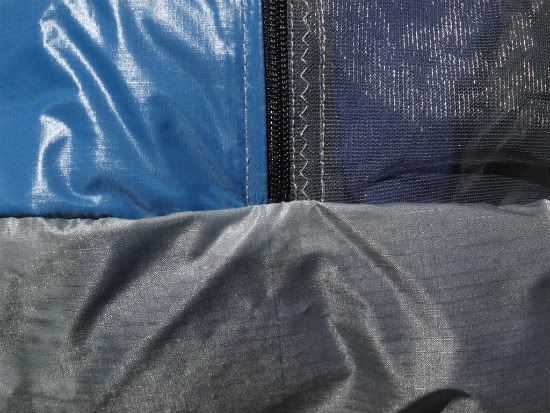
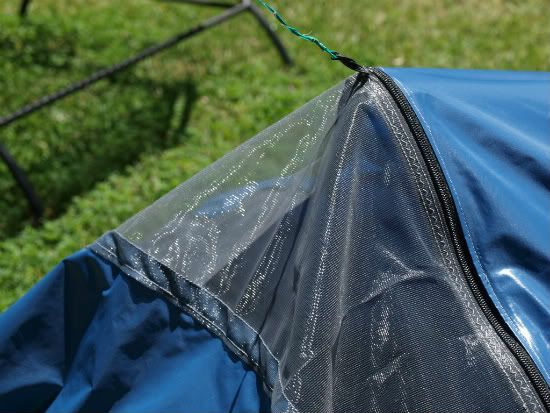
    Just got a chance to try to make a bivy over my spring break. The materials are silnylon for the bottom and the .9oz ripstop from OWF for the top and just a strip of bug netting across the face. This was my first attempt at a bivy and only my second time trying to make a piece of gear without an actual pattern. The design is thanks to Jamie Shortt, who was nice enough to share with me how he made his bivy and answer the numerous questions I had during the process. Thanks again for the help on this, Jamie. The final weight as of now is 6oz on the dot. I have not sealed any of the seams, but I mostly just need it to keep light snow and rain splash off me, so I am thinking I may not seam them up to help with how well it breaths. Anyone have thoughts on whether or not to seal a bivy? (It is my first time using a bivy so I'm not sure if it is a good idea to or not)Next I'm hoping to make a simple synthetic quilt similar to the MLD Spirit 45. And now a couple of pictures, because I know that's my favorite part of these posts when I read them.

    Bivy with the hood open and my Golite Ultra in it

    Bivy from the side.

    #1711341
    Bob Gross
    BPL Member

    @b-g-2-2

    Locale: Silicon Valley

    "The final weight as of now is 6oz on the dot."

    That's good. The foot area looks very snug in the upper photo, but it looks loose in the lower photo. Some of us need a lot of kick room.

    –B.G.–

    #1711385
    todd
    BPL Member

    @funnymo

    Locale: SE USA

    You're showing quite the talent Curtis!

    For your described usage, I wouldn't seamseal it.

    The materials you've chosen are up to the task, and as you pointed out, the breathability will be mildly enhanced without sealing it.

    Thank you for posting your projects.

    Todd

    #1711601
    Jamie Shortt
    BPL Member

    @jshortt

    Locale: North Carolina

    Chris, The bivy turned out great and thanks for posting the pics. I was glad to help. The 6 oz weight is nice for a fully functioning bivy.

    I will add a comment on the footbox since I think you used the samed dimensions as mine. The footbox is larger than it looks in the photo, but there is not a lot of room to spare. It is 48" diameter at the footbox which I believe is the same as the ti goat and BPL bivies. This is one dimension that I would not change unless I had a shoe size > 11 or was using a think Winter bag.

    Chris did deviate in the hood making a hood that I think is easier to produce. I liked the original hood, but think it was more complicated then need be. I'm glad you were able to improve on this. Just curious if you were to make any changes what would they be?

    Jamie

    #1711639
    Bob Gross
    BPL Member

    @b-g-2-2

    Locale: Silicon Valley

    "Just curious if you were to make any changes what would they be?"

    Where is the zipper for entry?

    –B.G.–

    #1711675
    Chris M
    BPL Member

    @kringle

    Locale: California

    The zipper for entry is across the chest.

    I haven't had a chance to field test it yet, so I can't tell for sure what I would change. Just from getting in it though, I would say that I would make the bug net a smaller section. I went with 6", and I just don't think that much is necessary. I think I would also move the zipper a bit farther up the body. It is a little low I think, but can't really tell yet. I really liked the more simple way of forming the hod by just using folded corners. The space for the legs is small, but definitely a good fit I think. I'll be sure to update you once I test it though.

    #1711686
    Bob Gross
    BPL Member

    @b-g-2-2

    Locale: Silicon Valley

    Yours beats mine for light weight (mine was about 8 ounces). I used one zipper going across the chest, but then I have another one running down the side. It makes it a lot easier for entry and exit.

    –B.G.–

    #1711694
    Jamie Shortt
    BPL Member

    @jshortt

    Locale: North Carolina

    I would really like to get all this info together so we can get a good bivy pattern into the public domain. I like the meteor bivy but it has a too much mesh for me.

    I agree Chris that the fold the corners method is the way to go for the hood. I need to go back and chack emails to see how you made it work. I would have you try the bivy out before suggesting a change to the bug net. I intentionally adding more bug netting because I was finding it hard to breath inside my MLD when it was fully zipped. But I did not want to have a full hood net. I have used this net strip and have had great results. If sleeping on your side or back you can breath out the side with minimal condensation.

    Bob, As far as the extra extra zipper on the side I agree 100% it makes entry easier, but I would have it as an option in the pattern. It would add about 1/2-3/4 oz and make it a bit more difficult to sew. Worth the weight…for most I would say yes.

    Jamie

    #1711781
    John Donewar
    BPL Member

    @newton

    Locale: Southeastern Texas

    Hey Jamie,

    I'll agree that there is a ton of mesh, figuratively, on the Meteor Bivy. I am a fan of it because I am most often a summer hiker and I use it basically as a "net tent" with the side benefit of the WPB lower half. To me the lower half adds just a little more protection from the elements under my tarp and maybe just a little extra warmth to my legs and feet at night.

    One thing is for sure the Meteor will never be the reason for a condensation problem with all of that mesh.

    I did have a condensation problem recently with my tarp due to wet ground and trapped rising moisture underneath my tarp in sub freezing temperatures.

    Summer hiker?!?!?!?!? ;-)

    I believe that this problem could have been avoided had I used a footprint sized groundsheet under my bivy and tarp as a vapor barrier. I think that this would have stopped the migration of the water vapor and kept my tarp condensation free.

    "As far as the extra extra zipper on the side I agree 100% it makes entry easier, but I would have it as an option in the pattern. It would add about 1/2-3/4 oz and make it a bit more difficult to sew. Worth the weight…for most I would say yes."

    +1 for those of us over 50 and pushing 60. LOL

    Party On,

    Newton

    #1737956
    Jacob Siddall
    Member

    @druewolf

    Locale: PNW

    Very nice looking work Chris!

    Having made a few stuff sacks and hammocks, I think the next step in my MYOG progression is going to be a bivy, and I was wondering if either Chris or Jamie would be interested/willing to post a pattern or at least description of construction on this gorgeous looking bag.

    Thanks,

    Jake

    #1738946
    Chris M
    BPL Member

    @kringle

    Locale: California

    Jake, for my contributions to the designs, I just made small changes to the design Jamie showed me. My changes were in creating the hood shape and the order that I sewed things together. In my case, I think it made the process a bit easier, but Jamie's way of doing it was much more professional. If you are interested in making it, you should get in contact with Jamie about the design. He's been very helpful on a couple of projects of mine. If you are curious about the changes I made, I'm sure Jamie has them and can explain them better than I could, but you can PM me with questions as well.

    I've had a chance to use it a couple of nights, and I have found that the bug netting is a little low on my body. Instead of over my eyes and mouth, it is over my mouth and neck. So it still works fine, and I would now agree the amount of mesh is correct. I would also say that the positioning is more because of my sewing than the design. Other than that, I have actually been able to sleep in the bivy without needing any way to pull it off my face like shock cord. It is very comfortable and perfectly roomy for me at 5'10" about 145 (side sleeper) and my Golite Ultra 20. I haven't had a chance to use a thick pad with it, nothing over about .5" because I don't own one, so I'm not sure how it would do then but it seems large enough.

    #1739269
    Jamie Shortt
    BPL Member

    @jshortt

    Locale: North Carolina

    I missed this most recent string of posts so this is a little late. But I did get a chance this morning to put together what I think is the latest simple bivy pattern. I put it on my website. Here is the link to the bivy details. Look for the design link on the page.

    LyW8_Bivy

    Use with caution as I have not actually made this design, but it is close to the one I show on my site. As far as I know Chris is the only person to have made one. I do believe there are a few differences between the posted design and Chris's. I am specifing 8" side walls for the foot box. This will make mine less round than Chris's. Also I am only using 6" high wall in the head box. The "walls" are made by using the same technique one would use to form the bottom of a square stuff suck. I think Chris and I are calling this the "Folded Corner Technique". Because Chris used higher walls in the headbox he used less taper from the chest width to the top. I believe his taper was 36 at chest to 35 at head compared to the pattern which is 36 to 25. If you make a bigger "wall" you will want to increase the top width as Chris did. Thanks Chris for helping me understand this.

    Chris please correct if I have made any mistakes.

    Jamie

    #1739297
    Jamie Shortt
    BPL Member

    @jshortt

    Locale: North Carolina

    Chris and I have been emailing back and forth to get this design as close as possible, if someone were to recreate it. I need to clarify that in the design on my website the 6" height for the head walls or sides is made up of a corner the "pinches" in 3" of Momentum and 3" of silnylon. This is indeed half of what Chris did. He refers to the height in term of the material so 6" height is 6" of momentum + 6" of silnylon. This is what I would call 12".

    The same goes for the footbox. I am specifying an 8" wall which is 4" of momentum + 4" of silnylon. I believe Chris used 6" of Momentum + 6" of Silnylon. Chris's dimensions will make a more square footbox but will shorten the bivvy by 3" over mine (if I have my geometry correct).

    This is important because the Folded Corner Method will reduce the width and length of the bivy in order to increase the Height. If you prefer to use Chris's "higher" walls you will want to adjust the dimensions accordingly.

    Chris refers to moving the zipper entry higher on the chest. I believe the current pattern does this. Heavy emphesis is on believe as I have not produced a bivy from this exact design yet.

    If someone makes one please let us know how it comes out.

    Jamie

    #1739925
    Stephen Hoefler
    BPL Member

    @talusterrapin

    Locale: Happily wandering

    I just downloaded the spec sheet and have my Silnylon cut to sew. I'm just waiting for the momentum 90 to arrive then I will let you know how it turns out!

    Thanks for posting this!

    #1743460
    Jason Kakimoto
    BPL Member

    @jasonkak

    Locale: Southern California

    MYOG Bivy sacks look great! Can you give me an idea of the cost of the materials used?

    #1743629
    Chris M
    BPL Member

    @kringle

    Locale: California

    I don't have receipts from it, but I purchased all my fabric from OWF (their website does not seem to be working well currently though). I think the .9 oz breathable was about $10 a yard. So, using that with silnylon second from OWF, the fabric cost me about $48. You would then just need a zipper coil and a very small amount of bug net. I think it cost me somewhere around $60, maybe a bit more with shipping costs and things I can't think of. I felt the price was pretty good for the results I got out of it.

    #1749676
    Stephen Hoefler
    BPL Member

    @talusterrapin

    Locale: Happily wandering

    Here's what I put into the project.

    $50.75 for 3 yards of Momentum 90 w/ shipping (@$13.59/yard)
    $15.00 for 2.5 yards of Silnylon from previous project w/shipping (@$5.40/yard)
    $6.83 for 2 #3 double zipper pull zippers and 1 yard of #3 Zipper w/shipping

    Factor in a small piece of elastic flat drawstring and Gutermann thread we come to about $75 for the raw materials.

    In other news, I finished the Bivy and will post those pictures later this evening.

    #1750132
    Stephen Hoefler
    BPL Member

    @talusterrapin

    Locale: Happily wandering

    As promised, I'm uploading the pictures of the LytW8 bivy. I hope that these pictures assist those considering the LytW8 bivy as their next MYOG project.

    I wanted the bivy to perform well with my current and future sleeping systems so I made a few small modifications to the dimensions. I haven't yet made a Quilt so for now I'm using a Feathered Friends Hummingbird, and to push the envelope, I tried the bivy with a NeoAir to see how much room the bivy had.

    I reduced the taper to the footbox by 1.5" (14" from center on each side rather than 12.5" or 28" instead of 25") and reduced the taper to the head box by 5" (17.5" from center on each side rather than 12.5" or 35" instead of 25"). These were the only modifications I made to the Bivy Dimensions.

    The finished weight of the bivy was 6.1 ounces but with some careful trimming of the seam allowance material I managed to pull the weight down to 5.8 ounces.

    Technical note: I reversed the M90 for personal preference. I didn't like the way the "shiny" side rubbed and stuck against the the bag so I opted to have that side out. From what I can tell, both sides of M90 are equally hydrophobic.

    Photobucket

    Here's a size comparison to a regular 72" NeoAir.

    Photobucket

    Here's the NeoAir inside the Bivy aligned with the mesh screen

    Photobucket

    Feathered Friends Hummingbird and NeoAir inside the Bivy

    Photobucket

    Side shot

    Photobucket

    Footbox Detail

    Photobucket

    Bug Mode

    Photobucket

    Zipper and Tie-out detail

    Photobucket

    More Zipper detail (Note: Sewing the bivy material over the zipper provides a nice and natural zipper stop)

    Photobucket

    Tie-out detail (Caveat: I realized afterwards that moving the tie-out to the main body of the bivy may make more sense for reducing condensation. It's current position primarily allows you to partially unzip the noseeum without without it falling to your face. I'm not especially concerned about this with the bivy but you may want to experiment with two Tie-outs opposite one another along the zipper or moving the Tie-out to the body portion along the zipper.)

    #1750920
    Jamie Shortt
    BPL Member

    @jshortt

    Locale: North Carolina

    Stephen, The bivy looks great. Thanks for the detailed posting. I'd say reducing the taper a bit was a nice add especially considering that you are using a neoair. How is the fit with such a thick pad? I'm curious if you would add any width to it or leave it as is (i.e. add width at widest point, chest)? Having more space in the head area is nice for putting things by your head (water bottle, light, etc). I can add your dimension changes as options to design.

    At < 6oz I'd say you have a bivy that competes with any you can buy!

    Thanks, Jamie

    #1750928
    todd
    BPL Member

    @funnymo

    Locale: SE USA

    Stephen,

    Thanks for taking time to post all the pics!

    I like the big footbox and width. Jamie's designs are sharp and you did a great job modifying it for your needs.

    #1750931
    Stephen Hoefler
    BPL Member

    @talusterrapin

    Locale: Happily wandering

    Thanks Jamie,

    The clear and concise instructions made the project very accessible and I'm very pleased with how it turned out.

    Regarding the fit, I actually don't use that Neoair much at all. My main set up sloshes back and fourth between a Zlite with 1/8 evazote pad and in colder weather an aluminized full lenth ridge rest. I mostly wanted to show that you can use the bivy with a thick pad like the Neoair to encourage others with that set up to give the bivy a try. When I got in the bivy with the neoair and bag the fit was admittedly pretty snug, totally functional though. I suspect that with the original dimensions this would not have been the case.

    The width of the bivy works very well for me and I wouldn't make any adjustments to that. For me, it was the staple measurement of the project and I based the other dimensions around it. I would suggest others approach the project that way so they can tailor the bivy to their specific needs. It's a convenient size and allows just the right amount of wiggle room even with a bigger Neoair + Bag set up. With a quilt and thinner pad you'll have far more room and probably wouldn't need to make any adjustments to the original dimensions.

    I was considering sewing the footbox the way Chris had(8 inches instead of 6) but instead opted to keep the height and make it wider to accommodate the Ridgerests width. That might be something to include in the instructions.

    "At < 6oz I'd say you have a bivy that competes with any you can buy!"

    > And at a fraction of the cost!

    #1767822
    Nate Powell
    Member

    @powell1nj

    Locale: North Carolina

    Howdy,

    Great looking bivvies everyone. I'm planning on making one soon myself. Question for Jamie, Chris or Stephen – I noticed in the plans that the bivy is sized for a 5'10" person. I'm 6' – do you think I should add length to the design? Looking at the pictures it seems like it could accommodate the slight extra bit of height but it's hard to say. I'm planning on reducing the taper a bit as Stephen did – probably by the same amounts. Along those lines, should I think about modifying the location of the netting because of the height difference? This is an important point for me as being able to see out through the netting for stargazing is a major factor in trying a bivy/tarp setup. I'm actually thinking of increasing the amount of netting to 8 or 9 inches (adding netting toward the head or top of the bivy).

    So, just a couple of things I've been wondering about. If any of you who have experience with this design can chime in with advice I'd appreciate it. Thanks for the posts and to Jamie for the great design!

    #1767863
    todd
    BPL Member

    @funnymo

    Locale: SE USA

    Nate,

    Not trying ot talk you out of one of these fine bivies at all but….

    Have you considered the SMD Meteor? Full netting at the head is the best for stargazing. The pattern is free, too. The above designs offer superior weather protection, however.

    Todd

    #1767912
    Chris M
    BPL Member

    @kringle

    Locale: California

    Just thinking about it real quickly, I think the height should still be fine. You should have something close 70" of length from the foot to the netting, plus another 8" of netting if you increase the amount of netting. This should put the netting in a good place for you to do some star gazing.

    Todd's suggestion of the meteor may be a good thought as well. It really just depends on what you want out of the bivy. I was hoping for more splash protection so that I could use a smaller tarp more easily as well as an increase the warmth of my shelter for colder months. So for that reason, I decided to go for a bivy design that included more water resistant and wind resistant fabric than it did bug netting. If what you are looking for is a roomy space to keep bugs off of you with a bit of splash protection, than I would suggest the meteor as a good alternative.

    #1768288
    Nate Powell
    Member

    @powell1nj

    Locale: North Carolina

    Thanks for the insight fellas. I am familiar with the Meteor, but as I believe was stated above, it has a bit too much netting. I don't really need the 'cone' of netting above the head. I'll have to keep thinking about it I guess, but hopefully within the next few weeks I'll have some photos to add to this post. Thanks again for the help.

Viewing 25 posts - 1 through 25 (of 80 total)
  • You must be logged in to reply to this topic.
Forum Posting

A Membership is required to post in the forums. Login or become a member to post in the member forums!

Get the Newsletter

Get our free Handbook and Receive our weekly newsletter to see what's new at Backpacking Light!

Gear Research & Discovery Tools


Loading...