Topic
Ideas for higher heat candle "stove"
Forum Posting
A Membership is required to post in the forums. Login or become a member to post in the member forums!
Home › Forums › Gear Forums › Make Your Own Gear › Ideas for higher heat candle "stove"
- This topic has 77 replies, 12 voices, and was last updated 7 years, 5 months ago by
 Anonymous.
-
AuthorPosts
-
Sep 2, 2017 at 11:43 am #3488539
 AnonymousInactive
Also, I was reading last night that people make their own gelled fuel by combining different alcohols to soy wax (they were talking primarily about using rubbing alcohol, but I would use denatured). Usually the ratio involves slightly more wax than alcohol per volume. Supposedly it’s fairly clean burning with primarily blue flame.
There would be some trade off since alcohol doesn’t have the energy density of wax, and it wouldn’t be as solid, and it’s not as inexpensive per BTU, but if it helps it to burn more efficiently and cleanly, I’d be interested in mixing in a little alcohol and see how that works.
I already have about 10 lbs of soy wax, so it might be interesting to try different ratios and see how little I can get the alcohol down to while improving the combustion. Probably start with half half.
Sep 2, 2017 at 12:15 pm #3488549AnonymousInactiveGary, I was thinking something along those lines. Apparently the military has forms of those handwarmers that get up to around 200 and use it to heat meals.
I’d be more interested in hearing from folks with a chemistry background on how to make it myself, and tweak it to be closer to the military grade.
Sep 2, 2017 at 12:22 pm #3488551AnonymousInactiveThe commercial ones are a combo of iron powder, activicated charcoal, salt, vermiculite, and oxygen from the air.
What if you cut out the vermiculite, add a little more salt? Shouldn’t that produce a higher heat reaction?
Sep 2, 2017 at 1:25 pm #3488561Justin, I had to give it a try, just to see. I found a couple of regular hand warmers that are less than a year until expiration. I placed a disk of closed cell foam into my MSR Titan kettle, and then a disk of carbon felt on top of that. I rigged up a way to slip my kitchen digital thermometer into the pour spout in a way that it would allow a bit more air to get inside. I placed a fuel canister on top of the lid to pin it down and keep the thermometer in place. Here’s what it looks like:

Note that after over an hour, the inside pot temperature leveled off at 104* F, whereas the thermometer on the floor said 78* F (a difference of 26*). So I don’t think this concept will work very well at 0* F. Body warmers might make a difference, as they should fit nicely by being placed on their sides to line the inside of the Titan pot. But still…
I know that Mountain House sells a set of special warmers to heat their FD meals. Maybe they are like those military food warmers you mentioned. When I was on a Federal disaster medical response team, we ate plenty of MREs while on deployment or doing training. The food warmers that they came with worked pretty well, but I don’t know how long they put the heat out. Long enough to heat up a meal, for sure, but they likely won’t put out the heat for more than an hour or so.
Your soy/alcohol idea sounds interesting. I’d like to read how it works out. It seems like all the good options involve carrying a lot of extra weight. When I was a kid, my older brother and I built a crappy tiny log cabin on the river outside of town. We spent a couple different nights camped there during the cold dark Montana winter. His cowboy trick was to place 6-8 tennis ball sized rocks next to the campfire for several hours to heat them up well. At bedtime he gloved up and put them in a large tin can (size #10?), and we slept on either side of that can inside the drafty cabin. It certainly helped ward off the frigid cold. That’s likely the lightest solution to your problem. Good luck with your quest, Justin.
Sep 2, 2017 at 2:00 pm #3488570A modified Fancee Feest stove made to burn paraffin wax. I has all the good points and bad points
Sep 2, 2017 at 2:09 pm #3488576use chafing fuel. Safe stuff if tipped over, won’t ignite.
 Sep 2, 2017 at 4:31 pm #3488621AnonymousInactive
Hi Gary, yeah I figured that the regular hand warmers probably wouldn’t heat too well. Not sure about the Mountain House ones.
I know I said I wouldn’t use thermite (and I don’t plan to), but a slower reacting thermitic reaction might be more ideal for such an application. Produces a lot of heat for a small amount of mass, and if the process is slowed down some (some do that with mixing sand with it), can burn for awhile.
But that stuff is mighty dangerous, especially inside a small, closed, flammable area. Speaking hypothetically, with a large Ti pot, lined with ceramic fiber blanket and carbon felt underneath that for insulation, with the lid lined with same material combo, and some small holes for pressure release, you might be able to get away with doing it fairly safely. But I don’t think it’s worth going there.
Would be safer to just burn wood in a tiny stove and flue vent it.
The rock idea could definitely work, but I try not to do camp fires though it’s usually allowed around here for various reasons. To take full advantage of a camp fire, you could also get a heet sheet or space blanket and string it up to reflect the radiant heat from the fire into the tent.
Sep 2, 2017 at 4:37 pm #3488627AnonymousInactiveHi Dan–the chafing stuff looks interesting. Seems there are a few different kinds or blends, I presume the stuff that was shown in the video is specifically or primarily diethylene glycol?
Have you ever tried an alcohol soy wax blend Dan?
Sep 2, 2017 at 11:56 pm #3488687AnonymousInactiveI haven’t completely given up on the wax for fuel idea yet. Was wondering if something like this might work? Get a large Al round container with a screw up lid, that’s 3 to 4″ diameter and at least a couple inches deep.
Take a piece of copper tubing, bend it in a inverted U, then drill a few small holes on the top of the inverted U tubing, thread some carbon felt through that Place that in through the screw on lid till it reaches down with about a half inch to spare. JB weld it in.
In that same copper tubing (probably want to do this before bonding it on), near the base of the copper tubing on one end, drill a larger hole at a 45* angle going up. Into that will be inserted a nozzle connected to a simple pressure control valve, and connected to that will be some tubing. To the end of a tubing will be connected a large, blown up balloon (bring a couple with you, so as one gets down, you can blow up another to replace it soon after).
Raise this up enough so that you can put a couple to few small beeswax candles under it. This is to melt the wax and build up a little pressure. Meanwhile, these provide some ambient light, relatively little soot, and a little, nice odor, heat (hopefully bears are hibernating at this point).
Question–should a small intake hole be put close above the valve to help draw in fresh air with more oxygen than one’s breath?
In any case, experiment with opening up the valve to different degrees and seeing any possible effects on flame at the top.
The downside of this system is you can’t add fuel while it’s going, but that’s why you start off with a good size container to begin with, with a good amount of wax in same.
Would this even have a chance of working at all? The idea is to help mix the air and fuel better through increased but controlled pressure and air circulation. A couple of large rubber balloons don’t weigh much. And it just so fortuitously happens, I’m full of hot air..
If batteries ever become super efficient and lighter weight, then you could convert it to being connected to a small fan instead.
Sep 3, 2017 at 5:37 am #3488701Justin, a brief study of thermodynamics will show you that this is all a lost cause. Mankind has been working on candles for several thousand years. What it all boils down to is the amount of energy available from a candle. Flipping through some engineering books it looks like 20-30W. Depending on what you try to heat up (your tent) this can take a few minutes to never. It doesn’t matter about mass, since, the candle would also need to warm this stuff up, to be radiated off later. You trade present time for later time. That doesn’t really matter over an increasingly colder night. So, the simplest design, that is safe, will be the best design, since it is also the lightest to carry, by definition.
As I remember an Eskimo igloo heater would work best. Today they are sold as survival candles. They usually have 1-5 wicks in a tin. With a simple double walled tent (low to prevent heat from rising away from you,) a safe place to keep the flame(s) going all night, and, enough low/high ventilation to prevent CO2 and CO from building up, you should be able to maintain your tent about 20-40F above ambient. Soo, if it gets to 0F, you should be warm enough inside to sit around with a jacket on and read, or, write. Yes, this means it will also be a bit cramped. But positioning yourself on your folded pad(s), with your sleeping bag around your shoulders, a pee bottle handy (to prevent heat loss of opening the door and the half hour warm up time,) a space blanket fitted around the tent (except for ventilation holes,) and your own body heat (around 60-80W) you should be comfortable. DO NOT overthink this as you are doing.
Perhaps a cord with some loops and four or five older candle lanterns spaced along it would work best. These catch a large amount of soot and re-burn a lot of it. Easy to carry and set up. The candles are the heaviest part. You would need 3-6 per night. At around 8-10 hours (more with bee’s wax but less heat) each, this will give you plenty of heat (and light) to warm up your tent. The Candlelier is a three wick candle that will work for small (1-2 cups) cooking chores (it is slow to boil, though.)
You can also create a small disk stopper (with a wick threaded and knotted to hold it, and line it with AL foil) for making your own candles from the soy wax you have. Just pour it into the aluminum casing leaving room for the base/spring.
Anyway, the Eskimo heater will work, too. It’s just a little more dangerous in a tent. I often bring a candle lantern and hang it near the peak vent to drive ventilation, removing condensation from my tent. I don’t care for the light at night, though.
Sep 3, 2017 at 5:52 am #3488705Survival candles – glorified large tea-lights with several wicks. Yeah, they give off a bit of heat, but they also present a huge risk. After 10 – 15 minutes you have this big pool of molten wax and some almost floating burning wicks. Fine when sitting on a solid table, but just a shade iffy in a tent in mid-winter.
Cheers
Sep 3, 2017 at 7:08 am #3488713Better to use candles with “followers” for safety, no pools of wax.
Sep 3, 2017 at 10:10 am #3488739AnonymousInactiveNo direct thoughts at all on the last concept?
Hi James, thanks for feedback. I hear yah, but would just point out that Gatt’s stove (the G Micro PSL) seemed to work to burn wax more efficiently, as did/does Jon’s. That means, technically it can be done. Yeah, they will still have odor and some fumes, but if it’s decreased a fair amount (especially and primarily CO)–I’m good with that.
Also, they were using paraffin wax. I’ll be using primarily soy wax (maybe mixed with some refined coconut oil), which a lot of folks says burns a bit cleaner and smells a bit less than paraffin, though not near as nice as beeswax. It has a lower melting temp than all the above, and I think a slightly lower combustion temp, which makes it better suited (or should I say, sooted..) for this purpose.
But there is no point in building the earlier mentioned “stove”, if the educated and/or experienced consensus is that it won’t and couldn’t work to improve combustion efficiency.
(Yes, whatever I end up doing with whatever fuel, the latter will be contained for sure).
Sep 3, 2017 at 10:19 am #3488741AnonymousInactive“hear yah, but would just point out that Gatt’s stove (the G Micro PSL) seemed to work to burn wax more efficiently, as did/does Jon’s.”
Would also point out that there is potentially a difference between technically working, and being commercially viable and marketable. I can understand why a lot of people wouldn’t want to buy a wax stove for backpacking, even with improved efficiency, and why these would fail on the market.
But I’m not concerned with the market–just want it for personal use.
Sep 3, 2017 at 2:09 pm #3488771I had heard, but haven’t confirmed, that MRE’s are heated with the endothermic reaction of calcium carbide and water. The acetylene isn’t used, but is why you couldn’t transport them on commercial flights.
Back before LED lights, I’d sometimes bring my caving carbide lamp on group backpacking trips: it was a sort of UL Coleman white gas lantern. Putting out light like a 20-30 watt incandescent bulb, it wasn’t as bright as a Coleman white gas lantern (which equates to 100-watts), but a lot lighter and a lot tougher. And directional, so instead of putting it IN the kitchen area, I’d point it at the kitchen area. And, being directional, you can turn it to illuminate something 50-100 feet away, which the Coleman light couldn’t.
Anyway, they put out some heat. Some heat of reaction as the water drips into the carbide reservoir, but much more so, when you burn the acetylene gas. Not the 10,000 BTU/hour that your canister stove does on full or even the 3,000-5,000 BTU/hour that a white-gas catalytic heater does. I’d estimate maybe 1,000 BTU/hour. A trick that cavers use to warm a hypothermic person is to make a tent of some sort (parka, poncho or trash bag) around the victim’s body (not their head!) and warm that volume with the carbide lamp.
Again, they’re small, compact, tough as dirt (because we’d drag them through the dirt), and a proven technology over many. many decades. In addition to providing heat, they provide a lot of usable light – Winter camping up here involves 16-hour-long nights, so lighting is a practical but also a mental-health requirement.
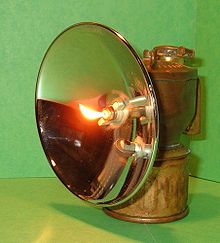
Sep 3, 2017 at 6:31 pm #3488804Hi David
Cheating – you polished the reflector!
Neither of our carbide lamps are that shiny.Cheers
Sep 3, 2017 at 7:15 pm #3488810You know how they clean with 200-inch reflector at Palomar Observatory? With Dawn dips soap.
Back in the day, for big, “booming” passage, there were 9-inch reflectors for a very tight beam of light.
Sep 3, 2017 at 9:31 pm #3488830AnonymousInactiveVery interesting and informative as usual David, thank you.
Are these carbide lamps still being made and sold today? Does acetylene burn clean with little CO and/or other harmful gases or fumes?
Sep 3, 2017 at 9:53 pm #3488833OMG. The ignorance of youth. (That’s you, Justin!)
Carbide lamps have two compartments. The one on top holds water. The one on the bottom holds calcium carbide as gravel. A tiny valve dribbles water from the top compartment into the bottom one, where it reacts with the calcium carbide to create acetylene. The gas comes out the jet at the front at very low pressure and burns. The flame is seriously oxygen-deficient and creates a LOT of atomic carbon. This carbon glows white hot, creating the light. It also creates a fair bit of CO, as you might expect.
You can write your name on the roof of a cave with with the soot from the flame. Irresponsible youths used to do that, but using your real name was ‘hazardous’.
Cheers
Sep 4, 2017 at 6:45 am #3488850Back woods mountain boys have been known to fish with carbide and gallon glass jugs :-)
Sep 4, 2017 at 12:34 pm #3488902AnonymousInactiveGuilty as charged Roger–I suppose someone in their latter 30’s is a youngin in comparison to some of the folks here.
In any case, I thought I was trying to get away from higher levels of CO–hence looking for more efficient, complete combustion?
Somewhat related: I just completed the breathable panel for my tent. Decided to not make it as a “add on panel” via velcro, but just put it on permanently. It’s a little on the heavy side, but I’ll need the moderate CFM levels for decent ventilation.
The outer fabric is a combination of a thin baselayer, polypropylene fabric (black, to handle UV better and absorb more solar heat), and with a polypropylene non woven fabric under that. Then a layer of 2.5 oz Apex, and then two layers of .67 nylon no see um mesh. It’s sufficiently air porous that I can both blow and suck air through all layers pretty easily, and yet, should shed snow and even light rain well enough (though rain won’t be an issue, this will only be used on the coldest of days). The top vent will be made out of a similar combo, minus the mesh (since velcro will be involved). Trying to strike a balance between insulation and allowing some air convection with fresh air intake and moist humid air exchange. Think it’s better than just opening up the door. A bit concerned that moisture might freeze inside the Apex though, but that’s why I need a heat source other than my body, to help drive the moisture out more efficiently.
Shouldn’t say fully completed since I haven’t sewed the border fabric on it. Since these materials are innately much more stretchy than the rest of the polyester based tent material, thought it was a good idea to sew a similar fabric as the tent material (silpoly vs the latter which is silpoly PU4000) around the borders to give it a more similar structure and fabric properties as the rest of the tent.
Yes, this will be one weird arse shelter, fo sho. I’ve never made a tent before (just a flat tarp once), but so far it seems that the amount of work involved is like making a few or more small tents (since it’s like making 4.5 small quilts, and then having to sew them all together, plus a little extra work here and there).
Sep 4, 2017 at 12:56 pm #3488909A bit of googling and I can’t find any new carbide lamps. Lots of used options on eBay. The big win for carbide lights used to be their higher light output and longer life, compared to zinc or alkaline batteries and incandescent bulbs. And that the equivalent of an extra set of batteries – a few tablespoons of carbide – was much lighter and compact. Modern batteries and LED bulbs eliminates those advantages. And carbide lamps have significant risks – CO, lighting someone’s clothing on fire – and they only work while upright.
Sep 4, 2017 at 1:47 pm #3488915Justin, here’s an idea building on David’s mention of a compact powder power source. Maybe you could build a larger scale carbide lantern ‘stove’ whose purpose would be heat generation vs light output. Vented of course with a smallish chimney pipe. Less frequent fuel feeding (Set it and forget it) and low but steady heat would be the primary benefit over current hot tent stoves..
Sep 4, 2017 at 2:15 pm #3488922As a convenient solid fuel to be used within a chimney, I’d suggest self-light charcoal briquettes over carbide. Far cheaper, more readily available, and higher heat output per carried weight. Or just use twigs and pine cones.
Sep 4, 2017 at 7:34 pm #3488980AnonymousInactiveWell, I suppose dying from CO poisoning is about one of the nicest ways to go…
Mostly joking, a flue should help mitigate the danger. However, I kind of want to start off with fuel sources that emit lower levels to begin with.
On another thread that Dan bumped, it was talked about the oxidative heating of copper in acetone vapor. I’ve read that there are some less than healthy potential gases and fumes created from that, but I wonder how well or not a carbon air filter placed over that would help? Activated charcoal is found in all sorts of air filters, from paint and fume filters to heavy duty gas masks. In any case, if works well as a heater, it would also be placed under the air porous/moderate CFM panel to further help lesson exposure to any nasty VOC’s.
Even though copper is quite dense and thus heavy, so far it sounds like you don’t need a whole lot to create some heat (and the specific gravity of acetone is the same as pure ethanol, so a bit lighter than water, about 22% per same volume). In any case, I plan to experiment with this at home under controlled conditions.
-
AuthorPosts


- You must be logged in to reply to this topic.
Forum Posting
A Membership is required to post in the forums. Login or become a member to post in the member forums!
Trail Days Online! 2025 is this week:

Thursday, February 27 through Saturday, March 1 - Registration is Free.
Our Community Posts are Moderated
Backpacking Light community posts are moderated and here to foster helpful and positive discussions about lightweight backpacking. Please be mindful of our values and boundaries and review our Community Guidelines prior to posting.
Get the Newsletter
Gear Research & Discovery Tools
- Browse our curated Gear Shop
- See the latest Gear Deals and Sales
- Our Recommendations
- Search for Gear on Sale with the Gear Finder
- Used Gear Swap
- Member Gear Reviews and BPL Gear Review Articles
- Browse by Gear Type or Brand.
