Introduction: How to Use Trekking Poles
While there is plenty of information available about why you should use trekking poles, very little information is available about how to use trekking poles. In this article, I describe a systematic and methodical approach describing how to use trekking poles in a way that allows you to use them to your advantage by making your hiking easier and more efficient.
Adjusting Pole Length
You can't learn how to use trekking poles properly if they are either too short, or too long. So first off, your new legs need to be a suitable length:
- For general use, set pole height so that when the tip is at your foot, your elbow makes a roughly 90° bend. Setting the height a little shorter allows you to clear plants or rocks with less lifting.
- On a typical three-tier pole, set the top adjuster so the upper section is telescoped halfway. Then fix the lower section to achieve the desired height. Make any adjustments en route using the top adjuster.
Why? It is hard to load (bear down on) your poles with your arm grossly extended or bent. (See how much less force you can generate at 180° or 0° than at 90°, for example.) Setting pole segments as suggested lets you change pole length using just one adjuster, the closest and least likely to be muddy and contaminated with poison oak/ivy oil.
Attaching your Poles
Next up, you have to attach your new legs to your original equipment.
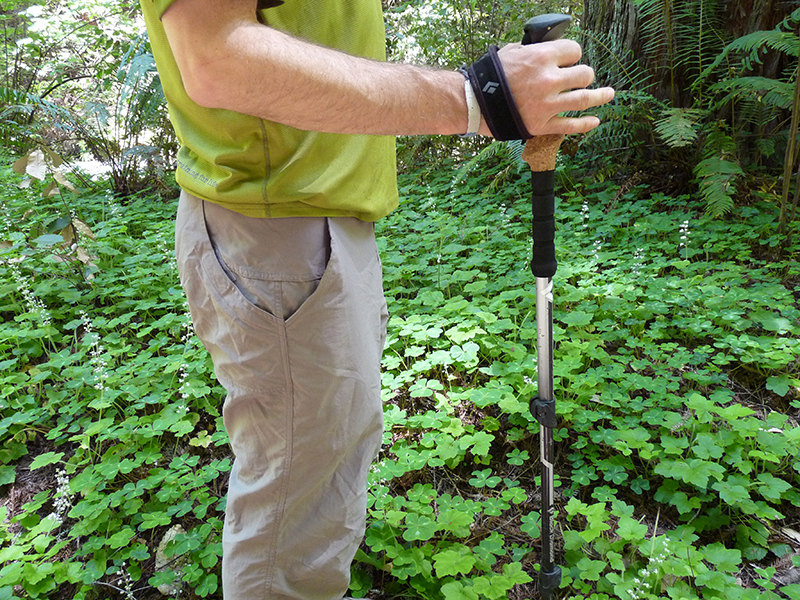
- For each pole, put your hand up through the bottom of the strap loop and then pull the strap down by holding the grip.
- Adjust the length of the straps such that your fingers land where they fit on the grips.
- Hold the grip loosely. You don’t even need to close your bottom three fingers around the grip (a good way to ensure that you aren’t over-gripping). Change how your fingers (loosely) hold the grip as needed to prevent hand or wrist soreness.
- Keep your elbows close to your sides.
Why? You are making a joint by using the strap as a strong, tireless ligament. If you grip tightly, your hands and wrists will needlessly work and stress. Keeping your arms close to your sides conserves energy and keeps your poles traveling where the path is most likely to be clear: down the center.

The Multiple Uses of Trekking Poles
Trekking poles are used primarily for endurance, building upper body strength, and reducing injury, but they serve many other functions:
- Checking for critters in high brush
- Moving poison oak/ivy, nettles, and other no-touchies out of the way
- Making a stand for a dromedary bag or gravity filter
- Poling a tarp or tarp tent
- Making noise to avoid bear, lion, and other unwelcome encounters
- Bluffing off an animal attack (swing poles over your head)
- Defending yourself in an actual attack
- Temporarily marking a trail
- Resting and stretching while standing
- Probing depth of water and mud
- Probing trail obstacles in the dark
- Stabilizing a camera
- Poking companions, as needed
Moving Trekking Poles Forward
Limbs attached, check. Now we have to move them forward, from “plant” to plant, as we hike.
- Jog the forearm up slightly to cause the pole to swing forward and then back down to plant the tip (for now don’t worry about where to plant). Or, move the pole with a slight flick of the wrist.
Why? These minor motions get the job done with a minimum of movement and energy.
Movement Patterns
- Alternate legs: Each pole goes forward when the opposite leg does. This pattern maximizes balance and lets your arms swing the way they do naturally when hiking.
- Parallel legs: Each pole goes forward when the same-side leg does. This pattern provides the most relief to your legs, so use it to minimize leg fatigue and stress as needed.
- Double (or simultaneous) pole: Both poles move forward at the same time. This pattern is useful for stepping up or down, or as a change up.
Load, Load, Load
The pedal-pushing analogy reminds us that it is essential that you load your poles! Without loading, you are basically just hauling stabilizers to engage in case of slipping. A lot of pole users are not loading enough. If your upper body doesn’t feel “worked” after an arduous trek, you are likely not loading enough.
Three Basic Techniques: Gas, Brake, and Coast
OK, let's get in gear. Conventional advice tells us where to plant (and how long the poles should be) based on the type of terrain: flat, uphill, and downhill. Instead, the Gas, Brake, Coast Method focuses on what we want our poles to do for us:
- Adding thrust (or gassing), which you might do on flats, uphill, and even downhill.
- Slowing assistance (braking), on downhill stretches.
- Nothing (coasting), which you might choose on any terrain.
The remainder of this article includes detailed sections about how to use trekking poles based on the following techniques:
- Technique 1: Gas
- Technique 2: Brake
- Technique 3: Coast
- Technique 4: Step Over
- Technique 5: Step Up
- Technique 6: Step Down
- Technique 7: Traverse
- Technique 8: Variable Rugged Terrain
# WORDS: 1640
# PHOTOS: 10 total, with captions (plus 2 videos!)
Member Exclusive
A Premium or Unlimited Membership* is required to view the rest of this article.
* A Basic Membership is required to view Member Q&A events

Home › Forums › Effectively Using Hiking Poles: The Gas-Brake-Coast Method