Topic
wind shield for alcohol stove
Forum Posting
A Membership is required to post in the forums. Login or become a member to post in the member forums!
Home › Forums › Gear Forums › Make Your Own Gear › wind shield for alcohol stove
- This topic is empty.
-
AuthorPosts
-
Jul 28, 2007 at 5:24 am #1224313
Saturday night, nowhere to go and nothing on TV. Good. I'll tinker.
Here's a mock-up of a wind shield I've been thinking about. I made this out of a coffee can that just happened to be the right size but it's not meant to be used. I would think that making it out of 1mm aluminium would be good. Using the can was helpful as it is already curved.
Having experienced blusterly winds that played havoc on my last stove I have been wanting to come up with a wind shield design that fits a few criteria.
1: can be stored in the pot.
2: full protection from wind.
3: minimal parts.
4: fits well around the pot.
5: acts as the pot support.
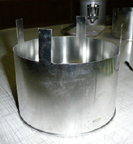
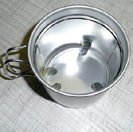
6: lightweight (of course)Photo 1 shows the base section under construction.

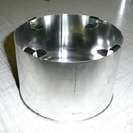
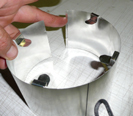
Photo2 shows the tabs formed that support the pot.

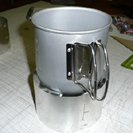
Photo 3 the pot sitting on the tabs on the base section.
Photo 4 shows the top section sitting on the base. It has 4 small sections cut out of the bottom edge so it slots over the tabs on the base.

Photo 5 shows the finished assembly.

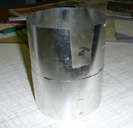
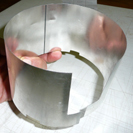
Photo 6 shows how the two parts fit inside the pot. Both parts have slits down the sides so they can 'compress' (?) to fit in the pot.

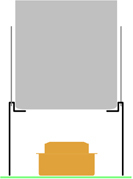
Photo 7 is a cut away view.

Still needs some fine tuning and some air vent holes.
Yes, the base of the coffee can is cut off.
Sorry if my lazy description is vague.Jul 28, 2007 at 5:38 am #1396701Two more photos
base section

top section
Jul 28, 2007 at 6:47 am #1396704Great design. You really got it down to the essentials. The folded tabs as a pot support are really creative. This sort of design could be die cut by a contractor and you're in business.
I wonder how much gain you get with the top section. Have you tried testing with and without? It makes sense to keep the wind off the pot as much as disturbing the flame below. My guess is that you would gain as much as using a lid to minimize heat loss.
I've been experimenting with 4" aluminum flashing using aluminum gutter spikes as crossbars, which can double as tent stakes and digging tools. Ti tent stakes can be used the same way. I've been able to make the same windscreen work with a Brasslite Turbo II-F and Esbit tabs. The pot can sit on the Brasslite stove, or by inserting the nails in punched holes, I can burn an Esbit tab resting on a cat food tin to get the right height. A regular paper punch will make precise holes in the flashing. I gave the flashing a 1" overlap and used a couple paper clips top and bottom to hold it closed. I notched the side to clear the handles as you did. A handle-less pot would require a pot grabber to pull it off the heat while fuel remained. I got a ~5 minute boil time with the Brasslite and their 600ml pot with 16oz/475ml tap water in 70F weather with a light breeze.
The flashing was $0.80/foot at a local Ace Hardware and the aluminum nails were $0.16 each. My cat is delighted to see me buying canned food for Esbit bases :) This same design would easily adapt to Fosters or Heineken beer cans, as would yours, for a totally "hobo" stove and pot combo.
Jul 28, 2007 at 7:41 am #1396706Nice design and great craftsmanship.
Watching with interest!!!!!!!
Jul 28, 2007 at 8:41 pm #1396747Hi.
I once had the experience of trying to use my last home made stove in strong blustering winds. It did not have a high shield and the wind would actually blow down into the short shield/pot holder and the burner could not work properly. So a lot of fuel was used for no effect. So for me the top section of this design is important at least for bad conditions. Also, the high wind shield helps keep the heat against the sides of the pot thus heating it quicker.
These 2 peices made out of a coffee can weight 4oz. Is that light?
I'm not experienced enough yet to make my own fuel stoves.
Aug 1, 2007 at 4:02 pm #1397100Although I prefer different approach – a sideburner stove that doubles as a opt stand – I like the simplicity of your design.
I'm only worried how it'll perform when heated and under load. Both steel and aluminium will get significantly softer when exposed to flame.
Here is one possible solution: make the tabs shaped as an bold arrow. The triangular 'wings' of the arrow will be bend 90 deg down, the tips touching the wall. This will add a lot of strength, while stil being made out of a single sheet. Maybe it would be possible to use even lighter material. (If this exercise in 3D imagination is to difficult, I may draw some picture)
Aug 3, 2007 at 4:55 am #1397291Hi. This prototype is made out of really thin steel yet the tabs holding the pot are fine. When I make the final product I'll just make 3 tabs instead of four. My previous homemade stove used the same tabs and it was fine. I do understand your idea and I would do it if needed.
Also, the shape of the tabs is such that they also keep the pot centred over the flame and also create an even airspace around the pot. I work on the theory that a 5 to 6 mm gap is good.
Aug 3, 2007 at 9:15 am #1397319Ian,
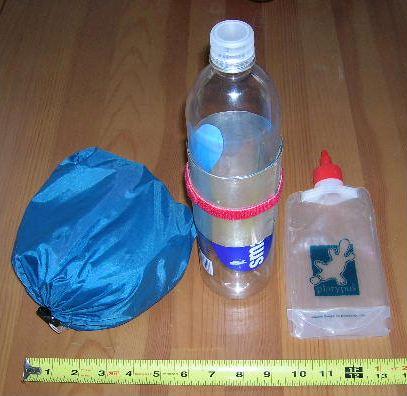
Instead of storing your windscreen in your pot have you considered wrapping it around a water bottle?

To support your pot add two stainless steel bicycle spokes and you have a durable and light stand/windscreen.
Aug 4, 2007 at 12:53 am #1397380Hi. I only carry platypus 'bottles' so can't do that. Plus I also try and keep all the cooking gear together as much as possible. My alcohol burner, spoon and knife also fit in the pot plus little things like matches or whatever.
The good thing about this design is that the two parts of the wind shield are under compression when stored inside the pot so push up against the side of the pot and take up virtually no space, except the tabs that stick out but even for those I put that piece in with the tabs down at the bottom of the pot thus out of the way.Aug 7, 2007 at 10:52 am #1397688I too use Platy's and store my kitchen stuff the way Ian does.
Ian — how heavy are the two sections of your windscreen? Which brand and size coffee can did you use?
Aug 7, 2007 at 5:41 pm #1397745Down here in Australia the coffee brand is International Roast. The main thing is the diameter of the can is 5 inches (127mm) and the weight of the 2 parts is 4oz (110g).
I really only made this as a design exercise which worked as I think the design and concept are exactly what I want. Whether or not 4oz is light I'm not sure, I want to make the final product out of aluminium which is thicker but may weigh the same. Being made out of a tin can, I think this prototype may not last too long as doesn't the tin coating burn off and then the steel will rust? -
AuthorPosts

- You must be logged in to reply to this topic.
Forum Posting
A Membership is required to post in the forums. Login or become a member to post in the member forums!
Our Community Posts are Moderated
Backpacking Light community posts are moderated and here to foster helpful and positive discussions about lightweight backpacking. Please be mindful of our values and boundaries and review our Community Guidelines prior to posting.
Get the Newsletter
Gear Research & Discovery Tools
- Browse our curated Gear Shop
- See the latest Gear Deals and Sales
- Our Recommendations
- Search for Gear on Sale with the Gear Finder
- Used Gear Swap
- Member Gear Reviews and BPL Gear Review Articles
- Browse by Gear Type or Brand.
