Topic
First MYOG project
Forum Posting
A Membership is required to post in the forums. Login or become a member to post in the member forums!
Home › Forums › Gear Forums › Make Your Own Gear › First MYOG project
- This topic is empty.
-
AuthorPosts
-
Feb 25, 2014 at 4:58 am #2076811
if you make a tarp out of silnylon. for one, it won't cost catastrophically a lot. and for two, when you devise a better idea about 15 minutes after you finish the first one (and the second .. and the third), you can recycle the silnylon as stuff sacks.
you may not know this yet, but your friends are going to need a LOT of stuff sacks.
cheers,
v.Feb 25, 2014 at 6:03 am #2076817Ben, it sort'a depends on your conditions. I spend most of my time out in the ADK's. We get some good storms here. Usually the forest floor is damp. Lakes and streams are often cold enough to support trout (usually well below 60F, max and it is rare that swimming for more than 5-10 minutes is comfortable.) Winds can get fairly nasty. But, I have survived some tornadic storms while the old pup tent stood up, OK. Lots of tree's down around us though. I just use 3/4" strap material. The patches (reinforcements) are around 5-6". I don't really care too much since they seem to hold better than the stakes. In 40 years of camping up there, I have had 5-6 tents come down due to inadequate staking. One was shredded pretty bad when I tied it off to a tree. I am guessing we got around a 40-45mph wind storm. Note that lower to the ground is generally better due to ground cover.
I only use reinforcement patches on the corners, and, at the peak of an A-frame or pup tent set-up. For pole growmets, I use a folded climbing harness strap about 8-10" long. Then I take a hot 16 penny nal and make a hole, just large enough for the tip. I loop the cord through that and down, with the pole (hiking staff) poking through the hole. There is a bit of give, but I just tighten around that. This will easily support 200-300 pounds or ~100kg. The tripple rolled seam makes tension easy. It will easily hold about 100-150 pounds. It takes most of the stress off the fabric. The down-side is that the fabric might stretch a bit leaving the panel slightly loose. I usually take care of that with the stakes. For intermediate stakes, I don't bother to reinforce them. I will loose a corner before these will come loose. A 10×10 is a good size for me. With a bivy, you can go less.
Feb 25, 2014 at 9:57 pm #2077184Thanks for the advice.
I have ordered second quality silnylon precisely because I don't expect my first attempts to be up to much. At some point I may graduate myself to some 'real' silnylon and one day I hope to dare to play around with some CF.
Feb 26, 2014 at 11:27 am #2077367Many years ago our first outdoor projects were always stuff sacks!
My wife made me a series of nice cotton stuff sacks for the MSR Wisperlight stove we used to carry. They had to be stout cotton because they doubled as a pot holder! Also, they were a little bigger than the factory sacks so it could also hold our spoons, lighter, repair kit, and the windscreen.Then we made all sorts of light nylon pack liners for waterproofing packs on canoe trips.
eventually we made several Ray Way kits. A double quilt, several of his stuff sacks and one funky hat kit. Using his kits introduced us to some very high quality materials.Making stuff yerself is fun and can be addictive. You might want to experiment with a cheap polycro tarp before making an expensive silnylon one. Don't forget that you can also make yer own alcohol stove too!
But, for a nice little sewing project how 'bout a pair of shell mittens?
I recently invented a pair and documented the process.Shell mittens are just that, big uninsulated mittens that can be worn over mittens or gloves or just by themselves.
Ever go backpacking on a blustery day and wind up trying to stick yer hands into yer pockets? It isn’t easy when yer wearing a backpack, and it is impossible if your holding trekking poles, a staff or an umbrella.
Just the shells can be worn in the rain to keep your hands warmer and dry, as the water sluicing down your rain jacket will otherwise keep your hands wet all day. Of course in that case you’d have to put the gloves on first, then your rain jacket, so the water runs over the gloves and not inside the cuffs.
Mittens do reduce your dexterity, but this isn’t a big deal in most conditions and they can be easily slipped off.
They are idea for wearing over fleece gloves.
Fleece gloves are cheap and very warm – When dry. Sadly they soak up water like a sponge, so they do need protective shells.
Shell mittens are also idea for digging snow caves, quinzees, snow trenches, for riding bikes in cold and / or wet weather, ( over normal bike gloves ), snowball fights and so forth.
They are easy to make. The palm needs to be made from something waterproof, like coated nylon. The backs should be something water resistant but breathable, like uncoated nylon.
Thankfully I have plenty of both kinds of material salvaged from an old tent.
The Inspiration –
“Lighten Up” by Don Ladigin and “Trail Life” by Ray Jardine

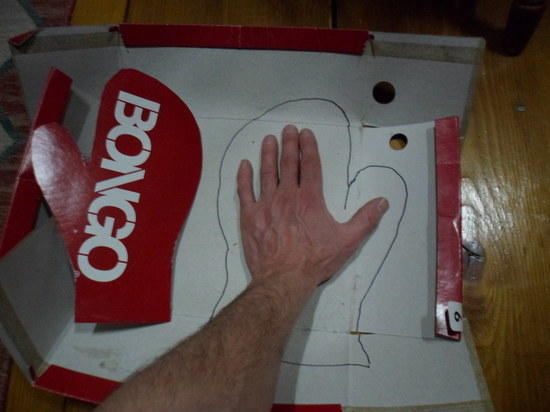
The pattern
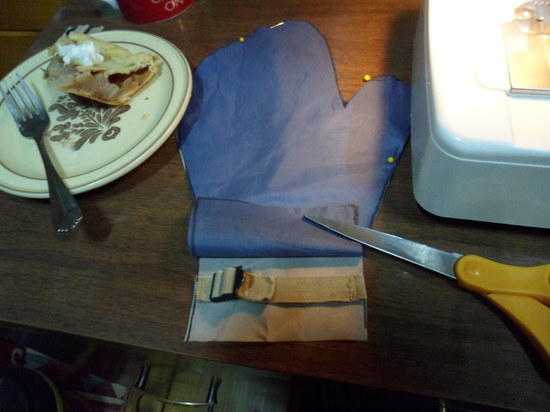
Cutting out the material
Pinning it together ( and pie and tea! )
Almost forgot to sew the gatherers on the cuff first – Note these were cut off the waist of an old set of BDU trousers!
Way, way to small!
Don't get discouraged by failure, think of it as evolution in progress. The New Pattern. Once a pattern is finally right, it is worth keeping in case you might want to make more in the future.
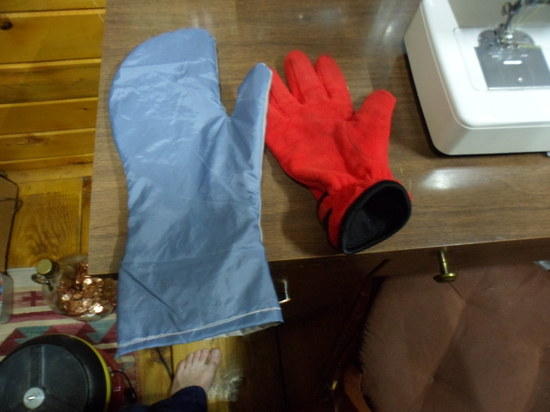
Success! And the fleece gloves to be worn under them in cold weather.
The glove is 0.4 ounce and quite compact! I’ll never notice a pair of these in my pack or pocket. I have yet to add something to gather the cuffs and seam seal them, so they will be heavier when done. It was getting late and I was finished for the evening, and I haven’t decided what to use. I could put a draw string in the cuff, add a Velcro tab, or use the tabs from the old BDU trousers.
If nothing else I have learned how to make waterproof gloves, so that is one less thing I have to buy. It would certainly be simple to make fleece, wool or rabbit fur mittens to wear under them, so I should always have warm hands!
Feb 26, 2014 at 11:43 am #2077374Want another easy as pie project?
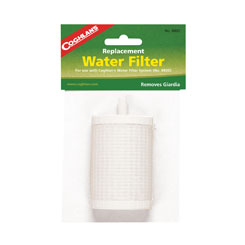
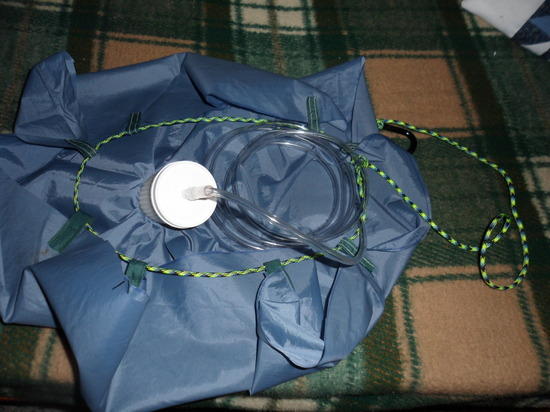
How 'bout a Ray Jardine style Hiker Friend water filter?In his book Trail Life Ray Jardine describes a gravity water filter he invented back in the 1980s. Like all Rays ideas, it’s light, easy to use and cheap to make, so I made one.
In essence it is nothing more than a water carrier with a cord to hang it up, fitted with a filter cartridge and length of hose.I decide that an El Cheapo 2 micron filter would work well enough for me ( I hope ). I was thinking of buying a twenty dollar Coghlan's filter when right next to it on “the big green board” I noticed replacement filters for it for just eleven dollars. No need to pay twenty dollars when I can pay eleven for the stuff that actually does the work, and I figured I could make something more reliable, lighter and easier to use than the plastic Coghlans pump anyway.

Years ago someone gave us several low quality worn out nylon tents, and my wife and I kept them for the fabric they contained and have been making stuff out of them ever since.
I still had an old tent door of waterproof coated nylon which was just big enough. I began by laying out a 30” circle on the old tent door –
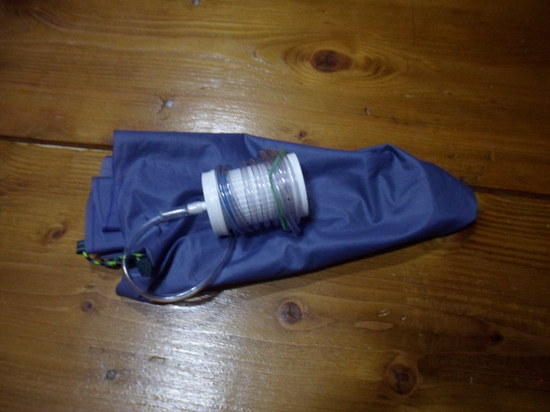
Then simply cut it out, sew eight little web tabs around the circumference and thread a six foot cord through them to gather the circle into a bag and hang it, and I attached the filter to seven and a half feet of ¼ inch soft plastic tubing ( cost me a dollar 13 cents at Lowes ), and rubber banded it to the center of the bottom of the circle.
I hung a .8 ounce aluminum clip to the end of the line to help hang the thing.
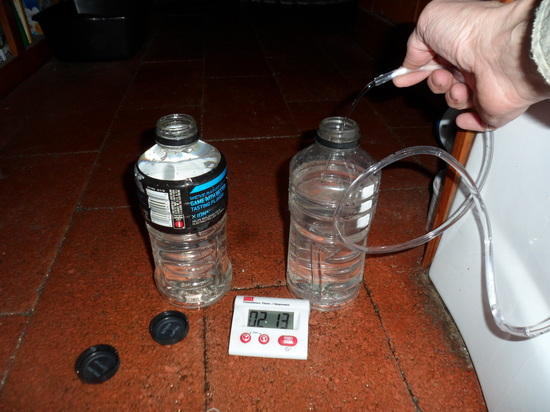
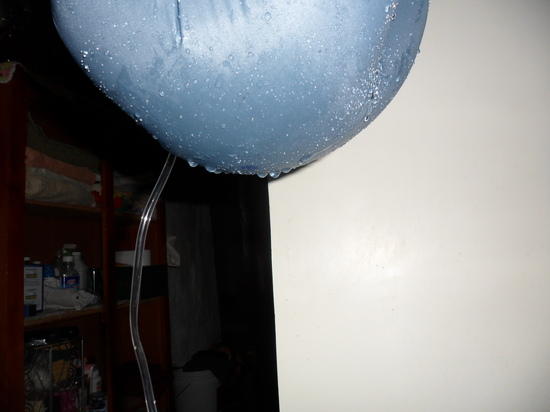
The total weight at this point is 6.7 ounces.I wanted to try it out with the dirty brown water in my pond, but after marching down onto my pond, kicking a foot and a half of snow off a spot, unlimbering my sidearm and discharging six shots into the ice at my feet I’d only penetrated a few inches and was nowhere near the water. The little stream on my land was equally iced up. Hmmm. Camping out this this time of year up here one melts snow for water or goes thirsty! So I gave up, hung it up in our bathroom at home and tested it with our well water.
The bag holds about two gallons. When filling it, the heavy asparagus-type rubber band holding the filter to the bottom took off for parts unknown, never to be found again!
So I simply sunk the filter in the water and sucked on the tube to fill it with water. It settled to the bottom of the bag and didn’t need to be held there.
The water siphoned easily and filled a quart bottle in about 2-1/2 minutes.My old coated nylon tent door fabric seeped just a little, but should work well enough –
Simple, light, nothing to break and multipurpose –
Easy to haul water into camp, hang it up and use water from it as needed. The tubing from it could be used in a solar still, as could the nylon bag spread out to catch the condensate.
It could be used to haul extra water for a long dry spell or for that matter to hold extra groceries that will not fit in yer pack from a trail side store for a big dinner that evening ( but you'd have to hold it in yer hand as you hiked along ).Things I noticed in use – The clip was useless, so I tossed it, making the dry weight just under six ounces. When wet, the filter stays wet. It weighed 4.1 ounces an hour after use, and stayed wet for days. It took four days in a dry, warm cottage to completely dry.
Also, holding the filter down inside the bag isn't needed, it sinks all by itself.
I am curious about how long other filters take to dry? It means that on a trip the actual weight will be closer to eight ounces, not six, and it brings up the concern of bacteria growing in the wet filter.
My backpack has mesh side pockets which is where I think I'll carry it so sunlight can get at the filter element.
After a trip it would probably be wise to disinfect the filter with chlorine or something and dry completely before packing away in a dark place!The Coghlan's filter is said to be good for 400 quarts and is inexpensive enough to simply buy a new one every season.
All in all, I'm happy with my 12 dollar 13 cent investment!
Feb 26, 2014 at 12:30 pm #2077394I wonder what you think you are achieving? If the Coghlans filter is rated to 2 microns, it will stop protozoa (eg Giardia), but it won't stop bacteria or viruses. Is it worth the weight?
Cheers
Feb 26, 2014 at 12:41 pm #2077397Roger, in North America we are taught to first assess the risk.
In many of the higher elevation places where we backpack, Giardia is about the only risk. In the lower elevation places, perhaps near rangeland, bacteria and viruses would be more obvious. Some of us never backpack at lower elevations. Hence, we filter for Giardia only.
The conventional wisdom is that a filter must have a pore size smaller than the organism that you are trying to eliminate, but that you really want something with a pore size that is one-tenth of that, just to be safe.
–B.G.–
Feb 26, 2014 at 1:34 pm #2077420Looks interesting – shame I just ordered a sawyer mini!
I may give the mitt's a try – I imagine they'd be nice and light if I used an uncoated nylon to use as a windproof layer.
Still waiting on delivery of some silnylon but some grosgrain ribbon arrived today ready for me to practice sewing reinforcements with some PU coated nylon scraps I have.
Any project photo's will be posted as soon as they're done.
Feb 26, 2014 at 2:09 pm #2077435Just for the record I have never in all the decades I've backpacked filtered or treated my water, and I've drank from some pretty nasty sources including cattle ponds, springs full of sheep pellets and even the gutter on the side of the road when I was a kid.
Sadly, my wife is not quite as immune as I seem to be and contracted giardia on a late fall canoe trip last year by drinking the lake water.So, that rig was aimed at precisely that, giardia. Bacteria doesn't see to be an issue and nothing protects against viruses except maybe killin' 'em off with chemicals or ultraviolet light.
Now if I was traveling to Africa I sure would invest in something better, but this suits my needs and it is nice to be able to haul a lot of water to camp, hang it up and simply use as needed.
– Fer that matter, no reason ya couldn't use any other filter with a gravity rig. I used what I did 'cause it was cheap, does what I need and was available.
Ben,
Glad if I could lend ya some ideas.
For the mitts, waterproof stuff for the palms is nice, so you can wipe snow offa stuff and handle stuff without soaking yer gloves under 'em. A completed set is about an ounce, depending upon what you use fer gathering the wrist so they sure are light!But whatever you make be sure to share with us!
Feb 26, 2014 at 9:18 pm #2077582Their only potential to see snow would be Easter in the Alps but I'll either be snowshoeing or snowboarding so they'd either be overkill or not quite enough.
On another note…how hard would it be to add waterproof panels to a pair of cheap softshell trousers? Spring snowboarding in the Alps gets hot – last year I had a few days in board pants and a short sleeve T. Sitting or kneeling in the snow requires some waterproofing but obviously not 360 degrees. Skiers use softshell pants and I use them for snowshoeing in. I wouldn't like to mess around with my favourite pair but if I bought a cheap pair then might it work to hack them into having a waterproof seat and lower legs?
If nobody reads the last part, I'll repost it in its own thread – I'd love to try that now!
-
AuthorPosts


- You must be logged in to reply to this topic.
Forum Posting
A Membership is required to post in the forums. Login or become a member to post in the member forums!
Our Community Posts are Moderated
Backpacking Light community posts are moderated and here to foster helpful and positive discussions about lightweight backpacking. Please be mindful of our values and boundaries and review our Community Guidelines prior to posting.
Get the Newsletter
Gear Research & Discovery Tools
- Browse our curated Gear Shop
- See the latest Gear Deals and Sales
- Our Recommendations
- Search for Gear on Sale with the Gear Finder
- Used Gear Swap
- Member Gear Reviews and BPL Gear Review Articles
- Browse by Gear Type or Brand.
