Topic
Hybrid Sideburner alcohol stove
Forum Posting
A Membership is required to post in the forums. Login or become a member to post in the member forums!
Home › Forums › Gear Forums › Make Your Own Gear › Hybrid Sideburner alcohol stove
- This topic is empty.
-
AuthorPosts
-
Jul 3, 2007 at 12:15 pm #1223949
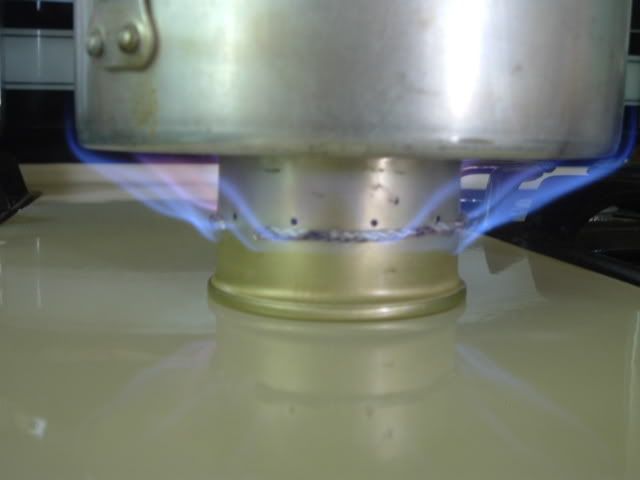
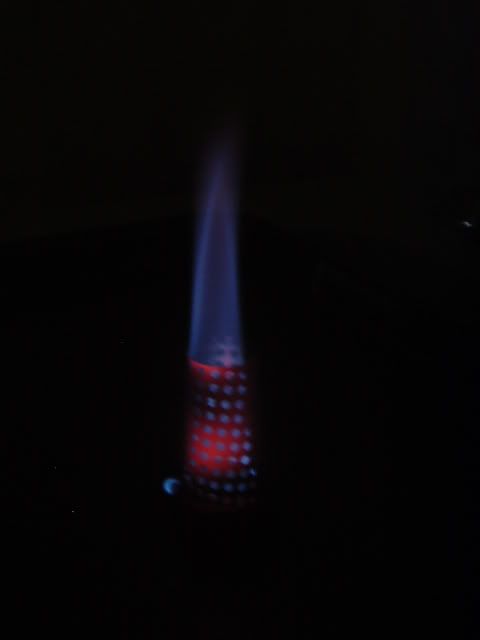
I gave some thought to making a sideburner stove. This is what I came up with.
This is a prototype!!!!!!!!
Made with a potted meat can. Contents were removed through 1/2 inch hole in the top. That left me with a secure container to hold the fuel. No man made, JB welded seams, or rolled on a lathe with heat applied. The seam on the can is factory sealed, no leaky, strong!!!!
It has a 2 1/2 inch base (1/2 inch larger than pop can stoves)
Fuel is poured in through the 1/2 inch hole in the top and then hole is covered with attached hole cover. It's attached to the can, no loosy. Cover is low profile and seals tight. No leaky
After the fuel has been put in, the wick material immediately starts to bring fuel up and out ready to be lit.
The pot of water is then put on the stove(no pot stand required) before lighting. Once on the stove the wick material is lit. The stove starts out slow and them once it's warmed sufficiently, the stove starts to burn vapors coming out of the jets.
The stove boils 2 cups of water in 4.5 min. using 16ml of denatured alcohol.
Stove weighs 10.2 grams
What is different about this stove?
1. No primer pan required, it's self priming.
2. No do-it-yourself seams to come apart.
3. Pot can be put on before stove is lit. No wasted heat.
1st photo sub 1, The Stove
1st photo shows attached hole cover.
2nd photo shows pot on stove before lighting.
3rd photo shows wick material heating pot of water and stove.
4th photo shows jets just starting to ignite. 5th photo shows jets in full burn.
Jul 4, 2007 at 8:56 am #1394361The wick is very cool….. So, do you really need the hole cover? Isn't the pot a good enough seal?
Jul 4, 2007 at 9:44 am #1394364Some pots may not have a smooth bottom. Any vapor leaking under the pot will ignite with a ssfffftswooosh. That'll make you aware of your heart after it skipped a beat. =)
Jul 6, 2007 at 8:39 am #1394558Has solved many problems
Jul 6, 2007 at 10:58 am #1394573Dan,
My friend "Por Donnde" has been buying potted meat from the dollar store for years. I don't know if he actually eats the stuff but I've been using the cans to construct stoves, they're a lot stronger than soda cans. I'm going to try using the taller Vienna Sausage cans and experiment with deforming the sides to get a more vertical jet alignment.
Does the single turn wick actually pull alcohol out of the jets before the wick burns out? I've always had to use at least four or five turns to get enough wick to hold the priming fuel required to heat the stove enough to vaporize the alcohol.
Jul 6, 2007 at 12:09 pm #1394584(quote)My friend "Por Donnde" has been buying potted meat from the dollar store for years. I don't know if he actually eats the stuff but I've been using the cans to construct stoves, they're a lot stronger than soda cans. I'm going to try using the taller Vienna Sausage cans and experiment with deforming the sides to get a more vertical jet alignment.
Does the single turn wick actually pull alcohol out of the jets before the wick burns out? I've always had to use at least four or five turns to get enough wick to hold the priming fuel required to heat the stove enough to vaporize the alcohol.(quote)
There are three individual wicks that make up the one complete circle of wick. That equates to six wicks(two ends per wick) dipping down into the fuel to suck-up, by capillary action, enough fuel to heat the pot into blooming out the jet ports. The wicks are constantly bringing fuel to the outside to assist in the water heating process and help maintain the burning of the jets in windy conditions. I've been wickatizing stoves for two years and it's been fun. I've got some that burn olive oil and some that burn kerosene.
You are right about these little cans being much much stronger than pop cans. You're not going to be able to smash these little guys if they are roughed up in your pack or even stepped on. Because they are almost whole, they are super tough.
I think they are worthy enough to make a few available on eBay. Next week I'll put some up on eBay and see if someone might be interested, just for the fun of it. "Nothing Ventured Nothing Gained".
Jul 6, 2007 at 12:43 pm #1394591With your description, and revisiting the photos, I see that you've pulled the wick through some holes and, I imagine, turned the wick down into the fuel. That's why there's no JB Weld showing on the wick ends. No? With all of the prototypes you've built I imagine you've got the system well worked out.
Would you be willing to give us an inside view of the wick attachment? I'm also curious how you keep the wicks from pulling too much fuel from inside the can. Or is the flaming wick part of the "burner"
My Duh! I've simply got to read slower and absorb more. You answered my flaming wick question already.
Jul 6, 2007 at 1:35 pm #1394595(quote)With your description, and revisiting the photos, I see that you've pulled the wick through some holes and, I imagine, turned the wick down into the fuel. That's why there's no JB Weld showing on the wick ends. No? With all of the prototypes you've built I imagine you've got the system well worked out.(quote)
Three pieces of wick, six ends threaded into six holes. The wicks turn downward on the inside of the can and lay on the bottom. No JB weld used at all. They are doing what they naturally do. I do nothing to slow down the capillary action. The wick is not attached in any special way. This system is working for me and it will work for you.
Denis, have you made any sideburner stoves?
Jul 6, 2007 at 2:04 pm #1394599Dan,
Several years ago, after seeing Tinny's MiniBull stoves, I experimented with a bunch of side burner designs. I've made single wall, double wall, double bottom, open top and pressurized (6-32 rivet-nut) types. For two years I carried various alcohol stoves until I just got tired of waiting for water to boil in windy and/or high altitude conditions. I then went to a Snow Peak Giga Power for summer and my old MSR Whisper Light in wet or winter conditions.
I still like to experiment with alcohol stoves and most recently have been trying to get back to alcohol using the Caldera Cone set up, in combination with various burners.
Jul 6, 2007 at 3:30 pm #1394606Hi Dan,
Nice design work, it solves the pot stand problem that is often encountered with can alcohol stoves.
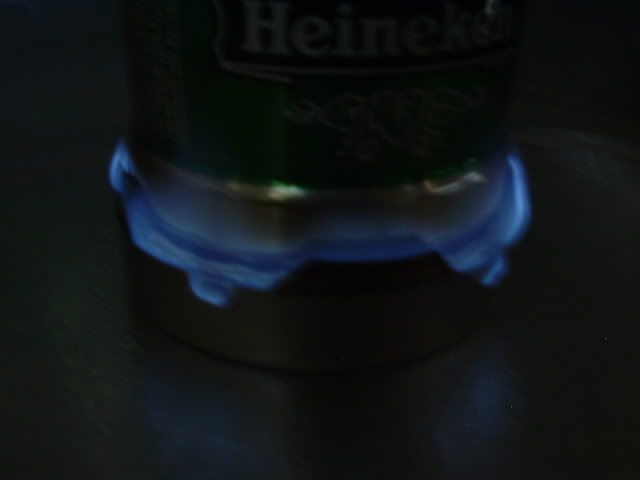
I am a bit concerned by the flame pattern only coming into contact with the outer edge of the bottom of the pot and then going up the sides from my investigations this is not the most efficient flame, most of the heat is going up the side of the pot therefore wasting energy, the longer the flame can be in contact the bottom surface the more heat it can transfer into the pot. Your design would be much more efficient under a large pot.
I wish I could obtain the materials for my stoves from the supermarket like most of the alcohol stoves that I see on BPL forums although a lot of my material comes from my work workshop scrap bin.
Tony
Jul 6, 2007 at 9:11 pm #1394635I get one dose of reality after another when I try my stoves out side to get a boil with 1/2 ounce of fuel. I don/t expect it any more. I settle for 200 degrees and that is way too hot for Ramen and other foods that I rehydrate(Mountainhouse). The foods rehydrate in 10 min. The water temp only falls 20 degrees(tested in 15 degree weather) 180 degrees is still way too hot to eat the foods. That's my reality, thats what I experience. I can't eat that hot of food. We all look for that almighty BOIL with our simple little alcohol stoves. Look back in Tinny's archives, he says many things, one side of his mouth says speed and boil, the other side says slow and not soo hot. I can't get the Ion to boil water in the field under breezy conditions. That's the only commercial stove that I have tested. That's the only one I can give results on. I can't get mine to boil either under adverse conditions. Low barometric pressure creates a no boil situation with 1/2 ounce fuel in stoves that consistantly boil in higher barometric pressures. We have to take all measures to protect the heat that comes from our stoves when we use them outside. Take everything with a grain of salt when people give you specs on boil times.
Flames going up the side of our pots aint all that bad!!!!!! The flames are hot and give part of their heat to the sides that transfere it into the water. The one stove I made heats only the sides of the pot and makes the water boil. I'll post photos as soon as I can to show what I'm refering to. In the case of the Ion, it burns slow and only heats the bottom of the pot in a small area. I believe there is alot of heat loss out the sides and top of the pot that makes me think it's inefficient. So much effort has to be given to conserve its heat in the form of tight fitting wind screen and also heat reflector under it to insulate it from the cool earth.
We try to do as much as we can with 1/2 ounce of fuel. We are stuck, on a dead spot, can't deviate from the 1/2 ounce, got to have a boil with 1/2 ounce. We get boils with the 1/2 ounce indoors. It's a measurement we use to judge weather or not our stove designs are worthy to take to the field. Once we get into the real world, we have to do all we can to conserve the heat.
Jul 7, 2007 at 2:09 am #1394648Hi Dan,
Thankyou for your opinion about flames up the sides I look forward to pics, I will confess that I do not have much experience with alcohol stoves other that the Trangia which I own two amongst many canister stoves and a white gas stove.
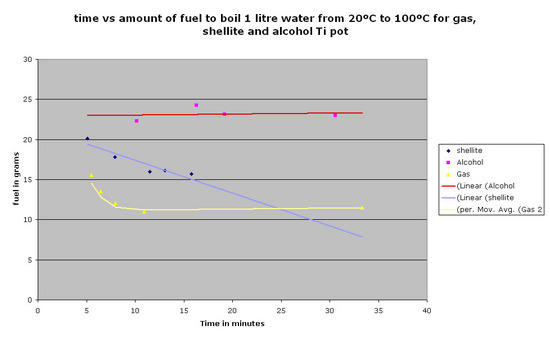
One test that I do with my stoves is to start with a measured (weight) amount of fuel and water, measure water temp make sure same at start for each run), start stove raise water to just before boiling (20-95C) taking note of time taken then I turn stove off then measure fuel used to raise water temp 75 degrees C I usually do this at ambient about 20C. Then I graph y axis fuel used x axis time so I can compare stoves and valve settings. A set of 0.1g scales and a stop watch is all that is needed.
A test that you could conduct is to try different size pots using the above mentioned method with your alcohol stove, which has only one control setting, it should be easy, with canister stoves it is not as simple as I have to go through a range of valve settings and it takes a lot of time. If you do these test could you post the results.
With the Trangia I used the simmering ring to slow the burn rate and I found that it did not use more fuel the longer it took to boil water. Trangia have designed there burner to be most efficient at full open settings. The Trangia full flame boiled 0.5L water in about 6 minutes which is the optimum fuel/time I get for my canister stoves but the weight of fuel used for the trangia was nearly double that of Canister gas. Alcohol has only about half of the heating energy of canister gas.
“Take everything with a grain of salt when people give you specs on boil times.”
I could not agree more. I am more interested about how much fuel I will use on a trip therefore how efficient a stove is or how little fuel I will use and need to carry.
“We try to do as much as we can with 1/2 ounce of fuel”.
(0.5 oz alcohol =11.2g) My JetBoil uses 4-4.5g of fuel to boil 0.5L (two cups of water) at ambient 20C.
“I get one dose of reality after another when I try my stoves out side to get a boil with 1/2 ounce of fuel.”
Me too I have had many more failures that success in the field what works in my workshop often fails in the field but I am learning every time I fail.
Tony
Jul 7, 2007 at 7:48 am #1394660"Thankyou for your opinion about flames up the sides I look forward to pics, I will confess that I do not have much experience with alcohol stoves other that the Trangia which I own two amongst many canister stoves and a white gas stove."
Tony, I'll try your methods for some of my test, thanks for the information.
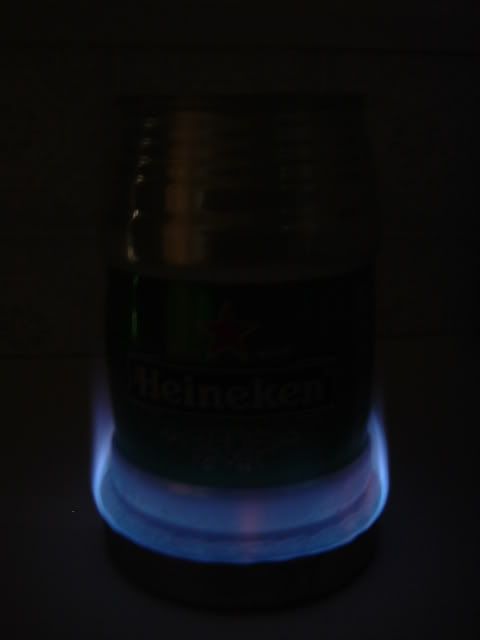
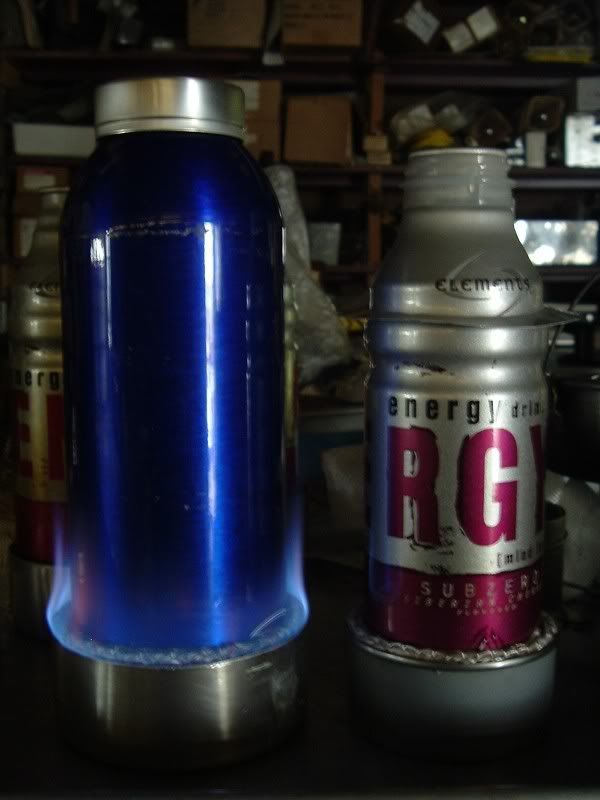
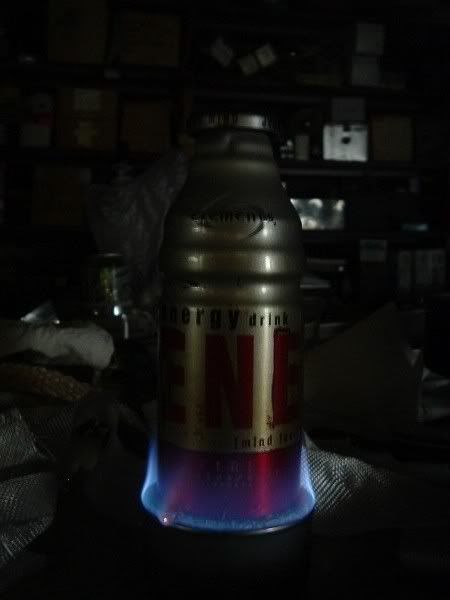
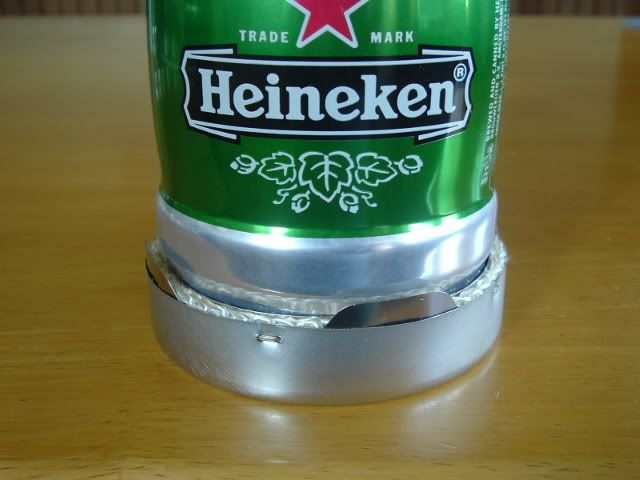
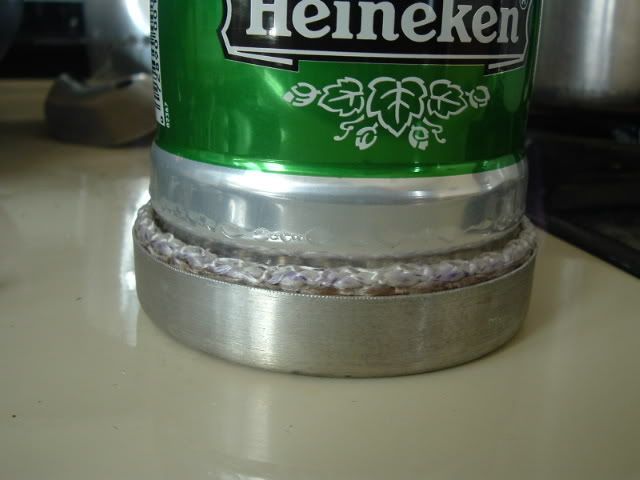
Here are some photos of stoves that heat only the sides of the pots. The last two photos are of the Stilletto stove. When the water was hot enough to boil and I looked inside the pot a 3/4 inch column of boil bubbles was rising.I picked up the pot and slowly moved the pot in a circular motion just above the flame and the column of bubbles would follow the rotation of the pot. It shows how a pinpoint heat source effects the water being heated. It was interesting to say the least.
Jul 7, 2007 at 1:47 pm #1394689Hi Dan,
Thanks for the photos, heating from the sides it is an interesting concept, I look forward to seeing some results from your testing.
Tony
Jul 7, 2007 at 11:23 pm #1394739Hi Dan,
I have just finished doing some tests with my mini Trangia, I used three aluminium pots from the same manufacturer of different diameters, small pot 106 mm, medium pot 127 mm and large pot 157 mm. All of the tests were conducted under the same conditions, ambient 11C, water start 12C water end 95C. At start and before each run the burner was emptied cooled down and filled with 50.0g of alcohol from a container at ambient temperature. The burner was lit in place under the pot as I had to have my temperature probe in place. As soon as water reached 95C the pot was removed and the cap was put on the burner to extinguish the flame and the burner was re-weighed.
Results:
Comment: Because of cool temperatures the tests were conducted in the flame was slow to start but after several minutes a full flame was obtained, this was the same for each test.
Small pot: time to raise water 83C, 8m 40s: fuel used 15.8g
Observation: after full flame was achieved the flame came up side of pot 2-3 cm.Medium pot: Time to raise water 83C, 7m 50s: fuel used 13.8g
Observation: after full flame was achieved the flame came up side of pot less than 1 cmLarge pot: Time to raise water 83C, 7m 47s: fuel used 14.7g
Observation: flame did not go up side of potDiscussion: Although the results show the larger diameter pots could be more efficient the results are very close and some caution must be applied to these results as only one test was conducted for each pot size at least three test should have been conducted for each pot to get an average to eliminate any errors, I did not have that time. Unfortunately I was not able to take pictures of the flame today.
Below is a earlier picture of my testing facility, I am using a calibrated thermistor/thermistor bridges with a National Instruments USB 6008 DAQ with Labview DAQ software program written by myself. (Temperature measurement is one of my areas of expertise)
Tony
 Jul 8, 2007 at 2:21 pm #1394781
Hi Tony,
I like your scientific approach to stove building. It's what is needed to dispell urban legends that have been created in the stove building circles. I appreciate your achievments and the sharing of your knowledge and talents. You are an ispiration.
In reference to the pots used, the smaller diameter pot, the shorter the sides of the pot, is that correct?
It is my thoery that if the pots were the same in diameter as the smallest one and the height were to be increased accordingly by a given dimension, test results would be similar/close. The increased surface on the side of the pots would absorb the heat going up the sides of the pot.
The pots that you used had increased side surface that absorbed heat as heat went up their sides, thus showing decreased time in temperature rise.
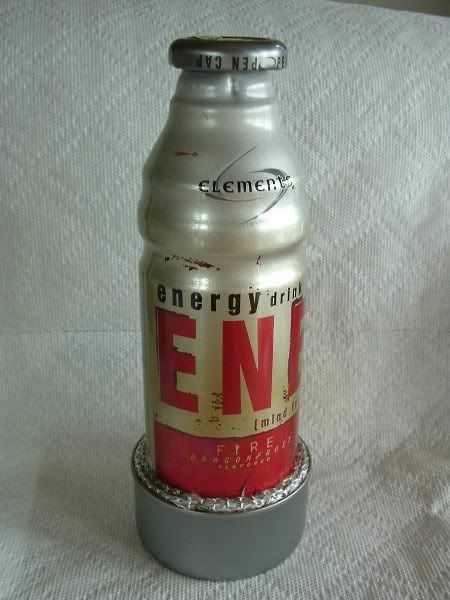
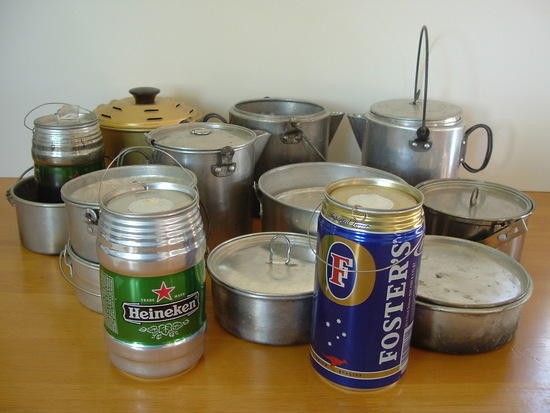
In my testing , the use of the same size diameter pot with and increase in side height, gave me the same results for amount of fuel used. In the photo is shown a variety of pots that are tested from time to time. The shortest and tallest aluminum pot were equal in efficiency. When we put our fingers at the side of the pot they feel heat. Just as our finger absorbs the heat and sends a signal to our brain and in turn our brain engages the motor nerves that makes us pull our finger away from the pot, the pot is absorbing the heat also.
The Fosters pot in foreground was imported from your homeland to help lighten our packs. The Fosters heats water faster than the Heineken. If you look their shape you can see why.
Jul 8, 2007 at 5:38 pm #1394796HI Dan,
“I like your scientific approach to stove building. It's what is needed to dispel urban legends that have been created in the stove building circles. I appreciate your achievements and the sharing of your knowledge and talents. You are an inspiration.”
Than you for your kind comments, I also appreciate you sharing your knowledge and talents, you have certainly got me thinking about pot side wall heating. There are quite a few myths about stoves out there, the one that gets to me most is that stove manufacturers claim that a measure of efficiency is how fast a stove can boil x amount of water. I decided to set up my own stove testing facility to try and sort out fact from fiction and to find out which stove pot combination is best suited to my needs, this has changed to an interest in designing canister stoves.
“It is my theory that if the pots were the same in diameter as the smallest one and the height were to be increased accordingly by a given dimension, test results would be similar/close. The increased surface on the side of the pots would absorb the heat going up the sides of the pot.”
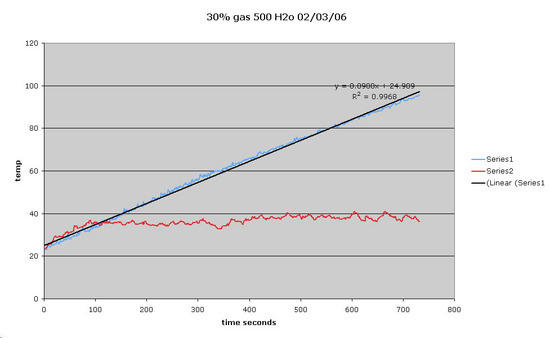
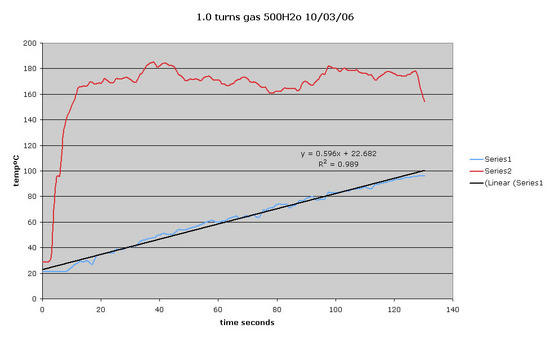
I have not done specific test on height of pots but I have done tests on same size pots of different material Ti, Al, SS and I have done lots of testing to find the optimum flame setting or burn rate as I call it and I have come to the conclusion that with Canister stoves at optimum flame setting most of the heat is absorbed through the base and heat is actually lost through the side walls especially with Aluminum pots, if you are absorbing heat through the side walls then the flame is too big and efficiency is lost. I tested this by placing a thermocouple on the outside of the pot 1.5cm from the bottom and 1cm from the side and measuring the hot gas temperature going up the side of the pot at the lower burn rates the thermocouple measured a slight rise in hot gas temperature as the water temperature rose.
Below is a graph of the rise in water temperature vs time (blue line) and the hot gas temperature at the side of the pot (red line) as you can see the gas temp rose relatively fast at the start then stated to level off but it still had a slight increase in temp. The valve setting was 0.3 turn open. The second graph is of the stove turned up to max notice the much higher gas temp (wasting fuel).
“The Fosters pot in foreground was imported from your homeland to help lighten our packs. The Fosters heats water faster than the Heineken. If you look their shape you can see why”
I also have similar large collection of pots. Foster is our export beer and it is not common here in OZ, I have been trying for some time to find a large fosters can with out luck but it is interesting that the Fosters can is better than the Heineken can (which I cant get either)
Tony

Jul 8, 2007 at 6:37 pm #1394799Very interesting testing. Not trying to hijack this thread but on the subject of heating efficiency check out this link. Not an UL gear test but some very interesting stuff for those wanting to maximize fuel efficiency.
http://www.bioenergylists.org/stovesdoc/Aprovecho/HeatLoss_Berick.pdf
One of the tests was blackened versus non blackened pots. By blackened they meant bottom & sides. As it turned out the black pots radiated (lost) more heat. Would be neat to see a study on pots with blackened bottoms (not sides) versus non-blackened ones. This could settle the debate on its benefits (if any) for heat absorption. Maybe we can solve the global warming problem yet :).
PS Sorry Tony–didn't realize you previously posted the URL.
Jul 8, 2007 at 7:00 pm #1394800Hi Steve,
I have already read the Berick paper, I posed the URL on BPL forums last February it is a very good paper. There should be more of them
Tony
Jul 8, 2007 at 7:47 pm #1394804Tony,
Thank you for your scientific testing and results. I am studying this thread with interest because I am deciding what to take on a 3 day alpine trip this weekend; alcohol+CalderaCone, or isobutane/burner. At a certain combination of (meals x efficiency) isobutane actually is the lighter option..Those pictures of side-burners shows that there is a lot of heat loss from the exterior of the flame ring (of course, it's uncontained). The efficiency of the fuel oxidation at the stove seems to be a secondary (second order) compared to the uncontained heat loss of the setup as a whole. Containing the combustion process will amost halve your boil times. A wind screen used in zero wind condiitons will help a little; but best I've seen is the Trail Designs Caldera Cones. I can boil(100C, not 95C) 500ml of 20C water in 4.75 minutes with 20ml using the simple open-jet non pressurized stove TD includes with the cone. Have you tried this device?
Pic from their website..
 Jul 8, 2007 at 8:23 pm #1394805
 Roleigh MartinBPL Member
@marti124
Locale: Founder & Lead Moderator, https://www.facebook.com/groups/SierraNorthPCThikersBrett, your comment "At a certain combination of (meals x efficiency) isobutane actually is the lighter option.." is of high interest to me. We are going on a two legged hike (a 7 day stretch, resupply, then 9 day stretch). I was thinking of taking the Caldera Alcohol stove – we only cook twice a day (breakfast and supper). Is the crossover to Isobutane under 7 days, under 9 days of 2 meals a day? We're thinking of taking two Caldera stoves for the 2 of us with the Cozy stove cover (the aluminum foil insulating cover) to conserve on fuel. What I like about alcohol is the ability to ration daily fuel use and measure how much you are using, knowing if you use less than you've packed, you can easily discard the excess without having to lug heavy empty cannisters.
Jul 8, 2007 at 10:12 pm #1394815Hi Brett,
I have looked at the Caldera cone with much interest and I think it is one of the best stove systems to come on the market since the JetBoil. They are not available here in Australia yet. The caldera cone does make a difference with helping direct and therefore keeping the hot gasses up the side of the pot as will any close fitting screen but the Caldera has the advantage of being the pot stand as well. My next stove design project will include a Caldera Cone or something similar.
I am not a great fan of Alcohol stoves, (see first graph fuel used vs time to boil for Trangia vs MSR Whisperlite vs MSR Pocket Rocket) Please note that the full open setting or fastest setting for the Trangia took about the same time as what I will call the optimum setting for the PR stove about 10-12 minutes for 1L, note the slower flame settings for the Trangia did not use more fuel. I think Trangia has it right but alcohol has much less heat energy in it than White gas or Butane/propane fuels.
From the graph the Trangia used 22g of fuel to boil 1L water that would be 11g for 0.5L or about 14ml. My Pocket rocket can boil 0.5L of water in about 2 minutes using 8.5g of fuel with no windscreen, or 5.5g of fuel in about 6 minutes, my JB uses 4g of fuel to boil 0.5L.
The reason I use 95C as my high temperature point is that I live 600m elevation and the boiling point of water is lower than that of sea level, I have measured it with a master thermometer at about 98.36 but it can change on any day with different atmospheric conditions, 95C gives me a set point just below boiling that I know is the same very time I do a test, in my tests the rate in which water boils is mostly linear (see second graph below) so I can extrapolate the results if I want to.
Tony

Jul 8, 2007 at 10:37 pm #1394818Roleigh, you asked "Is the crossover to Isobutane under 7 days, under 9 days of 2 meals a day?"
Imput your system weights into this simple algebra formula:
ASBW + (AGPM * m) = CSBW + (CGPM * m)
Where:
ASBW = Alcohol System Base Weight, everthing in your alcohol stove setup except fuel weight.
AGPM = Alcohol Grams (burned) Per Meal; for example about 30 for a 700ml in a cone.
m = meals (leave as a variable).
CSBW = Canister System Base Weight, everything in your canister stove setup including the EMPTY canister(s), no fuel weight.
CGPM = Canister Grams (burned) Per Meal, for example about 8 for a .7L jetboil, 15 for .7L on a Snowpeak gigapower.We set the two total weights as a function of time to be equal, then solve for "m", the number of meals at the crossover point.
Planning on less than "m" meals? Take alcohol; more than "m" meals? Take a canister system.If you dont have a box of partially used canisters you would take a new one; in which case the right hand side would be the total weight including full canister(s).
For example, A Caldera setup weighs 250 grams and burns 30g per meal(1 dish and 1 hot drink). A Snowpeak setup weighs 500 grams and burns 15g per meal.
250 + 30m = 500 + 15m
rearranging:
30m – 15m = 500 – 250
adding:
15m = 250
dividing:
m = 17 meals. (the crossover point)Less than 17 meals? Take alcohol
More than 17 meals? Take the canister setup.In your example you are going out for 9 days eating 2 meals per day That's 9*2=18 meals, that's close to the crossover point! I'd take the alcohol setup with at least 18*30=540 grams of alcohol. But of course you need to re-run the formula with YOUR numbers.
And since you are planning on taking 2 caldera cones, you would use the weight of BOTH setups vs. ONE canister stove and big pot. This would tip the scales towards the canister setup..
Just as an example of 2 calderas vs. one gigapower setup:
500 + 60m = 600 + 30m
m=3This system choice assumes no considerations other than weight. If you needed to melt snow of course you would not consider alcohol; but the analysis is valid any TWO stove systems independent of fuel.
Your point about being able to discard alcohol fuel; unlike the canisters is a very good point I had not thought of. If all your need for hot meals/drinks is done; toss the fuel!
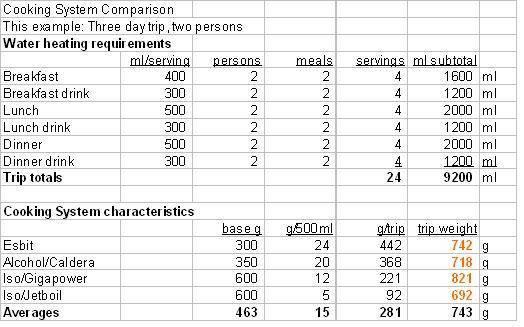
Heres an example calculation I started for my upcoming trip; values are approxiate. The Iso/Gigapower combo base weight is heavy because it requires a 250ml canister due to inefficiency when compared to the Jetboil which can get by on one 110ml canister for the whole trip.

-
AuthorPosts


- You must be logged in to reply to this topic.
Forum Posting
A Membership is required to post in the forums. Login or become a member to post in the member forums!
Our Community Posts are Moderated
Backpacking Light community posts are moderated and here to foster helpful and positive discussions about lightweight backpacking. Please be mindful of our values and boundaries and review our Community Guidelines prior to posting.
Get the Newsletter
Gear Research & Discovery Tools
- Browse our curated Gear Shop
- See the latest Gear Deals and Sales
- Our Recommendations
- Search for Gear on Sale with the Gear Finder
- Used Gear Swap
- Member Gear Reviews and BPL Gear Review Articles
- Browse by Gear Type or Brand.
