Topic
Personal Water Heater Kit
Forum Posting
A Membership is required to post in the forums. Login or become a member to post in the member forums!
Home › Forums › Gear Forums › Make Your Own Gear › Personal Water Heater Kit
- This topic is empty.
-
AuthorPosts
-
May 20, 2013 at 5:52 pm #1303167
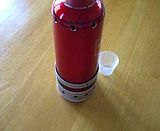
I've been creating a personal water heating kit.
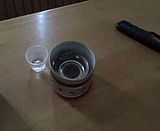
Used a Sigg water bottle for the windscreen, energy drink bottle for the pot, potted meat can for the base/stove container and a Modified StarLyte burner for the heat source. The windscreen "snaps" tight to the base for a secure way to transport the kit in a stuff sack. I paid .99 for the Sigg bottle at a thrift store.
Click on the picture to activate the photobucket video.
 May 20, 2013 at 6:25 pm #1988110
Dan,
I really like the new kit. I'm looking forward to when you light it up in the next video. ;-)
Party On,
Newton
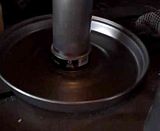
May 21, 2013 at 7:17 am #1988266Ok John, here is how I light it up and make mistakes. The body of the base got hotter than expected, oops! I need to do some fine tuning on air holes. The exhausting fumes don't smell right. No soot forming but the smell isn't right. I'm using HEET as fuel. More testing to be done. High humidity conditions exist today but will do testing anyway. Can't do yard work so stoves are the next best thing :-))))
Photobucket video….click on photo to activate.
This is a photobucket video of the first design concept. I used Iso91 for my fuel. The full history of this project is over at bplite.com.
May 21, 2013 at 9:22 am #1988312Hey Dan,
Benny Goodman, boiling water and breakfast; what a way to start the day! ;-)
Question:
Do you have the capability to swage out the windscreen larger so that it would fit over the bottom portion and not need to go so far down where the holes have to line up? Maybe that was two questions. LOL
Was effiency the idea behind the Sigg bottle "jacketed windscreen" going all the way up to the neck of the Venom bottle? It looks to me like the bottom stove portion almost forms a windscreen of its own.
As far as workbenches go during one of my solid fuel stove experiments I made a nice dark brown scorch mark on my wooden stool. What was amazing about it was that I had a hot plate or "trivet" on the stool surface covered by an aluminum foil reflector and the trapped heat did a number on the stool anyway! ;-)
Combustion air in and hot air/exhaust out make windscreens challenging. But if everything worked right the first time how boring would that be?
Party On,
Newton
May 21, 2013 at 5:41 pm #1988480John, I have the ability to swage it out with a pipe expander from harbor freight.
The hole line up was suppose to give me the ability to snuff out the burner and once cooled I'll be able to put the cap on the StarLyte. I rushed my first video. I dropped in two burners not knowing the JB Weld had not hardened up. The first burner in got welded to the storage container LOL. I was suppose to be able to fill 2 burners with 1 ounce each of fuel. I was suppose to add another ridgeline to the base so I could extend it's storage capacity to allow for the second starlyte burner. Oh well!!!
Most everything about this kit is bass akwards of the way we think. Caldera says we store windscreen/everything in pot. My kit says we store everything inside the windscreen. My windscreen is Sigg tough. The kit is 3.25"x9" What I like about is I can fill it in the morning with 2 cups of something and in the evening when I'm dead tired on my feet the kit is well on it's way to giving me some quick warm drink before I hit the sack. Disconnect the windscreen, set bottle of water on the ground, light burner, place opened bottle on pot support, place windscreen over bottle/pot and soon there will be warm water. (the burner already has fuel in it with cap on)
I have 2 additional red Sigg bottles to do a finalized version of this kit once I get it fine tuned. Got them on sale also for .99 each.
I have no intention of making these for sale. Just going to be my own little kit.
-
AuthorPosts
- You must be logged in to reply to this topic.
Forum Posting
A Membership is required to post in the forums. Login or become a member to post in the member forums!
Our Community Posts are Moderated
Backpacking Light community posts are moderated and here to foster helpful and positive discussions about lightweight backpacking. Please be mindful of our values and boundaries and review our Community Guidelines prior to posting.
Get the Newsletter
Gear Research & Discovery Tools
- Browse our curated Gear Shop
- See the latest Gear Deals and Sales
- Our Recommendations
- Search for Gear on Sale with the Gear Finder
- Used Gear Swap
- Member Gear Reviews and BPL Gear Review Articles
- Browse by Gear Type or Brand.
