Topic
Ultralight Kelly / Storm / Volcano Kettle
Forum Posting
A Membership is required to post in the forums. Login or become a member to post in the member forums!
Home › Forums › Gear Forums › Make Your Own Gear › Ultralight Kelly / Storm / Volcano Kettle
- This topic is empty.
-
AuthorPosts
-
Apr 23, 2007 at 11:49 am #1222952
I'm new to the forums and see that I'm not the only one who's wanted to "lighten up" the classic Kelly Kettle.
The Classic

(through-link to Kelly Kettle image)For background see these pages:
I'm working on a prototype of a leaner, meaner double-walled aluminum kettle, and I'm trying to gauge what kind of interest there is for this kind of cooking system. Here are the anticipated specs:
– under 5 oz total wt
– 14.5 oz water capacity
– approx 9" tall operating
– collapses to 7.25" x 3"
– welded aluminum construction
– carrying bag/ handling sleeve included in wt
-reusable mylar bags can be used to mix meals/ drinks (no need for additional pot)
– *a bit more delicate than the original, but what ultralight gear isn't? (still far more robust than a Foster's can!)
– $ Price = Depends on welding cost – I'll updateRight now I have the prototype all cut out of sample components and I'm trying to find someone in the area to do the welding for a good price. Other than the samples I'm working with, there is a minumum order of about 150 for each of the components I'm using, so there would need to be a good deal of interest if I were to make more than one.
Here are my questions:
1. How much interest is there in this kind of stove?
2. How much would people pay for it? (broad range, I know it will depend on finish quality)
3. Are these the kinds of specs people are looking for? Larger means heavier, and worse, bulkier.I'll provide pictures when it's all done.
Thanks!
Apr 23, 2007 at 2:51 pm #1387068Sounds good. I’d pay about $50-?? for one if it had the right specs.
Suggestions:
*Capacity should be 16oz–most meals require this amount
*Inner wall could be very thin–better heat transfer and less weight.
*Increase heat transfer by increasing inside surface area–add 10-20 vertical “fins” (1/4" to 1/2" wide)welded to inside chimney surface. These would run the full height of kettle. Will increase costs but greatly improve efficiency
*Add outer insulator (like jet boil)–thin neoprene or equivalent.
SteveApr 23, 2007 at 3:04 pm #1387070Devin,
I'd be interested in hearing/seeing more. You might consider posting the same message at the G-Spot section in these forums; I think more people will see it over there. Good luck with your project. Looking forward to updates. Mike
Apr 28, 2007 at 10:54 am #1387544Thanks for the suggestions, Steve. I think you're absolutely right about about the capacity and the inner wall. I'm trying to find a container that's a bit larger with the same wall thickness for the next version.
Your idea of fins is ingenious – it would function like a radiator, only it would efficiently collect heat rather than efficiently dispersing it. My concerns with installing those would be price and the fact that fuel might get stuck on them as you feed this kettle from the top.
I'm also looking for an inuslating material for the outside that would be light and durable enough. Do you know what light weight neoprene weighs per sq. ft? I've been thinking about making a carring bag out of a 4.5 oz/yd PBI/Kevlar material (like nomex, only lighter). You could then fold it up to make a sleeve and stuff in some socks, etc. into the sleeve and use the whole container for a winter thermos.
Anyway, my almost full sized version is at the shop to be welded and I hope to get it back early next week.
In the mean time, check out the "test of concept" model I made a couple weeks ago out of seltzer, mini coke, and Red Bull cans, the top from and aluminum Budlight bottle and some JB Weld.
Not the final version!
It weighs 1.2 oz, holds 4 oz, and I got it to boil in under 1:30 on less than .5 oz of carboard box while taking these pictures. Sure it's a bit small, the fire box won't last through 10 burns, and the water comes out tasting a bit like high temp. epoxy solvents, but it sure was fun, and really got me excited about this kind of boiler.
Apr 28, 2007 at 10:58 am #1387545Thanks, Mike. I think I'll definitely get it up in the G-spot once my prototype is finished and I've been able to run it through some tests. There sure seems to be more traffic there.
Apr 28, 2007 at 2:31 pm #13875583mm neoprene can be purchased here:
http://www.questoutfitters.com/neoprene.htm
Not very heavy – a 4"x4" square is 10grams.
You could eliminate the fire pan to save some weight. A piece of foil under the kettle with the kettle tilted up by a small rock will work almost as well. One could also make a "donut trough" to hold alcohol for times when dry twigs are not available. This would keep the flame(s) burning near the inside wall of the kettle to maximize heat transfer. Good luck Devin–no one to my knowledge has yet built a light weight and efficient KK. You could be the first!
May 1, 2007 at 7:37 am #1387772Sgt Rock mentioned working with some CF Plumbers Cloth that is flame resistant and fairly insulative. Might be an option rather than the neoprene…
May 2, 2007 at 9:01 pm #1387993Steve – thanks for the source and the ideas for the stove. Many thanks for the words of encouragement. You're vicious when it comes to saving weight, but I'll give the "rock 'n foil" thing a shot when I get the kettle back from the shop – if that ever happens. For my next version, I'll just make the whole thing out of Ti foil and finish it off by rigging up an aerogel cozy!
I had the same idea about an alcohol burner, or esbit chunk for woodless days, and your trough would distribute the flame rather than send it straight up the chimney.
Josh- I think that plumber's cloth is pretty close to the PBI/Kevlar mix I was considering. Once I have the kettle to mess with, I'll try to figure out if I'm going to go with a fabric like these, a foam, reflectix, or a combination. I'll be going for light and multi-use where possible.
As things are right now, it looks like I won't get it back until sometime next week. The shop I took it to only has one guy that's good with Aluminum this thin and he's pretty well booked. Better that than having a newbie on it, I guess.
May 14, 2007 at 7:17 am #1389182Argh – bad news. I got a message from the shop where I left the kettle saying that it was to thin to weld. That's pretty frustration considering the fact that I dropped it off three weeks ago when they said it wouldn't be a problem.
One possibility is that it is too thin, and that the guy I left it with didn't know what he was talking about, and the other is that they're too busy with other, larger, jobs to mess with a difficult, small, job like this one. The latter is a real possibility, as they were most frequently out of the shop with on-site jobs when I would call to check up on the status of my piece.
At this point, I think I'm going to pick the kettle up from the shop and temporarily set it up with *sigh* Jb Weld. Even though I won't have something that I can use to boil consumable water, at least I'll be able to determine the performance of the other parts of the system, just not the sealing method.
So, it's a setback, but not an insurmountable one. I'll post pictures and data from my tests of the kettle once it's mocked up. I'll also do some searching for the minimum weldable thickness of aluminum, and other sealing methods. I know that the Kelly Kettle company rolls their seams and spin forms their components, but that opens up a whole new can of worms and much larger minimum production numbers.
May 14, 2007 at 8:12 am #1389189That is a bit of bad news, but like you said it's a setback, not the end of the line. I think you are really on to a winner if the kettle works well and is light cause many ultralight backpackers only need to boil water to make hot drinks and rehydrate food–but do not need to cook. The Bushbuddy has the advantage of giving people the option to boil or cook, but like I said, many don't need to cook, and the kettle means that the backpacker doesn't need a pan/pot. Having said that, I see from the Kelly Kettle that an add-on grill and cook pot are options–and may be possible with your design too. I think it's worth pursuing your idea. Hang in there! –Mike
May 14, 2007 at 3:26 pm #1389231How thin is it? I've welded down to 35 thou aluminum before and a bit thinner than that shouldn't be an issue.
May 16, 2007 at 9:04 pm #1389479Thanks for the support, Mike!
Chris – I don't know exactly how thick the vessel itself is. The thickness wasn't listed by the Al bottle wholesaler I got the sample from and I don't have a micrometer. My guess is that it is .02 or thinner. On a side issue – I read in an old post that you were working on something like this – any luck?
Anyway, I got it back from the shop and I could see that they had tried to weld it, but were unsuccessful, and I'm frankly glad they stopped before it ruined the whole container. As soon as I got it back, I set it up with JB Weld, waited the obligatory 24 hrs and fired it up. See the photos and key below:
Photo 1 – the kettle as originally planned, collapsed into pack mode with a plastic stopper in place so it can hold reserve or cooking water while carried.
Photo 2 – original design cooking. The firebox really wasn't large enough and it took about 10 minutes of fiddling to get a good boil. Check out the kindling – cut up carboard. It's not very good compared to small dry sticks, but I couldn't find any in our miniature yard.
Photo 3 – a surprisingly quick fix – I assembled and cut up a cylinder from some .019 Al sheet and a few blind rivets.
Photo 4 – the new setup weighed with a larger gain than I wanted. After firing, I determined I could cut this down by .5" – .75" and get the weight to about 4.5 oz – leaving it .5 oz under my goal to allow for a cozy/carrying bag yet to be made. The holes in the cap that make it look like a pig's snout minimize heat loss and maximize the amount of water that will stay in the kettle (rather than boiling out).
Photo 5: Still packs up small and fits my original size goals. In addition to the vessel holding water while packed, I imagine the carring sack holding it all together and covering the top hole so that dry starter kindling, starter tabs, matches, flint, etc. can be stored in the chimney.
Photo 6: A much, much better boil this time around. It took just under 6 min, but I ran out of pre-cut cardbord half way through, and I'm sure I could do far better with a better fuel. Some water did go out the snout, and I had a net boiled water volume of 14oz.
All in all, I still get a kick from the thing. After half a dozen boils, I may taste test the water. JB Weld is supposed to be non-toxic and I imagine the water should act as an effective enough heat sink to keep the JB in contact with it below the critical 500 deg continuous operating temp, but I still don't entirely trust it.
If the water it produces ends up tasting okay, I'll bring it with me on my next trip, but I definitely won't be ordering 140 of those bottles. I'm now conviced that it would take a complete revamp to move this from a one off "make your own" to something with greater appeal. I'm going to look into that this summer, but in the meantime, I'll add posts on the fate of this one.
Dec 16, 2008 at 8:13 am #1464693I love the whole Kelly-style boiler model…any news on this project? I use a Trangia and a model that would take both Trangia and wood would be wonderful!
Dec 16, 2008 at 2:43 pm #1464773Thanks for the interest John! It’s actually kind of absurd how obsessed with making a workable version of this kettle I’ve become. I have made some real progress, but it’s been slow given the amount of time I have to commit to the project. Here’s more than you ever wanted to know:
I gave up on trying to make it out of available components, and decided I would have to start from scratch – bare aluminum sheet. So I downloaded Google’s Sketchup (awesome program for novice 3-d design), and designed a vessel and fire base that would weigh about 5 oz together, pack to 3 3/4" by 6 1/2", and boil and carry approximately 20 oz of water. Then I made a working mock-up of my design with aluminum sheet, some blind rivets, and JB-weld. The mock-up came in at about 5.8 oz (added weight was from rivets and epoxy), and could boil 20 oz of water in just under 6 minutes from lighting a match (awesome!). I did a number of tests (my notes are around here somewhere), and I think it took just about 2 oz of sticks for a good boil. They burned down to absolutely nothing, save a few white wisps of ash. I was really impressed with its weight and performance, and that my calculations and design had been pretty good.
So I sent copies of my design files and technical specs to a number of metal spinning and hydroforming shops for quotes to build a legit prototype. I knew this would be a big expense, but again, I was obsessed, and I figured I could probably sell enough of these to at least recoup some of the overhead for temporary mandrels (forms). Unfortunately, I found that the places that worked with the cheaper tooling (only $800 for the set I needed :) ) weren’t able to get the final material thickness I wanted, and the kettle would end up being 2-3x as heavy as designed. I did find some higher-end places that could get the thickness right, but only worked in permanent tooling that would run me about $6-7K. This was obviously more than I could spend, even if I could recoup some of it by selling a few.
I then decided to see if I could just make it myself, so I got some books on metal spinning and bought a low-end wood turning lathe, and some other shop tools. I got the necessary materials to convert the lathe to metal-spinning and to make my own spinning tools, and did so relatively easily despite my complete lack of experience. Then I got some maple and made the mandrels for the 3 pieces need to make the kettle and the aluminum sheet to form around them. I originally thought the mandrels had come out pretty good, but either because of the flimsy, cheap lathe, or the fact that I made them out of solid, unseasoned maple (instead of several laminated sections as was suggested), they ended up a bit warped. Despite their imperfection, I tried to spin the fire base because it was the smallest piece. Unfortunately, in addition to being flimsy, the available speeds on the lathe were too high and its power was too low to properly spin the metal without stalling the motor or stretching the metal to the point that it would tear.
I now have a better lathe with more power and the proper speeds. Unfortunately, my “workshop” is on the balcony of our 1 BR apartment, so all efforts have ceased for the winter. Once things warm up again, I’ll make some new mandrels and give this another shot.
Here's a close-up of the mock-up:
Here are a few of my spinning attempts, getting progressively better until the end where I tried to use even thinner sheet. As you can see, each has torn at the shoulder as a result of being overworked at high rpms:
Oh – and to answer your actual question about a Trangia – I haven't tried it with one of those, but it should work with burners that are small enough to fit in the base and have a flame pattern wide enough so the heat has good contact with the walls before heading up and out of the chimney.
Dec 16, 2008 at 3:08 pm #1464777Lofty goal! Do you use heat besides that of the tooling while working or during rest periods to allow the stresses to dissapate? Copper should go easier? Although heavier, but 2x the heat transfer of aluminum could be worth it.
Dec 16, 2008 at 3:21 pm #1464780Make that twice the heat transfer and 3.5 times the weight.
I've considered a copper chimney for a kelly kettle, but I can get most of the heat out of the flue gases by the time they exit so I don't thnk it's worth the weight penalty. If you cool the exhaust gases too much they stall and choke the stove.
Dec 16, 2008 at 3:34 pm #1464785Yah, made it 2x.
3.5 times the weight – ow.
At least it would be protected in there.
Interesting about the low-temp stall.Dec 16, 2008 at 3:55 pm #1464793>Lofty goal!
No joke! Thanks for putting it so kindly, Paul. :)
A philosophy major, my only knowledge of metallurgy comes from what I've read researching for this project, and my sources tell me that aluminum generally doesn't need to be annealed while spinning. Almost all spinning is done cold, but it is recommended that copper be annealed periodically while working on a piece to do exactly what you suggest – reduce hardening from the cold-working.
For my purposes – focusing on both light weight and minimized pack volume over absolute efficiency, I chose a compact, aluminum design for the project. Once I have it all worked out in Al (no small task, right?), I'd sure like to make one in Copper for its good looks.
Dec 16, 2008 at 6:24 pm #1464843Maybe home anodizing? It might not get messed up too bad by the heat. Or it might, and look really cool.
Like a logo, it could be a stencil that sticks on and stays throughout the process. Made out of a sticker, or tape.You could blacken inside the cone for the alcohol stovers.
Dec 16, 2008 at 8:02 pm #1464859Right on! I looked into hard anodizing for at least the inside of the kettle in order to make it easier to clean and to prevent aluminum from leaching into the water. It would be a great way to put a logo on the outside, and more importantly, a warning not to heat it when the stopper is in place (steam bomb). I called a local place, and it would only cost $5-10 per piece if I did a number of kettles at the same time. The only problem might again be that the metal is so thin that the high voltages they use for the hard anodizing might burn through, so I'd have to test it on one first.
For the black chimney – fortunately, after just a burn or two, the soot from the wood makes it nice and black!
Dec 16, 2008 at 8:42 pm #1464867> I got the necessary materials to convert the lathe to metal-spinning and to make my own spinning
> tools, and did so relatively easily despite my complete lack of experience.Blimey! Just like that. Nothing like fanaticism!
I do a little metal spinning myself, but on a smaller scale. It is not easy! I am greatly impressed.Aluminium: ask at the suppliers about what alloy they would recommend. There are some alloys which will be a right pain, but there are other Al alloys which are meant for bending and spinning. They 'flow' more easily.
Cheers
Dec 17, 2008 at 11:39 am #1464970>Blimey! Just like that.
:)
Yes, well that was certainly the longest and most difficult part of the project. I gave it the gloss so I didn't entirely bore everyone with the details, but "relatively easily" was, well, relative. Mostly it meant that I was actually able to do it and that I hadn't had any catastrophic failures in the process. I know that some people go crazy making spinning tools by hot forging them and everything, but I got the how-to on making the right kind of tool rest, combination spinning and planishing tool, and cutting tool from a video I rented from Smartflix.com (Netflicks for nerds, and an awesome resource). I shaped the tools themselves with a grinder and then sanded and polished the combination tool. You should have seen the looks my neighbors gave me as the sparks went flying!
>I do a little metal spinning myself
Cool, what have you worked on? As I started reading and watching this stuff on metal spinning I got really turned (no pun intended) on to it. It's still amazing to me that someone can form metal (what seems like such an alien, industrial process) on a simple wood lathe at home.
>Aluminium: ask at the suppliers about what alloy they would recommend.
Too right. My supplier has been McMaster-Carr and I've been consulting their metal suitability chart. So far I've been working with 3003 because it has good workability characteristics, is okay for use around food, is corrosion resistant, and is a bit stronger that 1100. At first, I was worried that the walls of the kettle would be weak, which is why I chose the 3003, but given the strength of my mock-up and that it's actually going to be pretty hard to get the metal as thin as I want, that may not be an issue. The 1100 is supposed to have even better working and anodizing (should I go that route later down the line) characteristics, so I may make the switch.
Thanks!
Dec 17, 2008 at 12:57 pm #1464988Hi Devin
I am NOT an expert on spinning, not at all! My efforts have been mainly with titanium in small sections. Some titanium alloys will form, while other will NOT. 6Al4V (usually in sheet form) will NOT, while 3Al2.5V and CP2 (often used in tubing) will.
I have been using a ball race as the spinning tool. A lot of force is needed with titanium.
As to what Al alloys: best consult a supplier. I got some sheet from a local sheet metal fab shop: they knew what the different alloys would do.
Cheers
Dec 17, 2008 at 1:10 pm #1464992Hi Devin,
Thanks for posting your MYOG metal spinning project I am finding it all very interesting, I have wanted to spin some pots for a while now.
I recently cut off a JetBoil PCS pot (anodized aluminum)and rolled a lip on it using my metal lathe and a ball bearing tool clamped in the tool holder it was not as successful as I had hoped.
I think will now try some real metal spinning.
Thanks for sharing.
Tony
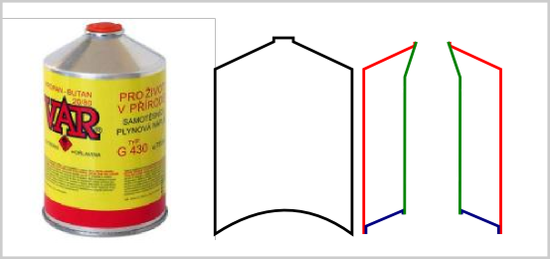
Dec 17, 2008 at 8:02 pm #1465078I had an idea how to make such a kettle out of "recycled matrials" – aluminium gas canisters (the largest ones, like the one on the picture).

One canister, with the bottom removed, would be uused as the outer shell. Upper part of second one will make bottom of the kettle. The chimney would have to be made from something different, possibly some aluminum bottle.
With the edges overlapping as in the picture, it might be possible to weld them without making holes in the shell (hopefully, I have not much experience with welding).
-
AuthorPosts


- You must be logged in to reply to this topic.
Forum Posting
A Membership is required to post in the forums. Login or become a member to post in the member forums!
Our Community Posts are Moderated
Backpacking Light community posts are moderated and here to foster helpful and positive discussions about lightweight backpacking. Please be mindful of our values and boundaries and review our Community Guidelines prior to posting.
Get the Newsletter
Gear Research & Discovery Tools
- Browse our curated Gear Shop
- See the latest Gear Deals and Sales
- Our Recommendations
- Search for Gear on Sale with the Gear Finder
- Used Gear Swap
- Member Gear Reviews and BPL Gear Review Articles
- Browse by Gear Type or Brand.
