Topic
What size CF tube to match alum tube strength?
Forum Posting
A Membership is required to post in the forums. Login or become a member to post in the member forums!
Home › Forums › Gear Forums › Make Your Own Gear › What size CF tube to match alum tube strength?
- This topic has 37 replies, 7 voices, and was last updated 6 years, 2 months ago by
 Sam Farrington.
-
AuthorPosts
-
Feb 17, 2013 at 3:27 pm #1299395
Could not figure out a good way to word my search on the subject, so I came up empty handed.
My question, for those that might know, how do I convert the diameter and wall thickness of an aluminum tube, to the Dia and wall of a CF tube, if I want to maintain the same strength?
I assume that a cf tube of the same diameter and thickness of the aluminum tube would be significantly stronger.For example, I have a 5/8" od aluminum tube with 1/2" id.
What size CF tube would I need to have the same strength and stiffness?For perspective: I'm working on an external frame pack design, and I want to start at a control before I start reducing the strength to save weight. I'd like to come up with a sub 2lb pack for normal loads up to 50lbs, then work on a sub 1lb pack for up to 20 or 30 lb loads.
I suppose I need to know what type of aluminum is used in kelty and jansport frames first. Anyone?
ETA: I originally posted this in the wrong forum, so I'm reposting it here.
Feb 17, 2013 at 5:53 pm #1955448"How do I convert the diameter and wall thickness of an aluminum tube, to the Dia and wall of a CF tube?"
Nick – Maybe not such a good approach because:
– Quality of carbon tube is all over the place. It is not a constant.
– Carbon has very different qualities. With most layups it is stiffer for the same weight and thickness, and while stronger, won't bend under stress like even the most highly tempered ALU. For the same reason, it is more prone to crushing.If you are working with 5/8" OD ALU tube, and want something equivalent in carbon as your post suggests, please note:
– Not sure what is Jansport's, but it is a step up from 6061T6, and weighs around 1.5 oz per running foot. It is stiffer than 6061T6 but still bends to small angles in a Ridgid bender.
– You cannot bend the carbon, so assume you have a tube-based design that doesn't require bending, and have figured out the connectors to use for 5/8" material. Would not suggest J-Sport ALU tube connectors, as carbon will tend to crush, crack or break over the rigid lip. Use a flexible, but strong connector, and even consider reinforcing the carbon tube with a smaller tube inside around the point where it enters the connector.
– The best quality and light weight for the money carbon tube in the 5/8" range I've seen mentioned on this forum comes from golf club shafts, from Dallas Golf and others. There are also carbon tubes for quadcopters on eBay. You could do a search and read some of the BPL threads. There is a very recent one posted this year. Look under MYOG tent poles and trekking poles.
– The only problem is that the golf shafts all taper to a lower OD at one end (as you would expect if you'd ever seen a golf club). If you can design to accommodate that, then you're in business.
– While good carbon tent poles run around half the weight of ALU, carbon tube gets heavier in thicker walls and diameters. But it may still be possible to get the pack under 2#. IMO, though, you will not find a simple formula that will tell you what diameter and wall thickness to use, for the reasons stated above.
– I have found it necessary to start first with what materials are available that are the best for the money that appear to be strong enough, and then design around the materials, not vice-versa. It is in that respect, I think, that MYOGers may differ most from professional engineers (beside a lot of us being less technically trained, of course). After wrestling many months with a flexible frame design, I finally opted for a .156" OD solid pultruded carbon rod telescoped into a .230" OD wrapped fiberglass tube, both from Goodwinds kites. It was the strongest arrangement I could find for the size and weight range, and would never have guessed the outcome when I started with .21" OD pultruded carbon rod that broke every way for Sunday. — Above all, stay away from pultruded carbon tube if you can. It never fails to disappoint.
-To fit the human back, you're going to want something prebent for the cross-braces on a conventional frame. Carbon won't do this (unless you've found a source for bent tube. If so, many want to know). Take a look at Roger Caffin's designs on the FAQ/MYOG sections of http://www.bushwalking.org.au/FAQ/FAQ_Index.htm
You may need to use elbows of some kind. All of which takes one back into the issue of sourcing flexible connectors for carbon. Again, designing around what materials are available seems to work best.I hope all that is of some use to you. With some more specific info, I might be able to do better. Good luck.
Feb 17, 2013 at 6:22 pm #1955459Thank you for the in depth response. I think I will just have to pick a place to start then go from there.
I was just hoping there was an easy answer from someone who deals with CF on a regular basis.
Of course I could always take the proper engineering route, but it's easier to spend money, ha!Feb 18, 2013 at 8:15 am #1955569Nick,
I can't answer your question directly but my experience with carbon fiber external frames might help you get started. Look here:
Skyshark 400s (wrapped carbon fiber) have been more than strong enough for loads up to 40 lbs with my pack frame. Samuel (previous poster) has located a couple of brands that are are even stronger. I don't have any hands-on experience with those, however.
My days of 60 pound packs are over so I haven't even tried to make one. I've never had a Skyshark frame break, however, so they might be even be strong enough for 60 lbs.
Your 1 pound and 2 pound goals are well within reach. My lightest pack capable of carrying 30 lbs, for example, is under 1/2 lb (frame, bag, straps, waist belt).
Daryl
Feb 18, 2013 at 12:57 pm #1955657> a 5/8" od aluminum tube with 1/2" id.
Woo – way heavy!Thing is, different Al alloys have very different strengths. VERY different. The strongest alloys (eg 7075 T9) cannot even be bent without very specialised equipment and skills.
I used CF arrow shafts like the Victory VForce 300 (from memory) for my pack frame. 0.244" ID (ground down 1/4" rod obviously for the mandrel) and ~0.295" OD. That H-frame pack (pics at the FAQ) has carried loads of >24 kg for ski touring.
Do NOT, repeat NOT, using any pultruded CF tubing. It splits brilliantly when bent. Use either wrapped or 2D wound.
In short, the strength of the CF rods is not an issue. But the joints, the way the harness attaches, and the design are.
Feb 18, 2013 at 6:43 pm #1955788Thanks guys.
Daryl:
thank you, I have already read about every thread regarding the externals you and another gentleman on here have come up with. I have gotten a lot of ideas, but it's nice to hear what kind of strength you are getting.Roger: thanks for the link. I haven't come across yours yet. This gives me more food for thought with my design.
I may have found a way to manufacture my own tubes that allows me to incorporate bends and curves. If it proves to be viable and cost effective, well lets not get ahead of myself…
I think I have an idea now of where I'm going to start. It's just going to take some experimentation now.
Jan 25, 2018 at 5:06 am #3514358Old Post but let’s give it a try
Nick,
Did you perfect your ability to make curved CF tubes?
Jan 25, 2018 at 4:09 pm #3514395Nick,
No direct help here. I do have 10-15 years experience with using carbon fiber tubing for pack frames, however, so something I say here might be of use.
Even if you get the same strength you won’t get the same reliability. Carbon fiber is prone to sudden catastrophic breaks when it reaches its limit. Aluminum is much more forgiving because it will usually bend first.
My wife took her 10 year old myog carbon fiber tubing pack on a backpacking trip to New Zealand. She called me from the Seattle airport. Both vertical tubes had broken. She had to replace them with aluminum tubing when she got to New Zealand. Big hassle. (It was my fault. I had cinched up drawstring on the arched tubing too much. I had ignorantly pre-stressed them to a point near their breaking point)
So my current strategy with carbon fiber pack frames is to make sure the user is prepared and capable of repairing them in the field if needed. If they aren’t then I suggest aluminum.
The carbon fiber tubing is light enough that carrying an extra one adds less than an ounce. I’ve also considered modifying one of my tent poles so it could serve as a replacement if needed.
Jan 25, 2018 at 6:31 pm #3514429D & D,
Your 15 years beats me by 14 years and around 330 days. I beat you have some great stories to tell about your great design/fabrication successes and failures. Please share any that you care to share.
Excellent idea on carrying the necessary spares and tools to perform field repair at least thru all worst case stress testing and beyond depending on destinations.
I am still waiting on my basic CF fabrication books from Amazon so this may be a stupid question.
” I had cinched up drawstring on the arched tubing..”
If that arched tubing was CF, how were you able to make arched CF tubing?
With those years of real world testing, how would you recommend that I determine what OD and what wall thickness that I should use on my verticals? A couple years back I put 75 pounds of rice in an old Jansport Wing Arm and did 5 miles on the tread mill with maximum incline at around 3 MPH and was very darn impressed especially in comparison to the same test with a large Alice on a Molle frame with Molle Shoulder and hip belts. (Both had added compression straps to keep the rice bags standing upright and tight toward the frame and my back.) The point concerning the vertical tube OD was that the Jansport did wonderfully. So as long as I use CF with the same strength characteristic with the various load types and directions I am guessing that I should be good. Is this a reasonable starting assumption?
Did you ever experiment with filling the CF tubes with expanding insulating foam?
Thanks very much for your recommendations and insight
Hawk
Jan 25, 2018 at 10:15 pm #3514478Would you consider a different take on the external frame?
Although CF may be too fragile to take this route
A laid up flat sheet frame shaped anatomically to the body which would use it. I’ve not seen one of these in decades and the last ones I did see were dinosaurs made from fibreglass mat and extremely heavy
Have you considered a composite frame using CF slats and UHMWPE sheet and arrow shaft horizontal stiffeners?
Jan 26, 2018 at 3:30 am #3514512“If that arched tubing was CF, how were you able to make arched CF tubing?”
The tubing created an arch when I attached a cord to each end of the tubing and bowed it……..like a bow.
“Did you ever experiment with filling the CF tubes with expanding insulating foam?”
Nope.
Jan 26, 2018 at 4:56 pm #3514607Edward John,
I would consider about anything.
I can visualize arrow shafts as the verticals with slightly curved CF/Paulownia slats horizontals. Springy, HIGHLY BREATHABLE mesh stretched across the verticals to have great airflow and a flexible feel against the back. The curved CF/Paulownia slats to allow the airspace between the mesh and the pack bag. At that point, I still need a pretty stout fabricated CF hinge for the Stephenson/Jansport like Wing Arms. I am having trouble figuring out how to do this wing arm thing that will not result in a broken vertical because of the stresses of the occasional 50-60 pound resupply and water trek.
My fixation with the Stephen wing arm design mostly comes from the fact that the actual transfer of the load from the frame to the left and right sides of the pelvis is via a several inch long one inch strap that allows the body to make twisting movements independent from the frame.
Thinking out loud again. Your outline has really helped me see some potential solutions to problems that I have been struggling with for many hours. I visualize the Composite being possibly 3/4-1″ wide strips with multiple layers of CF and Paulownia of some unknown thickness as the verticals and the arrows as the horizontals? Like the Stephenson JackPack frame, the verticals will be 16″” apart so that nothing but mesh touches my back. I made an (unfounded) assumption that I could not curve the arrow shafts and use them as the horizontals.
Brain Drizzle #1 (I am too old for Brain Storms):If the arrows can be curved. attachment of the arrows to the Composite verticals would be easy: glue them into a 1/2″ deep hole in the vertical and the mesh will keep pressure to assure the arrows ends do not escape from the verticals.
Brain Drizzle #2: “ACTUALLY” as my young grandson often responds to me, the verticals would not have to match the curvature of the back. They can be straight just like the JackPack since the mesh will will replace the need for the frame to match the back curvature.
Brain Drizzle #3: Maybe instead of Wing Arm that are hinged, the wing arm could be fixed -with the vertical looking like a “J” from the side- since my pelvis is about 15″ wide. This would be like the A-16 frame.
Brain Drizzle #4: Thinking of the way the A-16 can stand up on the ground by itself, the J shape of the frame could include some legs/feet or possibly a triangle coming out of the bottom of the vertical. horizontal. And since there will be no curvature in the composite I would not have to build a mould to vacuum the composite sandwich to.
Wow. that sounds like that solves most of my problems.
Thanks so very much for the kick start. Now that I have that out of my system, is there an image I can find on google or here that demonstrates the approach you were outlining? Are you talking about something like the Tenzing CF13?
I am sure that your ideas are much more thoroughly considered than my spur of the moment Brain Drizzles so I am anxious to understand what you have outlined.
Thanks again, Edward.
Daryl & Daryl,
“Like a bow”. Now I get it.
Jan 26, 2018 at 9:57 pm #3514687The old Gerry DIY booklet actually with his ideas brought forward to technology Mr Cunningham could only dream about; but the picture in my head is of an old school Yak-Pak on an external frame
I never owned anything from Yak-Works but I did own one of the Rivendel packs. I persevered with that for a while but it really was too fussy for me and I have never owned or tried any of the external frame packs with forward extensions so I can’t really add any further insight
However some of the later external frames were on their own very, very light and I think it was all the padding and strapping that made them so heavy
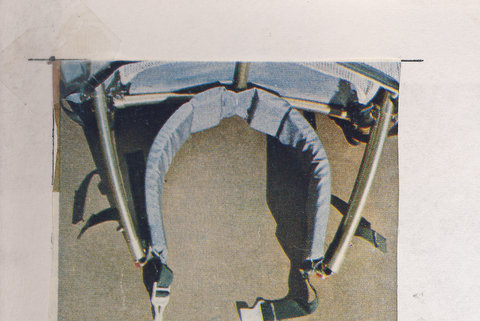
Jan 27, 2018 at 7:32 am #3514749Paul, please bear with me, and I promise to get to the point. Like you I’m wedded to the Stephenson ‘Jack-pack’ concept, and have been wrestling with the above and many related issues for some time. For those unfamiliar with the design, the jackpack side arms function totally differently than the Jansport and other packs that use or used sidearms. The latter have little or no connection to the pack at the small of the back, so the pack pulls backwards and down away from the back. With long sidearms, such a pack would be unwieldy and dangerous to the spine. With shorter sidearms, such as Jansport used on the D-2 for example, the packs were functional, but still had the same drawbacks to some extent. They also put the weight of the pack where the shorter arms connected to the belt at the wearer’s sides, minimizing any movement of the pack belt with the natural rotation of the hiker’s hips. The jackpack belt is connected to the frame at the small of the back, and at the 2 points of the sidearms, so the belt rests on the two points of the hipbone (Iliac) crests closer to the rear, the pack’s center of gravity is more forward, and the belt can swivel with the hipbones while walking (but not swivel too much, or the top of the pack will lean too much to the sides). Here’s a picture of Jack Stephenson’s original Warmlite design:

There is an upper crossbar above the hipbelt that is not clearly visible in the picture. Note that these two crossbars must be absolutely rigid for the sidearms to hold the hipbelt firmly against the hips. Found this out to my dismay after doing a whole prototype.
All the jackpack type frames I’ve made and used successfully were also of 5/8″ diameter alloy tube, and the lightest came to around 45lbs loaded with food for 7 days and 1-2 quarts of water. Also, the sidearms were designed to cinch the hipbelt against the hips/waist with a pulley arrangement, so there is no need for a buckle at the front.
So as with you, carbon fiber tube came to mind for today’s light backpackng. But big concerns remained about the stiffness of CF tube, and the much greater abuse that packs receive compared with tentpole tubes. You mention Paulonia curved CF slats, but all I could find on Google were Pawlonia (spelled with a W) wooden slats. The only precurved CF I could find was through Alibaba. I also have found that CF which is flexible enough to flex into a curve behind a suspended mesh backpanel, and also rugged enough to withstand abuse, makes the backpanel too taut, without the ‘give’ that is the whole point of a comfortable suspended mesh back panel.
Since Easton .340″ diameter tent tube is more durable than any CF tent tube I’ve found, and is readily available at Quest and others, I looked at its use for an hourglass frame using the best CF solution found; which consisted of a small pultruded CF tube that inserted very snugly into a filament wound fiberglass tube, both from Goodwinds, came to .248″ outside diameter, was even stronger than the Easton 340 alloy, and had some flexibility. But to use the CF/FG for an hourglass frame, numerous elbows would be required. Or with a ladder frame, numerous Tee fittings and more crossbars. The Fibraplex elbows were just the right size, OK for a tent, and very light, but were not tempered enough to hold the angle under stress. The Easton 340 elbows do not have ferrules as such; but rather consist of one rod of the ferrule diameter that runs right through the whole elbow, and is bent inside the .340 elbow tube, all of which makes for a lot of weight in an ultralight frame with a lot of alloy elbows.
So the decision was to use the .340 elbows (covered under a protective reinforced plastic tubing) just for the bottom two corners of the frame that take the most abuse, possibly with .340 elbows for the top frame corners, inside the pack and protected by reinforcements bonded and sewn on the pack. But what about the rest of the frame? Since the Easton .340 tubing can take long precurves, it would not require a slew of elbows for an hourglass frame. So the relative weights of the frame were roughly calculated and compared using mostly the precurved alloy with few elbows vs the FG/CF composite with more elbows. The prebent .340 alloy came out on top with a significantly lighter weight. With that, the use of CF was abandoned for an hourglass frame that could support sidearms, and withstand abrasion and abuse. Note the Easton .340 alloy weighs less than half the lightest 5/8″ alloy tube around, so considerable weight savings can be had with it.
Your description sounds like some form of the CF Zpacks frame, or a ladder-shaped frame like Roger’s, and you might able to use CF for the crossbars. But CF light enough to flex as you describe might not be robust and stable enough for a pack; and it is also nice to have prebends in the upright rails of the ladder, a la Jansport and others, so the frame will better fit the back’s contours. (Don’t quite get your nonuse of side rails, especially on a frame that will support rigid sidearms.) I chose an hourglass-shaped frame as it uses less tube length overall than a ladder shape, so can be built lighter. I think it also does a better job of keeping the pack contents from protruding against the backpanel and the back.
With the hourglass frame constructed to have short rails in the lower corners, either that or a ladder frame of .340″ Easton alloy tube can be built up to take Jansport fittings for a bit less than 5/8″ tube. This is fine, because another decision was to make just the sidearms out of tubing taken from the lower ends of X-C ski poles that taper from 5/8″ diameter to around half that at the baskets. .340″ tube had been tried for sidearms, but I wanted something much ruggeder. So a weight penalty has been accepted just for the sidearms.
Hope to get something done this year, but unlike your greyhound speed drizzle, I go slower than grass grows, although do actually finish and post a project now and then. And hope the above will be helpful to those wrestling with the same issues.
Jan 28, 2018 at 12:33 am #3514866Sam,
Glad to see that someone else has so thoroughly considered Mr. Stephenson’s ground breaking design. Your design approach certainly will result in a super strength JackPack with probably no total weight penalty. You have solved problems that I have not even thought of and I have been considering the JackPack clone for 2 or 3 years (yes: the speed of grass.)
My JackPack clone verticals will include fixed Wing Arms without a hinge. The weight still will be where we want it on the lilac and the flexibility between the body and frame should still be sufficient with the flexible strap frame to hip belt conection. My verticals will be Paulownia core/superstructure CF covered. Paulownia is twice the strength of Balsa wood for a given weight. See this video on how to make a Paulownia superstructure in a hollow core surfboard that will be extremely light and after being covered with fiberglass will support a surfboarder: https://www.youtube.com/watch?v=WbJFK-z6RNw . Using fixed wing arms and Paulownia core/superstructure and CF fabrication should provide significant weight savings. My JackPack Frame with all original material, straps and fittings but no bag weighs 2 lbs. 3.5 oz. I was hoping to get everything but the bag down to below 1.5 lbs.
The big question is how much body to frame flexibility this design will provide as compared to Daryl’s 5 oz. flexible frame. I would guess the current winner is:
- Daryl’s External Frame design in CF,
- with lighter weight JackPack design shoulder mesh some-how modified to keep the pack sack from touching my back,
- with an Aarn lightweight hip belt design with one hand separate adjustment of the upper and lower portion of the belt (see the adjustment loop at about 2:01 of this video https://www.youtube.com/watch?v=wp6sPBa6lpg),
- custom made lightweight (Aarn like) front balance packs that are held up by the hip belt and not the shoulders (but adjustable to the shoulders), to carry my water fuel and other dense items to accomplish correct center of balance and
- a CF pack sack.
I think this whole set up, bags included, might be less than 24 oz.? What do you think?
Regards,
Hawk
Jan 28, 2018 at 4:21 am #3514904Paul,
So you have decided on fixed wing arms without hinges. That will certainly cut out a lot of weight, although the cradle around the body must be very rigid to keep the belt tight around the hips. So the bottom crossbar(s) and sidearms must be made of quite rigid material that is unavoidably heavier; otherwise, the pack will slip down around the hips. Should mention though that there are some advantages to hinged arms that can be cinched to any position from fully open to fully closed: 1-The hipbelt can be adjusted, even when walking, to just the desired tightness, 2-The arms can be adjusted to fully closed if setting the pack face up on the ground, or packed in the car OR, to be partly open to prop the pack up at an angle, and this is what I often used while sitting next to the pack and cooking or whatever, 3-Without a front hipbelt buckle or ballast packs in front, the pack can be quickly shed, including on high water crossings (without letting the pack go entirely to rush downstream). The pulley tightening system is much lighter than one might imagine.
I’m guessing from your posts that you have perfected the art of laying up Carbon Fiber cloth over a core. Have seen a lot of Kevlar layups, including those made by Baldwin boats in Maine, but never with Carbon wrap. More power to you if you’ve adapted this technology to MYOG.
I am also shooting for a frame weighing no more than 1.5 lbs, so that with a pack weighing under a pound, the max result would be under 2.5 lbs total. I think this is reasonable, considering the comfort and stability attained with the jackpack type frame.
Daryl’s frame design links no longer work on BPL, but I do recall from his posts several years ago that these were not sidearm packs and were supported by just a very few CF tubes for maximum lightness with some support. I’m willing to go a little heavier. You mention keeping the pack and its contents away from your back, and that is where hourglass frames shine, as they support an inner solid backpanel and an outer mesh backpanel, both kept taut, with the frame in between. This approach was used by LL Bean in its AT 35-55 series packs, but they kind of ruined it by using a heavy pack in later editions-the first edition of the AT55 was fairly light, and I modified one to make a pack for my neighbor who loves it. Bean’s butterfly frame is low temper ALU though, and I think something tougher is needed for long distance treks.
Watched the Aarn video, and still do not quite get how all the straps work. With my jackpacks, like the one shown above, I simply set the height of the carry using the adjustable sidearms,and then tightened the shoulder and lift straps so there was almost no weight on the shoulders. As mentioned, this could be changed, even while walking, for comfort.
I chose to put the water bottles side-by-side in a centered pocket right behind my head where they are high and at the most forward point to keep the center of gravity forward. Certainly the ballast packs improve the center of gravity; however, I did not want a lot a paraphernalia in front of me for the reasons mentioned above.
You mentioned a CF pack sack. Assume that here you mean Cuben Fiber, not Carbon Fiber. Don’t want to reopen the Cuben vs Woven fabric debate on this thread, so will just say I prefer the latest ultralight woven fabrics, both for use and for sewing.
Please note the references to the jackpacks in the past tense. In 2007, with the materials then available, I made an hourglass framed pack without side-arms that was light for its time. However, I never enjoyed the same degree of comfort that I’d enjoyed with the jackpack designs, and with the advent of more and better materials, would really like to get back to an ultra light jackpack in the same weight categories that we have discussed.
And thanks for starting the new thread. Wow.
Jan 28, 2018 at 7:20 pm #3514984Sam,
I realized that having fixed swing arms would reduce the body to frame flexibility but guessed that Daryl’s post yesterday on MYOG: “KISS, MYOG, 5 ounce Pack Frame” would have more than offsetting flexibility and weigh probably at least 1 lb. less that the JackPack wing arm clone. You are vastly ahead of me in the thoroughness of your evaluation of the JackPack design and have done extensive actual clove fabrication and testing. I had not even though of the over advantages of the hinge that I will lose by using fixed wing arms, as you pointed out in your post above. Very good points.
At this stage, I have not even tried Carbon Fiber over a core but I do have experience with roof truss manufacturing, considerable experience with structural repair of an ocean racing sailboat and after watching a number of YouTube ‘hollow core surfboard’ fabrication video’s see no reason that Paulownia core/superstructure under Carbon Fiber approach will not work on fixed swing arms. I need to learn one of those 3D design application so I could illustrate my thoughts. I have a couple napkin sketches that make sense to me (but probably not to anyone else) of how this approach would work with considerable weight savings but with many, MANY man hours of work. After responding to your previous outstanding post, I have thought of a way to put a hinge in the wing arm with an aluminum hinge pin and aluminum bushings for the hinge pin to rotate in. After reading your latest post(above), if I am going to proceed with a JackPack clone I will probably need to make a hinged version work to avoid the problems with Fixed wing arms that you describe.
Hopefully Daryl would provide us with pictures and complete details of the CF version of his KISS 5 oz. frame and the related belts, straps and pack sack. I recall, but cannot locate, an old MYOG post that shows how the bottom tees of Daryl’s frame (might not have been Daryl’s) attaches to his hip belt. They attach without much JackPack type flexibility approximately at the outer left and right side of the flat of the person’s back. Daryl’s design certainly merits an A++ if only for the weight, cost, assembly time and likely high degree of flexibility that he has achieved.
You may recall a US civil war era patient with the verticals curving forward toward the body and go into the hip belt midway between the outer edge of the side of the back and where the JackPack flexibly attaches. I imagine that carbon fiber frame-but not stock CF tube- could do that and certainly Jansport type tube frame could be made to do that. I considered but dismissed any approach that did not have the swinging strap flexibility as on the JackPack. Someone, The North Face I believe, tried a frame with the Civil war patient type approach but I think it was soon discontinued.
I have a North Face hourglass pack and frame where the top and bottom of the hourglass and connected by a rubber like material that allows the frame to twist. I never got around to putting the frame to the 50+lbs and 5 mile test as the shoulder straps were broken and now I am not sure where in my attached 3 car <span style=”text-decoration: line-through;”>garage</span> warehouse that pack has been for over 10 years. I do recall that my research indicated that the flexible piece was subject to unexpected failure. The Hourglass design has some very worthwhile feature as you point out.
On the packsack, Cuben Not Carbon. I have a Granite Gear BLOCK rock solid 50 Liter 6.3 ounce compression sack (rectangle not round) that I purchased as my replacement bag for a Jansport with the swing arms with the plastic rather than the leather adjustments components. The frame has been stripped of a cross bar and of the bag hold open bar and new lighter should straps. I did do the 5 mile/50+ pound test on this with the original sack & frame when I purchased this and was pretty pleased which is why I spent the time to do the mods and weight reduction. I did not get around to modifying the compression sack so it would easily attach and de-attach from the frame, as I never could decide between one 50 Liter or two 30 Liter and vertical or horizontal sack orientation.
Yes, Aarn has a lot of different suspension adjustments that require considerable experimentation to find the sweet spot. It is difficult to appreciate the results by looking at the videos. If I get around to figuring out how to down load pictures or a video, I might make a post showing the high points of the Aarn suspension.
A very interesting and thought-provoking series of posts. You have already accomplished in actual production what I have only been contemplating for probably 10 years.
Thanks very much, Sam.
Feb 1, 2018 at 5:50 am #3515979Paul, thanks for the follow up with more history. When you get those hinges done, please post some pics if you have time. I’ve only seen a Jackpack in use once, in Weminuche WA, years ago, and the owner seemed to be having to walk very rigidly to keep the pack from slipping. That is probably at least partly what drove me to develop the hinged sidearms that cinch to just the right amount of closure. The Warmlite folks told me that they stopped making the packs years ago because Easton would no longer fabricate the alloy fittings in small quantities.
Building such a pack has become a must now due to a back injury that calls for a suspension that puts all the weight on the hipbone (iliac) crests, and therefore directly on the legs, not the shoulders or lumbar region of the back. So it is a priority if any backpacking is to continue. When I see Willem Lang on ‘Windows to the Wild’, on NH Public TV, or read about Eb Eberhart’s journeys like the Triple Crown, as Nimblewill Nomad, am always reinspired and reinvigorated to keep getting out there.
Would like to make the sidearms of carbon to keep the weight down. Once posted about waiting for a large hula hoop to come out made of carbon. Wishful thinking. With or without hinges, when those sidearms are sticking out, they are probably more exposed to damage, so not too unhappy about using the light alloy tapered tube from the ends of X-C touring poles. Even bought an expensive Proxon saw to make the most recent and lightest Jansport pack fittings into hinge parts. The old Jansport hinge parts could be purchased separately, but were too heavy for anything that could be considered light these days.
That may be a North Face ‘Back Magic’ pack you have. Knew when it came out that the polymer flexing fitting that allowed the belt to rotate would probably degrade with use. For many years, on Osprey and other packs, hip belts just slid behind lumbar pads, held in place by Velcro; but allowed just enough wiggle for hip rotation. Just a little is all that is needed to give the hips some freedom to rotate, so no fancy gizmos are needed. The trick is to find the sweet spot that allows just enough rotation without allowing the pack to sway uncomfortably from side to side.
Feb 1, 2018 at 3:34 pm #3516003Sam,
“Building such a pack has become a must now due to a back injury that calls for a suspension that puts all the weight on the hipbone (iliac) crests”
I herniated a disc in my lower back and therefore don’t want any weight on the spine above the injured disc. I found, however, that there is enough room below the disc for a full wrap-around waist belt. Might this apply to your situation?
Feb 2, 2018 at 2:03 am #3516108Gentlemen,
“I’ve only seen a Jackpack in use once, in Weminuche WA, years ago, and the owner seemed to be having to walk very rigidly to keep the pack from slipping.”
Original JackPack belt is 3″ wide and casing is not very grippy.
Daryl’s idea of 3″ webbing with a triangle (I assume about 1″X1″X1″) cut out at about the spine from the top of the webbing makes the standard webbing tighter on the top of the belt to grab the iliac crest.
My Aarn Magic Mountain has a 6″ wide (1/16-1/32″ thick material along the flat of the back, a one inch strap on the top of the 6” high material (to adjust the belt above the iliac) and a 1.5“strap coming off of the bottom of the 6” high material (to adjust the belt beneath the iliac crest.) Both straps are between 1/32 and 1/16 of an inch thick. Both the 1” and 1.5” strap join into a 3.5” tall and about 5” long piece of 1/32 to 1/16” thick material where one side of the 2” plastic belt connector is located. The adjustment for the top and the bottom of this hip belt is where the two belts connect to the 6” tall material just a little bit forward of the flat of the back. One loop allows you to pull forward (and YEA! not sideways) to tighten either the upper or lower or both at the same time. You can see this at https://www.aarnpacks.com/bio3 just scroll down to see: AUTO-FORM HIPBELTS
Although Daryl again certainly wins the KISS awards for 1.) simplest construction, 2) made out of always available material and 3.) is easily the least expensive approach with his belt design, I would like to make a belt similar to this Aarn belt but would like to put a thin pieces of somewhat soft STCKIE material amount 6 inch long on the 1” and 1.5” belt where it goes over the iliac crest. (A want rather than a need but I am old.)Joining the bad spine club here. I have 3 spinal fusions at the neck and 2 at the base of the spine. Drunk driver hit my wife and me head on. Wife still fine after almost 49 years.
A dozen used arrows are on the way for me to try Daryl’s KISS Frame.
Feb 2, 2018 at 3:29 am #3516122Might I offer yet another option? I have used titanium rod successfully for external frames for several of my packs. I used .125″ diameter type 5 titanium (6Al-4V), which is pretty stiff, but it does in fact flex a bit when I need it to. I bend it (with some difficulty) to fit the contour of my lumbar region. That metal won’t ever break, no matter how one abuses it. Each one weighs about 1.5 oz. It’s maybe something else for you to consider, as another possibility.
Feb 2, 2018 at 5:53 am #3516141“I herniated a disc in my lower back and therefore don’t want any weight on the spine above the injured disc. I found, however, that there is enough room below the disc for a full wrap-around waist belt. Might this apply to your situation?”
‘Fraid not. Granted, degenerating discs can create some painful problems. Been through that also, and mercifully, have been able to manage sciatic pain with what are called “William’s” flexion exercises. But with a serious back injury, like the horrid consequences of degeneration of an old burst fracture of a vertebrae, virtually all the weight has to be taken off the entire back and channeled to the legs, The only weight that can be carried upstairs is a slight backward pull from the pack straps due to the center of gravity falling a bit behind the shoulders. Jack’s three-point belt connection design concept is the only thing I’m aware of that has ever been able to do that for me. My past success with modifications of his design suggest that a very light weight version of my earlier photo can be produced; but certainly nothing as light as Daryl’s KISS design. No way to find out except turn up the heat in the basement workshop and go at it. Before bending with fine sand, the metal has to be brought upstairs and thoroughly warmed above room temperature. Otherwise, this is just the time of year for an indoor project.
Feb 5, 2018 at 1:20 am #3516568Gary,
Always willing to consider any approach. I am a firm believer of finding the very best ideas and making a product that encompasses them if appropriate.
About what does that titanium cost for a 32″ length?
I bend it (with some difficulty)
What do you mean ‘with some difficulty’ and if improperly done will it collapse and major bend as in useless?.
Hawk
Feb 5, 2018 at 9:52 pm #3516730Titanium 0.125″ dia 6Al-4V rod pack frames
I had to laugh.
Cost – HIGH
Force to bend: HIGH
And you can’t collapse ROD, only tube.To be sure, it will work, but it’s a shade ‘extreme’. Interesting idea though.
(Go for it Gary.)Cheers
PS: now I am wondering – how does the weight compare to 7.5×6.2 mm CF tube or Easton 355?Feb 9, 2018 at 3:32 am #3517386Hi Roger and Folks,
When I needed something longer than what could be fashioned from Ti tent pegs, got exactly what was needed from Alpha Knife Supply. But their selection is much more limited now. Still there is on line mentals: http://www.onlinemetals.com/merchant.cfm?id=185&step=2&top_cat=1353 (I see that automatic hyper links are no longer working.)
The costs are not too bad, just a few $US plus shipping, and sometimes the cost can be further reduced by shopping online metals through Amazon.
Bending elbows of Ti rod was discussed in my 2011 thread on the XX Tarp Tent prototype. Wanted an elbow that would not lose its angle with Ti rod, and Ti tent pegs were plenty long enough and available from a number of cottage suppliers often mentioned on BPL. But bending Ti rod with much higher than 0.125″ OD is very slow, subject to fractures, and I did not go for much more than a 125 degree angle. (Quest Outfitters sells Easton 340 tent tube elbows in that angle.) And even with 1/8″ OD Ti rod, I don’t think anything with tent stake temper is going to bend into a pretzel shape without fracturing. If the pack frame is designed with high radius curves, that should not be a problem.
0.125″ OD Ti rod used in a tent pegs weighs around .032 oz per running inch. 0.340″ OD Easton tent tube weighs around .04 oz per running inch. Agree with Roger that carbon fiber tent tube can run less than half the weight of Easton tent tube. But since straight carbon tubes cannot be bent, a good many fittings are required, and can add a lot of weight. A recent post on a carbon pack frame fashioned from scratch was amazing, but that technology may be beyond the average do-it-yourselfer’s ability, and is certainly beyond mine. I’ve not seen any good carbon fittings for carbon tent tubes (note that Fibraplex uses plastic for hubs), except kite fittings, and I’ve found them totally unreliable when incorporated in pack frames. One can go to carbon tubes of trekking pole diameter for pack frames, and maybe alloy fittings; but will it be lighter and as durable as a frame of Easton tent pole tube around half the diameter?
While I’ve seen light alloy rod used by Osprey and others for internal pack frames, I prefer the high temper Easton tent tube for frame designs with moderate curvature. Easton makes, and Quest can supply elbows if a sharper bend is needed, the only problem being that the elbows are of greater wall thickness and roughly double the weight of the tube where the elbow is installed. So, a frame design with less elbows and more long curved pieces will be much lighter.
Some of the Easton arrows (they make a multitude of types) are softer, or less tempered, and will bend more easily. However, they may not hold their shape in a pack frame.
As always, the devil is in the details.
-
AuthorPosts

- You must be logged in to reply to this topic.
Forum Posting
A Membership is required to post in the forums. Login or become a member to post in the member forums!
Our Community Posts are Moderated
Backpacking Light community posts are moderated and here to foster helpful and positive discussions about lightweight backpacking. Please be mindful of our values and boundaries and review our Community Guidelines prior to posting.
Get the Newsletter
Gear Research & Discovery Tools
- Browse our curated Gear Shop
- See the latest Gear Deals and Sales
- Our Recommendations
- Search for Gear on Sale with the Gear Finder
- Used Gear Swap
- Member Gear Reviews and BPL Gear Review Articles
- Browse by Gear Type or Brand.
