Topic
Building snow arches
Forum Posting
A Membership is required to post in the forums. Login or become a member to post in the member forums!
Home › Forums › General Forums › Winter Hiking › Building snow arches
- This topic is empty.
-
AuthorPosts
-
Feb 13, 2013 at 11:53 am #1299219
While building an igloo for kids the other day I thought how stable the whole thing becomes when you stack the final blocks, and the arched shape is complete. Then thought about masonry. It occurred to me that a standalone arch should hold up pretty well, even without the surrounding dome. Something like this:
http://en.wikipedia.org/wiki/File:CatenaryKilnConstruction06025.JPG
but made of snow:
https://lh5.googleusercontent.com/-KbVotGTvyj8/URvnKm3Do6I/AAAAAAAAAXs/_dyeaBGZOi0/w323-h241-n-k/IMAG0324.jpg
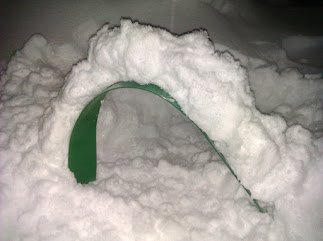
The test arch is just two feet tall, snow is sticky stuff at 32F and plastic support salvaged from trash is really flimsy. But it was promising. The arc stood fine after removing the plastic and it was dead easy to build it. So next one to one scale tests.My idea is to shovel and stomp a pile of snow, let it harden for a while and then cut lots of blocks (that's how the igloo was constructed, along guidelines of BPL article by Tad Englund). Then stack one arch, move the support a bit, stack a new arch, move the support … and thus start forming a snow tunnel.
I hope it would be very fast and easy to build. While igloo is quite limited in size and shape this method would also allow long tunnels, curved tunnels, tunnel crossings etc.Weather is going to be wet for few days and snow will be way heavier than ideal for this so I'm going to have a week to come up with a good design for the support. Any suggestions about:
– size?
– materials?
– packability?
– else?Feb 13, 2013 at 12:27 pm #1953999Alpo, this is a novel concept. Please do some testing on the thing and let us know how it goes.
The arch will need to have some length to give it some torsional strength kind of like a tunnel.The only limit to size (length) would be the location and the amount of snow available. It might take a lot of time to get the size needed to be a workable/livable structure and for a large length structure you would want more then one support to speed up the process, but it might work just fine.
Let us know,
Tadedited: you will need a 12.56 ft piece to make an arch equivalent to the interior of the igloo I build. That would give you an 8 ft floor. Of course you could make it smaller and the arch in more like a parabola than a half circle
Feb 13, 2013 at 11:48 pm #1954244I like the idea!
Concerning packability, I'm not sure that any material conducive to rolling-up will have enough strength to support the blocks, but it sounds like your plan is to only rest the blocks on the frame rather than trying to create them in place by packing snow.
If so you may be able to use a more skeletal structure (e.g. a pair of tent poles with something to maintain their spacing and tension).
OTOH, if you go with a single sheet of stiffer plastic, you should be able to halve the length by hinging it at the midpoint.
Feb 14, 2013 at 7:58 am #1954298Someone needs to design and sell a lightweight inflatable form that could be supported by trekking/ski poles for additional strength that you blow up, pack around with snow to make your igloo, and then deflate and remove.
If you followed Tad's igloo-building techniques and the majority of the weight of the snow remained on the walls rather than the inflatable this seems to me it would work.
I found this at Amazon.

It's too small for adults, but it does include a hole in the roof that would be used to finish the igloo from the inside.
Feb 14, 2013 at 11:31 am #1954376More masonry:

And finished shape:
This time support was three sections of 5/16" tent pole bent in shape with thin cord. Snow blocks took care of the torsional rigidity. Still wet and heavy snow here. 1m high & wide shape would probably be still ok with this pole diameter if the snow was drier and lighter. But blocks of drier snow probably need a wider support.
Feb 14, 2013 at 1:07 pm #1954429I was thinking on how you might easily combine adjacent arches, and realized that using this method you'll end up with all the vertical joints lined up rather than staggered. Hmm…
Feb 15, 2013 at 8:50 pm #1954919Bicycle wheel is a very strong structure in respect to it's weight, right?
11 feet 'rim' made of same 5/16 tent poles in a sleeve. Holds heavy wet blocks to three feet height before bending. I'll tension the spokes a bit and wait for drier snow conditions. Collapsible just like tents, but if you'd just stuff it into your backpack – well you know what happened in Gordion.
Feb 15, 2013 at 10:37 pm #1954939Tensioning it like a bicycle wheel is a brilliant idea. Potentially the pole(s) are the same as for your back-up tent (you know, the one you bring in case the snow-cave-building conditions aren't right).
Alternately, I'm thinking of a 2-beam or 3-beam truss using 2 or 3 tent poles which pass through plastic or metal spacers. By fixing the distance between the otherwise flexible tent poles, they become much, much stronger and stiffer as an assembly.
Look at smaller radio towers – a triangular configuration of three main vertical members, trussed with many, small spacers which triangulate many points along the three long members.
In my caving days, I imagined such a contraption, compact until assembled, for pushing vertical leads where one couldn't rock climb up a face.
Feb 26, 2013 at 1:59 am #1958773That is nice from you as it does look pretty awesome, you made better effort.
Mar 10, 2013 at 3:53 pm #1963980Finally got some drier cold snow and I had to give up the abovementioned 'bicycle wheel' construction. At least one made of odinary 5/16" diameter tent pole. Construction weighted total 350grams which is a bit ambitious. Three last blocks were always too much. Lessons learned:
– Snow knife as seen in classic film of Douglas Wilkinson is a very useful tool. In absence of one I used a mineral wool knife.
– First blocks need a solid base.
– Use the knife as in the film to get the blocks stick to each other.
– Few last blocks are the toughest bit.
– When the first arch is ready the next one with sideways support from the first arc is a piece of cake (tried with smaller sized shapes)Apr 7, 2013 at 2:00 am #1973601Finally got something useful done. With some leftovers of kitchen renovation I built a sturdier support. Snow is already pretty hopeless sugary powder for construction purposes and night temperatures are just few degrees below freezing. Trampled some snow and let it cure overnight and voila:

Also stacking second arch was easy (very easy), but didn't have enough firm snow so it collapsed right away.Materials are 1/2 inch OSB board and 2mm plastic. Pretty suitable materials for building a toboggan, so maybe there is a chance to use this also for hiking.
Jan 12, 2015 at 4:02 am #2163849New winter, more snow, new old tricks
I returned back to the basics in materials. Snow & wood:
1) Piled a heap of snow and let it set.
2) Cut a trunk of a small willow, 10 foot in length and inch or two in diameter. Bent it to an arc.
3) Cut snow blocks to build a vertical rear wall of a tunnel.
4) Cut more blocks and stacked them to a masonry arch, supporting vertically to the bent willow and leaning a bit towards rear wall.
5) Used a snow knife to cut a small gap between finished arch and the wooden support.
6) removed the support, snow arc held fine (on third or fourth attempt)
7) placed support one foot further and stacked a new arch, leaning a bit on the already built tunnel.
8) repeated few times.
9) built a vertical front wall and cut the door.

I think this is quite promising. Initial vertical snow wall provides plenty of sideways support. Less anarchistic hiker could use an extra strong tent pole (see earlier posts) instead of a living shrub.
In theory you only need to pile the snow needed for the walls. No 'waste snow' like with quinzee. Requires less skill than Igloo, although skills don't weight that much.
Size is flexible from one person bivy to eight feet wide tunnel as long as you have space.What I still need is a better snow knife (recommendations?), lots more skill and good snow conditions. Tried this a week later in another place but snow was hopeless. For my skills.
If you try this copy the snow knife technique of this film: https://www.nfb.ca/film/how_to_build_an_igloo/
-
AuthorPosts


- You must be logged in to reply to this topic.
Forum Posting
A Membership is required to post in the forums. Login or become a member to post in the member forums!
Our Community Posts are Moderated
Backpacking Light community posts are moderated and here to foster helpful and positive discussions about lightweight backpacking. Please be mindful of our values and boundaries and review our Community Guidelines prior to posting.
Get the Newsletter
Gear Research & Discovery Tools
- Browse our curated Gear Shop
- See the latest Gear Deals and Sales
- Our Recommendations
- Search for Gear on Sale with the Gear Finder
- Used Gear Swap
- Member Gear Reviews and BPL Gear Review Articles
- Browse by Gear Type or Brand.
