Topic
ULA Arctic 1000 Packs
Forum Posting
A Membership is required to post in the forums. Login or become a member to post in the member forums!
Home › Forums › Gear Forums › Gear (General) › ULA Arctic 1000 Packs
- This topic is empty.
-
AuthorPosts
-
Jun 17, 2007 at 9:42 pm #1392588
FYI, the 50 L dry sack holds a fully stuffed ULA Amp pack (2600 ci) very nicely (and the whole thing can be lashed to the bow of an Alpacka raft). For those overnight packraft trips where you don't need the Arctic pack.
Jun 18, 2007 at 7:02 pm #1392667Carol, just curious as to how you secure the Arctic's dry bag alone to the raft's bow. In my experience, webbing run through the raft's lash tabs (in opposition/diagonally) tends to slip off the top and bottom of the pack (or bag, in this case) unless that webbing is secured through fixed points on a pack, such as beneath the Arctic's frame's compression panel/side webbing. Is aggressive cinching the trick, or maybe less aggressive waters?
Jun 18, 2007 at 8:19 pm #1392671Less aggressive waters – a reservoir. I fed the strap/line through the tabs at the bottom of the dry bag and through/around the roll top for three points of security. The dry bag stayed in place through three practice flips. One end slipped off during the fourth flip.
Jun 20, 2007 at 12:53 am #1392797ericnoble wrote: "By sealing the open end of the dry bag with a hot iron you could make a permanent custom air mattress if you wanted to."
Eric,
Have you actually sealed a WXTex with a hot iron? Has anybody else?
I assume that you would cut off the flap, webbing, and closure buckle, and hot weld a portion of the coated interior of the bag along the cut end. Is this right?
I have a spare 5L WXTex that would make a great air pillow if I could seal the end, but I don't want to ruin it.
Jun 20, 2007 at 5:53 am #1392803Jason, I have not done this myself, but it has been done by others. You assume correctly that the flap and webbing would need to be cut off. You will not need to hot weld or use any other adhesives, based on the experience of others I believe a hot iron will be sufficient. Ryan Faulkner was the one who did this with a WXTex dry bag as I recall. It is my understanding that the fabric used by POE for their dry bags is the same as that used for their air mattresses.
Jun 20, 2007 at 10:39 am #1392831I have received my pack and I think the concept is very good. I have always liked big hipbelt pockets and these are good ones. The frame appears reasonably padded and supportive. I do have my concerns:
If the hole at the bottom of the POE Dry Bag ever rips out you won't be able to use the pack. There is not an alternate way to attach the shoulder strap to the pack. Additionally, if you ever wanted to use it to haul a load of wood (without dry bag) or use it with an alternate dry bag or several smaller dry bags you can't attach the shoulder straps. I'd like a way to attach the shoulder straps to the pack itself. Any ideas? I'm considering sewing a strap on the bottom that would feed through the plastic ring at the bottom of the strap or cutting a hole in the pack or a sewn on strap for the plastic ring to feed through to make the pack more versatile and "redundant" (fixable if the dry bag hole rips out). I'd like to hear any other ideas.
Jun 20, 2007 at 10:44 am #1392833I looked at trying to figure out a fix IF the hole in the dry bag breaks. What I came up with is taking off the buckle of the lower side compression straps sewn to the back pad frame. Then threading this webbing through the shoulder strap's buckle at the end that fits in the dry bag holes. Then reattaching the buckle on the compression strap and going back to normal operation. For me this worked well and was not a problem.
Jun 20, 2007 at 11:05 am #1392836I did not realize the shoulder straps attached to the drybag! That strengthens my conviction that a GearSkin might be a good alternative for that type of pack. It doesn't come with drybags but I bet it'd work well with them if/when you needed to live outdoors in always wet conditions. And you get a custom made pack to boot!
Jun 20, 2007 at 11:28 am #1392838Gearskin? Apples and Oranges—it's not a framed pack. The Drysack material is tougher than you think, anyway.
Great fallback solution, David, if one were needed—good for peace of mind.
Jun 21, 2007 at 10:40 pm #1393022Hi Ryan, looking at your comments about the shoulder straps forming a loop under the pack when not using the dry bag slots, and this giving a dynamic suspension. Is this similar to the Arn system? I really like Arns suspension, and this would be a great feature for me.
Jun 24, 2007 at 7:42 am #1393247Folks-
If the slotted corner on the POE Drybag fails, it is easy to rig up an alternative anchor.
There is a 1" webbing loop that is sewn to the bottom (center) of the backpanel.
Found it? Good. Don't forget where it is. We'll come back to it.
Step 1: Unthread the shoulder strap anchors from the slotted corners of the POE drybag, so that the shoulder straps are no longer attached.
Step 2: Pull one of the lengths of webbing (either right or left shoulder strap) that adjusts the lower shoulder strap tension all the way through until the slotted rectangular piece of hardware catches on the ladderlock. It should not pull through this piece of hardware.
Step 3:Unthread the other shoulder strap anchor from the shoulder strap ladderlock.
Step 4: Now, thread the end of the first length of shoulder strap webbing (the one that is attached to the shoulder strap) into and through the rectangular hardware of the 'free' strap. Be sure to double back the webbing in the piece of rectangular hardware so it does not release under tension. You should now have a double length shoulder strap anchor with one end attached to the ladderlock on a shoulder strap, the two lengths connected via the rectangular hardware, and the remaining end free.
Step 5: Thread the free end through the aforementioned 1" webbing loop that is sewn to the bottom (center) of the backpanel.
Step 6: Now, thread the free end through the ladderlock on the remaining unattached shoulder strap and tension appropriately.
In a nutshell, you have simply connected the 2 lengths of shoulder strap anchor webbing, run the connected lengths through the 1" webbing loop, and re-threaded the webbing through the shoulder strap. If done correctly, the shoulder strap tension is only adjustable on ONE SIDE.
I hope that helps. Pictures would be better, but alas…
Brian
Aug 4, 2007 at 10:13 am #1397407Hello,
Is this pack compatible with other size dry bags?
Thanks,
KurtSep 10, 2007 at 9:54 am #1401732Now that I have had the opportunity to use this pack, I thought it worthwhile to come back ons this thread.
In general satisfied although I've had some serious back pain after a number of days. I already had some backpain when vacation started so it's a bit difficult to relate it completely to the pack but I am a bit worried. I hope I haven't bought the wrong size (although based on my backmeasurement it should be OK) because the shoulderstraps seem to short to use them with the alternative attachment system as mentioned before. Perhaps playing with the shape of the frame stays can help.Another point is the attachment from the shoulderstraps to the bag. I felt it necessary to reinforce this point with some extra webbing because i've got the impression that they can detach from eachother to easily. Anyone else had a problem with this?
Mar 1, 2008 at 2:51 pm #1422653It's been a while since anything has been said about these packs, to the owners, what do you think?
What have you used the pack for, how do you pack it, and where do you store water?
Any thoughts would be appreciated.
Oh, and whatever happened to the more subdued colors for the drybag?
Thanks.
Mar 1, 2008 at 3:47 pm #1422656I've used this pack for three trips. About 50 miles Nov 2007 on the Florida Trail thru the St Marks National Wildlife Refuge, about 80 miles Dec 2007 on the Florida Trail from the Suwannee River thru the Acilla River area and about 60 miles in Feb 2008 on the Florida Trails Ocean to Lake Hike. I've been very happy with it. It seems to be able to handle the 30 to 35 lbs I normally carry and it does so better than my old ULA Circuit. I find it takes me a bit longer to pack things up with it, but it hangs better than my past packs, so I don't have to adjust things as I'm hiking as much as I use to.
Putting the water on top of the pack didn't work for me. Putting the water between the back and the bag didn't work either, it warps the pack too much. Putting it on the front of the pack puts the weight too far back. I've added a couple pockets, one on each side, to carry water. I use two, two liter Platypus flexible water bottles with a hose to the front of the pack from the left Platypus. I would have thought having differing amounts of water on either side of the pack would cause problems, but so far it has not.
The only problem I've had is I have to be very careful about packing anything even a little damp inside the waterproof bag. I pretty much knew this when I purchased it, so when it happens, it's totally my fault.

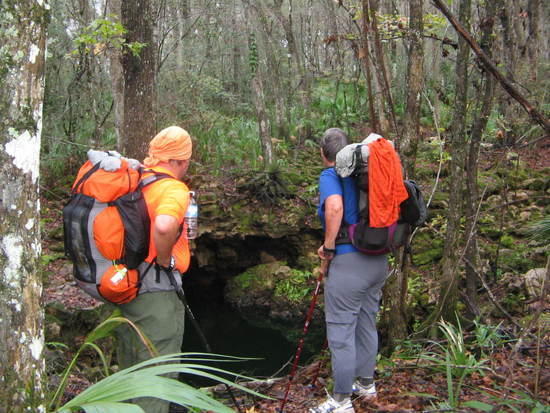
In case you didn't notice the orange pack, I'm on the left side. You can see one of the pockets I added on the right side of the pack. The grey thing on top is my MacCat tarp, which got wet from the night before.
Mar 2, 2008 at 6:12 am #1422711I finally got out for a hike with this pack last weekend. There's definitely a bit of learning and art to how you pack this thing (maybe already obvious to others). I found the best way for me was to remove the drysack completely from the harness and load it up while laying it flat on the ground to ensure an even distribution of contents. Then close up top and squeeze out any remaining air through the air valve. Lay out the pack harness flat with all load straps unhooked, First lay the hydration bladder w/hose on the pack, run hose to the top where you need it and then lay dry sack on top. Then fold rear section of pack onto the dry sack, attach and cinch down all compression straps, then attach shoulder straps to the dry sack. I did not find it necessary to attach the hydration bladder in any way, the tension from the compression straps was sufficient to hold it there. I did not seem to experience any warping of the pack frame from doing this.
BTW, I was not sure what to do with the extra foam support that shipped with the pack. Can anyone shed some light on this?
Once I managed to better distribute the load in the drysack the pack carried quite well, as good as any other pack I've used. I was only carrying around 25-30lbs, nowhere close to the max rated capacity. You can't go wrong with ULA packs, always first-rate design and quality of construction. I did miss having side pockets, maybe I'll try the mod suggested by Paul. It is a bit difficult to get anything in or out of the rear sleeve without loosening the straps first. I think I'll need to figture out a way to better utilize those spacious hip belt pockets too.
This pack really does fill a niche for me. Like others, I have become frustrated with pack covers that do not really seem to work in sustained rain, and ponchos flapping around with decreased ground visibility are not always a good answer either. The dry sack continues to be a handy item to have in camp, I'm still trying to dream up other creative uses for it. For sure, for people who use 2/3 length inflatable pads, those who like to maintain full inflation for a firmer pad can use this to prop up the lower body to a more level position. And I like having a bomber waterproof place to hold the rest of my gear while in camp. When hammocking I will put all my unused gear inside the dry sack at night (including the pack frame), and hang the dry sack on the hammock guy line by looping the closure buckle around it.
Kudos to ULA and BPL for coming out with such a unique and useful product.
Apr 16, 2009 at 5:02 am #1494478I have just read this entire thread, and at the end of it all I know is I want one of these packs.
Just seen the price on the shop and at £222 (Sterling), they are EXPENSIVE!
Are they as much the "Mutts Nutts" as I have read or should I look at stand ULA pack?
Many thanks
Mike
-
AuthorPosts
- You must be logged in to reply to this topic.
Forum Posting
A Membership is required to post in the forums. Login or become a member to post in the member forums!
Our Community Posts are Moderated
Backpacking Light community posts are moderated and here to foster helpful and positive discussions about lightweight backpacking. Please be mindful of our values and boundaries and review our Community Guidelines prior to posting.
Get the Newsletter
Gear Research & Discovery Tools
- Browse our curated Gear Shop
- See the latest Gear Deals and Sales
- Our Recommendations
- Search for Gear on Sale with the Gear Finder
- Used Gear Swap
- Member Gear Reviews and BPL Gear Review Articles
- Browse by Gear Type or Brand.
