Topic
Help with a MYOG Pack
Forum Posting
A Membership is required to post in the forums. Login or become a member to post in the member forums!
Home › Forums › Gear Forums › Make Your Own Gear › Help with a MYOG Pack
- This topic is empty.
-
AuthorPosts
-
Oct 25, 2012 at 4:30 pm #1295527
Hi, I'm currently in the designing stages of a MYOG backpack. I've bought most of the materials, and have most of the design either in my head, or on paper. But I've still got a couple questions.
My design is primarily a shoulder strap only design, with a detachable webbing hipbelt. I'd still like to design this pack to specifically fit my back.
1) I've read a lot about people measuring their back length & width (assuming it's at the shoulders), but I don't know how. Can anyone tell me how to accurately measure my back length and width and, just as important, how that correlates to designing pack length and width? I'm not sure if this is a factor, but I do plan on having a pad on the outside of my pack against my back to give the pack some form.
2) Does anyone have an easier formula for getting a rough estimate of what pack volume would be?
3) Because I won't really be using a hip belt much, I see the design of my pack straps to be very important. I've found a couple designs online, but all are very simple and straight. I'm wondering if a contoured strap would work better. Does anyone have any other designs that would be applicable? Also, pertaining to straps, Are their any guidelines on where to attatch them to the pack? Ie: how far down from the top of the pack, how far up from the bottom.Very thankful for any input!
KyleOct 25, 2012 at 7:09 pm #1924436"1) I've read a lot about people measuring their back length & width (assuming it's at the shoulders), but I don't know how. Can anyone tell me how to accurately measure my back length and width and, just as important, how that correlates to designing pack length and width? I'm not sure if this is a factor, but I do plan on having a pad on the outside of my pack against my back to give the pack some form."
Look up the HMG website for a diagram of how torso length works. Here's the basic idea. The hipbelt needs to rest on your hips so that the pack straps only put some of the weight on your shoulders while tightened up. I measure from where a snug belt would fit to the top of my shoulders. With frameless packs a inch extra won't hurt if you plan on using the hipbelt a lot because even when stiffened up with sleeping pad, frameless packs will collapse a bit under weight (which shortens the torso length). Straps are usually about 3 inches apart where they attach but I made mine more like 4 inches on my last pack (thick neck).
"2) Does anyone have an easier formula for getting a rough estimate of what pack volume would be?"
Not really, just get a rough estimate of the made pocket and whatever extra pockets add.
"3) Because I won't really be using a hip belt much, I see the design of my pack straps to be very important. I've found a couple designs online, but all are very simple and straight. I'm wondering if a contoured strap would work better. Does anyone have any other designs that would be applicable? Also, pertaining to straps, Are their any guidelines on where to attatch them to the pack? Ie: how far down from the top of the pack, how far up from the bottom."
I use a simple curved pattern that works well for me (I do use the hibbelt though). If you have a stirnum strap and some padding it helps a lot. I would be sure to attach the top of the straps at an angle. Its a bit more work but well worth it for the comfort.
Good luck. Honestly you will probably make a few mistakes and want to try again so I would not sink super expensive fabric into your first design. Use something like X-pac thats a bit cheaper but fully functional. Once you've perfected a design you can use more expensive fabric if you really want too.
Oct 25, 2012 at 7:16 pm #1924439To measure your back, take the point running between your two hip bone tips, what you can press onto your side, then from the middle of that line, go up to the big vertebrae in your neck, that sticks out more than the others, and which is about shoulder height. That's your torso measurement.
width I never heard about, the only area there I can see mattering is the width, or separation, of the shoulder straps where they attach to the pack, which is based on what it is roughly beteen center of shoulder to center of shoulder, flaring out. For my pack, that was about 3.5 inches, give or take, at where the straps connected to the pack.
Pack volume is trivial to calculate, especially if you are the person making the dimensions, if the sides are basically rectangles, the old: area of base times height. So width times depth times height, in inches. Divide total by about 61 to get the liters size.
I ignored the rolltop volume when calculating my pack. Be careful, there are some, I assume older, designs out there that are huge. For shoulder strap only I wouldn't want more than 30 liters, if that. I also ignore external pocket volume completely, I don't consider that part of the pack size, 4 bottles and some stuff stuffed in the back tall pocket.
Straps are hard. There are J straps, which curve towards the bottom, going straight out from their attachment points, and there are S straps. S straps require a reasonably stiff foam to work, otherwise the S collapses, as I discovered during testing. Evazote foams, while delightfully soft, are not stiff.
Do not make a real pack first, you will spare yourself great pain and sadness by making at least one prototype, with the volume and straps you want. If you make it reasonably well, you'll have a simple bag backpack to use for something even if it's not perfect. Since you are starting from zero on straps, I'd make a raw prototype that you can rip the straps off easily to test their fits until you get a fit you like.
S Straps take more work and trial and error, but fit to your body better, J straps are simpler, I went with S straps, but it took m e about 6 or 7 prototypes before I got close, and what I ended up with was not perfect, but it was fine for long backpacking trip, at least so far, so I guess it was ok.
Straps are this: length that is sewn onto pack. Length from pack body to center of shoulder. Length from center top of shoulder to well below armpit, if J strap. If S strap, it's harder, the curve starts a bit below the front of the shoulder, inward, then back out to get under the armpit, then curves a bit more out, it's not really an S, it's more like a sort of lightning bolt, simplistically put.
Those dimensions are your body, so you have to figure it out on your body. If you have a friend or significant other to help you, it's hugely useful, since they can measure these distances for you, it's very hard to do it yourself.
Straps there are different places, you can attach them to the seam where the top cover or rolltop hits the pack body, you can attach them a few inches down, just remember, with no real hip strap to hold the pack stiff and firm, how it actually acts with weight in it might not be what you expect, which is why you make a prototype first, then take an hour or two hike with it, to see if the straps, size, fit, etc, actually are what you thought.
I've read more than one backpack maker who said it takes 3 to get it right, that's my experience, my first attempt I ripped up since it was all wrong, way too big, and everything else was off too. I got a working version in the 2nd attempt, after taking it half apart to fix straps that were too tight.
Oct 26, 2012 at 5:25 am #1924491Kyle,
"I've found a couple designs online, but all are very simple and straight".
Below is a link to Chris Zimmer's website where he shows step by step how to make curved and padded shoulder straps.
http://www.zimmerbuilt.com/padded-shoulder-straps.html
While you are there click on the Custom Backpacks "button" and look over Chris's many pack designs to get an idea of where and how you want to attach your straps.
IMHO the bottom attachment point should be at or just above the bottom of the pack. I know this sounds like I'm working backwards but I generally put the upper attachment point of my shoulder straps at a point where my torso length measurement falls when measured from the bottom attachment point going up. Naturally if your pack has an extension "collar" at the top the collar will be above this attachment point.
Look under the articles header for MYOG and an article by Jay Ham.
This will help answer a lot of your questions.
Party On,
Newton
Oct 26, 2012 at 8:24 am #1924504Good and complex questions Kyle.
The above links on how to measure torso length are a good start. While it is possible to make a pack which is too big, almost everyone makes one too small. If you don't use a belt often this is less relevant.
Getting a basic understanding of volume is easy, but packs aren't perfect shapes in use so every method is imperfect.
Shoulder straps are a pain, and the only way to answer those questions for yourself is trial and error. I don't make them, preferring to acquire already made ones via various means (Osprey will sell them if you ask). The angle of attachment and spacing which suits me has been discovered and refined by much practice and fiddling.
Oct 26, 2012 at 9:10 am #1924512A couple tips for attaching shoulder straps:
-Attach shoulder straps to a piece of fabric and then attach that to the back panel. This makes future adjustments much easier than if they're sewn into a seam and it makes getting the symmetry right much easier. You'll probably end up replacing them and/or making adjustments no matter how meticulously you prepare.-Some folks are big advocates of attaching straps at an angle (you're shooting for the same angle as the top of your shoulder). I find that an angled attachment is helpful, but possibly equally helpful is making sure that any padding stops a couple inches short of the attachment point. This ensures that it's plenty flexible at the attachment and can form to your shoulder.
-I'm kinda over 3d mesh for shoulder straps. I like it for hibelts and especially lumber pads but I find it can be too abrasive for shoulder straps. Many probably don't have this problem. Next pack I'm going to try just using some stretchy wicking poly/nylon.
Oct 26, 2012 at 9:15 am #1924513Kyle,
What kind of sewing machine do you have? A better question would probably be, how high does the presser foot clear the foot plate when it is lifted?
This is important when it comes to building padded shoulder straps. On homestyle machines you can run into problems fitting everything under the presser foot with anything over 3/8" closed cell foam. If you add in a 3D type foam mesh on the underside and use a heavier fabric (say 3.5 to 4 oz) on top with a strip of webbing down the front of the strap things can get really crowded really fast under the presser foot. This will be especially evident at the point where the ladder lock attaches because of the two layers of webbing.
Depending on the amount of weight you intend to carry I find that the width of the straps and not the padding is more important to my comfort. I try to keep my straps around 3" wide where they cross over my shoulders. I also attach them at a bit of an angle so that they lie flat where they cross over my shoulders. The idea is to help distribute the weight over as large an area as possible.
My current pack has shoulder straps with only 4mm thick foam mesh and VX21 Xpac fabric with 3/4" lightweight webbing down the front from Quest Outfitters.

I sew the foam mesh and the Xpac fabric together wrong sides out and then turn it right side out like a sock coming out of the dryer. I then stitch all around the edge about 3/8" to make it all lie flat. After that I attach the ladder lock and sew on the webbing. When all of this has been done they are ready to be attached to the pack.
This link will take you to the thread on my current pack where you can see how I attached the straps to the pack.
The unpadded straps work well for me up to about 23 pounds.
Party On,
Newton
Oct 26, 2012 at 10:29 am #1924527Here's a link to making shoulder straps without sewing through the foam. I've been using these straps for about a year on a daily basis and they are holding up very well.
Oct 28, 2012 at 6:27 pm #1924979Thank you guys for all of the help. I found a lot of what you said to be super helpful & exactly what I was looking for. I've got my plans much closer to being done now.
I think I'll end up making some curved straps based on @newton's Zimmerbuilt website. I do agree that a little thicker makes sense for distributing weight. And that angling them will also help keep the weight spread out on my angled shoulder. I like the idea of having straps with no padding, but I've already bought the padding (oops)… and I'd rather not pay shipping for just a little bit of foam mesh… oh well… Oh – @david – I also thought ending the padding an inch or two before joining it to my pack was a super good idea too…
@luke, thanks for the HMG image, that was helpful.Unfortunately, I've got one more question/confusion point: I've got the lower attachment points one inch above the bottom of my pack and the upper attachment points I'm planning on having a torso length above that – but I'm getting different measurments for my torso length!
My lovely wife measured me 3x at 16 inches! Which, from what I've read, seems rediculously short. But it seems like she's doing it exactly right. While the local REI guy measured me at 18.5… Any idea why there would be a difference?Oct 30, 2012 at 9:49 am #1925359Kyle,
"I do agree that a little thicker makes sense for distributing weight. And that angling them will also help keep the weight spread out on my angled shoulder".
In my earlier post I said;
"I try to keep my straps around 3" wide where they cross over my shoulders. I also attach them at a bit of an angle so that they lie flat where they cross over my shoulders. The idea is to help distribute the weight over as large an area as possible".
Slip of the keyboard? Wide not thick. ;-)
The straps on the MyOwn pack aren't padded but are 3" wide.
Party On,
Newton
Oct 31, 2012 at 11:31 am #1925643Newton-
Not so much a slip of the keyboard as it was a slip of the brain…! Wide was what I had in mind – thick came out. Oops!
I've been thinking of switching from foam to your 4mm thick mesh. But that would mean making an order for the mesh only – and shipping for one item. Do you swear by them that much? They seem like they are a lot more flexible too, right?
Oct 31, 2012 at 12:04 pm #1925660Probably go with the REI guy, or go back and try again. 16 inches would be really short for most people. Also don't forget that frameless packs collapse a bit when they are loaded up so the torso lenght will get shorter. If he said 18.5 I might go with 19 or even 19.5 as your torso length.
Oct 31, 2012 at 12:29 pm #1925672Kyle,
Yes they are quite flexible.
I find them quite comfortable for the load that I am carrying. I just did a 24 hour out and back overnight and wore my fully loaded MYOG pack for 5 hours straight without complaint. A full load for me limits out at 23 pounds.
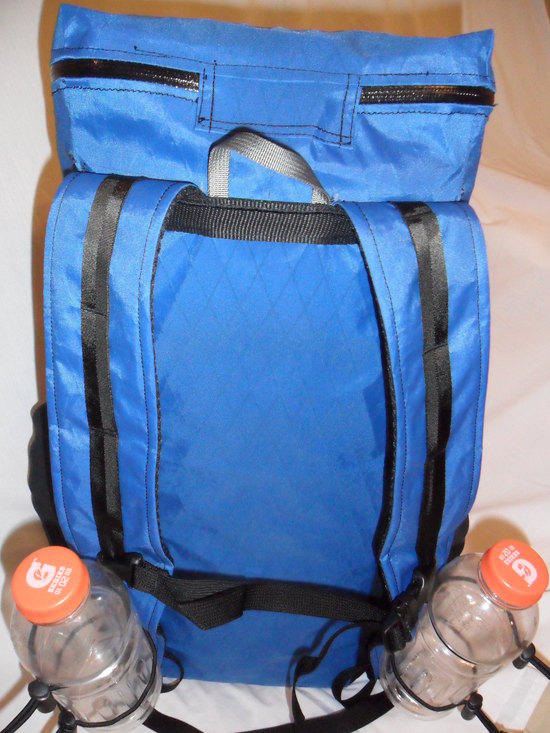
My pack's shoulder straps have a sternum strap with an elastic section in it for some "give". There is no hip belt on the pack or load lifters on the shoulder straps.
I carried two 1 quart Powerade bottles, one on each side, in the water carrier bungees on the front of each strap on my overnighter.

The bottles in the picture are 20 ounce Gatorade bottles.
The edges of the straps could be a little abrasive if they get next to your skin. If your hikiing shirt is between you and your straps it won't be a problem.
Hint:
Make you shoulder straps first. Get some help to position them on your shoulders so that you can get the angle of attachment and the spacing apart from one strap to the other correct.
"Do you swear by them that much"?
I plan on using this pack on next year's AT section hike. Last time out my partner and I did 100 miles in 10 days. The only thing that may keep me from using it is that I may make another without side pockets. I will still make the new pack with the same unpadded straps.
Reason for a new pack:
We did some bushwacking and the lycra side pockets don't like scrub brush.
Caveat:
If you are used to padding and a hip belt the wider unpadded straps will take some getting used to. I have been walking 12.6 miles with this pack, loaded, every Saturday morning for 5 to 6 weeks now plus my overnighter. At first there were a few shoulder shrugs and arm stretches while getting used to them. the total of your pack weight will be on the top of your shoulder muscles.
Give it some time and you'll save some weight and once you're used to the straps you won't even remember that they are unpadded.
FWIW It works for me. Ultimately you are building your pack and how it fits and how comfortable it is rests entirely on your shoulders. It's a terrible pun, I know, but I've built seven MYOG packs to get to this pack. Design is subjective and performance is objective. It can look good and work well or fail miserably. Your body type and build will have as much of an effect on how your straps feel just as much as whether they are padded or not.
IMHO I'm not a real believer that padding makes any real difference. I wasn't always this way and I could be wrong. But look at it this way. The material on the underside of a padded set of shoulder straps is stressed and pulled tight against your shoulders and body. Where is the padding? It's sandwiched inside of a fabric "pocket" and only gets compressed when the top piece of the material on the straps pulls down against it. At the same time this is happening the bottom piece of material is being pushed closer to your shoulders by the foam padding which wants to expand back to its natural shape.
Good luck with your pack build and with your choice of strap design.
Party On,
Newton
Edited to add question:
What kind of pad do you use and how do you plan to use it as a virtual frame for your pack?
I now use an inflatable and fold it so that it rests against my back. I then pack everything inside between it and the sides and pack front. I used to use a CCF pad rolled into a cylinder and I would then stuff the pack "burrito" style inside of the CCF pad.
Oct 31, 2012 at 2:54 pm #1925703You might find it useful to have a hip STRAP anyhow. Not a hip belt to support the load, but a strap to limit pack sway wghen going over rough country. Two different things.
My hips don't even support a hip belt very well, but I do appreciate a strap to stop the pack moving around when I am going over boulders or through jungle-gym scrub.Cheers
-
AuthorPosts

- You must be logged in to reply to this topic.
Forum Posting
A Membership is required to post in the forums. Login or become a member to post in the member forums!
Our Community Posts are Moderated
Backpacking Light community posts are moderated and here to foster helpful and positive discussions about lightweight backpacking. Please be mindful of our values and boundaries and review our Community Guidelines prior to posting.
Get the Newsletter
Gear Research & Discovery Tools
- Browse our curated Gear Shop
- See the latest Gear Deals and Sales
- Our Recommendations
- Search for Gear on Sale with the Gear Finder
- Used Gear Swap
- Member Gear Reviews and BPL Gear Review Articles
- Browse by Gear Type or Brand.
