Topic
the DIY Gear Scramble-a-Thon!
Forum Posting
A Membership is required to post in the forums. Login or become a member to post in the member forums!
Home › Forums › Gear Forums › Make Your Own Gear › the DIY Gear Scramble-a-Thon!
- This topic is empty.
-
AuthorPosts
-
Jun 10, 2012 at 7:59 pm #1290898
Hello friends!
I'm new to BPL.com, and this is my first post. I'm a 26 yo man, living in Boulder, CO, and recently I lost my job and have been floating in the world (with the good graces of so much support, fiancée included), and spending much of my time doing what pleases me, which is crafting. Perhaps crafting isn't the right word… I dabble somewhere between crafting (which suggests needlework and ceramic figurines) and construction (which suggests slabs of concrete and I-beams). I make things like wool tunics, wood tables, and blow-dart guns, and a few weeks ago I invented a board game to teach sailing skills. Most recently I've gotten into DIY backpacking gear, but without going much farther than the design phase on most projects. Then a light came on somewhere in the recesses of my angst-filled unemployed brain and I saw a brilliant new future! One of 500 epic miles, spanning from Durango to Denver, Colorado. That's right, solo hiking the Colorado Trail. And my plan is to make it all possible with 7 DIY gear projects, all aimed at creating a "moderately" priced ultralight kit for high elevation. And, because this isn't enough challenge, I will be assembling this slue of gear, testing it moderately, and betting my life on it by the end of three weeks. Three weeks! Am I crazy?This all would not be even conceivable without the ample insight, support, and instructions on this site and others like it. So many have gone either the DIY route, the ultralight route, or both, and been willing to share about it, post pictures about it, and ever so often write up full-blown instructables about it. Thank you! For these reasons, I have a fighting chance.
Although I'm not experienced in ultralight backpacking, or thru-hiking, I am an eagle scout, with years of experience living in hammocks, tipis, and moving around with all my possessions in a backpack. I'm a bare-foot-aholic, known for my excess of tools and my knack for simple solutions. My odds of success are further increased by these experiences.
What kinds of gear am I making? Here's the list (everything is as UL as affordable; i.e. everything ISN'T made out of cuben fiber, just the backpack): a hammock, a tarp/poncho, a down-quilt / under/over-quilt hybrid (for the hammock ideally, but also works on the ground in a pinch), a synthetic insulated vest, a wind-breaker, a wool tunic, and a cuben fiber backpack.
Why am I announcing all this? Because I've already started placing orders for materials and other UL gear for the trip, bought a dehydrator off Craigslist, and I'm selling off old camping gear and misc. possessions to raise money. Tonight I'll start making the big orders for cuben fiber and the materials and patterns for the clothes. So, it's on! This isn't just a pipe-dream anymore. Something… SOMETHING is going to happen. And why not share as much of the process as I can with all you?
I'll do my best to take pictures and post them. Please share any ideas you have, suggestions, or comments. The leap from day-dreamer to gear-builder feels intense… I can't imagine what the leap from gear-builder to gear-tester will feel like, but it's got to be even better!
Much love, fellow gear-heads~
Jun 11, 2012 at 5:16 am #1885848You're going to need it. :)
Do your research. You have tons of great info here on MYOG.
Jun 11, 2012 at 6:42 am #1885862Hi Aaron,
Interesting project. I'm neither a hammock user, nor Colorado-based, but these questions occur to me:-Are all campsites along the CT hammock-suitable, esp. at elevation? Will your gear let you do an emergency bivy above timberline?
-How does the CT compare to other longer-distance hikes you've done? What are your expectations for your hike and your gear? In my view, success or failure will have more to do with conditioning and knowledge (of the trail, of your gear/hiking style) than your DIY skills.
-What do you expect from conditions in the high country in early July?
-Not sure what a "wool tunic" is. It sounds heavy for the warmth (tho' it may not be). It also sounds unconventional enough I'd want to test it pretty extensively before relying on it.
Good luck. Keep us posted.
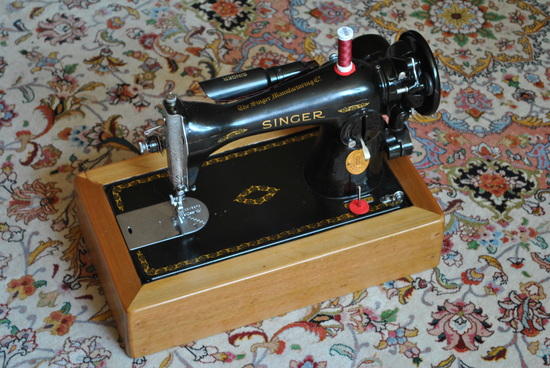
Jun 11, 2012 at 9:44 am #1885896This is my gear maker: the 1930's Singer electric, potted motor, straight-stitch sewing machine. Seen below, housed in a custom cedar box I made, this baby has been running for 70+ years! Still runs like a champ and can knock straight stitches (or zig-zag with help) through layers of leather, denim, whatever. Overkill for sewing nylon, I know, but why not do it in style?
 Jun 11, 2012 at 10:17 am #1885902
Just wanted to say, cool man, have fun! Most important thing here is patience and forethought. You'll do great! Read over other people who have done that trail's gear lists, they're always a great resource for the things you'll need to plan on.
Jun 11, 2012 at 12:07 pm #1885922Hello friends,
Thanks for your questions and insight. My hybrid quilt will be designed to either go around a hammock, in an ideal situation, or to zip up like a sleeping bag for emergency ground camping. Although home-made, I can estimate by loft that it will keep me comfortable down to around 20 degrees F (for me that's 4 inches of down). My poncho/tarp should keep me dry in an emergency ground-camping scenario, and I can use the sit-pad I'll carry to keep my upper body somewhat insulated from the ground. Again, not my preferred arrangement. I know there are plenty of trees below tree-line, so I'll have plan ahead to make the best use of my hammock.As for long distance hikes, I'm a beginner. I've hiked 5+ miles on occasion, and usually less. When I backpack I've used lightweight setups, mostly hammocks and small tents. You're right that my conditioning and knowledge will really be put to the test, and will inevitably determine my success or failure.
From what I know about the weather on the CT it's anything and everything goes. I'll prepare to hit 20F and 100F, and if it seems like lower temperatures are possible I'll try to adjust my altitude accordingly or wait out a weather system. From what I hear I'm bound to hit snow even in July.
Ah, my wool tunic. I'm a bit of a romantic. I made my original wool tunic as a life-style choice, hoping to simplify my wardrobe, and because, well, I'm unemployed so I can do these things. I liked it so much I've decided to build a second tunic as my mid-layer for the trip. It's a suiting fabric, mid to light weight for wool, but by mountaineering gear standards it's heavy. I'll weight it when I'm finished and post pictures. If it's too heavy I'll just scrap it for a fleece jacket or similar.
UPDATE: Orders placed, gear materials are in the mail!
Thanks for your support guys and great questions David! Keep 'em coming.Jun 11, 2012 at 3:30 pm #1885973Hi Aaron
A very good machine too.
Disclosure: I have the same nmodel and use it for pack-making. I use a bonded nylon thread with #100 needles.
But I have also sewn silk with it.
:-)Cheers
Jun 11, 2012 at 9:03 pm #1886094Nice machine. A friend of mine does alot of quilting, her machine looks to be the same. Apparently those machines are highly sought after in the quilting world. Anyways welcome, and good luck on your MYOG endeavours.
Jun 12, 2012 at 8:53 pm #1886395I'm really interested in seeing how this quilt/bag comes out. Make sure to post pics. :)
One comment if I may: You'd do well to start training for longer days hiking. If you're only ready to cover 5-ish miles per day, it's gonna create some logistical problems for you like needing 2.5 to 3 weeks to get the 105 miles from Denver to the end of section 6 where you can hitch to Breckenridge and get a resupply.
Also at that pace you'll need 14 to 15 weeks to get to Durango and might be racing the snow in the San Juans.Jun 23, 2012 at 9:50 am #1889494Hello folks!
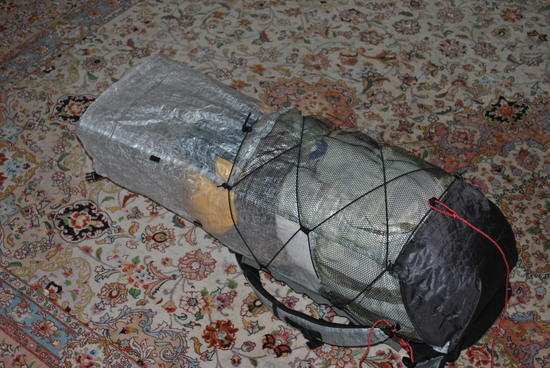
Happy to hear from all of you! Thanks for the suggestions and encouragement. I've been busy hunched over the sewing machine for the past week, and I've been largely successful.:P” height=”822″ src=”https://dpcr19kltm61a.cloudfront.net/backpackinglight/user_uploads/1340469986_64760.jpg” width=”550″ />
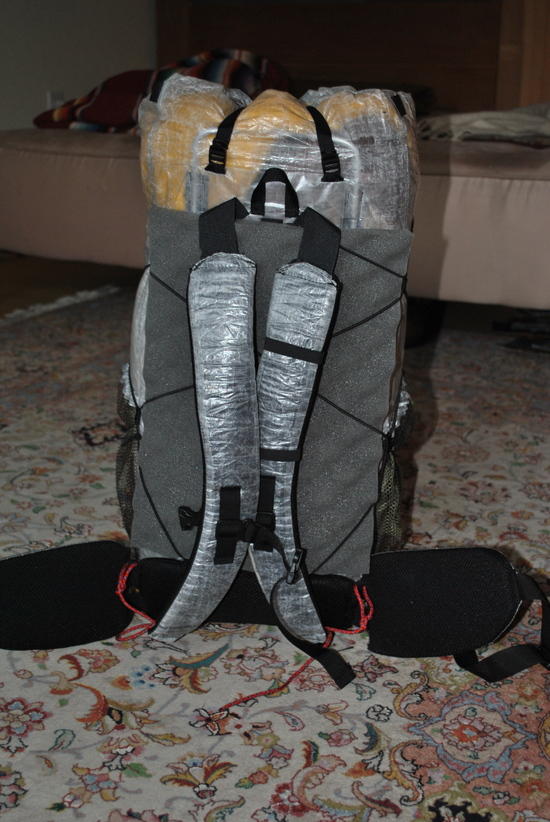
The crown jewel of my DIY-bent hermitage is my cuben fiber backpack. I haven't found a good way to weigh it yet (my only scale is a lil' digital one), but it's incredibly light (maybe 8-12oz with all the extras)[see later posting for weight]. Made with a 1.5oz cuben body, a curved cuben hybrid abrasion-resistant bottom, and a removable hip-belt system (which made sewing the bag together easiest, and may prove useful for upgrading). A shout out goes to Andy at Sea to Summit who shared his cuben backpack-smithing insight (http://seatosummitultralight.blogspot.com/2012/04/cuben-fiber-hybrid-backpack-with.html). I'm using the Gossamer Gear internal aluminum frame, and all the cuben fiber came from ZPacks. The seams, as you'll notice are all done with french-seams sewn flat, while the reinforcement areas are held on with 3M transfer tape (9485 I believe, whatever ZPack sells). Coming in a 60 yard roll, I've got a lifetime supply of that transfer tape now.

I call her Solaria, because she's probably going to cook my gear like a lil' oven. :P I'm thinking of using a white plastic bag as a pack liner. Note the curved bottom panel. That's the product of hours of contemplation, design, and fine stitchery, and IMO well worth it. When packed a bit tighter than it is here it looks stunning and professional, not to mention keeping the pack weight in just the right spot on my back. PM me if you want the lo-down on how to do that yourself. Be prepared to scratch your head a little.
Integrated with the Gossamer sit-pad (cut down a little to accommodate for the large hip-belt lower back pad).
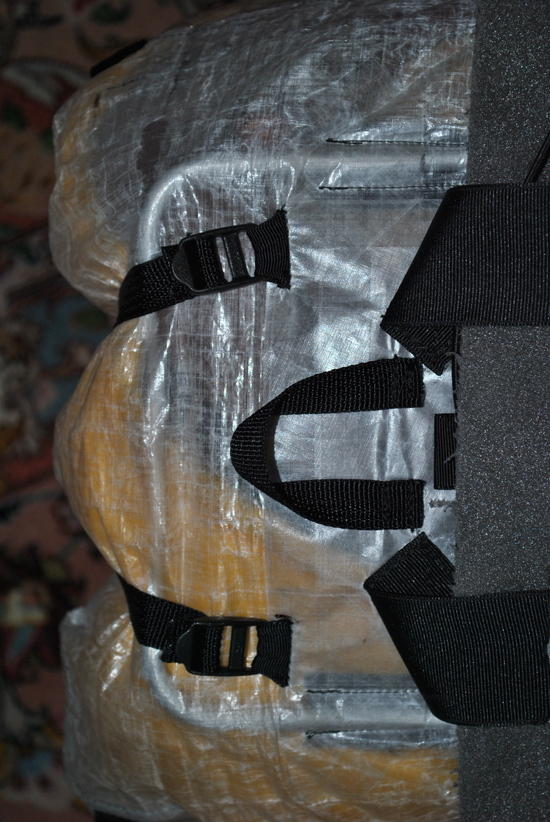
Close-up of the removable hip belt. The hem you see is the boundary of a piece of 3D mesh wrapped around a piece of black hybrid cuben fabric. Against the pack body is a piece of velcro that matches a similarly sized piece on the belt. Slide it in with your hand between the velcro pieces, remove the hand… and voila! Connection and security.
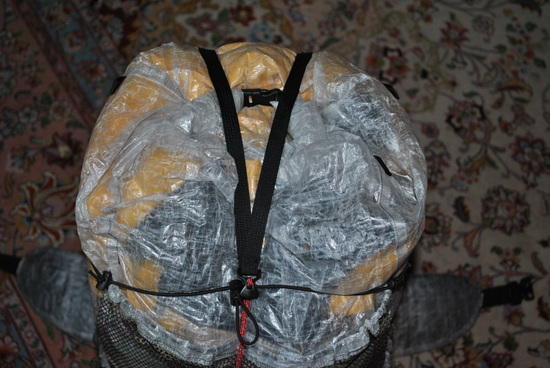
You're seeing the roll-top closure system I used, identical in most respects to a dry-bag. Just tuck the opening into a fold to fit the space between the two buckles, and roll. Then over the top you're seeing my top-strap. I designed this to be removable, as you'll see in the next photo, and it both compresses the bag and adds a space to strap on additional bulk. Also, it divides the large back mesh pocket, in-case I prefer smaller areas to organize gear.
The top-strap is held on by two 1/2" ladder locks. At the end of the webbing I just sewed two stops as you'd see at the end of a webbing strap. These are quite easy to remove with a little effort, but very secure under pressure.Lastly the volume:
Plenty of space in there. I didn't even run the bungee all the way up the sides because I just won't need it. Nice to know that I have the option in the future.Other successes include a Primaloft (6oz/yard, the thicker stuff) "Minima" insulated vest (kit from Thru-Hiker), in canary yellow at 6.5oz, a brown wool tunic, weighing in at 13oz, a ripstop (1.1oz/yard, because I'm a 135lb feather-weight) hammock (48" wide) with amsteel guylines and nylon tree-huggers, all adding up to 8.8oz, and I'm working on my tarp/poncho today. The tarp/poncho is made of PU coated digital camo seconds I grabbed from backwoodsdaydreamer.com at under $3 a yard, but I'm paying for it in weight. This stuff weights something like 2.5oz/yard and my "UL" hammock set up will probably hit the 2lb mark by the time I'm done. If I had the cash left I'd shell out for a cuben tarp, but for now I think I'll make this work. As Ryan of BPL mentioned on a blog post he wrote last year, it's about getting out there; and I quote: "Spreadsheeting is interesting, pivoting means you have some amount of intelligence, but trust me when I tell ya: walking is where it’s at."
My big failure: the Libery Ridge wind-breaker from Thru-Hiker. I thought after I'd survived the annals of cramming heavy-weight Primaloft into french-seams (the vest) that making a simple wind-breaker would be a walk in the park. Just ordinary french-seams right? Nope. For some very intelligent reason, no doubt, the pattern is truly interesting, with about every seam being a curve that weaves back and forth. I took my time and made very careful seams, but in the end the seams wouldn't lay flat on my body (as they should have) and it seemed the sizing was way off. My vest, also from Thru-Hiker was a size extra-small, and even with the additional heavy batting and my thicker-than-intended seams, fit me like a charm. The shell was size small but seems to be incredibly off, too short at the sleeves, too short at my waist and tight around the shoulders. Granted I'm a funny shaped guy (tall, lanky, very slender) but I'm not sure that these unique seam locations make for a better breaker if it's hard to keep them true to the pattern, by the time you're done sewing them twice around alternating curves. This is all just a defense of my skills. I'm sure this pattern works wonders for some people.
My sleeping bag has been postponed until the start of next week, as I change out the color of my shell material (from evergreen to coyote brown, it's an OCD thing). I give my gratitude to Paul (AYCE) at Thru-Hiker who made dealing with them very easy and who gives great advice about gear-smithing. Truly the best price on materials if you want to make your own high-end down quilt, of any variety, is to buy it from Thru-Hiker IMHO. For about $200 I have 5 yards of .6oz/yrd Momentum fabric (water-resistant, ultra-light, and down-proof), and 18.6oz of 900-fill down. The down is the big ticket item, and 18oz is a whole bunch of it. My design, at 4inches of loft, will still only use about 15oz and is over-sized as both a quilt and a sleeping bag. 3oz will probably end up imbedded in the mesh of the tent I'm planning to do my down-stuffing in.
So excited to get more pictures up on here. One big question I have is for the lightest way to clip my under/over-quilt and a splash guard (to go below the hammock if it starts raining hard) to my suspension. I need something I can put together from pieces at the hardware store, inexpensive, and light weight. Any ideas?
Thanks friends!
Jun 23, 2012 at 11:13 am #1889513Grab a cup. Put it on the scale. Zero it out. Then put the pack on top. That's the best way to get the weight on a small scale.
Good Luck
Jun 23, 2012 at 5:55 pm #1889588Or use a hanger.
Jun 23, 2012 at 7:19 pm #1889609I just put my bag on the scale, balancing it on a corner of the frame. This method is highly accurate, and certainly without error. Amidst rapidly changing numbers, my approxim-idia, a little known but highly utilized part of the brain, soundly concluded that my bag, frame and all weighs 16oz, exactly a pound. That's 12.5oz of a bag, with 3.5 ounces of a frame (weighed with similar finesse). The hip belt alone weighs 4.3 ounces; this is over 1/4 of the total pack weight! As you may have read, the hip belt is removable and replaceable. The reason for this weight distribution is that I, personally, was not built with a hip-pad, nor much other padding. So I figured the weight spent on padding my hips is weight well carried. What do you think? With about a 10 lb base weight (30lb max skin-out weight), am I going to wish I'd left the big belt at home?
Jun 23, 2012 at 10:39 pm #1889634+1 hanger.
Bend the hook part upside down so it bears on the scale while the cross bar goes under the scale and hang the pack from that. That will center the weight on the scale to improve accuracy rather than hanging it from the side of the scale.
In general, it makes is easy to read wide items that otherwise obscure the readout.
Jun 23, 2012 at 11:36 pm #1889641> I, personally, was not built with a hip-pad, nor much other padding. So I figured the
> weight spent on padding my hips is weight well carried
The alternative is to have an even lighter pack and very sore hips…
You will need the padding.Cheers
Jun 24, 2012 at 8:30 am #1889674Aaron,
Go for it and have a wonderful time! I can really relate to what you are doing.
I had the summer of 1970 off and was 26 years old at the time. I had a 2 week trip planned with the Seattle Mountaineers doing the Bailey Range Traverse in Olympic National Park and climbing Mt Olympus during the trip. I had a Singer lent to me by my Mom and I had all the time I needed to fiddle with and make gear in advance of the trip. I enjoyed preparing for the trip as much or more than the trip itself.
Have a blast.
Daryl
Jun 25, 2012 at 2:33 pm #1890018Hey Aaron. Wow! Your gear looks beautiful, thanks for posting the pxts of your cuben pack. I especially like your padded hipbelt. With the internal frame I'm sure you will be able to comfortably carry the extra weight after a heavy resupply. Have a great time on the Colorado Trail!
BTW, I also use a 1930's era Singer for all my MYOG gear. 80 years old and still going.
Jun 25, 2012 at 3:29 pm #1890033Nice sewing machine.
Hammock: Aren't there some long stretches above treeline on the CT? That would make hammocking difficult.
Conditioning: If your long hikes are five miles, load up your pack with the weight you expect to carry and go for some longer local hikes. You're young, so you should be OK physically but your feet might not like a big jump up in miles.Jun 25, 2012 at 3:56 pm #1890037You guys are great. I am new to forums, and already in such appreciation. Thanks for everyone's comments and information. I've bitten off something big here, I know, and I'm starting to train this week. For scheduling reasons I've ended up with an extra week to get ready, so there are two weeks to go before I hit the trail. Unfortunately for similar scheduling reasons I'll be doing the trail from South to North, hitting the big peaks first. I've been loading up my bag with weight, and doing progressively longer hikes here at home. I'm lucky that I can hike about 1.5 miles on streets and then reach an area of rocky trails, with steep inclines. There's a big loop, adding up to about 6 or so miles, that I can do a few times a day, once I'm ready. The heat this summer has been pretty brutal (104 right now) and I'm still adjusting just to being in the elements for long hours at a time.
One big design mishap I've realized is with my pack sizing. Seems when I wear the pack with weight, the bag is either correctly tight on my hips and away from my upper back (a gap between my shoulder blades and my pack) or else I synch up the shoulder pads, the bag is snug with my back, and the hip pads are just an inch or two too high to really let the weight rest. My opinion is that the shoulder straps are mounted on the bag too low, and I'm thinking of relocating them about 1-3 inches higher on the bag. Any advice on if I've got this right? Sad to be leaving box-stitch-shaped sections of holes in the cuben, but I want a good fit. Thanks in advance~
Jul 7, 2012 at 7:02 am #1892793Hello friends!
I've been so busy packing, gear smithing, and de-stressing, I haven't had a chance to post all the gear development that's taken place. I did get a chance to make a gear summary video, which I'm posting here. Today I leave for the Crestone, CO hot-springs, and tomorrow on to Durango, CO. You can follow updates on the trip via our blog at hikefornepal.wordpress.com I haven't mentioned this yet, but we're fundraising for a 3-month volunteer trip to Nepal, hence the blog. Thanks forum world for your wisdom and friendly comments! I got forth, onto yonder rugged peaks, with such support. Hi-ho! -
AuthorPosts


- You must be logged in to reply to this topic.
Forum Posting
A Membership is required to post in the forums. Login or become a member to post in the member forums!
Our Community Posts are Moderated
Backpacking Light community posts are moderated and here to foster helpful and positive discussions about lightweight backpacking. Please be mindful of our values and boundaries and review our Community Guidelines prior to posting.
Get the Newsletter
Gear Research & Discovery Tools
- Browse our curated Gear Shop
- See the latest Gear Deals and Sales
- Our Recommendations
- Search for Gear on Sale with the Gear Finder
- Used Gear Swap
- Member Gear Reviews and BPL Gear Review Articles
- Browse by Gear Type or Brand.
