Topic
wood stove
Forum Posting
A Membership is required to post in the forums. Login or become a member to post in the member forums!
Home › Forums › Gear Forums › Make Your Own Gear › wood stove
- This topic is empty.
-
AuthorPosts
-
Feb 18, 2007 at 5:06 am #1221899
Any designs for a light weight wood stoves out there?
i.e., like the bush buddy.Feb 18, 2007 at 8:50 am #1379017Feb 21, 2007 at 12:46 pm #1379507Yeah, I'm busy working on converting a quart size new paint can into one.
Feb 21, 2007 at 1:17 pm #1379513I thought a quart paint can would be the perfect size to. Let us know how it works out.
Feb 21, 2007 at 4:19 pm #1379547This thread took place quite a while back:
Feb 26, 2007 at 6:15 pm #1380170I just built a wood burning stove. I am fairly new to UL backpacking and this is my first MYOG project.
I dont know if it technically counts as a downdraft gassifier but it weighs just over an ounce (35 grams, not including the GG ti stakes, I would carry these anyways for my tarp). I tested the stove this evening and was able to boil a pint of water in about 9 minutes.
I would love to get one of those bush buddys but I just dont have the money in my backpacking budget at this point in time. I am hoping to use this type of stove as an affordable substitute.
The stove is based on the design of Mark Jurey at:
http://www.csun.edu/~mjurey/pennywood.html
I made the stove from a standard 14.5 oz can of green beans and added 3 GG ti stakes to serve as a pot stand.
I plan to try it out in the field later this spring and will be practicing my fire building techniques at home to make sure I can use the stove in a variety of weather conditions.
Ive included a few pictures of the stove.

 Feb 26, 2007 at 8:15 pm #1380195
This is what I came up with this past fall when I was experimenting with the Downdraft stoves. I like the double wall design better for in order to have the design below work properly you must have a tall windscreen anyway.
Feb 27, 2007 at 7:47 am #1380235Scott, you and Sam have already 'discovered' the single modification that gets you the most "bang for your buck" (aka biggest increase in efficiency / ease of use for the amount of manufacturing effort) in homemade woodstoves… raising the floor so that air can freely flow into and up from your burn area.
I, too, really want to get a bushbuddy (and, according to my wife I NEED to as I don't "spoil" myself nearly as much as my income should allow… I took my knocks in college and wound up as an engineer… but now I'm straying way too far off topic…).
However, I work with a boyscout troop and try to teach and display for them DIY gear in order to save $$ and weight. I already arranged (along with one of the other leaders, who worked at a place that had a automated plasma cutter) to "make" each of them a nimblewill nomad, but now am leaning towards the can stoves (it's been fun to see them emulate and sometimes forget important concerns of design… which then becomes another teaching poitn).
Anyhow, I suspect you are going to get some good use out of that penny stove. One thing I might suggest adding (it's on penny's instructions) is a cut up peach can as a windblock / screen. It'll improve the performance of your stove without much weight penalty (you could also use aluminum something or other, but you trade some robustness for some weight), and it'll be about the perfect height.
Feb 28, 2007 at 12:12 pm #1380448Scott, the only concern I have with your model are the sharp edges scare the heck out of any UL fabrics! How will you carry this in/on your pack?
Steve, 2 things I thought would work in the quart paint can's favor, A) the lid can be punched so as to provide pot supports when reversed, yet still be able to 'close' the can, possibly allowing internal storage of fire related items.
B) The lower inlet air holes could be placed to support the 'floor screen', again, no protruding sharp edges allowing packing in a regular silnylon storage bag attached to my pack's exterior if desired.
Mar 7, 2007 at 6:07 am #1381404i used the one that is described at the TLB site as a basis for mine. i like the idea of raising the floor though. mine is a pineapple juice can that has been churchkeyed along the bottom and has a large triangle cut in the side. the pot rests directly on top of the can and it seems to work fairly well although i find i need to continue to feed small sticks etc into it to get much of a boil. i like it but not as much as a simple alcohol stove and beercan pot. one idea that im thinking about is a stove/windscreen that can burn alcohol/esbit/wood. im thinking about somehow using aluminum siding for the windscreen and making it so that you dont use the alcohol stove but the windscreen converts into a wood burning stove. not sure if it is possible but it would be a kinda cool thing if it worked.
matt
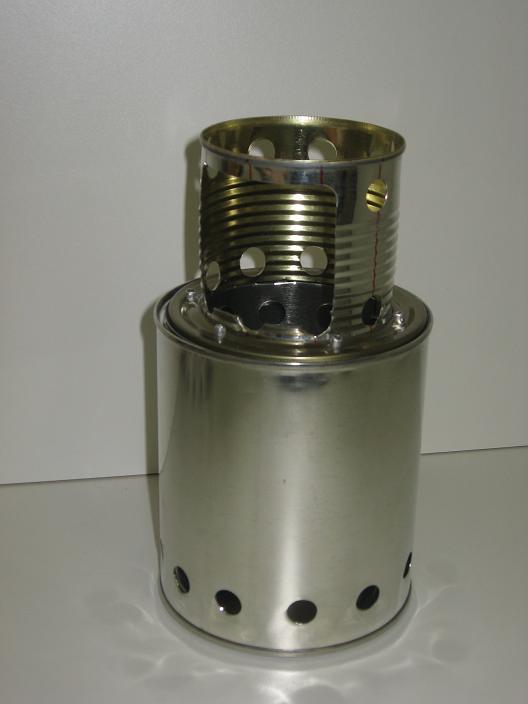
Mar 8, 2007 at 12:08 pm #1381612Here are a few pics of a 'paint can' wood stove prototype. The outside of the burner is made from a new quart size paint can ($1.99). The inside of the burner is made from a new pint size paint can ($1.49). The pot stand/chimney is made from two recycled tin cans. Both paint cans are used upside-down. The removable 'bottom' might be useful as an ash clean-out or a tinder chamber.
Weight: 6- 7/8 ounces.I don't doubt that it will take many test burns and tinkering to perfect it, but that's another day!

Looking thru bottom of can. (Paint can lid removed for picture.)
Looking down into burner.
Post script: Cones for K-Mart grease pot.
Mar 8, 2007 at 12:30 pm #1381616Dang Lance! That was way faster than I was able to put mine together, I cordially defer further questions on the 1 QT Paint can WoodStove.
What did you use to punch the holes in the paint can?
What is the screening sitting on inside the can? this is where I was stymied, and slowed on my build.
Not able to follow where the pint can is inside the 1qt can, could you elaborate?
I'm staring at the tin can and trying to figure out how you got that configuration, the lid it's on seems 1" larger+ than the cut away can? Purpose of the large cutout on the tin can's side?
Thanks, Gene
Mar 8, 2007 at 1:28 pm #1381630I made the holes with a punch from Harbor Freight. Cost about $25, but it's been HANDY!
The pint can 'hangs' upside down from the top of the stove. Here are the steps I took:
1. Punch holes in the quart can. (I was barely able to fit the can over the punch.)
2. Cut a hole in the bottom of the quart can the diameter of the pint can. (the body diameter of the pint can, not the rim diameter. This gives a tighter fit.) The bottom of the quart can then becomes the top of the stove.
3. Next cut the bottom 1/2" off of the pint can and make snips around the cut edge. The metal between the snips will later be bent over as tabs.
4. Punch holes in the pint can.
5. Hold the quart can with the factory top down and the cut hole up. Hold the pint can with the factory top down and the cut end up. Feed the pint can up through the quart can and through the cut hole far enough so that you can bend the tabs out.
6. Lower the pint can until the tabs rest on the quart can. Drill and pop rivet a few of the tabs.
7. The factory top of the upside down pint can provides the flange necessary to support the wire mesh.
8. The chimney/pot support is assembled essentially the same way.
The purpose of the large cutout in the tin can chimney's side is to improve draft and provide an opening the add fuel to the burner without lifting off your pot.
Here are two more pics.
Looking straight down into the burner. You can see the flange the mesh rests on and the 'tabs' cut in the pint can that are bent out and rivited to the quart can.
Looking straight into the bottom of the stove (With the factory paint can lid removed).
Mar 8, 2007 at 2:45 pm #1381636 AnonymousInactive
Lance,
Looks good. Could you include a cross section drawing as well as a a picture of your stove with a pot boiling water?
Thanks
Mar 8, 2007 at 8:46 pm #1381679Roger,
Here is a 2D cross section and some pictures in use. It used a lot more fuel than I expected, even for it's maiden voyage. Estimating the BTUs in the grams of fuel used vs the BTUs absorbed by the water, efficiency for the system was disappointing at 10-15%. However, it did appear to burn gases as they rose past the secondary air ports and left just a tiny bit of ash when done. Modifications and additional test will have to wait for another day. Mar 9, 2007 at 11:22 am #1381748
Hey, how'd the floor look when you were done?
Mar 9, 2007 at 11:34 am #1381752Is that carpet I'm seeing!!!??
Mar 9, 2007 at 2:51 pm #1381787Most definitely of the short nap indoor kind *GRIN*!
Thanks Lance for the great job, and informative post on this project. I'd appreciate an update to this thread as you work out your kinks with the woodstove.
Mar 9, 2007 at 7:35 pm #1381808The carpet is a special heat sinking, non-combustible, broom finish product I had laid (poured) in my driveway!!!
Thanks for the positive comments.
-
AuthorPosts


- You must be logged in to reply to this topic.
Forum Posting
A Membership is required to post in the forums. Login or become a member to post in the member forums!
Our Community Posts are Moderated
Backpacking Light community posts are moderated and here to foster helpful and positive discussions about lightweight backpacking. Please be mindful of our values and boundaries and review our Community Guidelines prior to posting.
Get the Newsletter
Gear Research & Discovery Tools
- Browse our curated Gear Shop
- See the latest Gear Deals and Sales
- Our Recommendations
- Search for Gear on Sale with the Gear Finder
- Used Gear Swap
- Member Gear Reviews and BPL Gear Review Articles
- Browse by Gear Type or Brand.
